Page 169 of 192
8-54
8
4. Connect the negative lead of the jumpercable to the negative terminal of the
charged battery and the other end of the
negative lead to an unpainted metal sur-
face of the frame of the vehicle to be
started.
5. Start the engine. (Refer to “Starting the engine” on page 6-2.)
6. After the engine starts, disconnect the
negative lead of the jumper cable from
the frame and charged battery, and then disconnect the positive lead of the jump-
er cable from the charged battery and the
battery in the vehicle.
7. Install the hood.
EBU33100Fuse replacementThe main fuse, the fuel injection system fuse,
the EPS fuse, and the fuse box are located
under the hood. (See page 8-10 for hood re-
moval and installation procedures.)
1. Jumper cable negative lead
1
UBN57AE0.book Page 54 Tuesday, November 24, 2015 1:42 PM
Page 170 of 192
8-55
8
If a fuse is blown, replace it as follows.1. Turn the key to “ ” (off) and turn off the
electrical circuit in question.
1. Fuse box
2. Main fuse
3. EPS fuse
4. Fuel injection system fuse
5. Fuel injection system spare fuse
1 3
2
4
5
1. Backup fuse “BACK UP” (for clock)
2. Ignition fuse “IGNITION”
3. Four-wheel-drive motor fuse “DIFF”
4. Auxiliary DC jack fuse “TERMINAL”
5. Signaling system fuse “SIGNAL”
6. Headlight fuse “HEAD”
7. Spare fuse
8. Radiator fan motor fuse “FAN”
1
2
3
4
5
6
8
7
7
UBN57AE0.book Page 55 Tuesday, November 24, 2015 1:42 PM
Page 171 of 192
8-56
8
NOTICEECB00641To prevent accidental short-circuiting,
turn off the main switch when checking or
replacing a fuse. 2. Remove the hood. (See page 8-10 forhood removal and installation proce-
dures.)
3. Remove the blown fuse, and then install a new fuse of the specified amperage.
WARNING! Always use a fuse of the specified amperage. Never use any
material in place of the proper fuse.
Using an improper fuse can cause
damage to the electrical system and
may lead to a fire.
[EWB03440]
Specified fuses: Main fuse:40.0 A
Fuel injection system fuse: 10.0 A
Headlight fuse: 15.0 A
Ignition fuse: 10.0 A
Auxiliary DC jack fuse: 10.0 A
Signaling system fuse: 10.0 A
Four-wheel-drive motor fuse: 10.0 A
Radiator fan motor fuse: 25.0 A
Backup fuse: 10.0 A
EPS fuse: 40.0 A
UBN57AE0.book Page 56 Tuesday, November 24, 2015 1:42 PM
Page 172 of 192
8-57
8
4. Turn the key to “ ” (on) and turn on theelectrical circuit in question to check if
the device operates. If the fuse blows
again immediately, have a Yamaha dealer
check the electrical system.
5. Install the hood.EBU32670Replacing a headlight bulbIf a headlight bulb burns out, replace it as fol-
lows. 1. Remove the cover at the rear of the head- light by pulling it off. 2. Remove the headlight bulb cover by pull-
ing it off.
3. Disconnect the headlight coupler.1. Cover at the rear of the headlight
1
1. Headlight bulb cover
1
UBN57AE0.book Page 57 Tuesday, November 24, 2015 1:42 PM
Page 173 of 192
8-58
8
4. Unhook the headlight bulb holder.5. Wait for the headlight bulb to cool before
touching or removing it. Remove the
burnt-out bulb by pulling it out.
6. Place a new headlight bulb into position, and then secure it with the bulb holder.
NOTICE: Do not touch the glass part of
the headlight bulb to keep it free from
oil, otherwise the transparency of the
glass, the luminosity of the bulb, and
the bulb life will be adversely affected.
Thoroughly clean off any dirt and fin-
gerprints on the headlight bulb using a
cloth moistened with alcohol or thin-
ner.
[ECB00652]
1. Headlight coupler
1. Headlight bulb holder
11
UBN57AE0.book Page 58 Tuesday, November 24, 2015 1:42 PM
Page 174 of 192
8-59
8
7. Connect the headlight coupler.
8. Install the bulb cover and the cover at therear of the headlight. NOTICE: Make
sure the headlight bulb cover is se-
curely fitted over the bulb holder and
seated properly.
[ECB02210]
9. Adjust the headlight beam if necessary.
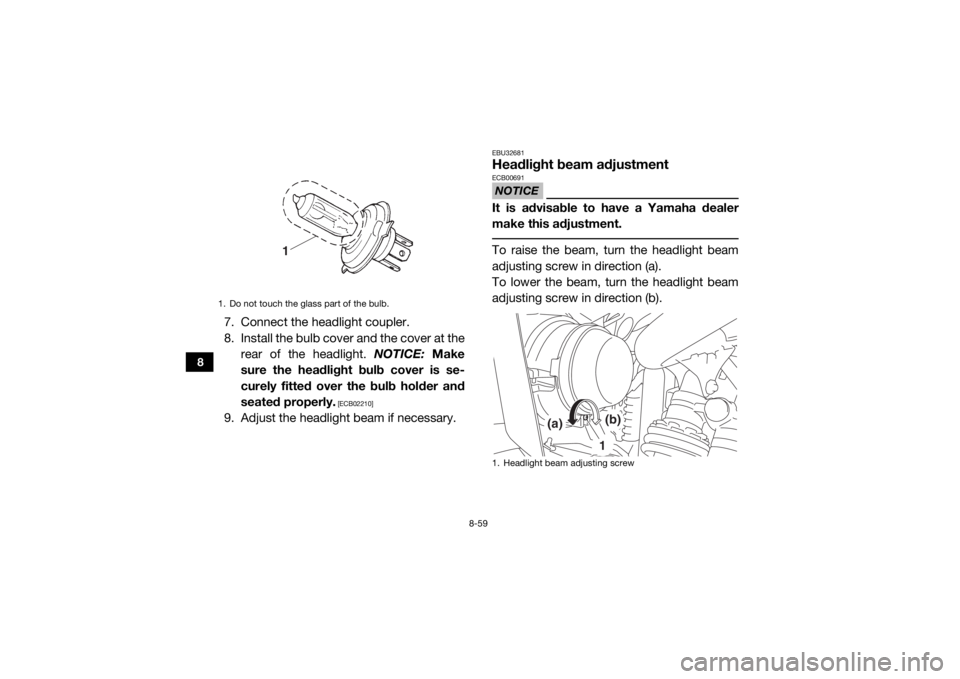
EBU32681Headlight beam adjustmentNOTICEECB00691It is advisable to have a Yamaha dealer
make this adjustment. To raise the beam, turn the headlight beam
adjusting screw in direction (a).
To lower the beam, turn the headlight beam
adjusting screw in direction (b).
1. Do not touch the glass part of the bulb.
1
1. Headlight beam adjusting screw
1
(a)
(b)
UBN57AE0.book Page 59 Tuesday, November 24, 2015 1:42 PM
Page 175 of 192

8-60
8
EBU33590Tail/brake light bulb replacementIf a tail/brake light bulb burns out, replace it as
follows:1. Remove the tail/brake light bulb holder
(together with the bulb) by turning it
counterclockwise.
2. Push the burnt-out bulb in and turn it counterclockwise to remove it from the
bulb holder.
3. Push a new bulb in and turn it clockwise to install in the bulb holder. 4. Install the bulb holder (together with the
bulb) by turning it clockwise.
EBU32700TroubleshootingAlthough Yamaha vehicles receive an inspec-
tion before shipment from the factory, trouble
may occur during operation. Any problem in
the fuel, compression, or ignition systems can
cause poor starting and loss of power. The
troubleshooting chart describes a quick, easy
procedure for making checks. If your vehicle
requires any repair, take it to a Yamaha deal-
er.
The skilled technicians at a Yamaha dealer-
ship have the tools, experience, and know-
how to properly service your vehicle. Use only
genuine Yamaha parts on your vehicle. Imita-
tion parts may look like Yamaha parts, but
they are often inferior. Consequently, they
have a shorter service life and can lead to ex-
pensive repair bills.
1. Tail/brake light bulb holder
1
UBN57AE0.book Page 60 Tuesday, November 24, 2015 1:42 PM
Page 176 of 192
8-61
8
WARNING
EWB03450When checking the fuel system, do not
smoke and make sure there are no open
flames or sparks in the area, including pilot
lights from water heaters or furnaces.
Gasoline or gasoline vapors can ignite or
explode, causing severe injury or property
damage. UBN57AE0.book Page 61 Tuesday, November 24, 2015 1:42 PM