Page 41 of 192
4-2
4
EBU31262Indicator lights and warning lights
EBU31270Low-range indicator light “L”
This indicator light comes on when the drive
select lever is in the “L” position.EBU31280High-range indicator light “H”
This indicator light co mes on when the drive
select lever is in the “H” position.
1. On-Command differential gear lock indicator light “DIFF.
LOCK”
2. Low-range indicator light “L”
3. High-range indicator light “H”
4. Neutral indicator light “N”
5. Reverse indicator light “R”
6. Parking brake indicator light “ ”
7. On-Command four-wheel-drive/differential gear lock indicator “ ”/“ ”
8. Engine trouble warning light “ ”
9. Coolant temperature warning light “ ”
10.Electric Power Steering warning light “EPS”356421
7
8109
1. Helmet indicator light “ ”
2. Seat belt indicator light “ ”
21
UBN57AE0.book Page 2 Tuesday, November 24, 2015 1:42 PM
Page 42 of 192

4-3
4
EBU31290Neutral indicator light “N”
This indicator light comes on when the drive
select lever is in the “N” position.EBU31300Reverse indicator light “R”
This indicator light comes on when the drive
select lever is in the “R” position.EBU31310Parking brake indicator light “ ”
This indicator light comes on when the park-
ing brake is applied.EBU31320On-Command four-wheel-drive
indicator “ ”, On-Command differential
gear lock indicator “ ” and indicator light
“DIFF. LOCK”
The On-Command four-wheel-drive
indicator “ ” comes on when the On-Com-
mand drive knob “2WD/4WD/DIFF LOCK” is
set to the “4WD” position.The On-Command differential gear lock
indicator “ ” and the On-Command differen-
tial gear lock indicator light “DIFF. LOCK”
come on when the On-Command drive knob
“2WD/4WD/DIFF LOCK” is set to the “DIFF
LOCK” position.
TIP
Due to the synchronizing mechanism in the
differential gear case, the four-wheel-drive
indicator may not come on until the vehicle
starts moving.
When the On-Command drive knob
“2WD/4WD/DIFF LOCK” is set to “DIFF
LOCK” or “4WD”, the indicator “ ” and the
indicator light “DIFF. LOCK” will flash until
the differential gear is completely locked or
unlocked. If the indicator and the indicator
light continue to flash, the differential is not
completely locked or unlocked. In this
case, start moving to allow time for the dif-
ferential to lock or unlock.
UBN57AE0.book Page 3 Tuesday, November 24, 2015 1:42 PM
Page 43 of 192

4-4
4
EBU31330Coolant temperature warning light “ ”
If the coolant temperature reaches a specific
level, this light comes on to warn that the
coolant temperature is too hot. If the light
comes on during operation, stop the engine
as soon as it is safe to do so and allow the en-
gine to cool down for about 10 minutes. (See
page 8-63.)
The electrical circuit of the warning light can
be checked by turning the key to “ ” (on). If
the warning light does not come on initially
when the key is turned to “ ” (on), or if the
warning light remains on, have a Yamaha
dealer check the electrical circuit.NOTICEECB02040 The engine may overheat if the vehicle is
overloaded. If this happens, reduce the
load to specification.
After restarting, make sure that the
warning light is out. Continuous use
while this warning light is on may cause
damage to the engine.
EBU31340Engine trouble warning light “ ”
This warning light comes on or flashes if a
problem is detected in the electrical circuit
monitoring the engine. When this occurs,
have a Yamaha dealer check the self-diagno-
sis system. (See page 4-10 for an explanation
of the self-diagnosis device.)
The electrical circuit of the warning light can
be checked by turning the key to “ ” (on). If
the warning light does not come on initially
when the key is turned to “ ” (on), or if the
warning light remains on, have a Yamaha
dealer check the electrical circuit.
UBN57AE0.book Page 4 Tuesday, November 24, 2015 1:42 PM
Page 44 of 192

4-5
4
EBU33041Electric Power Steering warning light
“EPS”
This warning light comes on when the key is
turned to “ ” (on), and then goes off once
the engine is started. If the warning light re-
mains on or comes on after the engine is
started, the EPS system may not be working
correctly. When this occurs, have a Yamaha
dealer check the EPS system.
The electrical circuit of the warning light can
be checked by turning the key to “ ” (on). If
the warning light does not come on, have a
Yamaha dealer check the electrical circuit.TIPIf the steering load is too heavy (e.g., exces-
sive steering use at slow speed or when op-
erating in deep mud, sand, or snow), the
power assist is reduced to protect the EPS
motor from overheating.
EBU31360Helmet indicator light “ ”
The indicator light comes on and stays on
while the key is turned to “ ” (on) to remind
the occupants to always wear a helmet. If the
indicator light does not come on when the key
is turned to “ ” (on), have a Yamaha dealer
check the electrical circuit.EBU31370Seat belt indicator light “ ”
The indicator light comes on when the key is
turned to “ ” (on) to remind the occupants
to fasten their seat belt. The indicator light
stays on until the driver seat belt is properly
latched. If the indicator light does not come
on when the key is turned to “ ” (on), or if
the indicator light remains on after the driver
seat belt is properly latched, have a Yamaha
dealer check the electrical circuit.
UBN57AE0.book Page 5 Tuesday, November 24, 2015 1:42 PM
Page 45 of 192
4-6
4
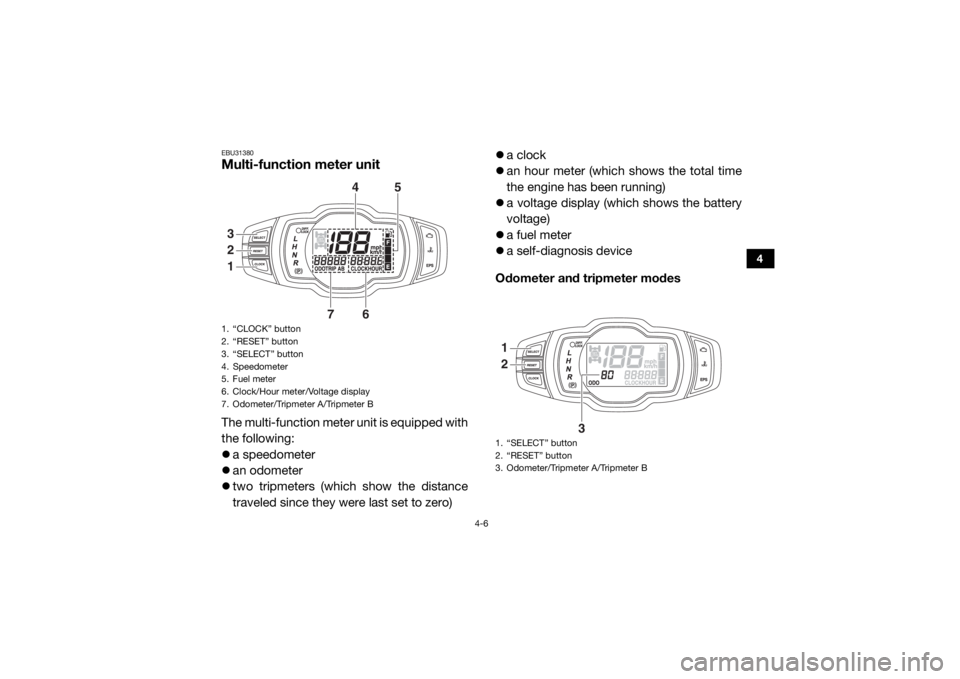
EBU31380Multi-function meter unitThe multi-function meter unit is equipped with
the following:
a speedometer
an odometer
two tripmeters (which show the distance
traveled since they were last set to zero)
a clock
an hour meter (which shows the total time
the engine has been running)
a voltage display (which shows the battery
voltage)
a fuel meter
a self-diagnosis device
Odometer and tripmeter modes1. “CLOCK” button
2. “RESET” button
3. “SELECT” button
4. Speedometer
5. Fuel meter
6. Clock/Hour meter/Voltage display
7. Odometer/Tripmeter A/Tripmeter B321
4
5
6
7
1. “SELECT” button
2. “RESET” button
3. Odometer/Tripmeter A/Tripmeter B12
3
UBN57AE0.book Page 6 Tuesday, November 24, 2015 1:42 PM
Page 46 of 192

4-7
4
Pushing the “SELECT” button switches the
display between the odometer mode “ODO”
and the tripmeter modes “TRIP A” and “TRIP
B” in the following order:
ODO → TRIP A → TRIP B → ODO
To reset a tripmeter, select it by pushing the
“SELECT” button, and then push the “RE-
SET” button for at least three seconds. The
tripmeters can be used to estimate the dis-
tance that can be traveled with a full tank of
fuel. This information enables you to plan fu-
ture fuel stops.TIPTo switch the display between “mph” and
“km/h”, turn the key to “ ” (off), then push
and hold the “SELECT” button while turning
the key to “ ” (on).
Clock, hour meter and voltage display
modes
Pushing the “CLOCK” button switches the
display between the clock mode “CLOCK”,
the hour meter mode “HOUR”, and the volt-
age display mode “ ” in the following or-
der:
CLOCK → HOUR → → CLOCK1. “SELECT” button
2. “RESET” button
3. “CLOCK” button
4. Clock/Hour meter/Voltage display
4
123
UBN57AE0.book Page 7 Tuesday, November 24, 2015 1:42 PM
Page 47 of 192
4-8
4
To set the clock1. Set the display to the clock mode.
2. Push the “SELECT” button and “RESET”button together for at least three sec-
onds.
3. When the hour digits start flashing, push the “RESET” button to set the hours.
4. Push the “SELECT” button, and the mi-
nute digits will start flashing.
5. Push the “RESET” button to set the minu- tes.
6. Push the “SELECT” button, and then re- lease it to start the clock. Voltage display mode
This display shows the battery voltage.
“ ” appears for 1 second when the volt-
age display mode is first selected, and
then “ ” appears and the battery voltage is
displayed.
If the battery voltage is less than 10 volts,
“LO” is displayed, and if the voltage is above
16 volts, “HI” is displayed.
UBN57AE0.book Page 8 Tuesday, November 24, 2015 1:42 PM
Page 48 of 192
4-9
4
NOTICEECB02050If the voltage display indicates “LO” or
“HI”, there may be trouble with the battery
charging circuit or the battery may be
faulty. If this occurs, have a Yamaha dealer
check or repair the vehicle. Fuel meterThe fuel meter indicates the amount of fuel in
the fuel tank. The display segments of the fuel
meter disappear from “F” (full) towards “E”
(empty) as the fuel level decreases. When the
“E” segment disappears and the fuel level
warning indicator flashes, refuel as soon as
possible.
TIPThis fuel meter is equipped with a self-diag-
nosis system. If a problem is detected in an
electrical circuit, all the display segments and
fuel level warning indicator start flashing. If
this occurs, have a Yamaha dealer check the
electrical circuit.
1. Fuel level warning indicator
2. Fuel meter
3. “E” segment
1
23
UBN57AE0.book Page 9 Tuesday, November 24, 2015 1:42 PM