2016 VOLVO XC90 T8 buttons
[x] Cancel search: buttonsPage 300 of 546
DRIVER SUPPORT
* Option/accessory, for more information, see Introduction.
298
Speed limiter (SL) *
The Speed Limiter (SL) is a feature that helps prevent the driver from exceeding a preset maxi-mum speed.
Overview
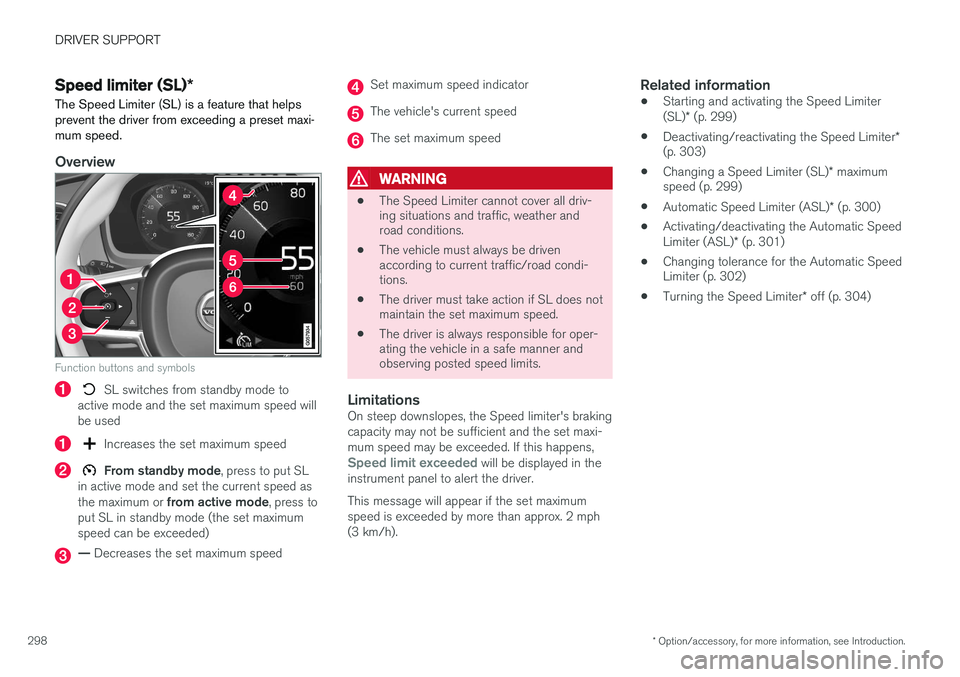
Function buttons and symbols
SL switches from standby mode to
active mode and the set maximum speed will be used
Increases the set maximum speed
From standby mode , press to put SL
in active mode and set the current speed as the maximum or from active mode , press to
put SL in standby mode (the set maximum speed can be exceeded)
— Decreases the set maximum speed
Set maximum speed indicator
The vehicle's current speed
The set maximum speed
WARNING
• The Speed Limiter cannot cover all driv- ing situations and traffic, weather androad conditions.
• The vehicle must always be drivenaccording to current traffic/road condi-tions.
• The driver must take action if SL does notmaintain the set maximum speed.
• The driver is always responsible for oper-ating the vehicle in a safe manner andobserving posted speed limits.
LimitationsOn steep downslopes, the Speed limiter's braking capacity may not be sufficient and the set maxi-mum speed may be exceeded. If this happens,
Speed limit exceeded will be displayed in the
instrument panel to alert the driver. This message will appear if the set maximum speed is exceeded by more than approx. 2 mph(3 km/h).
Related information
• Starting and activating the Speed Limiter (SL)
* (p. 299)
• Deactivating/reactivating the Speed Limiter
*
(p. 303)
• Changing a Speed Limiter (SL)
* maximum
speed (p. 299)
• Automatic Speed Limiter (ASL)
* (p. 300)
• Activating/deactivating the Automatic SpeedLimiter (ASL)
* (p. 301)
• Changing tolerance for the Automatic Speed Limiter (p. 302)
• Turning the Speed Limiter
* off (p. 304)
Page 301 of 546
DRIVER SUPPORT
}}
* Option/accessory, for more information, see Introduction.299
Starting and activating the Speed Limiter (SL)*
The Speed Limiter (SL) is a feature that has to be selected and activated in order to set a maxi-mum speed.
Selecting SL (putting it in standby mode)
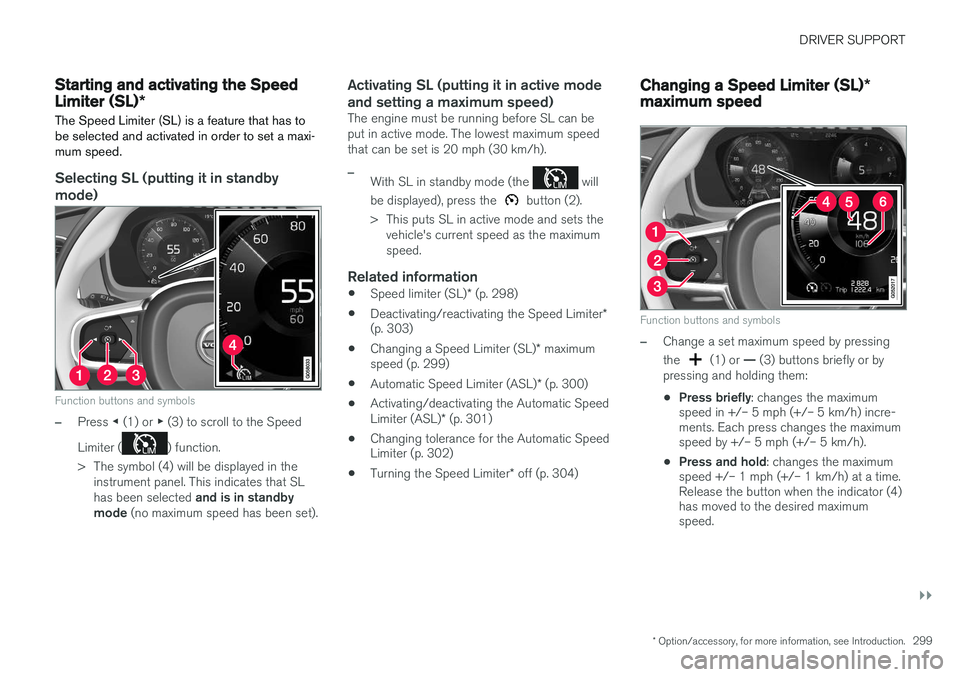
Function buttons and symbols
–Press ◀ (1) or ▶ (3) to scroll to the Speed
Limiter (
) function.
> The symbol (4) will be displayed in the instrument panel. This indicates that SL has been selected and is in standby
mode (no maximum speed has been set).
Activating SL (putting it in active mode and setting a maximum speed)
The engine must be running before SL can be put in active mode. The lowest maximum speedthat can be set is 20 mph (30 km/h).
–With SL in standby mode (the will
be displayed), press the
button (2).
> This puts SL in active mode and sets the vehicle's current speed as the maximum speed.
Related information
• Speed limiter (SL)
* (p. 298)
• Deactivating/reactivating the Speed Limiter
*
(p. 303)
• Changing a Speed Limiter (SL)
* maximum
speed (p. 299)
• Automatic Speed Limiter (ASL)
* (p. 300)
• Activating/deactivating the Automatic Speed Limiter (ASL)
* (p. 301)
• Changing tolerance for the Automatic Speed Limiter (p. 302)
• Turning the Speed Limiter
* off (p. 304)
Changing a Speed Limiter (SL) *
maximum speed
Function buttons and symbols
–Change a set maximum speed by pressing the
(1) or — (3) buttons briefly or by
pressing and holding them: • Press briefly
: changes the maximum
speed in +/– 5 mph (+/– 5 km/h) incre- ments. Each press changes the maximumspeed by +/– 5 mph (+/– 5 km/h).
• Press and hold
: changes the maximum
speed +/– 1 mph (+/– 1 km/h) at a time.Release the button when the indicator (4)has moved to the desired maximumspeed.
Page 304 of 546
DRIVER SUPPORT
* Option/accessory, for more information, see Introduction.
302
Changing tolerance for the Automatic Speed Limiter
Posted speed limit toleranceASL can be set to allow the vehicle to drive a maximum of 5 mph (10 km/h) above or belowthe posted speed limit. For example, if the currentposted speed limit is 50 mph (70 km/h), thedriver can opt to allow the vehicle to drive at aspeed of 55 mph (80 km/h).
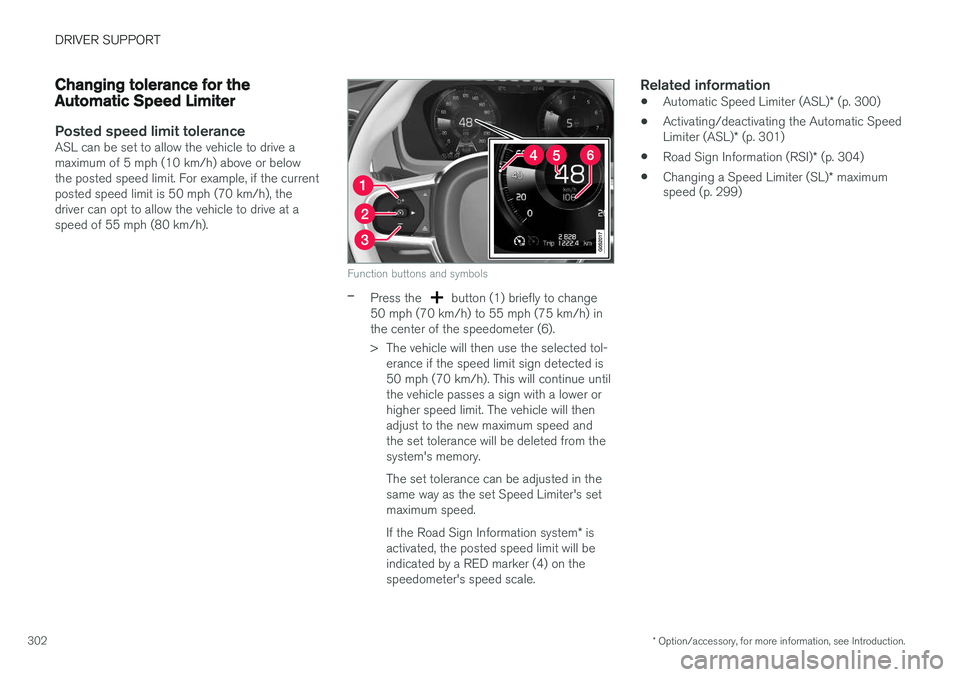
Function buttons and symbols
–Press the button (1) briefly to change
50 mph (70 km/h) to 55 mph (75 km/h) in the center of the speedometer (6).
> The vehicle will then use the selected tol- erance if the speed limit sign detected is 50 mph (70 km/h). This will continue untilthe vehicle passes a sign with a lower orhigher speed limit. The vehicle will thenadjust to the new maximum speed andthe set tolerance will be deleted from thesystem's memory. The set tolerance can be adjusted in the same way as the set Speed Limiter's setmaximum speed. If the Road Sign Information system * is
activated, the posted speed limit will be indicated by a RED marker (4) on thespeedometer's speed scale.
Related information
• Automatic Speed Limiter (ASL)
* (p. 300)
• Activating/deactivating the Automatic Speed Limiter (ASL)
* (p. 301)
• Road Sign Information (RSI)
* (p. 304)
• Changing a Speed Limiter (SL)
* maximum
speed (p. 299)
Page 305 of 546
DRIVER SUPPORT
* Option/accessory, for more information, see Introduction.303
Deactivating/reactivating the Speed Limiter*
The Speed Limiter (SL) can be temporarily deac- tivated and put in standby mode.
Deactivating and putting SL in standby
mode
To temporarily put the Speed Limiter in standby mode:
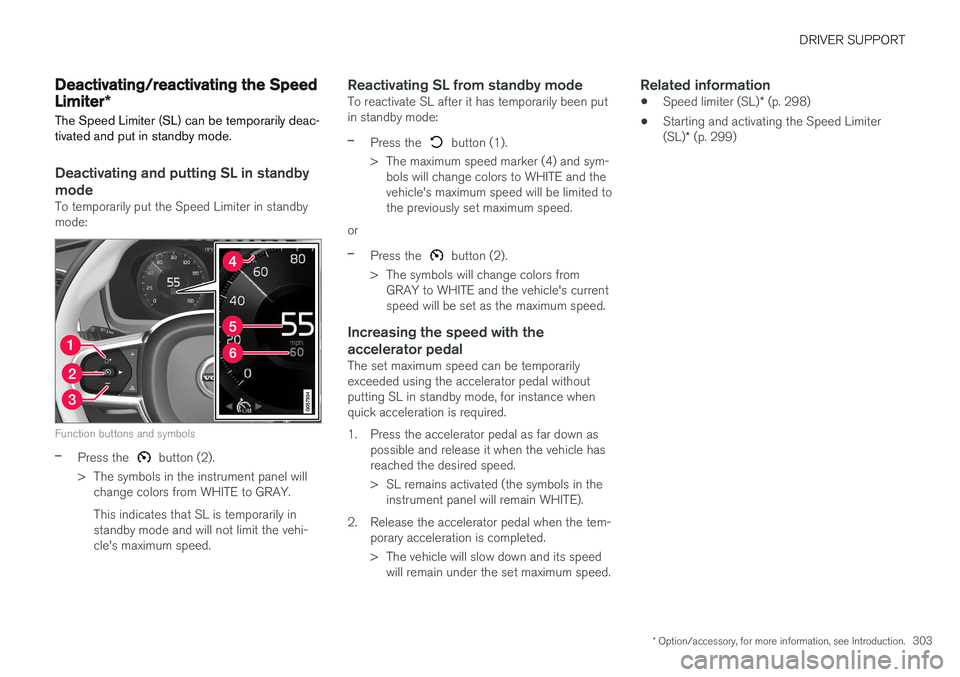
Function buttons and symbols
–Press the button (2).
> The symbols in the instrument panel will change colors from WHITE to GRAY. This indicates that SL is temporarily in standby mode and will not limit the vehi-cle's maximum speed.
Reactivating SL from standby modeTo reactivate SL after it has temporarily been putin standby mode:
–Press the button (1).
> The maximum speed marker (4) and sym- bols will change colors to WHITE and the vehicle's maximum speed will be limited tothe previously set maximum speed.
or
–Press the button (2).
> The symbols will change colors from GRAY to WHITE and the vehicle's current speed will be set as the maximum speed.
Increasing the speed with the accelerator pedal
The set maximum speed can be temporarily exceeded using the accelerator pedal withoutputting SL in standby mode, for instance whenquick acceleration is required.
1. Press the accelerator pedal as far down as possible and release it when the vehicle has reached the desired speed.
> SL remains activated (the symbols in theinstrument panel will remain WHITE).
2. Release the accelerator pedal when the tem- porary acceleration is completed.
> The vehicle will slow down and its speedwill remain under the set maximum speed.
Related information
• Speed limiter (SL)
* (p. 298)
• Starting and activating the Speed Limiter (SL)
* (p. 299)
Page 306 of 546
DRIVER SUPPORT
* Option/accessory, for more information, see Introduction.
304
Turning the Speed Limiter * off
The Speed Limiter (SL) can be turned off.
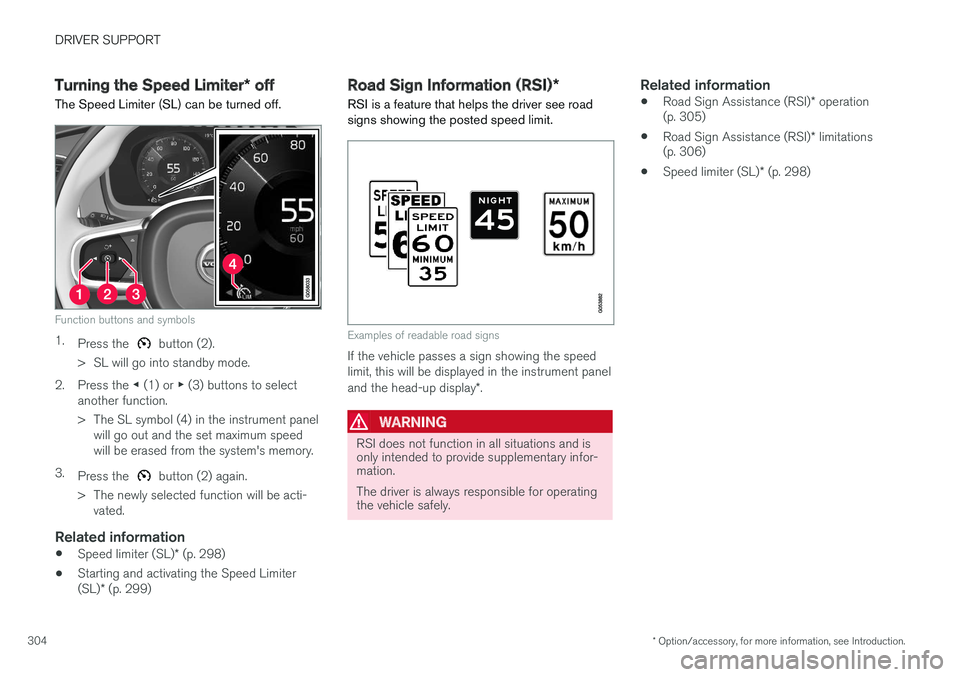
Function buttons and symbols
1. Press the button (2).
> SL will go into standby mode.
2. Press the ◀ (1) or ▶ (3) buttons to select
another function.
> The SL symbol (4) in the instrument panel will go out and the set maximum speed will be erased from the system's memory.
3. Press the
button (2) again.
> The newly selected function will be acti- vated.
Related information
• Speed limiter (SL)
* (p. 298)
• Starting and activating the Speed Limiter (SL)
* (p. 299)
Road Sign Information (RSI) *
RSI is a feature that helps the driver see road signs showing the posted speed limit.
Examples of readable road signs
If the vehicle passes a sign showing the speed limit, this will be displayed in the instrument panel and the head-up display *.
WARNING
RSI does not function in all situations and is only intended to provide supplementary infor-mation. The driver is always responsible for operating the vehicle safely.
Related information
• Road Sign Assistance (RSI)
* operation
(p. 305)
• Road Sign Assistance (RSI)
* limitations
(p. 306)
• Speed limiter (SL)
* (p. 298)
Page 393 of 546
STARTING AND DRIVING
}}
391
Available drive modes
HYBRID
This is the default mode. The vehicle normally starts in
Hybrid mode 4
. The
engine management system uses both the elec- tric motor and gasoline engine (separately or intandem) and calculates the optimal levels of per-formance, fuel consumption and comfort. Athigher speeds, ground clearance is reducedautomatically to help reduce wind resistance. The amount of driving done using only the elec- tric motor in
Hybrid mode is determined by the
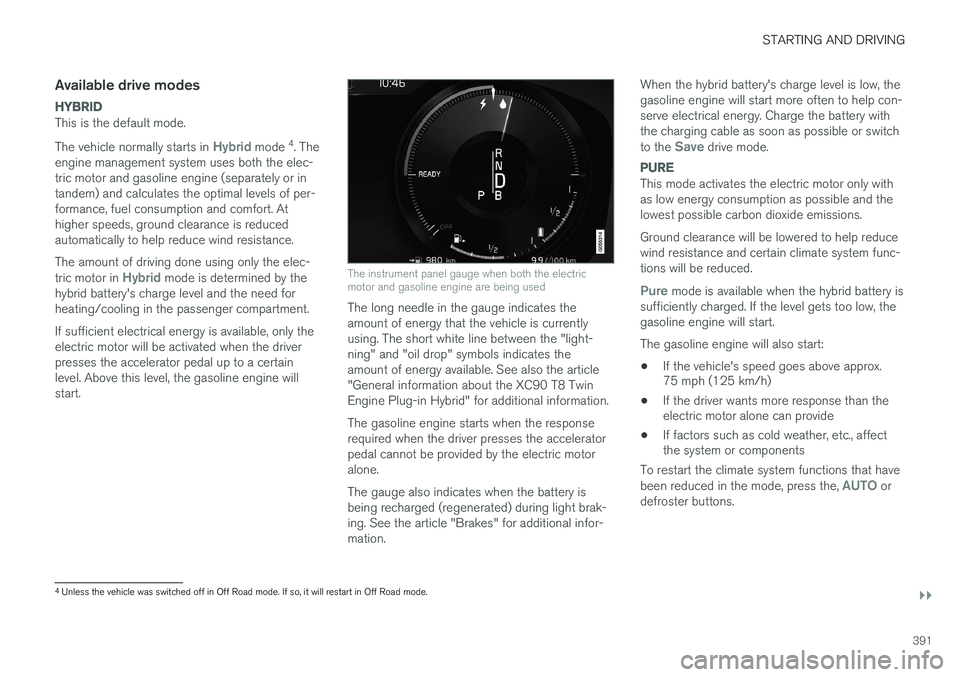
hybrid battery's charge level and the need for heating/cooling in the passenger compartment. If sufficient electrical energy is available, only the electric motor will be activated when the driverpresses the accelerator pedal up to a certainlevel. Above this level, the gasoline engine willstart.The instrument panel gauge when both the electric motor and gasoline engine are being used
The long needle in the gauge indicates the amount of energy that the vehicle is currentlyusing. The short white line between the "light-ning" and "oil drop" symbols indicates theamount of energy available. See also the article"General information about the XC90 T8 TwinEngine Plug-in Hybrid" for additional information. The gasoline engine starts when the response required when the driver presses the acceleratorpedal cannot be provided by the electric motoralone. The gauge also indicates when the battery is being recharged (regenerated) during light brak-ing. See the article "Brakes" for additional infor-mation. When the hybrid battery's charge level is low, thegasoline engine will start more often to help con-serve electrical energy. Charge the battery withthe charging cable as soon as possible or switch to the
Save drive mode.
PURE
This mode activates the electric motor only with as low energy consumption as possible and thelowest possible carbon dioxide emissions. Ground clearance will be lowered to help reduce wind resistance and certain climate system func-tions will be reduced.
Pure mode is available when the hybrid battery is
sufficiently charged. If the level gets too low, the gasoline engine will start. The gasoline engine will also start: • If the vehicle's speed goes above approx. 75 mph (125 km/h)
• If the driver wants more response than theelectric motor alone can provide
• If factors such as cold weather, etc., affectthe system or components
To restart the climate system functions that have been reduced in the mode, press the,
AUTO or
defroster buttons.
4 Unless the vehicle was switched off in Off Road mode. If so, it will restart in Off Road mode.
Page 403 of 546

STARTING AND DRIVING
401
Suspension leveling settings
Easy entry
The vehicle can be lowered to entering and exit- ing easier. Select
SettingsVehicleEasy Entry/Exit
Control via the center display's Top view to lower
the vehicle when getting in or out. When the vehicle is parked and the engine is turned off, the level is lowered (if a side door isopened, the level adjustment will stop). When theengine is started and the vehicle begins to move,the level will be raised to the height set by theselected drive mode.
Turning off suspension and leveling control
In certain situations, this function has to be turned off, for example when lifting the vehicle ona jack or garage hoist. 1. Tap
Settings in the center display's Top
view.
2. Tap
My CarSuspension .
3. Select
Deactivate Suspension & Leveling
Control.
Changing suspension control
Three different levels of suspension control can be selected from the center display: 1. Tap
Settings in the center display's Top
view. 2.
Tap
My CarDrive Mode.
3. Under
Suspension Control, select Eco,Comfort or Dynamic.
Loading mode
Use the buttons in the cargo compartment to raise or lower the vehicle to make loading orunloading easier or when attaching a trailer.
Parking the vehicleWhen parking, be sure that there is adequatespace above and below the vehicle since itsground clearance may vary, e.g., depending onthe ambient temperature, how the vehicle is loa-ded, if loading mode is being used or the drivemode selected after the engine is started. The level may also be adjusted for a certain time after the vehicle has been parked to compensatefor possible height adjustments due to tempera-ture changes in the pneumatic suspension whenthe vehicle has cooled.
TransportWhen transporting the vehicle on a ferry, train ora tow truck, it may only be secured (lashed)around the tires, not using any other chassiscomponents. Changes in the pneumatic suspen-sion may occur during transport that could nega-tively affect the lashing and result in damage.
Related information
• Drive modes (p. 390)
• Driving with a trailer (p. 367)
• Loading (p. 215)
8
Standard equipment on certain models.
Page 417 of 546
INFOTAINMENT
}}
415
Overview
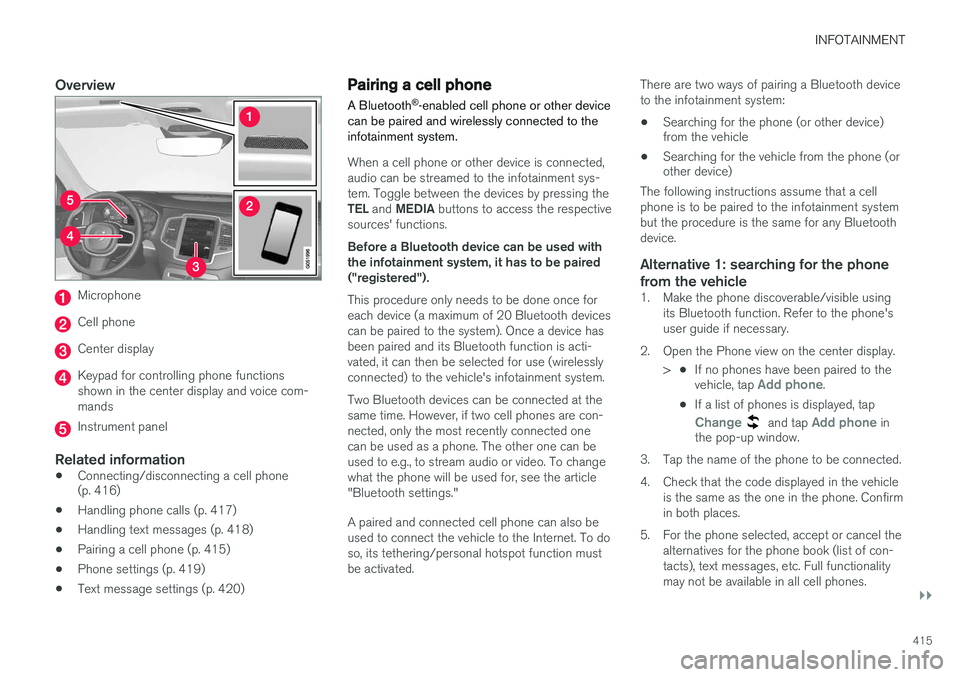
Microphone
Cell phone
Center display
Keypad for controlling phone functions shown in the center display and voice com-mands
Instrument panel
Related information
•Connecting/disconnecting a cell phone (p. 416)
• Handling phone calls (p. 417)
• Handling text messages (p. 418)
• Pairing a cell phone (p. 415)
• Phone settings (p. 419)
• Text message settings (p. 420)
Pairing a cell phone
A Bluetooth ®
-enabled cell phone or other device
can be paired and wirelessly connected to the infotainment system.
When a cell phone or other device is connected, audio can be streamed to the infotainment sys-tem. Toggle between the devices by pressing the TEL and MEDIA buttons to access the respective
sources' functions. Before a Bluetooth device can be used with the infotainment system, it has to be paired("registered"). This procedure only needs to be done once for each device (a maximum of 20 Bluetooth devicescan be paired to the system). Once a device hasbeen paired and its Bluetooth function is acti-vated, it can then be selected for use (wirelesslyconnected) to the vehicle's infotainment system. Two Bluetooth devices can be connected at the same time. However, if two cell phones are con-nected, only the most recently connected onecan be used as a phone. The other one can beused to e.g., to stream audio or video. To changewhat the phone will be used for, see the article"Bluetooth settings." A paired and connected cell phone can also be used to connect the vehicle to the Internet. To doso, its tethering/personal hotspot function mustbe activated. There are two ways of pairing a Bluetooth deviceto the infotainment system:
• Searching for the phone (or other device) from the vehicle
• Searching for the vehicle from the phone (orother device)
The following instructions assume that a cell phone is to be paired to the infotainment systembut the procedure is the same for any Bluetoothdevice.
Alternative 1: searching for the phone
from the vehicle
1. Make the phone discoverable/visible using its Bluetooth function. Refer to the phone'suser guide if necessary.
2. Open the Phone view on the center display. >•If no phones have been paired to the vehicle, tap
Add phone.
• If a list of phones is displayed, tap
Change and tap Add phone in
the pop-up window.
3. Tap the name of the phone to be connected.
4. Check that the code displayed in the vehicle is the same as the one in the phone. Confirm in both places.
5. For the phone selected, accept or cancel the alternatives for the phone book (list of con-tacts), text messages, etc. Full functionalitymay not be available in all cell phones.