2016 VOLVO XC90 T8 buttons
[x] Cancel search: buttonsPage 244 of 546
LOCKS AND ALARM
* Option/accessory, for more information, see Introduction.
242
Locking/unlocking from inside the vehicle The lock buttons on either of the front doors can be used to lock or unlock all doors and the tail-gate at the same time. The rear doors can be locked using their respective lock buttons *.
The central locking system
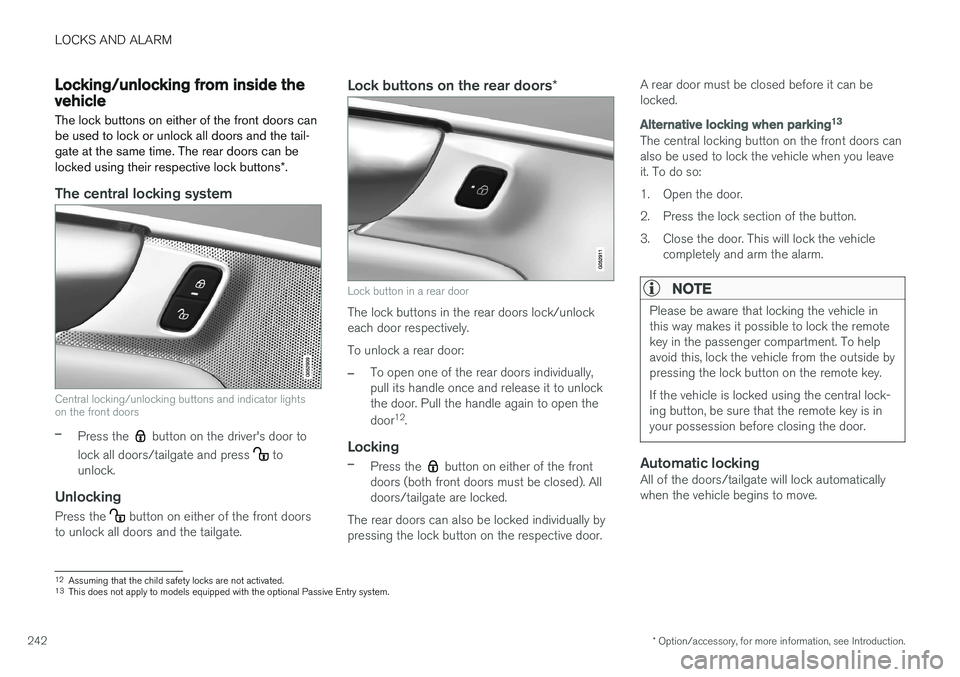
Central locking/unlocking buttons and indicator lights on the front doors
–Press the button on the driver's door to
lock all doors/tailgate and press
to
unlock.
Unlocking
Press the button on either of the front doors
to unlock all doors and the tailgate.
Lock buttons on the rear doors *
Lock button in a rear door
The lock buttons in the rear doors lock/unlock each door respectively. To unlock a rear door:
–To open one of the rear doors individually, pull its handle once and release it to unlockthe door. Pull the handle again to open the door12
.
Locking
–Press the button on either of the front
doors (both front doors must be closed). All doors/tailgate are locked.
The rear doors can also be locked individually bypressing the lock button on the respective door. A rear door must be closed before it can belocked.
Alternative locking when parking
13
The central locking button on the front doors can also be used to lock the vehicle when you leaveit. To do so:
1. Open the door.
2. Press the lock section of the button.
3. Close the door. This will lock the vehicle
completely and arm the alarm.
NOTE
Please be aware that locking the vehicle in this way makes it possible to lock the remotekey in the passenger compartment. To helpavoid this, lock the vehicle from the outside bypressing the lock button on the remote key. If the vehicle is locked using the central lock- ing button, be sure that the remote key is inyour possession before closing the door.
Automatic lockingAll of the doors/tailgate will lock automatically when the vehicle begins to move.
12Assuming that the child safety locks are not activated.13
This does not apply to models equipped with the optional Passive Entry system.
Page 245 of 546

LOCKS AND ALARM
}}
* Option/accessory, for more information, see Introduction.243
Related information
•Locking/unlocking from outside the vehicle (p. 243)
• Child safety locks (p. 228)
Locking/unlocking from outside the vehicle The buttons on the remote key can be used to lock or unlock all doors and the tailgate at thesame time. This can also be done without press-ing the remote key buttons on models equippedwith the optional keyless Passive Entry system. The power tailgate
* can also be opened/closed
by moving your foot under a sensor beneath therear bumper *.
The lock/unlock settings can be changed in the center display's Top view. Go to:
SettingsMy CarRemote Unlockand select Unlock All Doors or Driver Door
Only.
In order to lock the vehicle, the driver's door must be closed. If the tailgate or any of the other doorsare open, they will be locked and the alarm will bearmed when they are closed.
NOTE
Be sure the remote key is outside of the vehi- cle before the other doors/tailgate are closedto help avoid locking the remote inside thevehicle.
If the locks repeatedly do not react when the unlock button is pressed, it may be necessary toreplace the battery in the remote. In this case, the driver's door can be unlocked with the detacha-ble key blade.
Keyless Passive Entry
*If the vehicle is equipped with this system, it isonly necessary to have a remote key in your pos-session to operate the central locking system. Models with Passive Entry have an indentation on the outside of the handle for locking the vehicleand a pressure-sensitive area on the inside of thehandle for unlocking. The tailgate has a rubber-ized button used only for locking/unlocking.
Outer indentation for locking, the pressure sensitive area on the inside of the handle is for unlocking
Page 248 of 546

LOCKS AND ALARM
* Option/accessory, for more information, see Introduction.
246
Power tailgate *
The optional power tailgate can be opened/ closed in several ways.
The power tailgate can be opened/closed using the
button on the lighting panel in the pas-
senger compartment, the
on the remote key,
by moving your foot under a sensor under the rear bumper * or manually.
WARNING
When operating the tailgate manually, do not use force to open or close it. This could resultin injury.
Buttons in the lower edge of the tailgate
Button on the lighting panel in the passenger compart- ment
Opening the tailgateThe power tailgate can be opened electrically by:
• Pressing and holding the
button on the
lighting panel until the tailgate begins to open.
• Pressing and holding the
button on the
remote key until the tailgate begins to open.
• Pressing lightly on the rubber-covered button under the tailgate's outside handle.
• Moving your foot under a sensor under the rear bumper
*.
Closing the tailgateThe tailgate can be closed by moving your foot under a sensor beneath the rear bumper *, by
pressing the button on the lighting panel, with the remote key or by pressing the button on the lower edge of the tailgate *14
To close the tailgate 15
:
–Press the button on the lighting panel
or on the
button on the remote key.
> The tailgate will close automatically and audible signal will sound. This will not
lock the tailgate.
Buttons on the lower edge of the tailgate
14 Models equipped with the optional Passive Entry system have a button to close the tailgate and a button to close and lock the tailgate.
15 See also the article "Foot movement tailgate opening/closing."
Page 249 of 546

LOCKS AND ALARM
}}
* Option/accessory, for more information, see Introduction.247
–Press the button14
on the lower edge of
the tailgate.
> The tailgate will close automatically but will not be locked .
–Press the button14
on the lower edge of
the tailgate.
> The tailgate will close automatically. The tailgate and doors will also be locked and
the alarm will be armed.
If the remote key is not close enough to the tail- gate, automatic locking/unlocking/opening/clos-ing will not be possible. Three short audible sig-nals will sound.
Interrupting opening/closing
–This can be done in five ways: • Press the button on the lighting panel
• Press the button on the remote key
• Press either of the buttons on the lower edge of the tailgate
• Press lightly on the rubber-covered buttonunder the tailgate's outside handle
• Move your foot under a sensor beneath the rear bumper
*
> The tailgate will stop moving
Programming the tailgate's maximum opening angle
The tailgate's maximum opening angle can be programmed, for example, if the tailgate has to beopened in a garage with a low ceiling. Programming the opening angle:
–Open the tailgate manually to the desired angle and press and hold the closing buttonon the tailgate's lower edge for at least 3seconds. Release the tailgate.
> Two audible signals will sound to indicate that the selected opening angle has been stored.
Erasing tailgate programming
–Open the tailgate manually to its highest position and press and hold the closing but-ton on the tailgate's lower edge for at least 3seconds. Release the tailgate.
> Two audible signals will sound to indicate that the programmed opening angle has been erased.
NOTE
If the tailgate has been opened and closed continuously too long, the automatic functionwill be deactivated to avoid overloading theelectrical system. The automatic function canbe used again after approximately 2 minutes. If the vehicle's battery has been discharged or disconnected, or if the tailgate has been openfor more than 24 hours, the tailgate must beopened and closed once manually to resetthe system.
Pinch protectionIf the tailgate is obstructed when being opened/ closed, a pinch protection mechanism is acti-vated.
• While opening: the tailgate will stop moving and an audible signal will sound.
• While closing: the tailgate will stop andreturn to the maximum programmable open-ing position. An audible signal will sound.
WARNING
Be sure that no one is near the tailgate when it is opened or closed automatically. The tail-gate should never be obstructed in any waywhen it is operated.
14
Models equipped with the optional Passive Entry system have a button to close the tailgate and a button to close and lock the tailgate.
Page 263 of 546
DRIVER SUPPORT
}}
* Option/accessory, for more information, see Introduction.261
Cruise Control (CC)
Cruise Control (CC) is designed to assist the driver by maintaining a set speed. It is primarilyintended for use on long straight roads in steadytraffic, such as on highways and other mainroads in smoothly flowing traffic.
Overview
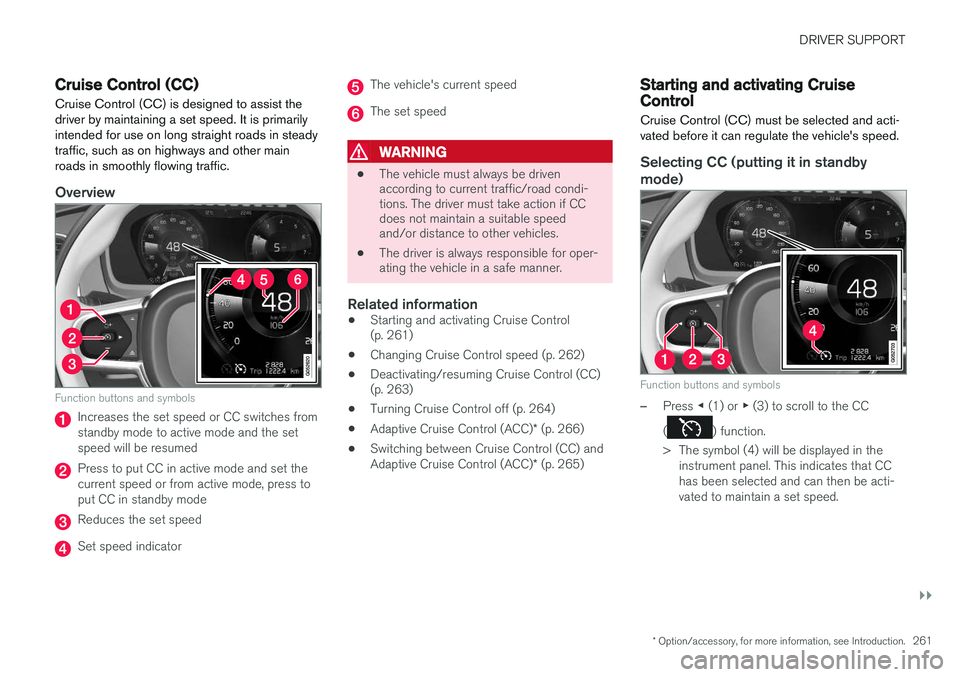
Function buttons and symbols
Increases the set speed or CC switches from standby mode to active mode and the setspeed will be resumed
Press to put CC in active mode and set the current speed or from active mode, press toput CC in standby mode
Reduces the set speed
Set speed indicator
The vehicle's current speed
The set speed
WARNING
• The vehicle must always be driven according to current traffic/road condi-tions. The driver must take action if CCdoes not maintain a suitable speedand/or distance to other vehicles.
• The driver is always responsible for oper-ating the vehicle in a safe manner.
Related information
•
Starting and activating Cruise Control(p. 261)
• Changing Cruise Control speed (p. 262)
• Deactivating/resuming Cruise Control (CC)(p. 263)
• Turning Cruise Control off (p. 264)
• Adaptive Cruise Control (ACC)
* (p. 266)
• Switching between Cruise Control (CC) and Adaptive Cruise Control (ACC)
* (p. 265)
Starting and activating Cruise Control
Cruise Control (CC) must be selected and acti- vated before it can regulate the vehicle's speed.
Selecting CC (putting it in standby
mode)
Function buttons and symbols
–Press ◀ (1) or ▶ (3) to scroll to the CC
(
) function.
> The symbol (4) will be displayed in the instrument panel. This indicates that CC has been selected and can then be acti-vated to maintain a set speed.
Page 264 of 546
||
DRIVER SUPPORT
* Option/accessory, for more information, see Introduction.
262
NOTE
Before CC can be activated, the vehicle's speed must be at least 20 mph (30 km/h).This is also the lowest speed that can be set.
Activating CC (putting it in active mode and setting a speed)
–With the symbol displayed (CC is in
standby mode), press the
button (2) on
the left-side steering wheel keypad.
> This puts CC in active mode and will maintain the vehicle's current speed.
Related information
• Cruise Control (CC) (p. 261)
• Switching between Cruise Control (CC) and Adaptive Cruise Control (ACC)
* (p. 265)
• Deactivating/resuming Cruise Control (CC) (p. 263)
• Turning Cruise Control off (p. 264)
Changing Cruise Control speed
Changing a set speed
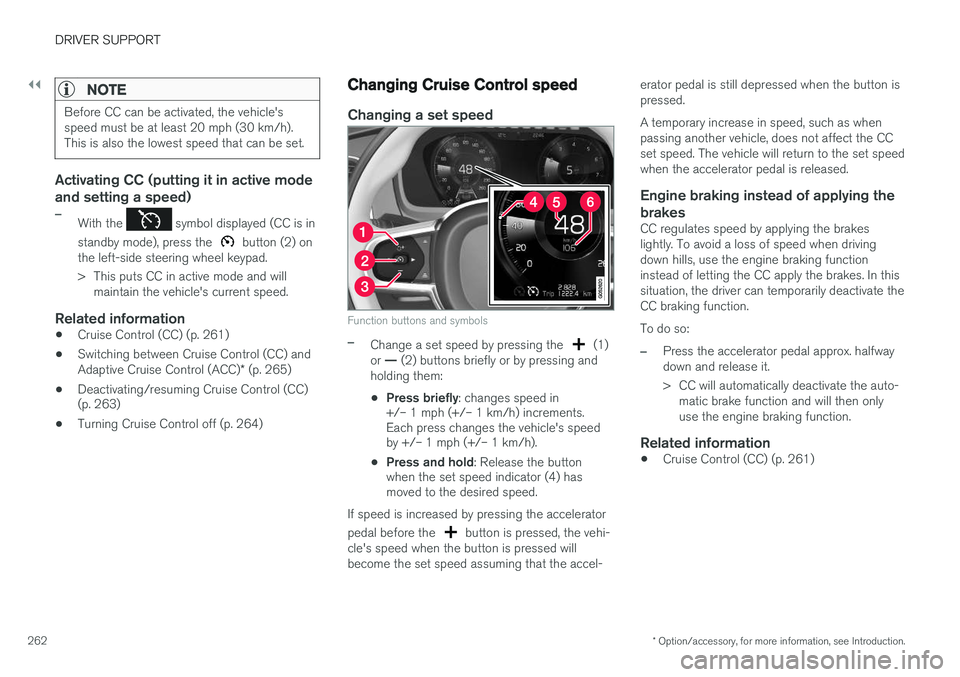
Function buttons and symbols
–Change a set speed by pressing the (1)
or — (2) buttons briefly or by pressing and
holding them:
• Press briefly
: changes speed in
+/– 1 mph (+/– 1 km/h) increments. Each press changes the vehicle's speedby +/– 1 mph (+/– 1 km/h).
• Press and hold
: Release the button
when the set speed indicator (4) hasmoved to the desired speed.
If speed is increased by pressing the accelerator pedal before the
button is pressed, the vehi-
cle's speed when the button is pressed will become the set speed assuming that the accel- erator pedal is still depressed when the button ispressed. A temporary increase in speed, such as when passing another vehicle, does not affect the CCset speed. The vehicle will return to the set speedwhen the accelerator pedal is released.
Engine braking instead of applying the
brakes
CC regulates speed by applying the brakeslightly. To avoid a loss of speed when drivingdown hills, use the engine braking functioninstead of letting the CC apply the brakes. In thissituation, the driver can temporarily deactivate theCC braking function. To do so:
–Press the accelerator pedal approx. halfway down and release it.
> CC will automatically deactivate the auto- matic brake function and will then only use the engine braking function.
Related information
• Cruise Control (CC) (p. 261)
Page 265 of 546
DRIVER SUPPORT
}}
263
Deactivating/resuming Cruise Control (CC) Cruise Control (CC) can be temporarily deacti- vated and put in standby mode.
Deactivating and putting CC in standbymode
To temporarily deactivate and put Cruise Control in standby mode:
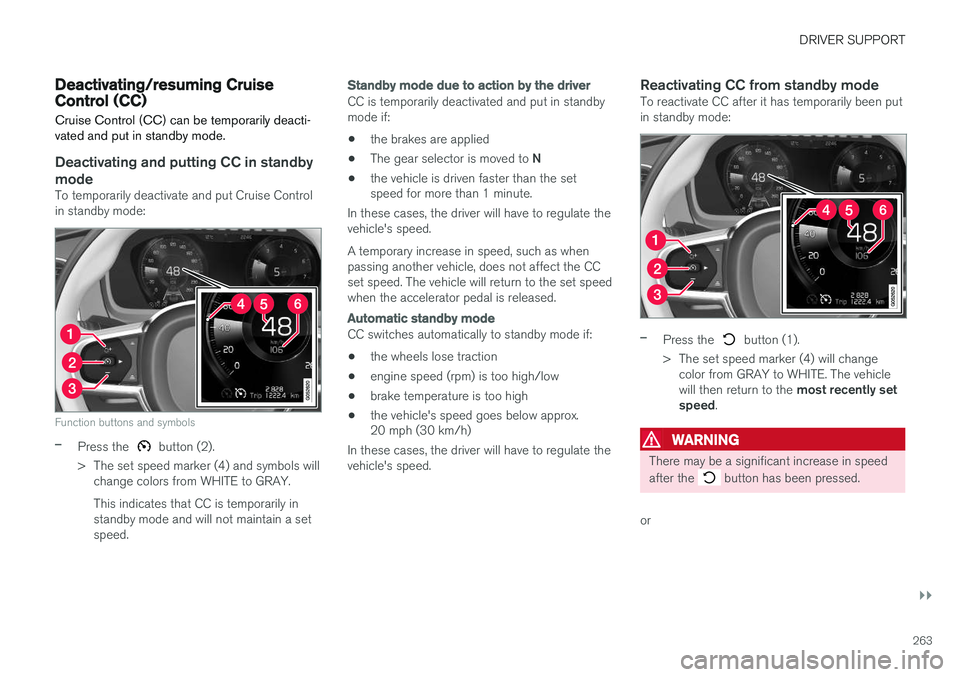
Function buttons and symbols
–Press the button (2).
> The set speed marker (4) and symbols will change colors from WHITE to GRAY. This indicates that CC is temporarily in standby mode and will not maintain a setspeed.
Standby mode due to action by the driver
CC is temporarily deactivated and put in standby mode if:
• the brakes are applied
• The gear selector is moved to
N
• the vehicle is driven faster than the set speed for more than 1 minute.
In these cases, the driver will have to regulate the vehicle's speed. A temporary increase in speed, such as when passing another vehicle, does not affect the CCset speed. The vehicle will return to the set speedwhen the accelerator pedal is released.
Automatic standby mode
CC switches automatically to standby mode if:
• the wheels lose traction
• engine speed (rpm) is too high/low
• brake temperature is too high
• the vehicle's speed goes below approx. 20 mph (30 km/h)
In these cases, the driver will have to regulate the vehicle's speed.
Reactivating CC from standby modeTo reactivate CC after it has temporarily been putin standby mode:
–Press the button (1).
> The set speed marker (4) will change color from GRAY to WHITE. The vehicle will then return to the most recently set
speed .
WARNING
There may be a significant increase in speed after the
button has been pressed.
or
Page 266 of 546
||
DRIVER SUPPORT
264
–Press the button (2).
> The set speed marker (4) and symbols will change colors from GRAY to WHITE. CC will then set and maintain the vehicle's current speed.
Related information
•Cruise Control (CC) (p. 261)
• Starting and activating Cruise Control (p. 261)
Turning Cruise Control off
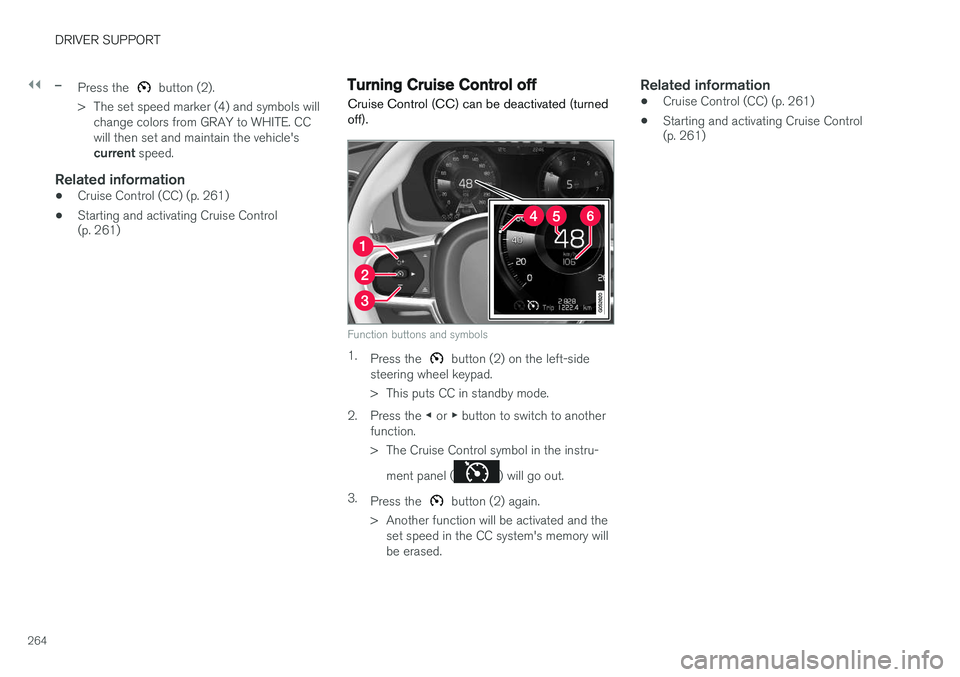
Cruise Control (CC) can be deactivated (turned off).
Function buttons and symbols
1. Press the button (2) on the left-side
steering wheel keypad.
> This puts CC in standby mode.
2. Press the ◀ or ▶ button to switch to another
function.
> The Cruise Control symbol in the instru-
ment panel (
) will go out.
3. Press the
button (2) again.
> Another function will be activated and the set speed in the CC system's memory will be erased.
Related information
• Cruise Control (CC) (p. 261)
• Starting and activating Cruise Control (p. 261)