2016 VOLVO XC90 T8 towing
[x] Cancel search: towingPage 4 of 546

2
INTRODUCTION
Contacting Volvo14
Volvo On Call Roadside Assistance 14
Additional information about your vehicle 14
General information about the XC90 T8 Twin Engine Plug-in Hybrid 16
Volvo and the environment 20
Owner's manual and the environment 21
IntelliSafe —driver support
21
Sensus 22
Owner's manual in mobile devices 25
Options, accessories and the On-board Diagnostic (OBDII) socket 26
Owner's information 27
Driver distraction 28
Volvo Structural Parts Statement 29
Crash event data 30
Volvo ID 31
Center display overview 32
Changing center display settings 34
Using the center display keyboard 35
Function view buttons 40
Navigating in the center display's views 42
Symbols in the center display status bar 47
Changing settings in different typesof apps 48
Using the center display
49
Using the owner's manual 53
On-board digital owner's manual 55
Navigating in the digital owner's manual 56
Glass 57
Technician certification 57
SAFETY
General safety information60
Occupant safety 60
Reporting safety defects 61
Recall information 62
Safety during pregnancy 62
Whiplash protection system 63
Seat belts 64
Seat belt pretensioners 65
Buckling and unbuckling seat belts 65
Door and seat belt reminders 67
Child safety 68
Child restraints 70
Infant seats 72
Convertible seats 74
Booster cushions 77
ISOFIX/LATCH lower anchors 78
Lower child seat attachment points 79
Top tether anchors 80
Integrated booster cushion *
81
Raising the integrated booster cushion *
82
Stowing the integrated booster cushion *
83
Occupant weight sensor 84
Safety mode 87
CONTENTS
Page 9 of 546

7
Electronic Stability Control (ESC) sport mode324
Electronic Stability Control (ESC)symbols and messages 325
Roll stability control (RSC) 327
Driver Alert Control (DAC) 327
Driver Alert Control limitations 328
Using Driver Alert Control (DAC) 328
Distance Alert *
329
Using Distance Alert *
329
Distance Alert * limitations
330
Blind Spot Information (BLIS) *
330
Blind Spot Information (BLIS) * On/Off
332
Blind Spot Information (BLIS) * limitations
332
Cross Traffic Alert (CTA) *
333
Activating/deactivating Cross Traffic Alert (CTA) * 334
Cross Traffic Alert (CTA) * limitations
335
Blind Spot Information (BLIS) * with
Cross Traffic Alert (CTA) * symbols
and messages 337
Driving lane assistance 338
Activating/deactivating Lane Departure Warning (LDW) 340
Activating/deactivating Lane Keeping Aid (LKA) * 340
Driving lane assistance symbols and messages
342
STARTING AND DRIVING
Starting and driving
346
Brakes 346
Brake functions 348
Auto-hold brake function 349
Brake assist system 349
Braking effect after a collision 350
Emergency brake lights 350
Hill Descent Control (HDC) 350
Hill Start Assist 351
Parking brake 352
Using the parking brake 352
Parking brake malfunctions 354
Before a long distance trip 355
Driving economically 355
Driving through standing water 357
Overheating the engine and transmission 357
Winter driving 358
Towing eyelet 359
Towing recommendations 360
Fuel 361
Octane rating 362
Opening/closing the fuel filler door 363
Emission controls 364
Jump starting 365
Page 84 of 546

||
SAFETY
* Option/accessory, for more information, see Introduction.
82 •
That the seat belt is properly positioned and is taut.
• The shoulder section of the seat belt isacross the child's collarbone, not over theneck.
• The lap section of the seat belt is across thechild's hips and not the abdomen.
Related information
•
Seat belts (p. 64)
• Child safety (p. 68)
• Raising the integrated booster cushion
*
(p. 82)
• Stowing the integrated booster cushion
*
(p. 83)
Raising the integrated booster cushion *
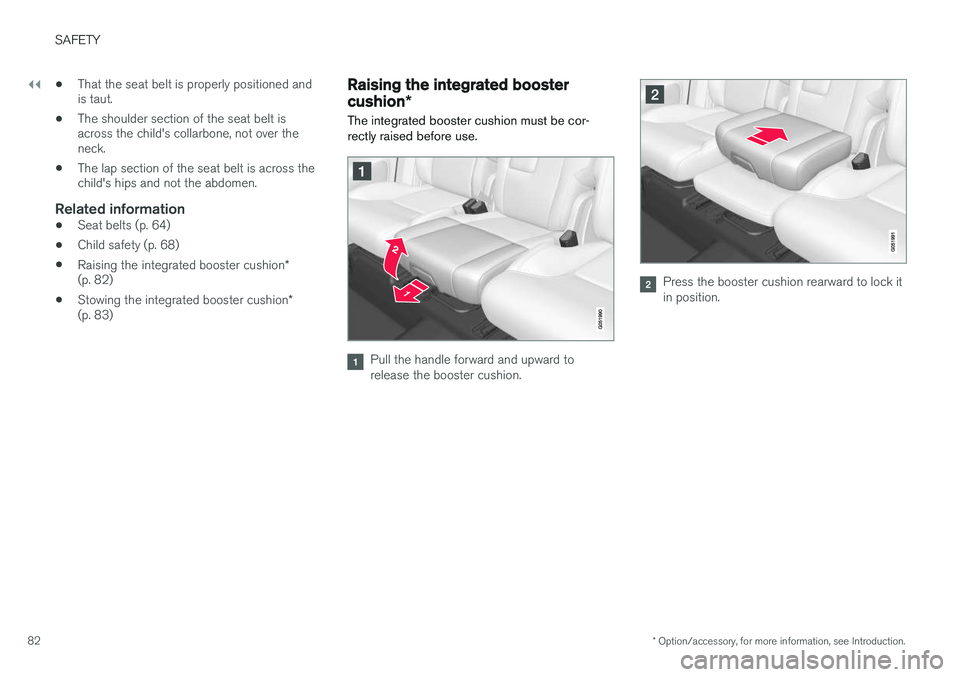
The integrated booster cushion must be cor- rectly raised before use.
Pull the handle forward and upward to release the booster cushion.
Press the booster cushion rearward to lock it in position.
Page 85 of 546

SAFETY
}}
* Option/accessory, for more information, see Introduction.83
WARNING
DEATH or SERIOUS INJURY can occur Follow all instructions on the booster cushion and in the vehicle's owner'smanual. MAKE SURE THE BOOSTER CUSHION IS SECURELY LOCKEDBEFORE THE CHILD IS SEATED. •Use this booster cushion only with chil- dren whose height and weight are withinthe permitted limits.
• In the event of a collision while the inte-grated booster cushion was occupied, theentire booster cushion and seat belt mustbe replaced. The booster cushion shouldalso be replaced if it is badly worn ordamaged in any way. This work should beperformed by a trained and qualifiedVolvo service technician only.
Related information
•
Integrated booster cushion
* (p. 81)
• Stowing the integrated booster cushion
*
(p. 83)
Stowing the integrated booster cushion *
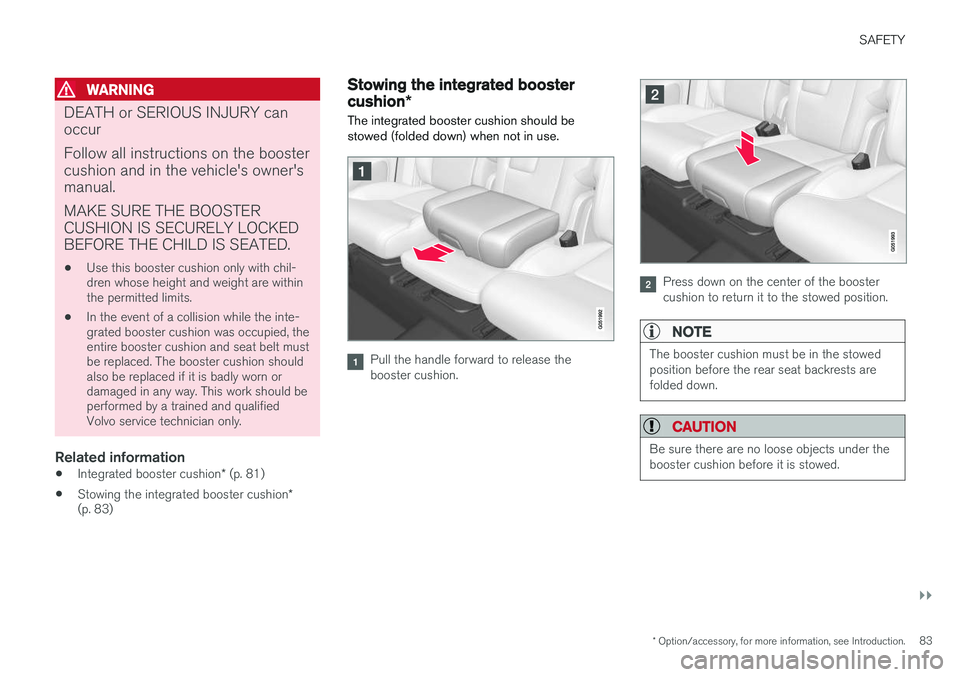
The integrated booster cushion should be stowed (folded down) when not in use.
Pull the handle forward to release the booster cushion.
Press down on the center of the booster cushion to return it to the stowed position.
NOTE
The booster cushion must be in the stowed position before the rear seat backrests arefolded down.
CAUTION
Be sure there are no loose objects under the booster cushion before it is stowed.
Page 90 of 546

SAFETY
88
Starting or moving a vehicle in safety mode
If
Safety mode has been set, it may be possible
to start and move the vehicle, for example, if it is blocking traffic.
Starting the vehicle in safety mode1. Check the vehicle for damage, particularly for fuel leakage or the smell of gasoline fumes. If the damage to the vehicle is minor and there is no fuel leakage/fumes, you mayattempt to start the engine and move thevehicle.
WARNING
If you smell gasoline fumes or detect fuel leakage while Safety mode See Owner's
manual is displayed in the instrument panel,
do not attempt to start the vehicle . Leave
the vehicle immediately.
2. Turn the start knob to STOP and release it.
3. Try to start the vehicle. >
Vehicle start System check, wait will
be displayed in the instrument panel while the vehicle's electrical system attempts toreset to normal mode. This may take up toa minute. 4.
When
Vehicle start System check, wait is
no longer displayed, try to start the vehicle again.
WARNING
If the message Safety mode See Owner's
manual is still displayed, the vehicle should
not be driven and must be towed (lifted onto a flatbed tow truck. The vehicle may never betowed with the wheels on the ground). Con-cealed faults may make the vehicle difficult tocontrol.
Moving the vehicle after safety mode has been set
If the message Normal mode The vehicle is
now in normal mode is displayed, the vehicle
may be moved carefully from its present position if, for example, it is blocking traffic. It should, however, not be moved farther than is absolutely necessary.
WARNING
After Safety mode has been set, the vehicle
should not be driven or towed (pulled on the ground by another vehicle). It must be trans-ported on a flatbed tow truck to a trained andqualified Volvo service technician for inspec-tion/repairs.
Related information
• Safety mode (p. 87)
• Towing recommendations (p. 360)
Page 309 of 546

DRIVER SUPPORT
}}
307
The tone becomes constant when you are within approximately 1 ft (30 cm) of an object and theinnermost sensor field will be red. If there areobjects within this distance both behind and infront of the vehicle, the tone alternates betweenfront and rear speakers. While an audible signal is being given, its volume level can be raised/lowered using the
>II control
in the center console or can be adjusted in the Setting menu.
WARNING
Park Assist is an information system, NOT a safety system. This system is designed to bea supplementary aid when parking the vehicle.It is not, however, intended to replace the driv-er's attention and judgement.
Rear park assist
The system's rear sensors are activated automat- ically when the engine is started and are active ifthe vehicle rolls rearward with the gear selector in N or if R has been selected.
The distance monitored behind the vehicle is approximately 5 ft (1.5 m). The audible signalcomes from the rear speakers. The rear sensors will be deactivated automatically when towing a trailer if Volvo genuine trailer wir-ing is used. If a non-Volvo trailer hitch is beingused, it may be necessary to switch off the sys-tem manually.
Side park assist
The system's side sensors are activated automat- ically when the engine is started and are active atspeeds below approximately 6 mph (10 km/h). The distance monitored along the sides of thevehicle is approximately 1 ft (0.3 m). The audiblesignal comes from the side speakers.
Front park assist
The system's front sensors are activated auto- matically when the engine is started and areactive at speeds below approximately 6 mph(10 km/h). The distance monitored in front of the vehicle is approximately 2.5 ft (0.8 m). The audible signalcomes from the front speakers. Front Park Assist is deactivated if the parking brake is applied or if the gear selector is put in
P.
When installing auxiliary headlights, be sure that they do not obstruct the front sensors. Otherwise,these lights could trigger a Park Assist warning.
Page 320 of 546

DRIVER SUPPORT
* Option/accessory, for more information, see Introduction.
318
Using Park Assist Pilot (PAP) *
Park Assist Pilot (PAP) gives the driver instruc- tions during the parking procedure.
Symbols, images and text in the center display indicate when the various steps in the parkingprocedure will be carried out. PAP can be activated if the following conditions are met after the engine has started:
• The vehicle may not be towing a trailer.
• The vehicle's speed must be below approx. 30 mph (50 km/h).
NOTE
If a trailer hitch is configured in the vehicle's electrical system, PAP will take the trailerhitch into consideration when determining thenecessary size of a parking space.
ParkingProcedure for parking:
1. The system searches for and measures a
possible parking space.
2. The vehicle is steered while it is backing into the parking space.
3. The vehicle's position is adjusted in the park- ing space by moving forward and rearward.
1: Searching and measuring
Parallel parking
Perpendicular parking
PAP searches for a potential parking space and measures it to see if there is sufficient space foryour vehicle. To start this procedure: 1. Tap the
Park Assist button
in the center display's Function view. If necessary, slow down toa speed below 20 mph (30km/h) for parallel parking orapprox. 12 mph ( 20 km/h) forperpendicular parking.
2. Keep an eye on the display and be prepared to stop the vehicle when you are instructed by PAP to do so.
3. Select
Parallel parking or Perpendicular
parking and put the transmission in reverse.
4. Keep an eye on the display and be prepared to stop the vehicle when you are instructed by PAP to do so.
5. Stop the vehicle when instructed to do so.
NOTE
PAP normally searches for available parking spaces along the curb on the right (passeng-er's) side of the vehicle. However, it can alsoassist in finding and parking in spaces on thedriver's side. To do so:
• Activate the left turn signal. PAP will then search for a parking space on the leftside of the vehicle.
Page 325 of 546

DRIVER SUPPORT
}}
* Option/accessory, for more information, see Introduction.323
Adjustable steering force*
Steering force increases with the speed of the vehicle to give the driver an enhanced sense ofcontrol and stability. At low speed the vehicle iseasier to steer in order to facilitate parking, etc.
Changing the steering force levelTo change the level of steering force, see theinformation under the heading "individual" in arti-cle "Drive modes" for additional information.
NOTE
•This steering force level menu function cannot be accessed when the vehicle isin motion.
• In certain situations, the power steeringfunction may become too hot and mustbe temporarily cooled. During cooling,power steering effect will be reduced andmore force may be necessary to turn thesteering wheel and a message will bedisplayed in the instrument panel.
Related information
• Driver support systems (p. 252)
• Drive modes (p. 390)
Electronic Stability Control (ESC)
Electronic Stability Control (ESC) helps reduce wheel spin, counteract skidding and to generallyhelp improve directional stability.
A pulsating sound will be audi- ble when the system is activelyoperating and is normal. Accel-eration may also be slightlyslower than normal.
WARNING
ESC is a supplementary aid and cannot deal with all situations or road conditions. The driver is always responsible for operating the vehicle in a safe manner in accordancewith current traffic regulations.
ESC consists of the following functions: • Traction control
• Spin control
• Active Yaw Control
• Engine Drag Control
• Trailer Stability Assist
Traction controlThis function is designed to help reduce wheel spin by transferring power from a drive wheel that begins to lose traction to the wheel on the oppo-site side of the vehicle (on the same axle).
Spin controlThis function is designed to help prevent thedrive wheels from spinning while the vehicle isaccelerating.
Active Yaw ControlAt low speeds, this function helps maintain direc-tional stability by braking one or more of thewheels if the vehicle shows a tendency to skid orslide laterally.
Engine Drag Control EDCEDC helps keep the engine running if the wheelsshow a tendency to lock, e.g., when shifting downin the manual shifting mode or while using theengine's braking function on a slippery surface. Ifthe wheels were to lock, the vehicle wouldbecome more difficult to steer.
Trailer Stability Assist
*4TSA helps stabilize a vehicle that is towing atrailer when the vehicle and trailer have begun tosway. This system is automatically deactivated if the driver selects
Sport mode.
Related information
•Detachable trailer hitch (p. 368)
• Driving with a trailer (p. 367)
4
This function is included if the vehicle is equipped with a Volvo original trailer hitch.