2016 VOLVO XC90 T8 steering wheel
[x] Cancel search: steering wheelPage 210 of 546

LOADING AND STORAGE
* Option/accessory, for more information, see Introduction.
208
Cargo space
The vehicle has flexible cargo capacity that makes it possible to load and secure largeobjects.
By folding down the backrests in the second and third rows * of seats, the cargo capacity of the
vehicle increases considerably. To make loading easier, the rear section of the vehicle can beraised and lowered using the pneumatic suspen- sion *. Use the load anchoring eyelets or the gro-
cery bag holder to secure objects and the cargo compartment cover helps conceal the load. The jack * and tools can be found under the cargo
compartment's floor.
Related information
• Loading (p. 215)
• Cargo compartment cover
* (p. 221)
• Cargo net (p. 217)
• Grocery bag holder (p. 217)
• Load anchoring eyelets (p. 220)
• Steel cargo grid
* (p. 219)
Passenger compartment storage spaces
The following is an overview of the passenger compartment and its storage spaces.
Front seats
Storage spaces in the door panel, near the steering wheel, the glove compartment and the sun visors
Storage spaces, cup holders and 12-volt socket in the tunnel console
Second row of seats
Storage compartments in the door panels, cupholders in the center seat's backrest, storage pockets on the rearside of the front seat backrest, and 12-volt socket onthe rear side of the tunnel console
Page 237 of 546

LOCKS AND ALARM
}}
235
Remote key's range
In order to function correctly, the remote key must be within a certain distance of the vehicle.
Manual useThe remote key's functions, such as locking and unlocking the vehicle, which are activated by pressing the
or buttons, have a range
of approx. 65 feet (20 meters) from the vehicle. Buildings or other obstacles may interfere with the function of the remote key. The vehicle canalso be locked or unlocked with the key blade. If the vehicle's locks do not react, move closer and try again.
Keyless use 5
The shaded areas illustrate the range of the Passive Entry system's antennas
For keyless entry into the vehicle, the remote key must be within approximately 5 feet (1.5 meters)of the sides of the vehicle or approximately 3 feet(1 meter) of the tailgate as shown in the illustra-tion. The remote key may not function properly due to ambient radio waves, buildings or topographicalobstructions, etc. The vehicle can always belocked/unlocked with the detachable key blade.
If the remote key is removed from the vehicle
If all of the remote keys are removed from the vehicle while the engine is running, Vehicle key
not found Removed from vehicle will be dis-
played in the instrument panel and an audible signal will sound when all of the doors have beenclosed. The message will be erased when aremote key has been returned to the vehicle and the O button on the right-side steering wheel
keypad has been pressed or when all of the doors have been closed again.
Related information
• Remote key (p. 235)
• Antenna locations for the start and lock sys- tem (p. 230)
Remote key
The remote key is used to lock/unlock the vehi- cle and must be in the passenger compartmentin order to start the engine.
The standard remote key (left) and the Key Tag (right)
In models with the standard Passive Start system, the remote key only needs to be in the front sec-tion of the passenger compartment or in the tun-nel console cup holders in order to start theengine. The keyless Passive Entry system for locking/ unlocking the vehicle is available as an option.This system has a range of approximately 5 feet(1.5 meters) from the sides of the vehicle orapproximately 3 feet (1 meter) from the tailgate.With this system, a remote key can be anywherein the vehicle.
5 Models equipped with the optional Passive Entry only.
Page 264 of 546

||
DRIVER SUPPORT
* Option/accessory, for more information, see Introduction.
262
NOTE
Before CC can be activated, the vehicle's speed must be at least 20 mph (30 km/h).This is also the lowest speed that can be set.
Activating CC (putting it in active mode and setting a speed)
–With the symbol displayed (CC is in
standby mode), press the
button (2) on
the left-side steering wheel keypad.
> This puts CC in active mode and will maintain the vehicle's current speed.
Related information
• Cruise Control (CC) (p. 261)
• Switching between Cruise Control (CC) and Adaptive Cruise Control (ACC)
* (p. 265)
• Deactivating/resuming Cruise Control (CC) (p. 263)
• Turning Cruise Control off (p. 264)
Changing Cruise Control speed
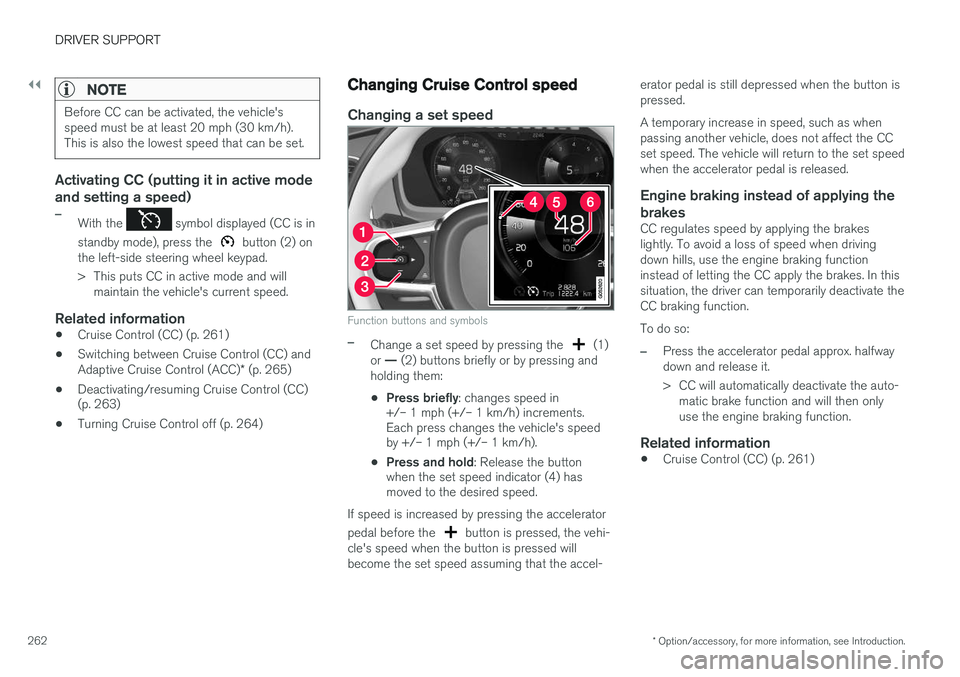
Changing a set speed
Function buttons and symbols
–Change a set speed by pressing the (1)
or — (2) buttons briefly or by pressing and
holding them:
• Press briefly
: changes speed in
+/– 1 mph (+/– 1 km/h) increments. Each press changes the vehicle's speedby +/– 1 mph (+/– 1 km/h).
• Press and hold
: Release the button
when the set speed indicator (4) hasmoved to the desired speed.
If speed is increased by pressing the accelerator pedal before the
button is pressed, the vehi-
cle's speed when the button is pressed will become the set speed assuming that the accel- erator pedal is still depressed when the button ispressed. A temporary increase in speed, such as when passing another vehicle, does not affect the CCset speed. The vehicle will return to the set speedwhen the accelerator pedal is released.
Engine braking instead of applying the
brakes
CC regulates speed by applying the brakeslightly. To avoid a loss of speed when drivingdown hills, use the engine braking functioninstead of letting the CC apply the brakes. In thissituation, the driver can temporarily deactivate theCC braking function. To do so:
–Press the accelerator pedal approx. halfway down and release it.
> CC will automatically deactivate the auto- matic brake function and will then only use the engine braking function.
Related information
• Cruise Control (CC) (p. 261)
Page 266 of 546

||
DRIVER SUPPORT
264
–Press the button (2).
> The set speed marker (4) and symbols will change colors from GRAY to WHITE. CC will then set and maintain the vehicle's current speed.
Related information
•Cruise Control (CC) (p. 261)
• Starting and activating Cruise Control (p. 261)
Turning Cruise Control off
Cruise Control (CC) can be deactivated (turned off).
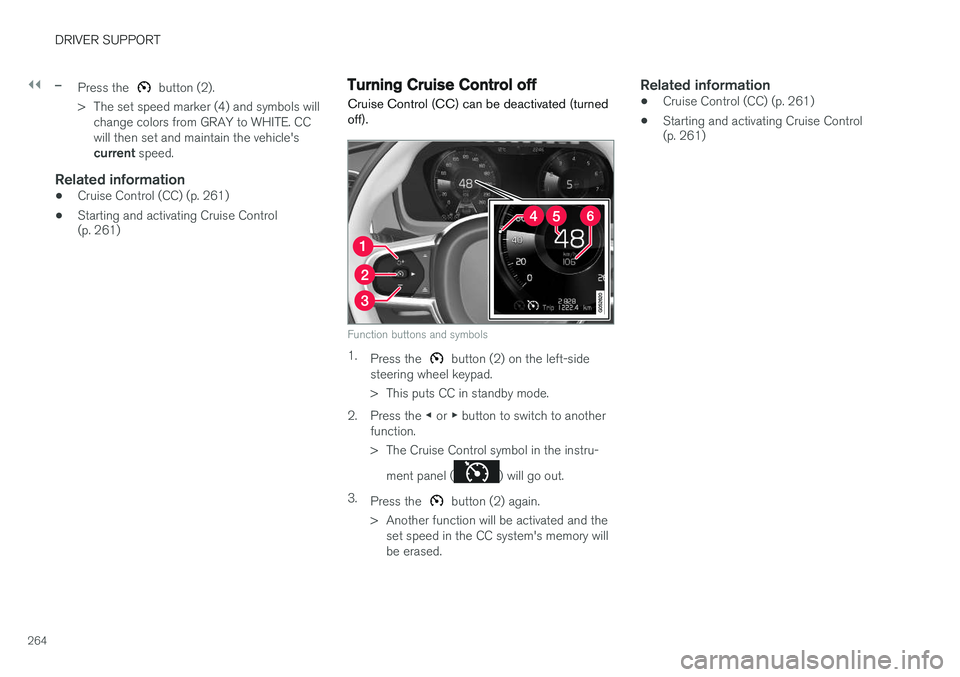
Function buttons and symbols
1. Press the button (2) on the left-side
steering wheel keypad.
> This puts CC in standby mode.
2. Press the ◀ or ▶ button to switch to another
function.
> The Cruise Control symbol in the instru-
ment panel (
) will go out.
3. Press the
button (2) again.
> Another function will be activated and the set speed in the CC system's memory will be erased.
Related information
• Cruise Control (CC) (p. 261)
• Starting and activating Cruise Control (p. 261)
Page 271 of 546

DRIVER SUPPORT
}}
* Option/accessory, for more information, see Introduction.269
Activating ACC (putting it in active mode and setting a speed)
Before ACC can be put in active mode:
• The driver's seat belt must be buckled and the driver's door must be closed.
• There must be a vehicle ahead (a target vehi-cle) or your vehicle's current speed must beat least 10 mph (15 km/h).
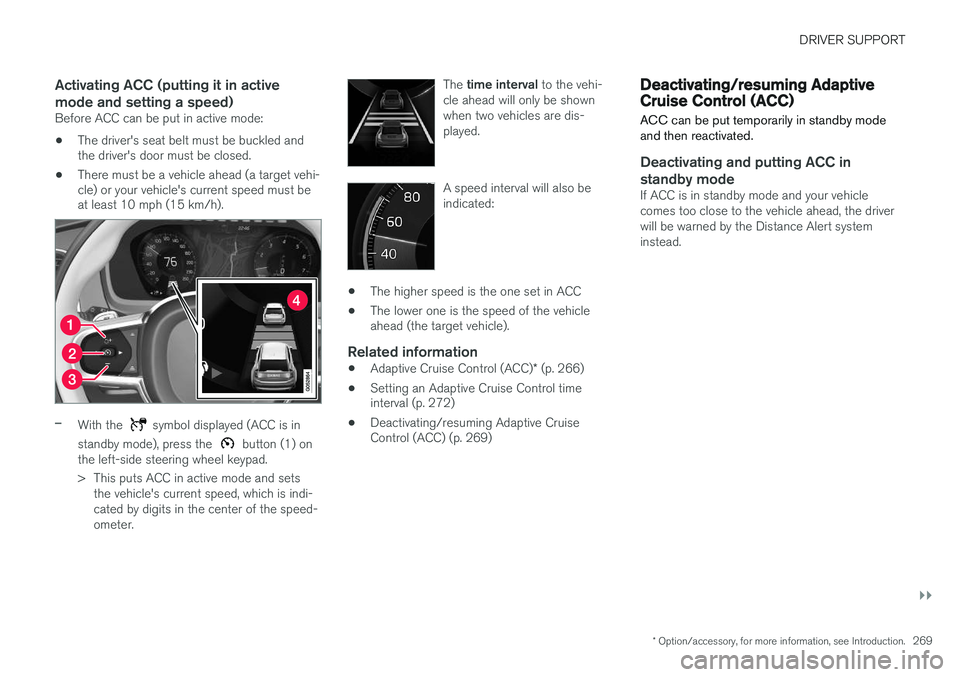
–With the symbol displayed (ACC is in
standby mode), press the
button (1) on
the left-side steering wheel keypad.
> This puts ACC in active mode and sets the vehicle's current speed, which is indi- cated by digits in the center of the speed-ometer. The
time interval to the vehi-
cle ahead will only be shownwhen two vehicles are dis-played.
A speed interval will also be indicated:
• The higher speed is the one set in ACC
• The lower one is the speed of the vehicle ahead (the target vehicle).
Related information
•
Adaptive Cruise Control (ACC)
* (p. 266)
• Setting an Adaptive Cruise Control timeinterval (p. 272)
• Deactivating/resuming Adaptive CruiseControl (ACC) (p. 269)
Deactivating/resuming Adaptive Cruise Control (ACC)
ACC can be put temporarily in standby mode and then reactivated.
Deactivating and putting ACC in standby mode
If ACC is in standby mode and your vehicle comes too close to the vehicle ahead, the driverwill be warned by the Distance Alert systeminstead.
Page 278 of 546

||
DRIVER SUPPORT
* Option/accessory, for more information, see Introduction.
276
WARNING
Pilot Assist only provides warnings for vehi- cles that its radar sensor and camera havedetected. For this reason, a warning may begiven later than expected or not at all. Thedriver should never wait for a warning beforeapplying the brakes.
Related information
• Pilot Assist limitations (p. 280)
• Pilot Assist auto-hold brake function (p. 279)
• Distance Alert
* (p. 329)
• Other Adaptive Cruise Control (ACC) func-tions (p. 282)
• Setting an Adaptive Cruise Control timeinterval (p. 272)
Starting and activating Pilot Assist
Function buttons and symbols
Prerequisites
The prerequisites for activating Pilot Assist are:
• The vehicle ahead must be within a reasona- ble (detectable) distance
• The camera must be able to clearly detectthe traffic lane's side marker lines
• The vehicle's speed must be under approx.30 mph (50 km/h).
A WHITE symbol indicates that Pilot Assist has been selected. In other cases, the WHITE arrow pointing to the right indi-cates that the system is availa-ble.
A YELLOW symbol with a flashing WHITE arrow indicates that the system is about to shift intostandby mode. With ACC in standby mode:1.Tap ▶ (4).
> The symbol will be displayed and Pilot Assist will go into standby mode.
2. Press the
button (1) on the left-side
steering wheel keypad.
> Pilot Assist will go into active mode.
WARNING
• Pilot Assist is not a collision avoidance system. The driver is always responsiblefor applying the brakes if the system doesnot detect another vehicle.
• Do not use Pilot Assist in demandingdriving conditions such as city driving orother heavy traffic situations, in slipperyconditions, when there is a great deal ofwater or slush on the road, during heavyrain or snow, in poor visibility, on windingroads or on highway on- or off-ramps.
• Pilot Assist uses the vehicle's cameraand radar sensor, which have limitations.
Pilot Assist may deactivate or not function optimally if:
Page 279 of 546

DRIVER SUPPORT
}}
* Option/accessory, for more information, see Introduction.277
•the lane's side market lines are missing, badly faded or cross each other.
• the division of lanes is not clear, e.g.,when a line divides or merges withanother, at exits or if there are many roadsigns/markers.
• if there are edges or other lines on ornear the lane, e.g., curbs, cracks, repairedareas, sharp shadows, etc.
• the lane is narrow or winding.
• the weather conditions (rain, snow, fog,slush, poor visibility, backlighting, etc).
The driver should also be aware that Pilot Assist has the following limitations: • High curbs, barriers and temporary obsta- cles (cones, barriers etc) may not bedetected or could be detected incorrectlyas side marker lines, which may create arisk of collision. The driver must ensure asafe distance to these obstacles.
• The camera or radar sensor may not beable to detect objects if there are pot-holes or if there are stationary objectspartially or completely blocking the road.
• Pilot Assist does not "see" pedestrians,animals, etc.
• Pilot Assist's steering capacity is limitedand may not always be able to help thedriver keep the vehicle in the lane.Hands on the steering wheel
Pilot Assist only functions when the driver's hands are on the steering wheel
, which is con-
tinuously monitored by the system. If this is notthe case, the driver will be alerted by a text mes-sage in the instrument panel. If the driver's handsare not returned to the steering wheel, an audiblesignal will sound. If the driver does not return his/her hands to the steering wheel after the audible signal, PilotAssist will go into standby mode and must be reactivated by pressing
.
Related information
• Pilot Assist
* (p. 273)
Deactivating/resuming Pilot Assist
Putting Pilot Assist in standby mode
Function buttons and symbols
1.
Press the button (1).
> Pilot Assist will go into standby mode.
2. Press the ◀ button (2).
> Pilot Assist will be turned off and shift to ACC in standby mode.
or
–Press the ◀ button (2).
> Pilot Assist will be turned off and switch to ACC in active mode.
Page 280 of 546

||
DRIVER SUPPORT
* Option/accessory, for more information, see Introduction.
278
Standby mode due to driver action
If a turn signal is used or if the accelerator pedal is pressed, Pilot Assist will temporarily go intostandby mode. When the turn signal is switchedoff or the accelerator pedal is released, PilotAssist will reactivate automatically. Automatic reactivation from standby mode can be done within 1 minute. After 1 minute haselapsed, Pilot Assist must be reactivated man- ually by pressing the
button.
Pilot Assist will temporarily go into standby mode if: • the brakes are applied
• the gear selector is moved to the
N position.
The driver will then have to regulate speed and distance to the vehicle ahead, or reactivate Pilot Assist manually by pressing the
button on
the left-side steering wheel keypad.
Automatic standby mode
Pilot Assist interacts with other systems, such as Electronic Stability Control. If any of these othersystems are not functioning properly, Pilot Assistwill automatically be deactivated.
WARNING
If this happens, the driver will be alerted by an audible signal and a message in the instru-ment panel. The driver will have to adapt thevehicle's speed, apply the brakes when nec-essary and keep a safe distance to the vehicleahead.
Pilot Assist switches automatically to standby mode if: • the camera cannot detect the traffic lane's side marker lines
• the vehicle ahead is not within a reasonable(detectable) distance
• the driver's hands are not on the steeringwheel
• the driver unbuckles the seat belt
• engine speed (rpm) is too high/low
• the wheels lose traction
• brake temperature is too high
• The camera lens/radar sensor is covered bye.g., wet snow or if heavy rain interferes withradar waves
Reactivating Pilot Assist from standby mode
–Press the button (1).
> The most recently set speed will be used.
Related information
• Pilot Assist
* (p. 273)
Setting a Pilot Assist time interval
Different time intervals to the vehicle ahead can be selected and are shown in the instrumentpanel as 1–5 horizontal bars.
Changing the time intervalThe greater the number of bars, the longer the time interval.One bar between the vehiclesrepresents a time interval ofapproximately 1 second; 5 barsis approximately 3 seconds.
The same symbol appears if Distance Alert isactivated.