Page 121 of 546

INSTRUMENTS AND CONTROLS
}}
* Option/accessory, for more information, see Introduction.119
Via settings
1.
Tap Settings in Top view.
2. Tap
My CarDisplays.
3. Select/deselect
Head-Up Display.
Selecting display alternatives1.Tap Settings in Top view.
2. Tap
My CarDisplaysHead-Up
Display Options.
Tap Go to the center display's Settings view and select
Driver Display & Head-up
Display.
3. Select :
Show Navigation In Head-Up
Display, Road Sign Information In Head-
Up Display, Show Driver Support In
Head-Up Display or Show Phone In
Head-Up Display.
Adjusting HUD brightness and height position
1. Tap Head-up display adjustments in the
center display's Function view. 2. Use the right-side steering wheel keypad to
adjust the HUD's brightness and height posi- tion on the windshield in the driver's field ofvision.
Reduce brightness
Increase brightness
Higher position
Lower position
Confirm
Adapting brightness
The brightness of the graphics displayed in the HUD are also automatically adjusted according toambient lighting conditions. HUD brightness isalso affected by adjustments to the brightness ofthe other displays in the vehicle.
Power front seat * memory function
The position of the HUD can be stored in the power seat's memory function.
Replacing the windshieldVehicles with a head-up display have a specialtype of windshield meeting the requirements fordisplaying projected information. If the windshield has to be replaced, contact a trained and qualified Volvo service technician orauthorized workshop. The correct type of replace-ment windshield must be used for a head-up dis-play.
Calibrating the horizontal positionIf the windshield has been replaced, it may benecessary to calibrate the HUD's horizontal posi-tion. This means that the projected image willhave to be rotated clockwise or counterclockwise.To do so:
1. Pull down the center display's Top view and
tap
Settings.
2. Select
My CarDisplaysHead-Up
Display Calibration.
3. Use the buttons on the right-side steering wheel keypad to calibrate the horizontal posi- tion.
Page 163 of 546

INSTRUMENTS AND CONTROLS
}}
* Option/accessory, for more information, see Introduction.161
Adjusting the steering wheel
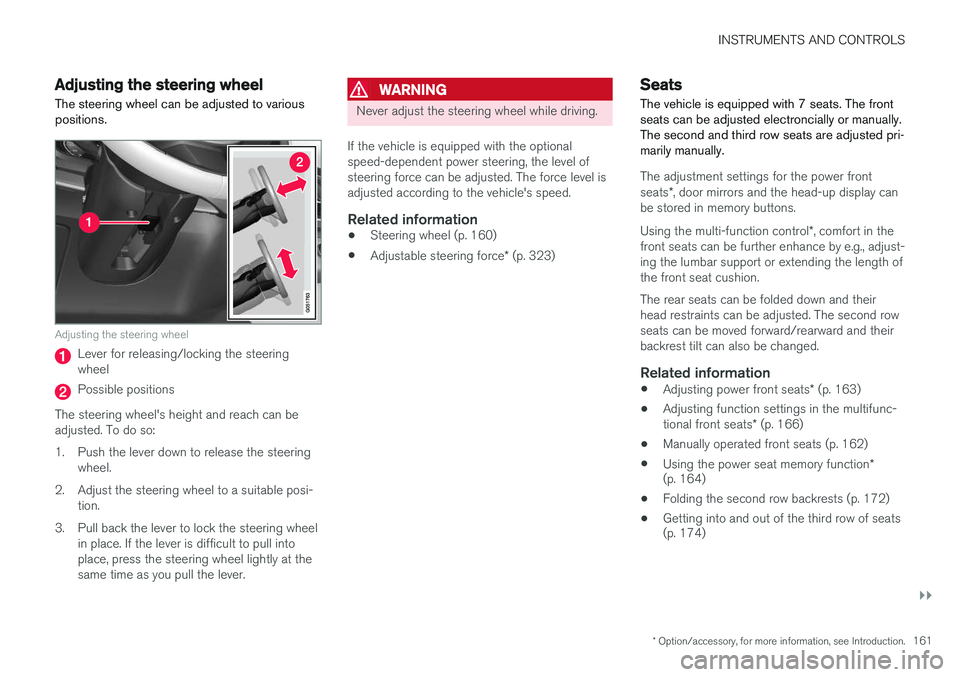
The steering wheel can be adjusted to various positions.
Adjusting the steering wheel
Lever for releasing/locking the steering wheel
Possible positions
The steering wheel's height and reach can be adjusted. To do so:
1. Push the lever down to release the steering wheel.
2. Adjust the steering wheel to a suitable posi- tion.
3. Pull back the lever to lock the steering wheel in place. If the lever is difficult to pull into place, press the steering wheel lightly at thesame time as you pull the lever.
WARNING
Never adjust the steering wheel while driving.
If the vehicle is equipped with the optional speed-dependent power steering, the level ofsteering force can be adjusted. The force level isadjusted according to the vehicle's speed.
Related information
• Steering wheel (p. 160)
• Adjustable steering force
* (p. 323)
Seats
The vehicle is equipped with 7 seats. The front seats can be adjusted electroncially or manually.The second and third row seats are adjusted pri-marily manually.
The adjustment settings for the power front seats *, door mirrors and the head-up display can
be stored in memory buttons. Using the multi-function control *, comfort in the
front seats can be further enhance by e.g., adjust- ing the lumbar support or extending the length ofthe front seat cushion. The rear seats can be folded down and their head restraints can be adjusted. The second rowseats can be moved forward/rearward and theirbackrest tilt can also be changed.
Related information
• Adjusting power front seats
* (p. 163)
• Adjusting function settings in the multifunc- tional front seats
* (p. 166)
• Manually operated front seats (p. 162)
• Using the power seat memory function
*
(p. 164)
• Folding the second row backrests (p. 172)
• Getting into and out of the third row of seats (p. 174)
Page 403 of 546

STARTING AND DRIVING
401
Suspension leveling settings
Easy entry
The vehicle can be lowered to entering and exit- ing easier. Select
SettingsVehicleEasy Entry/Exit
Control via the center display's Top view to lower
the vehicle when getting in or out. When the vehicle is parked and the engine is turned off, the level is lowered (if a side door isopened, the level adjustment will stop). When theengine is started and the vehicle begins to move,the level will be raised to the height set by theselected drive mode.
Turning off suspension and leveling control
In certain situations, this function has to be turned off, for example when lifting the vehicle ona jack or garage hoist. 1. Tap
Settings in the center display's Top
view.
2. Tap
My CarSuspension .
3. Select
Deactivate Suspension & Leveling
Control.
Changing suspension control
Three different levels of suspension control can be selected from the center display: 1. Tap
Settings in the center display's Top
view. 2.
Tap
My CarDrive Mode.
3. Under
Suspension Control, select Eco,Comfort or Dynamic.
Loading mode
Use the buttons in the cargo compartment to raise or lower the vehicle to make loading orunloading easier or when attaching a trailer.
Parking the vehicleWhen parking, be sure that there is adequatespace above and below the vehicle since itsground clearance may vary, e.g., depending onthe ambient temperature, how the vehicle is loa-ded, if loading mode is being used or the drivemode selected after the engine is started. The level may also be adjusted for a certain time after the vehicle has been parked to compensatefor possible height adjustments due to tempera-ture changes in the pneumatic suspension whenthe vehicle has cooled.
TransportWhen transporting the vehicle on a ferry, train ora tow truck, it may only be secured (lashed)around the tires, not using any other chassiscomponents. Changes in the pneumatic suspen-sion may occur during transport that could nega-tively affect the lashing and result in damage.
Related information
• Drive modes (p. 390)
• Driving with a trailer (p. 367)
• Loading (p. 215)
8
Standard equipment on certain models.