2016 VOLVO XC90 T8 ECO mode
[x] Cancel search: ECO modePage 219 of 546
LOADING AND STORAGE
}}
* Option/accessory, for more information, see Introduction.217
Grocery bag holder
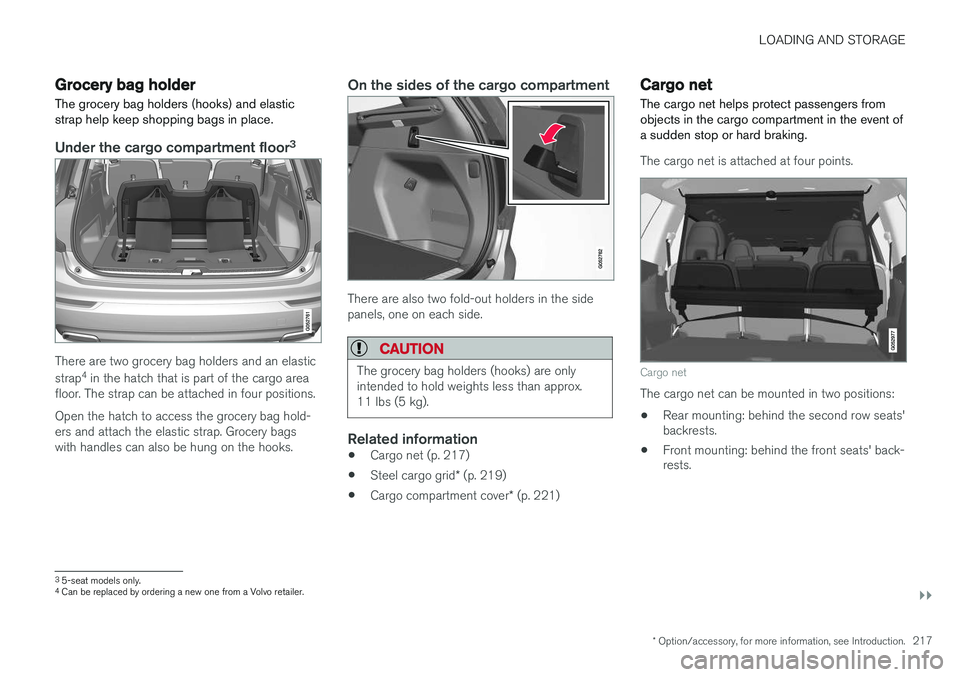
The grocery bag holders (hooks) and elastic strap help keep shopping bags in place.
Under the cargo compartment floor 3
There are two grocery bag holders and an elastic strap
4
in the hatch that is part of the cargo area
floor. The strap can be attached in four positions. Open the hatch to access the grocery bag hold- ers and attach the elastic strap. Grocery bagswith handles can also be hung on the hooks.
On the sides of the cargo compartment
There are also two fold-out holders in the side panels, one on each side.
CAUTION
The grocery bag holders (hooks) are only intended to hold weights less than approx.11 lbs (5 kg).
Related information
• Cargo net (p. 217)
• Steel cargo grid
* (p. 219)
• Cargo compartment cover
* (p. 221)
Cargo net
The cargo net helps protect passengers from objects in the cargo compartment in the event ofa sudden stop or hard braking.
The cargo net is attached at four points.
Cargo net
The cargo net can be mounted in two positions: • Rear mounting: behind the second row seats' backrests.
• Front mounting: behind the front seats' back-rests.
3
5-seat models only.4
Can be replaced by ordering a new one from a Volvo retailer.
Page 221 of 546
LOADING AND STORAGE
}}
* Option/accessory, for more information, see Introduction.219
CAUTION
Pressure from the front seats against the cargo net could damage the net and/or itsbrackets.
5. Pull the lower straps taut.
Removing and storing
1. Reduce tension on the net by pressing the
button on the lower straps' respective locks and allow some slack on both sides.
2. Press in the catches and release both of the straps' hooks.
3. Remove the upper hooks from the ceiling mounting points.
4. Press the red button on the upper rod to allow it to fold.
5. Fold and roll up the net. Store the net under the cargo compartment floor.
Related information
• Cargo compartment cover
* (p. 221)
• Load anchoring eyelets (p. 220)
• Steel cargo grid
* (p. 219)
• Loading (p. 215)
Steel cargo grid
*
Your vehicle can be equipped with a steel grid that helps prevent objects in the cargo area frommoving forward into the passenger compart-ment.
The steel grid is made up of the grid itself and two separate mounting brackets. Each of thebrackets has a screw cover and there are twoplastic sleeves for the grid.
WARNING
• No one should ever be allowed to remain in the cargo compartment when the vehi-cle is moving.
• The steel grid may only be used in therear position described in this article. Theceiling attachment points above the front seats are
not intended to anchor the
steel grid.
• The third row of seats (7-seat models
*
only): these seats must be folded down when the steel grid is mounted in thevehicle.
• After being mounted, be sure that thesteel grid is securely anchored in place.
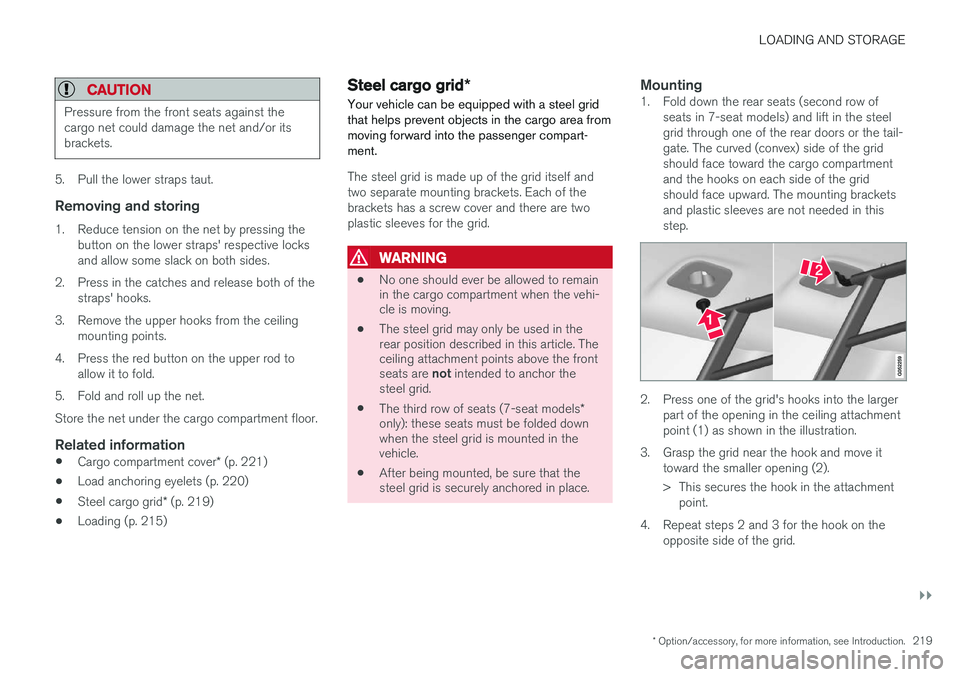
Mounting1. Fold down the rear seats (second row of
seats in 7-seat models) and lift in the steel grid through one of the rear doors or the tail-gate. The curved (convex) side of the gridshould face toward the cargo compartmentand the hooks on each side of the gridshould face upward. The mounting bracketsand plastic sleeves are not needed in thisstep.
2. Press one of the grid's hooks into the largerpart of the opening in the ceiling attachment point (1) as shown in the illustration.
3. Grasp the grid near the hook and move it toward the smaller opening (2).
> This secures the hook in the attachmentpoint.
4. Repeat steps 2 and 3 for the hook on the opposite side of the grid.
Page 229 of 546

LOCKS AND ALARM
* Option/accessory, for more information, see Introduction.227
Arming the alarm
–Lock the vehicle by pressing the remote key's lock button, pressing the outer indenta- tion for locking on one of the door handles1
or by pressing the tailgate's rubberized pres-sure plate 1
.
If the vehicle is equipped with a power tail- gate *, the button on the lower edge of the
tailgate can also be used to lock the vehicle and arm the alarm.
Disarming the alarm
–Unlock the vehicle by pressing the remote key's unlock button, pressing the pressure-sensitive area on the inside of one of the door handles 1
or by pressing the tailgate's
rubberized pressure plate 1
.
Turning off a triggered (sounding) alarm
–Press the remote key's unlock button or put the ignition in mode I by turning the start
knob to START and releasing it.
Alarm signalsThe following occurs if the alarm has been trig- gered:
• A siren will sound for 30 seconds or until the alarm is turned off
• All turn signals flash for 5 minutes or untilthe alarm is turned off If the door that triggered the alarm is left open,
the alarm cycle will be repeated 10 times.
Alarm indicatorA red indicator light on the upper side of the dashboard shows the alarm's status:
• Indicator off: the alarm is disarmed
• Indicator flashes once every two seconds: the alarm is armed
• Indicator flashes quickly after the alarm hasbeen disarmed until the ignition has been put in mode
I (turn the start knob to START and
release it): the alarm has been triggered
Related information
• Automatically arming/disarming the alarm (p. 228)
• Deactivating the alarm without a functioningremote key (p. 228)
1
Models withe the optional Passive Entry only.
Page 239 of 546
LOCKS AND ALARM
}}
237
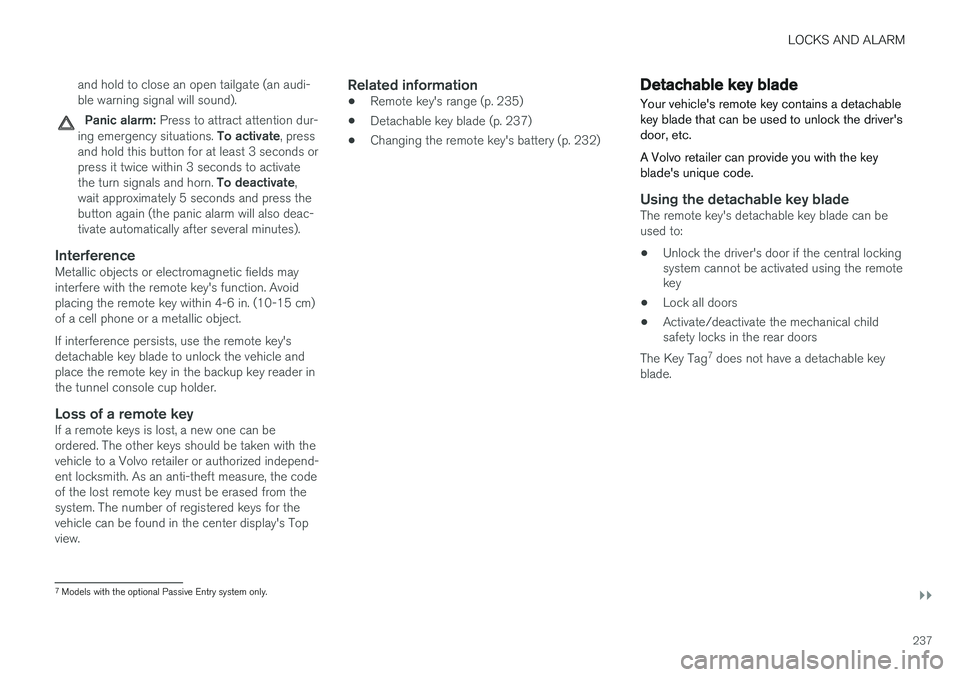
and hold to close an open tailgate (an audi- ble warning signal will sound).
Panic alarm: Press to attract attention dur-
ing emergency situations. To activate, press
and hold this button for at least 3 seconds or press it twice within 3 seconds to activate the turn signals and horn. To deactivate,
wait approximately 5 seconds and press the button again (the panic alarm will also deac-tivate automatically after several minutes).
InterferenceMetallic objects or electromagnetic fields mayinterfere with the remote key's function. Avoidplacing the remote key within 4-6 in. (10-15 cm)of a cell phone or a metallic object. If interference persists, use the remote key's detachable key blade to unlock the vehicle andplace the remote key in the backup key reader inthe tunnel console cup holder.
Loss of a remote keyIf a remote keys is lost, a new one can beordered. The other keys should be taken with thevehicle to a Volvo retailer or authorized independ-ent locksmith. As an anti-theft measure, the codeof the lost remote key must be erased from thesystem. The number of registered keys for thevehicle can be found in the center display's Topview.
Related information
• Remote key's range (p. 235)
• Detachable key blade (p. 237)
• Changing the remote key's battery (p. 232)
Detachable key blade Your vehicle's remote key contains a detachable key blade that can be used to unlock the driver'sdoor, etc. A Volvo retailer can provide you with the key blade's unique code.
Using the detachable key bladeThe remote key's detachable key blade can be used to:
• Unlock the driver's door if the central locking system cannot be activated using the remotekey
• Lock all doors
• Activate/deactivate the mechanical childsafety locks in the rear doors
The Key Tag 7
does not have a detachable key
blade.
7 Models with the optional Passive Entry system only.
Page 249 of 546

LOCKS AND ALARM
}}
* Option/accessory, for more information, see Introduction.247
–Press the button14
on the lower edge of
the tailgate.
> The tailgate will close automatically but will not be locked .
–Press the button14
on the lower edge of
the tailgate.
> The tailgate will close automatically. The tailgate and doors will also be locked and
the alarm will be armed.
If the remote key is not close enough to the tail- gate, automatic locking/unlocking/opening/clos-ing will not be possible. Three short audible sig-nals will sound.
Interrupting opening/closing
–This can be done in five ways: • Press the button on the lighting panel
• Press the button on the remote key
• Press either of the buttons on the lower edge of the tailgate
• Press lightly on the rubber-covered buttonunder the tailgate's outside handle
• Move your foot under a sensor beneath the rear bumper
*
> The tailgate will stop moving
Programming the tailgate's maximum opening angle
The tailgate's maximum opening angle can be programmed, for example, if the tailgate has to beopened in a garage with a low ceiling. Programming the opening angle:
–Open the tailgate manually to the desired angle and press and hold the closing buttonon the tailgate's lower edge for at least 3seconds. Release the tailgate.
> Two audible signals will sound to indicate that the selected opening angle has been stored.
Erasing tailgate programming
–Open the tailgate manually to its highest position and press and hold the closing but-ton on the tailgate's lower edge for at least 3seconds. Release the tailgate.
> Two audible signals will sound to indicate that the programmed opening angle has been erased.
NOTE
If the tailgate has been opened and closed continuously too long, the automatic functionwill be deactivated to avoid overloading theelectrical system. The automatic function canbe used again after approximately 2 minutes. If the vehicle's battery has been discharged or disconnected, or if the tailgate has been openfor more than 24 hours, the tailgate must beopened and closed once manually to resetthe system.
Pinch protectionIf the tailgate is obstructed when being opened/ closed, a pinch protection mechanism is acti-vated.
• While opening: the tailgate will stop moving and an audible signal will sound.
• While closing: the tailgate will stop andreturn to the maximum programmable open-ing position. An audible signal will sound.
WARNING
Be sure that no one is near the tailgate when it is opened or closed automatically. The tail-gate should never be obstructed in any waywhen it is operated.
14
Models equipped with the optional Passive Entry system have a button to close the tailgate and a button to close and lock the tailgate.
Page 264 of 546
||
DRIVER SUPPORT
* Option/accessory, for more information, see Introduction.
262
NOTE
Before CC can be activated, the vehicle's speed must be at least 20 mph (30 km/h).This is also the lowest speed that can be set.
Activating CC (putting it in active mode and setting a speed)
–With the symbol displayed (CC is in
standby mode), press the
button (2) on
the left-side steering wheel keypad.
> This puts CC in active mode and will maintain the vehicle's current speed.
Related information
• Cruise Control (CC) (p. 261)
• Switching between Cruise Control (CC) and Adaptive Cruise Control (ACC)
* (p. 265)
• Deactivating/resuming Cruise Control (CC) (p. 263)
• Turning Cruise Control off (p. 264)
Changing Cruise Control speed
Changing a set speed
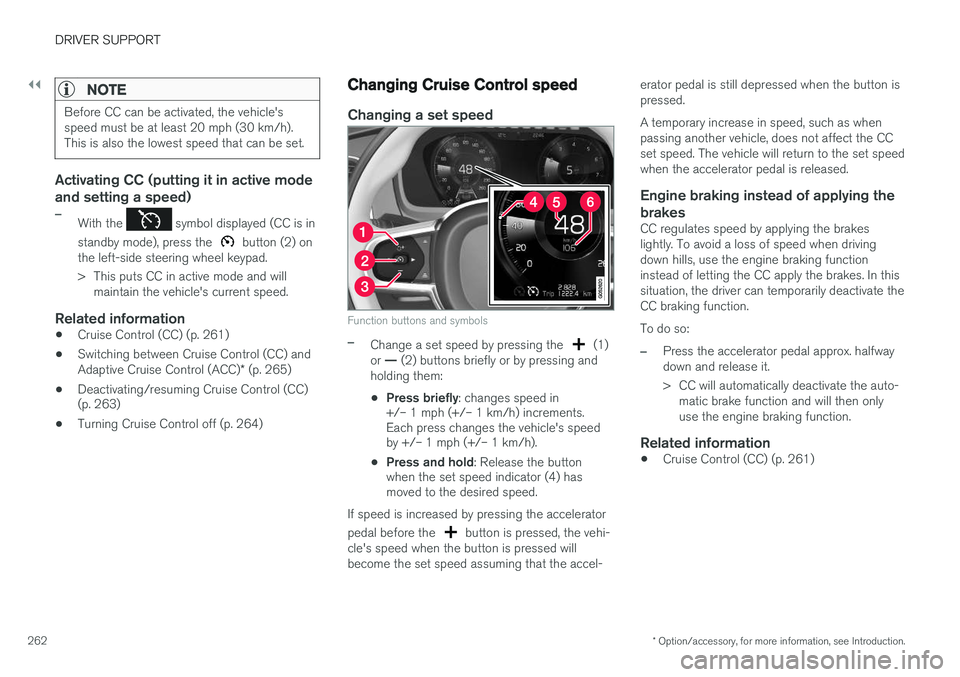
Function buttons and symbols
–Change a set speed by pressing the (1)
or — (2) buttons briefly or by pressing and
holding them:
• Press briefly
: changes speed in
+/– 1 mph (+/– 1 km/h) increments. Each press changes the vehicle's speedby +/– 1 mph (+/– 1 km/h).
• Press and hold
: Release the button
when the set speed indicator (4) hasmoved to the desired speed.
If speed is increased by pressing the accelerator pedal before the
button is pressed, the vehi-
cle's speed when the button is pressed will become the set speed assuming that the accel- erator pedal is still depressed when the button ispressed. A temporary increase in speed, such as when passing another vehicle, does not affect the CCset speed. The vehicle will return to the set speedwhen the accelerator pedal is released.
Engine braking instead of applying the
brakes
CC regulates speed by applying the brakeslightly. To avoid a loss of speed when drivingdown hills, use the engine braking functioninstead of letting the CC apply the brakes. In thissituation, the driver can temporarily deactivate theCC braking function. To do so:
–Press the accelerator pedal approx. halfway down and release it.
> CC will automatically deactivate the auto- matic brake function and will then only use the engine braking function.
Related information
• Cruise Control (CC) (p. 261)
Page 270 of 546

||
DRIVER SUPPORT
* Option/accessory, for more information, see Introduction.
268
Head-up-display *
A flashing light alerts the driver
A flashing icon will appear in the head-up dis- play* to alert the driver of a collision risk.
WARNING
Adaptive Cruise Control only warns of vehicles detected by the radar sensor. In some casesthere may be no warning or the warning maybe delayed. The driver should always apply thebrakes when necessary.
Related information
• Adaptive Cruise Control (ACC) - fault tracing (p. 285)
• Starting and activating Adaptive CruiseControl (ACC) (p. 268)
• Adaptive cruise control passing assistance(p. 284) •
Setting an Adaptive Cruise Control timeinterval (p. 272)
• Deactivating/resuming Adaptive CruiseControl (ACC) (p. 269)
• Adaptive Cruise Control (ACC) symbols andmessages (p. 286)
• Switching between Cruise Control (CC) and Adaptive Cruise Control (ACC)
* (p. 265)
Starting and activating Adaptive Cruise Control (ACC)
ACC must first be put in active mode before it can be started in order to regulate speed or aset time interval to the vehicle ahead.
Starting ACC (putting it in standby
mode)
Function buttons and symbols
–Press ◀ (2) or ▶ (3) to scroll to the ACC
(
) function. The symbol (4) will be dis-
played in the instrument panel.
> The symbol indicates that ACC has been
started and is in standby mode . In
standby mode, the vehicle will not main-
tain a set speed or a time interval to the vehicle ahead.
Page 271 of 546
DRIVER SUPPORT
}}
* Option/accessory, for more information, see Introduction.269
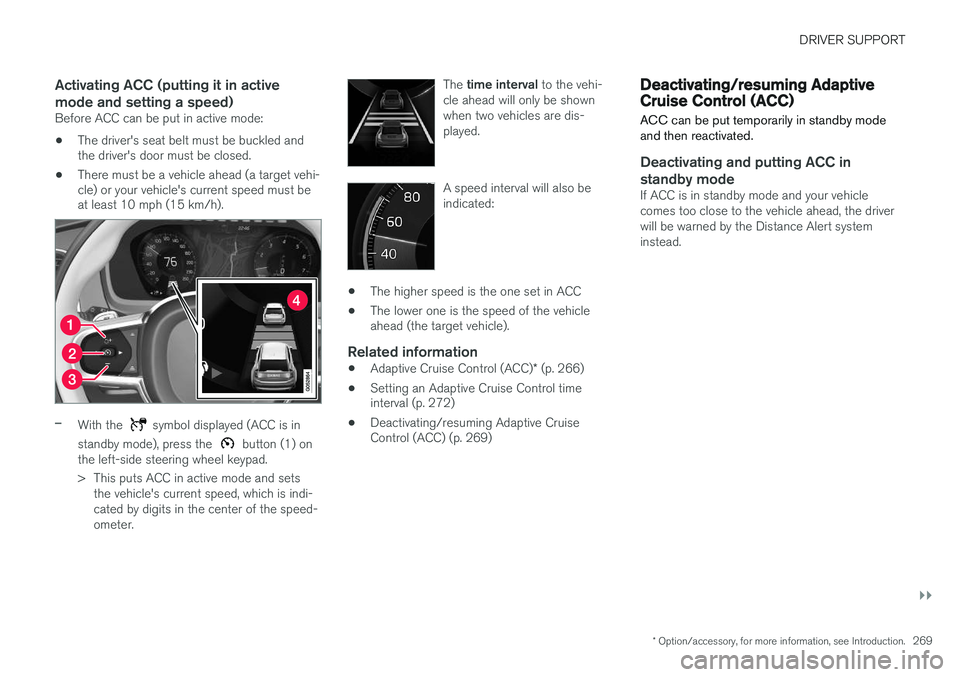
Activating ACC (putting it in active mode and setting a speed)
Before ACC can be put in active mode:
• The driver's seat belt must be buckled and the driver's door must be closed.
• There must be a vehicle ahead (a target vehi-cle) or your vehicle's current speed must beat least 10 mph (15 km/h).
–With the symbol displayed (ACC is in
standby mode), press the
button (1) on
the left-side steering wheel keypad.
> This puts ACC in active mode and sets the vehicle's current speed, which is indi- cated by digits in the center of the speed-ometer. The
time interval to the vehi-
cle ahead will only be shownwhen two vehicles are dis-played.
A speed interval will also be indicated:
• The higher speed is the one set in ACC
• The lower one is the speed of the vehicle ahead (the target vehicle).
Related information
•
Adaptive Cruise Control (ACC)
* (p. 266)
• Setting an Adaptive Cruise Control timeinterval (p. 272)
• Deactivating/resuming Adaptive CruiseControl (ACC) (p. 269)
Deactivating/resuming Adaptive Cruise Control (ACC)
ACC can be put temporarily in standby mode and then reactivated.
Deactivating and putting ACC in standby mode
If ACC is in standby mode and your vehicle comes too close to the vehicle ahead, the driverwill be warned by the Distance Alert systeminstead.