2016 VOLVO XC90 T8 rear seat
[x] Cancel search: rear seatPage 92 of 546

||
SAFETY
90The location of the front airbags is indicated by SRS AIRBAG
embossed on the steering wheel
pad and above the glove compartment, and by decals on both sun visors and on the front andfar right side of the dash. The driver's side front airbag is folded and
located in the steering wheel hub.The knee airbag is folded on the underside of
the dashboard on the driver's side. The text AIRBAG is embossed on the panel.
The passenger's side front airbag is folded
behind a panel located above the glove compart- ment.
WARNING
• The airbags in the vehicle are designed to be a SUPPLEMENT to–not a replace-ment for–the three-point seat belts. Formaximum protection, wear seat belts at alltimes. Be aware that no system can pre-vent all possible injuries that may occur inan accident.
• Never drive with your hands on the steer-ing wheel pad/airbag housing.
• The front airbags are designed to helpprevent serious injury. Deployment occursvery quickly and with considerable force.During normal deployment and depend-ing on variables such as seating position,one may experience abrasions, bruises,swellings, or other injuries as a resultfrom deployment of one or both of theairbags.
• When installing any accessory equipment,make sure that the front airbag system isnot damaged. Any interference in the sys-tem could cause malfunction.
Front airbag deployment
•The front airbags are designed to deploy dur-ing certain frontal or front-angular collisions,impacts, or decelerations, depending on thecrash severity, angle, speed and objectimpacted. The airbags may also deploy in certain non-frontal collisions where rapiddeceleration occurs.
• The airbag system sensors, which trigger thefront airbags, are designed to react to boththe impact of the collision and the inertialforces generated by it, and to determine ifthe intensity of the collision is sufficient forthe seat belt pretensioners and/or airbags tobe deployed.
However, not all frontal collisions activate the front airbags.
• If the collision involves a nonrigid object (e.g., a snow drift or bush), or a rigid, fixed objectat a low speed, the front airbags will not nec-essarily deploy.
• Front airbags do not normally deploy in aside impact collision, in a collision from therear or in a rollover situation.
• The amount of damage to the bodyworkdoes not reliably indicate if the airbagsshould have deployed or not.
Page 93 of 546

SAFETY
}}
91
NOTE
•Deployment of front airbags occurs only one time during an accident. In a collisionwhere deployment occurs, the airbagsand seat belt pretensioners activate.Some noise occurs and a small amountof powder is released. The release of thepowder may appear as smoke-like matter.This is a normal characteristic and doesnot indicate fire.
• Volvo's front airbags use special sensorsthat are integrated with the front seatbuckles. The point at which the airbagdeploys is determined by whether or notthe seat belt is being used, as well as theseverity of the collision.
• Collisions can occur where only one ofthe airbags deploys. If the impact is lesssevere, but severe enough to present aclear injury risk, the airbags are triggeredat partial capacity. If the impact is moresevere, the airbags are triggered at fullcapacity.
WARNING
• Do not use child safety seats or child booster cushions/backrests in the frontpassenger's seat. We also recommendthat occupants under 4 feet 7 inches(140 cm) in height who have outgrownthese devices sit in the rear seat with theseat belt fastened. See also the Occu-pant Weight Sensor information,.
• Never drive with the airbags deployed.The fact that they hang out can impair thesteering of your vehicle. Other safety sys-tems can also be damaged.
• The smoke and dust formed when theairbags are deployed can cause skin andeye irritation in the event of prolongedexposure.
Should you have questions about any component in the SRS system, please contact a trained andqualified Volvo service technician or Volvo cus-tomer support: In the USA Volvo Cars of North America, LLC Customer Care Center1 Volvo DriveP.O. Box 914Rockleigh, New Jersey 076471-800-458-1552 www.volvocars.com/us In Canada Volvo Cars of Canada Corp. National Customer Service9130 Leslie Street, Suite 101Richmond Hill, Ontario L4B 0B91-800-663-8255www.volvocars.com/ca
Airbag decals
Airbag decal on the outside of both sun visors
Page 94 of 546

||
SAFETY
92
Passenger's side airbag decal
WARNING
•Children must never be allowed in the front passenger's seat.
• Occupants in the front passenger's seatmust never sit on the edge of the seat, sitleaning toward the instrument panel orotherwise sit out of position.
• The occupant's back must be as uprightas comfort allows and be against the seatback with the seat belt properly fastened.
• Feet must be on the floor, e.g., not on thedash, seat or out of the window.
WARNING
•
No objects or accessory equipment, e.g. dashboard covers, may be placed on,attached to, or installed near the air baghatch (the area above the glove compart-ment) or the area affected by airbagdeployment.
• There should be no loose articles, suchas coffee cups on the floor, seat, or dash-board area.
• Never try to open the airbag cover on thesteering wheel or the passenger's sidedashboard. This should only be done by atrained and qualified Volvo service techni-cian.
• Failure to follow these instructions canresult in injury to the vehicle occupants.
Related information
• Seat belts (p. 64)
• Occupant weight sensor (p. 84)
Inflatable curtains
The inflatable curtain is designed to help protect the heads of the occupants of the front seatsand the occupant of the outboard rear seatingpositions in certain side impact collisions.
This system consists of inflatable curtains located along the sides of the roof liners, stretching fromthe center of both front side windows to the rearedge of the rear side door windows. In certain side impacts, both the Inflatable Cur-
tain (IC) and the side Impact Airbag System (SIPS airbag) will deploy. The IC and the SIPSairbag deploy simultaneously.
Page 95 of 546

SAFETY
}}
93
WARNING
•Never try to open or repair any compo- nents of the IC system. This should bedone only by a trained and qualified Volvoservice technician.
• Never hang heavy items from the ceilinghandles. This could impede deploymentof the Inflatable Curtain.
• The cargo area and rear seat should notbe loaded to a level higher than 4 in.(10 cm) below the upper edge of the rearside windows. Objects placed higher thanthis level could impede the function ofthe Inflatable Curtain.
• In order for the IC to provide its best pro-tection, both front seat occupants andboth outboard rear seat occupants shouldsit in an upright position with the seat beltproperly fastened; adults using the seatbelt and children using the proper childrestraint system.
Related information
• Airbag system (p. 89)
• Side impact airbags (p. 93)
• Child safety (p. 68)
• Seat belts (p. 64)
Side impact airbags
As an enhancement to the structural side impact protection built into your vehicle, it is also equip-ped with Side Impact Protection System (SIPS)airbags.
The SIPS airbag system is designed to help increase occupant protection in the event of cer-tain side impact collisions. The SIPS airbags aredesigned to deploy only during certain side-impact collisions, depending on the crashseverity, angle, speed and point of impact.
NOTE
SIPS airbag deployment (one airbag) occurs only on the side of the vehicle affected by theimpact. The airbags are not designed todeploy in all side impact situations.
Components in the SIPS airbag systemThis SIPS airbag system consists of a gas gener- ator, the side airbag modules built into the out-board sides of both front seat backrests, andelectronic sensors/wiring.
WARNING
• The SIPS airbag system is a supplement to the structural Side Impact ProtectionSystem and the three-point seat belt sys-tem. It is not designed to deploy duringcollisions from the front or rear of thevehicle or in rollover situations.
• The use of seat covers on the front seatsmay impede SIPS airbag deployment.
• No objects, accessory equipment or stick-ers may be placed on, attached to orinstalled near the SIPS airbag system orin the area affected by SIPS airbagdeployment.
• Never try to open or repair any compo-nents of the SIPS airbag system. Thisshould be done only by a trained andqualified Volvo service technician.
• In order for the SIPS airbag to provide itsbest protection, both front seat occupantsshould sit in an upright position with theseat belt properly fastened.
• Failure to follow these instructions canresult in injury to the occupants of thevehicle in the event of an accident.
Page 98 of 546
INSTRUMENTS AND CONTROLS
96
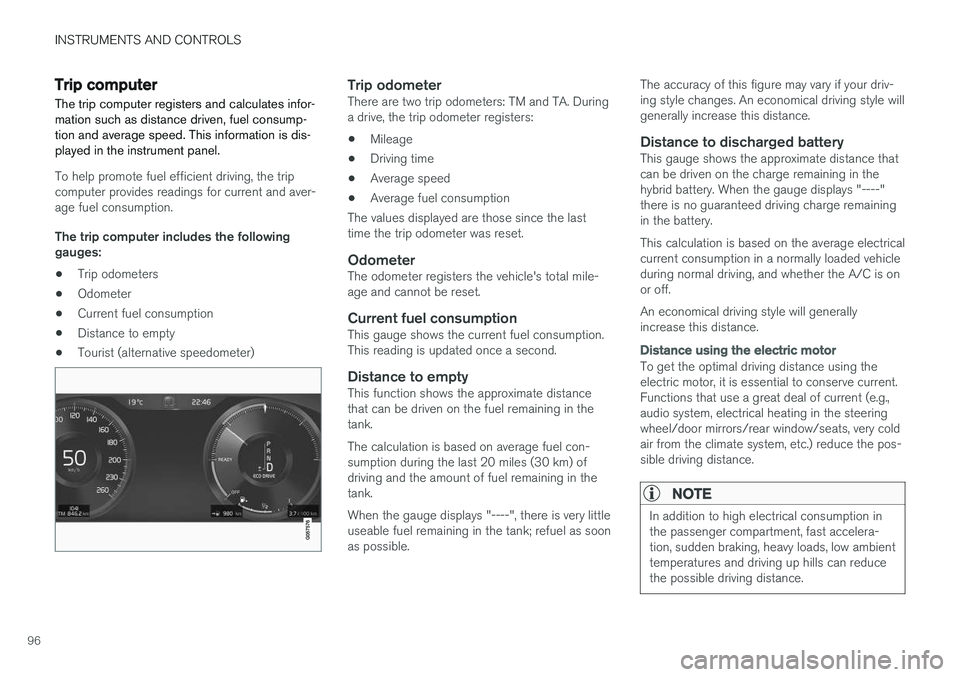
Trip computer The trip computer registers and calculates infor- mation such as distance driven, fuel consump-tion and average speed. This information is dis-played in the instrument panel.
To help promote fuel efficient driving, the trip computer provides readings for current and aver-age fuel consumption. The trip computer includes the following gauges:
• Trip odometers
• Odometer
• Current fuel consumption
• Distance to empty
• Tourist (alternative speedometer)
Trip odometerThere are two trip odometers: TM and TA. During a drive, the trip odometer registers:
• Mileage
• Driving time
• Average speed
• Average fuel consumption
The values displayed are those since the lasttime the trip odometer was reset.
OdometerThe odometer registers the vehicle's total mile-age and cannot be reset.
Current fuel consumptionThis gauge shows the current fuel consumption.This reading is updated once a second.
Distance to emptyThis function shows the approximate distancethat can be driven on the fuel remaining in thetank. The calculation is based on average fuel con- sumption during the last 20 miles (30 km) ofdriving and the amount of fuel remaining in thetank. When the gauge displays "----", there is very little useable fuel remaining in the tank; refuel as soonas possible. The accuracy of this figure may vary if your driv-ing style changes. An economical driving style willgenerally increase this distance.
Distance to discharged batteryThis gauge shows the approximate distance thatcan be driven on the charge remaining in thehybrid battery. When the gauge displays "----"there is no guaranteed driving charge remainingin the battery. This calculation is based on the average electrical current consumption in a normally loaded vehicleduring normal driving, and whether the A/C is onor off. An economical driving style will generally increase this distance.
Distance using the electric motor
To get the optimal driving distance using the electric motor, it is essential to conserve current.Functions that use a great deal of current (e.g.,audio system, electrical heating in the steeringwheel/door mirrors/rear window/seats, very coldair from the climate system, etc.) reduce the pos-sible driving distance.
NOTE
In addition to high electrical consumption in the passenger compartment, fast accelera-tion, sudden braking, heavy loads, low ambienttemperatures and driving up hills can reducethe possible driving distance.
Page 106 of 546
||
INSTRUMENTS AND CONTROLS
* Option/accessory, for more information, see Introduction.
104
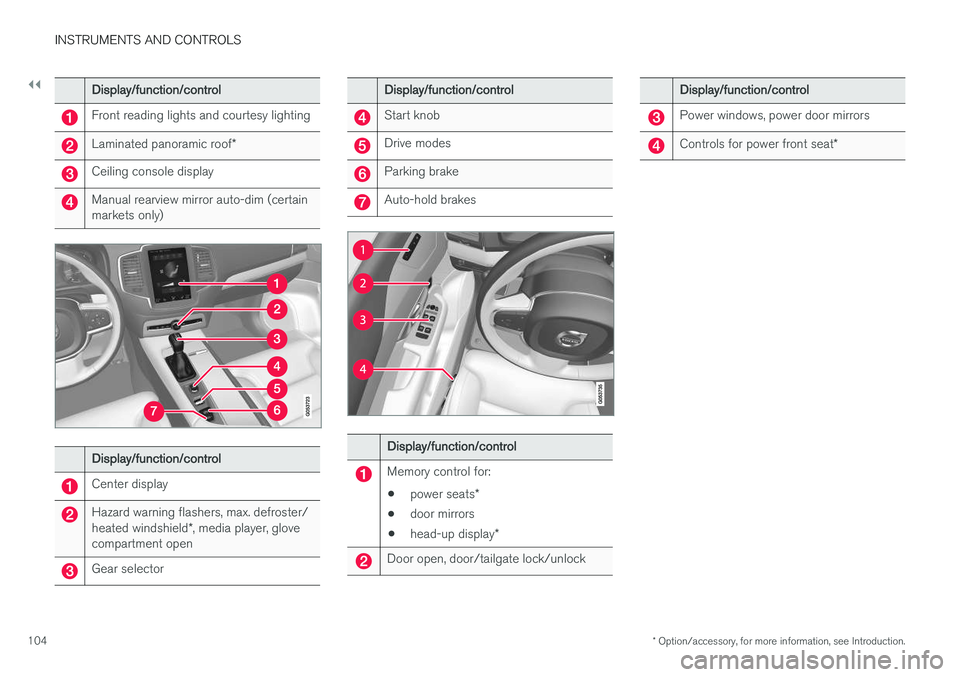
Display/function/control
Front reading lights and courtesy lighting
Laminated panoramic roof *
Ceiling console display
Manual rearview mirror auto-dim (certain markets only)
Display/function/control
Center display
Hazard warning flashers, max. defroster/ heated windshield*, media player, glove
compartment open
Gear selector
Display/function/control
Start knob
Drive modes
Parking brake
Auto-hold brakes
Display/function/control
Memory control for:
• power seats
*
• door mirrors
• head-up display
*
Door open, door/tailgate lock/unlock
Display/function/control
Power windows, power door mirrors
Controls for power front seat *
Page 108 of 546
||
INSTRUMENTS AND CONTROLS
* Option/accessory, for more information, see Introduction.
106 1.
Tap
Settings in Top view.
2. Tap
My CarMirrors.
3. Select
Fold Mirrors When Locking to acti-
vate/deactivate.
Resetting the mirrors' positionA mirror that has been moved manually (e.g., bumped into in a parking lot, etc.) has to bereturned to its normal position electrically beforeautomatic folding will function correctly. 1. Fold in the mirrors with the L and R buttons.
2. Fold out the mirrors with the L and R buttons.
The mirrors have now been reset to their original positions.
Auto-dim *Settings can be made for the auto-dim functionin the rearview and door mirrors. The auto-dim function is always active while the vehicle is being driven except when the reversegear has been selected. The level of sensitivityfor this function can be set to three levels, whichaffect the rearview mirror and door mirrors.
NOTE
When the level of sensitivity is changed, this change will not be noticeable immediately butwill take effect after a short period of time.
The level of sensitivity is set from the center dis- play: 1.
Tap
Settings in Top view.
2. Tap
My CarMirrors.
3. Under
Auto Dim Mirrors, select Normal,Dark or Light.
Related information
• Using the power seat memory function
*
(p. 164)
• Rearview mirror (p. 110)
Laminated panoramic roof
*
The laminated panoramic roof is divided into two sections and only the front section can beopened; it can be slid horizontally to the open orclosed positions or its rear edge can be raisedand lowered to allow ventilation.
The laminated panoramic roof also has a sun shade made of perforated fabric that is locatedbelow the sections of glass. This shade can beopened or closed, for example when driving inbright sunlight.
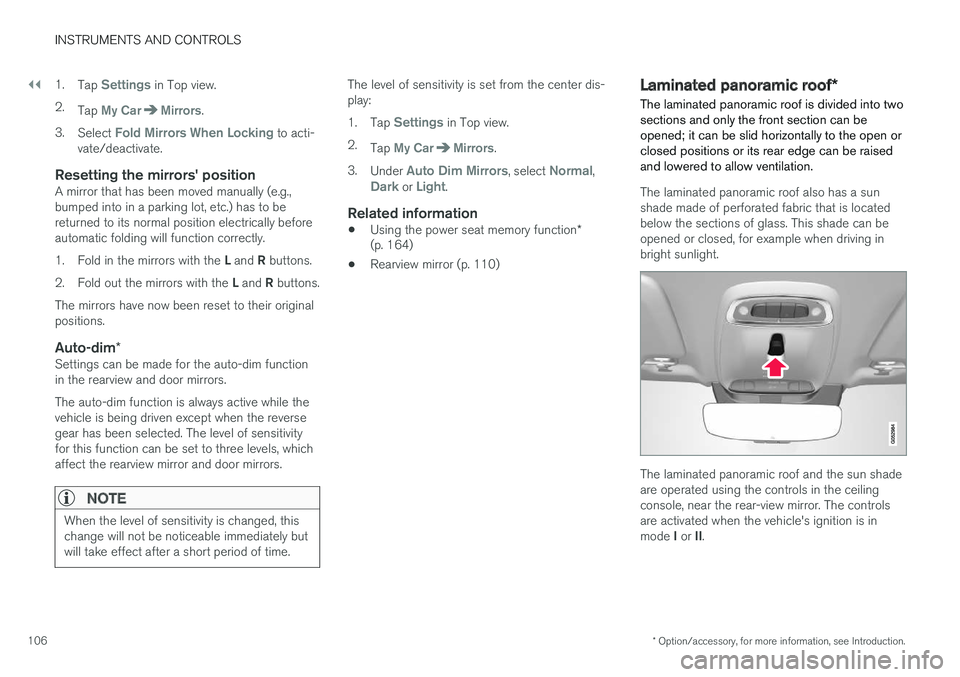
The laminated panoramic roof and the sun shade are operated using the controls in the ceilingconsole, near the rear-view mirror. The controlsare activated when the vehicle's ignition is in mode I or II.
Page 112 of 546

||
INSTRUMENTS AND CONTROLS
110For the power windows to function, the ignition must be in at least mode
I. When the vehicle has
been running, the power windows can be oper- ated for several minutes after the ignition hasbeen switched off, or until a door has beenopened.
NOTE
• Movement of the windows will stop if they are obstructed in any way. If this happenstwice in succession, the automatic func-tion will not work for several minutes andthe window can be closed by holding thebutton up.
• To reduce buffeting wind noise if the rearwindows are opened, also open the frontwindows slightly.
Manual up/down
–Move one of the controls up/down slightly.
> The power windows move up/down as
long as the control is held in position.
Auto up/down
–Move one of the controls up/down as far as possible and release it.
> The window will open or close completely.
ResettingIf the battery has been disconnected, the auto open function must be reset so that it will workproperly
1. Gently raise the front section of the button to close the window and hold it for one second.
2. Release the button briefly.
3. Raise the front section of the button again for one second.
Related information
• Child safety locks (p. 228)
Rearview mirror The interior rearview mirror has an auto-dim function that helps reduce glare from followingvehicle's headlights.
Auto-dim functionThe auto-dim function is controlled by two sen- sors: one pointing forward (located on the for-ward-facing side of the mirror, which monitors theamount of ambient light) and one pointing rear-ward (located on the side of the mirror facing thedriver at the upper edge, which senses thestrength of following vehicles' headlights), andwork together to help eliminate glare.
NOTE
Obstructing the forward sensor with e.g., parking stickers, transponders, etc., or the rearsensor by loading the cargo area or the rearseat in such a way that light is prevented fromreaching the sensor will reduce the auto-dimfunction in the interior rearview mirror andoptional auto-dim function in the door mirrors.
The auto-dim function is always active while the vehicle is being driven except when the reversegear has been selected. The level of sensitivityfor this function can be set to three levels, whichaffect the rearview mirror and door mirrors.