Page 455 of 546

WHEELS AND TIRES
}}
453
Changing tires
When changing wheels to another dimension, always follow Volvo's instructions.
When changing to tires of another
dimension
If you mount tires with a dimension other thanthe factory-installed tires, contact an authorizedVolvo retailer to update the vehicle's software.This may also be necessary when changing fromsummer to winter tires, or vice versa.
Related information
• Snow tires and chains (p. 451)
• Installing a wheel (p. 456)
• Removing a wheel (p. 454)
Tools in the cargo compartment
Tools for e.g., changing wheels, etc. are located under the cargo compartment floor. Jack
The jack is used to raise the vehicle, for examplewhen mounting winter wheels, etc.
WARNING
• The jack must correctly engage the jack attachment.
• Be sure the jack is on a firm, level, non-slippery surface.
• Never allow any part of your body to beextended under a vehicle supported by ajack.
• Use the jack intended for the vehiclewhen changing a tire. For any other job,use stands to support the vehicle.
• Apply the parking brake and put the gear selector in the Park (
P) position.
• Block the wheels standing on the ground, use rigid wooden blocks or large stones.
• The jack should be kept well-greased andclean, and should not be damaged.
• No objects should be placed between thebase of jack and the ground, or betweenthe jack and the attachment bar on thevehicle.
Page 457 of 546

WHEELS AND TIRES
}}
* Option/accessory, for more information, see Introduction.455
WARNING
•The jack must correctly engage the jack attachment.
• Be sure the jack is on a firm, level, non-slippery surface.
• Never allow any part of your body to beextended under a vehicle supported by ajack.
• Use the jack intended for the vehicle whenchanging a tire. For any other job, usestands to support the vehicle.
• Apply the parking brake and put the gear selector in the Park (
P) position.
• Block the wheels standing on the ground, use rigid wooden blocks or large stones.
• The jack should be kept well-greased andclean, and should not be damaged.
• No objects should be placed between thebase of jack and the ground, or betweenthe jack and the attachment bar on thevehicle.
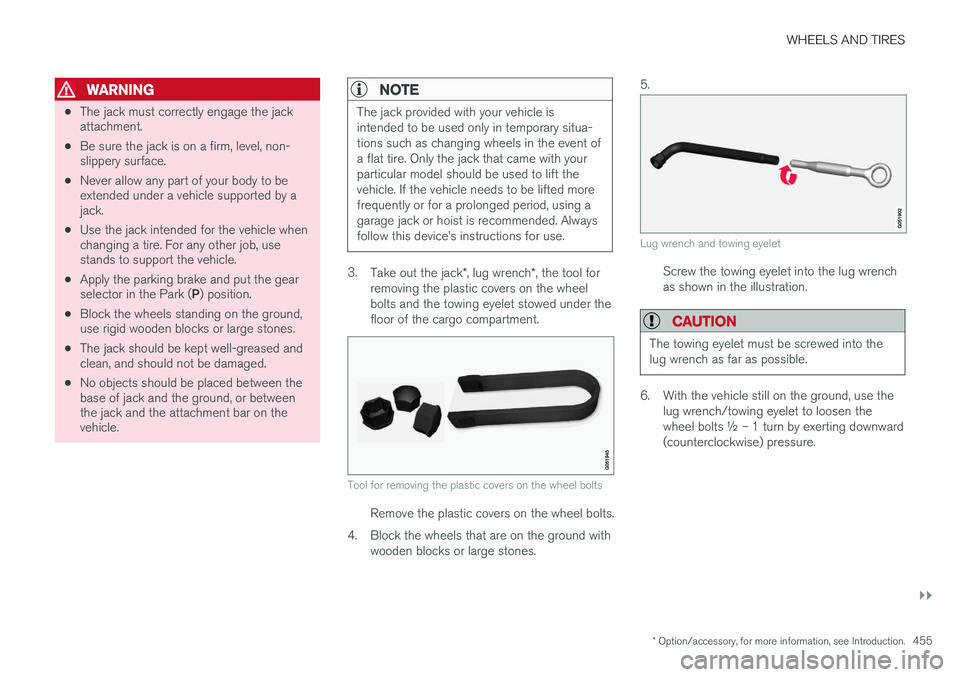
NOTE
The jack provided with your vehicle is intended to be used only in temporary situa-tions such as changing wheels in the event ofa flat tire. Only the jack that came with yourparticular model should be used to lift thevehicle. If the vehicle needs to be lifted morefrequently or for a prolonged period, using agarage jack or hoist is recommended. Alwaysfollow this device
Page 486 of 546
MAINTENANCE AND SERVICING
484
Fuses in the engine compartment
The fuses in the engine compartment help pro- tect electrical components such as engine andbrake functions.
Page 489 of 546
![VOLVO XC90 T8 2016 Owner´s Manual MAINTENANCE AND SERVICING
}}
* Option/accessory, for more information, see Introduction.487
Function[A]
––
Horn20
Alarm siren*5
Brake system control module (valves, parking brake)40
Windshield wip VOLVO XC90 T8 2016 Owner´s Manual MAINTENANCE AND SERVICING
}}
* Option/accessory, for more information, see Introduction.487
Function[A]
––
Horn20
Alarm siren*5
Brake system control module (valves, parking brake)40
Windshield wip](/manual-img/45/36400/w960_36400-488.png)
MAINTENANCE AND SERVICING
}}
* Option/accessory, for more information, see Introduction.487
Function[A]
––
Horn20
Alarm siren*5
Brake system control module (valves, parking brake)40
Windshield wipers30
Tailgate window washer25
Heated windshield *, passenger
side40
––
Brake system control module (ABS pump)40
––
Heated windshield *, passenger
sideShunt
Feed when ignition is switched on to: engine control module,transmission components, elec-trical power steering, centralelectrical module5
Exterior vehicle sound (certain markets)5
Function[A]
Passenger side headlight7,5
––
––
––
Air bags; Occupant Weight Sen- sor (OWS)5
Driver side headlight7,5
Accelerator pedal sensor5
Transmission control module; Gear selector control module15
Engine control module5
––
––
––
––
Engine control module; Turbo- charger valve20
Solenoids; Valves; Engine cool- ing system thermostat10
Function[A]
Vacuum regulators; Valve7,5
Spoiler shutter control module; Radiator shutter control module;Fuel leakage detection5
––
Heated oxygen sensors (front and rear)15
Oil pump solenoid; A/C mag- netic coupling; heated oxygensensor (center)15
––
Engine control module20
Ignition coil; Spark plugs15
––
––
Transmission oil pump control module30
Vacuum pump control module40
Transmission actuator25
––
Page 493 of 546

MAINTENANCE AND SERVICING
}}
* Option/accessory, for more information, see Introduction.491
Positions
•Fuses 1, 3–21, 23–36, 39–53 and 55–59 are called "Micro".
• Fuses 2, 22, 37–38 and 54 are called"MCase" and should only be replaced by atrained and qualified Volvo service technician.
FunctionA
––
– 120-volt socket between the rear seats A–
––
Alarm system movement sensor B5
Media player5
Instrument panel5
Center console buttons5
Sun sensor5
––
––
Steering wheel module5
Module for start knob and parking brake5
FunctionA
Heated steering wheel
* module15
––
––
––
––
Climate system control module10
––
On-board diagnostics (OBDII)10
Center display5
Climate system blower module (front)40
––
Instrument lighting; Courtesy light- ing; Rearview mirror auto-dim func-tion; Rain and light sensor; Rear tunnel console keypad *A
; Power
front seats *; Power rear seats A
;
Display for rear seat conveniencefunctions A
; Rear seat massage
function A7.5
FunctionA
Control module for driver support functions5
Panorama roof and sun shade
*20
Head-up display*5
Courtesy lighting5
––
Ceiling console display (seat belt reminder, front passenger side air-bag indicator)5
––
Humidity sensor5
Rear passenger-side door module20
Fuses in the cargo compartment10
Internet connection control module; Volvo On Call control module5
Rear driver-side door module20
Infotainment control module (amplifier)40
Climate system blower module (rear)40
Page 499 of 546
MAINTENANCE AND SERVICING
497
WARNING
•The ignition should be switched off com- pletely (be in ignition mode
0) when
replacing bulbs.
• If the engine has been running just prior to replacing bulbs in the headlight hous-ing, please keep in mind that componentsin the engine compartment will be hot.
Front bulbs (vehicles with halogen headlights)
Side marker light
Low beam
High beam
Parking light/Daytime Running Light
Turn signal
(Not in use)
Taillight bulbs
Brake light (LED)
Side marker light (LED)
Backup light 2
Taillight (LED)
Turn signal (LED)
Fog light (LED)
High-mounted brake light (LED)
Related information
•
Bulb specifications (p. 501)
• Removing the rectangular headlight cover (p. 498)
• Replacing parking light bulbs (p. 500)
• Replacing front turn signal bulbs (p. 500)
• Replacing High Beam headlight bulbs(p. 499)
• Replacing low beam headlight bulbs (p. 498)
2
Must be replaced by a trained and qualified Volvo service technician.
Page 506 of 546

MAINTENANCE AND SERVICING
504
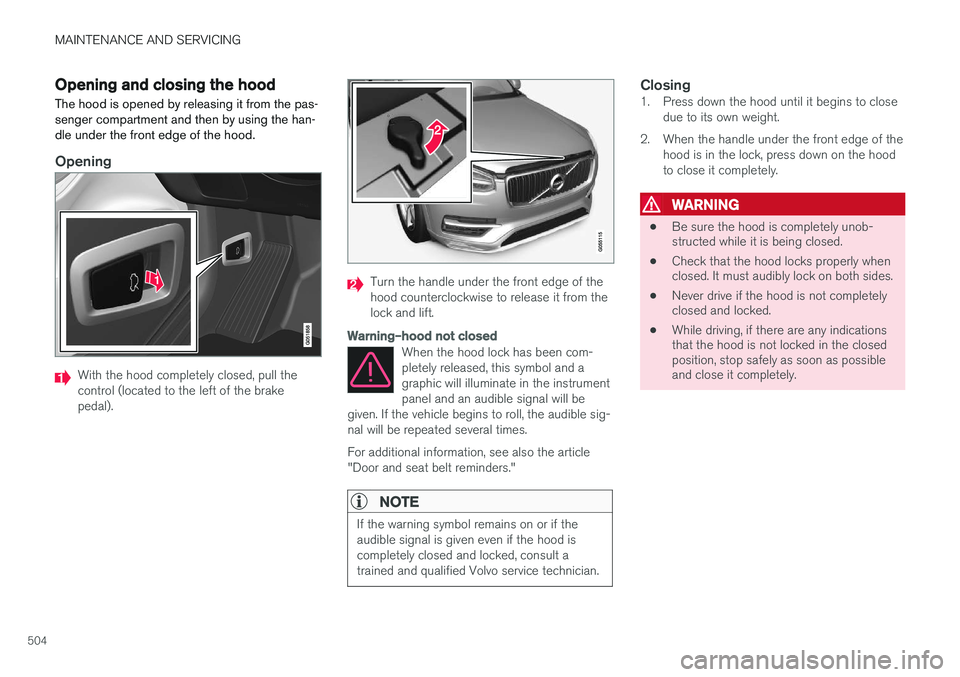
Opening and closing the hood The hood is opened by releasing it from the pas- senger compartment and then by using the han-dle under the front edge of the hood.
Opening
With the hood completely closed, pull the control (located to the left of the brakepedal).
Turn the handle under the front edge of the hood counterclockwise to release it from thelock and lift.
Warning–hood not closed
When the hood lock has been com- pletely released, this symbol and agraphic will illuminate in the instrumentpanel and an audible signal will be
given. If the vehicle begins to roll, the audible sig-nal will be repeated several times. For additional information, see also the article "Door and seat belt reminders."
NOTE
If the warning symbol remains on or if the audible signal is given even if the hood iscompletely closed and locked, consult atrained and qualified Volvo service technician.
Closing1. Press down the hood until it begins to close due to its own weight.
2. When the handle under the front edge of the hood is in the lock, press down on the hood to close it completely.
WARNING
• Be sure the hood is completely unob- structed while it is being closed.
• Check that the hood locks properly whenclosed. It must audibly lock on both sides.
• Never drive if the hood is not completelyclosed and locked.
• While driving, if there are any indicationsthat the hood is not locked in the closedposition, stop safely as soon as possibleand close it completely.
Page 508 of 546
||
MAINTENANCE AND SERVICING
506
•The distributor ignition system operates at very high voltages. Special safety pre-cautions must be followed to prevent injury. Always turn the ignition
off when
replacing distributor ignition components e.g. plugs, coil, etc.
• Do not touch any part of the distributorignition system while the engine is run-ning. This may result in unintended move-ments and body injury.
The layout of the engine compartment may differ slightly from model to model
Coolant expansion tank
Brake fluid reservoir
Washer fluid reservoir
Relay/fuse box
Air cleaner
Engine oil filler cap
Related information
• Ignition modes (p. 370)
• Opening and closing the hood (p. 504)
• Refilling the windshield washer fluid reservoir (p. 511)
Engine oil
The correct oil must be used for the stated oil change (service) intervals to apply.
Volvo recommends: