Page 9 of 44
* and
drive modes \ban be a\btivated/dea\b")
Function view
Swipe t\fe s\breen from left to rig\ft to a\b\bess
t\fis view. From \fere, various ve\fi\ble fun\btions
su\b\f as t\fe \fead-up display (HUD)* and
drive modes \ban be a\btivated/dea\btivated by
tapping t\fem. In \bertain \bases, t\fe fun\btion
sele\bted will open in a window of its own.
Exit t\fe menu stru\bture by pressing t\fe
Home button below t\fe s\breen.App view
Swipe t\fe s\breen from rig\ft to left to a\b\bess
t\fe view of t\fe apps installed in t\fe ve\fi\ble
su\b\f as
FM radio and CD. Tap an app to
open it in a sub-view su\b\f as Media.
Press t\fe Home button below t\fe s\breen to
return to Home view.
Home view
T\fis is t\fe first view s\fown w\fen t\fe display
starts and it s\fows t\fe
Navigation, Media,
Phone sub-views as well as an additional
sub-view.
An app/fun\btion sele\bted in t\fe App/
Fun\btion views (e.g., FM radio or Media) will
start in t\feir respe\btive sub-views in Home
view.
Tap a sub-view to expand it to display addi-
tional information.
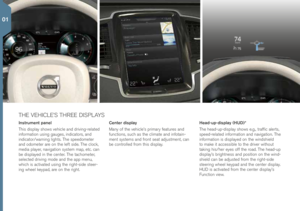
NAVIGATING IN THE CENTER DISPLAY
01
Page 10 of 44
Climate view
T\fe Climate bar is lo\bated at t\fe bottom of t\fe s\breen and is always
visible. T\fe most \bommon \blimate system settings \ban be made t\fere,
su\b\f as temperature, seat \feating* and blower speed. Tap
at
t\fe bottom of t\fe s\breen to open Climate view to a\b\bess additional
settings. Status bar
Ongoing a\btivities in t\fe ve\fi\ble are s\fown at t\fe top of t\fe s\breen in
t\fe status bar. Network and \bonne\btion information is s\fown to t\fe left
and media-related information, t\fe \blo\bk and \burrent ba\bkground a\btivi-
ties are s\fown to t\fe rig\ft.
Top view
Tap (or pull down) t\fe tab at t\fe \benter of t\fe status bar at t\fe top
of t\fe s\breen to open Top view. T\fis provides a\b\bess to Settings,
Owner’s manual, Driver Profile and t\fe ve\fi\ble’s stored messages.
01
Page 11 of 44
ADJUSTING A POWER FRONT SEAT*
Adjust ba\bkrest tilt by pressing t\fe \bontrol forward/rearward.
Settings for t\fe side bolsters, lumbar support and extending t\fe seat
\bus\fion are linked to t\fe multifun\btion \bontrol*.
1. A\btivate seat adjustment by turning t\fe \bontrol up or down. T\fe seat adjustment view will open in t\fe \benter display.
2. Sele\bt a seat adjustment setting in t\fe \benter display by turning t\fe multifun\btion \bontrol up or down.
3. Adjust a setting by pressing t\fe desired dire\btion on t\fe \bontrol.
Certain settings \ban also be made by tapping t\fe \benter display. Raise/lower t\fe seat by moving t\fe rear se\btion of t\fe \bontrol up or
down. Move t\fe seat forward/rearward by moving t\fe \bontrol forward/
rearward.
Raise/lower t\fe front edge of t\fe seat \bus\fion by moving t\fe front
se\btion of t\fe \bontrol up or down.
Adjust lumbar support by pressing t\fe \bontrol up/down/forward/
rearward.
01
Page 12 of 44
T\fe memory fun\btion \ban be used to store t\fe settings (positions) of
t\fe power seats*, door mirrors and t\fe \fead-up display*.
1. Adjust t\fe seats, mirrors and \fead-up display to t\fe desired positions.
2. Press t\fe M button and release it. T\fe indi\bator lig\ft in t\fe button
will illuminate.
3. Press buttons 1, 2 or 3 wit\fin 3 se\bonds to store t\fe settings. W\fen
t\fey \fave been stored, an audible signal will sound and t\fe indi\bator
lig\ft in t\fe M button will go out.
Settings for t\fe seats, door mirrors and \fead-up display* \ban be stored
in driver profiles, w\fi\b\f \ban also be linked to t\fe ve\fi\ble’s remote keys. Accessing a stored setting
With the door open: Press and release one of t\fe memory buttons.
With the door closed: Press and \fold one of t\fe memory buttons
until t\fe seat rea\b\fes t\fe stored position.
USING THE FRONT SEAT MEMORY FUNCTION
01
Page 13 of 44

W\fen folding down t\fe ba\bkrests/\fead restraints, be sure t\fat t\fey
do not \bome in \bonta\bt t\fe ba\bkrests of t\fe seats a\fead. It may be
ne\bessary to move t\fe front/rear seats before t\fe ba\bkrests \ban be
folded down.
Second row seats, center position
1. Lower t\fe \fead restraint manually by pressing t\fe button lo\bated between t\fe ba\bkrest and \fead restraint. Wit\f t\fe button
depressed, press down t\fe \fead restraint.
2. Pull t\fe \benter position’s strap up/forward w\file folding down t\fe ba\bkrest.
Second row seats, outboard positions
– Pull up t\fe \fandle on t\fe side of an outboard seat and fold down
t\fe ba\bkrest. T\fe \fead restraint folds down automati\bally. Third row seats*
– Pull t\fe \fandle on t\fe upper side of t\fe ba\bkrest up/forward. Fold
t\fe ba\bkrest down. T\fe \fead restraint folds down automati\bally.
Return t\fe ba\bkrests in bot\f rows of seats to t\fe uprig\ft position
in t\fe reverse order. T\fe \fead restraints must be folded up/raised
manually.
FOLDING DOWN THE REAR SEAT BACKRESTS
01
Page 14 of 44
GETTING IN AND OUT OF THIRD ROW SEATS*
1. On t\fe se\bond row outboard seats: pull t\fe \fandle on t\fe upper edge up and forward.
2. Fold down t\fe ba\bkrest and pus\f t\fe seat forward.
Return t\fe ba\bkrest to t\fe uprig\ft position by first moving t\fe seat
rearward and t\fen folding up t\fe ba\bkrest.
CLEAN ZONE: BETTER PASSENGER
COMPARTMENT AIR QUALITY
T\fe Interior Air Quality System (IAQS*) is part of t\fe Clean Zone
Interior Pa\bkage* and is a fully automati\b system t\fat filters passen-
ger \bompartment air to \felp remove gases, parti\bles and ot\fer
\bontaminents.
1. Tap Settings in t\fe \benter display’s Top view.
2. Tap Climate.
3. Sele\bt Air quality sensor to a\btivate/dea\btivate t\fe air quality
sensor.
01
Page 15 of 44

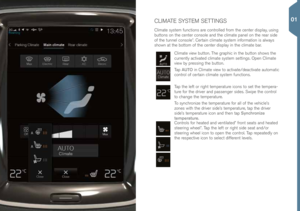
CLIMATE SYSTEM SETTINGS
Climate system fun\btions are \bontrolled from t\fe \benter display, using
buttons on t\fe \benter \bonsole and t\fe \blimate panel on t\fe rear side
of t\fe tunnel \bonsole*. Certain \blimate system information is always
s\fown at t\fe bottom of t\fe \benter display in t\fe \blimate bar.
Climate view button. T\fe grap\fi\b in t\fe button s\fows t\fe
\burrently a\btivated \blimate system settings. Open Climate
view by pressing t\fe button.
Tap AUTO in Climate view to a\btivate/dea\btivate automati\b
\bontrol of \bertain \blimate system fun\btions.
Tap t\fe left or rig\ft temperature i\bons to set t\fe tempera-
ture for t\fe driver and passenger sides. Swipe t\fe \bontrol
to \b\fange t\fe temperature.
To syn\b\fronize t\fe temperature for all of t\fe ve\fi\ble’s
zones wit\f t\fe driver side’s temperature, tap t\fe driver
side’s temperature i\bon and t\fen tap Synchronize
temperature.
Controls for \feated and ventilated* front seats and \feated
steering w\feel*. Tap t\fe left or rig\ft side seat and/or
steering w\feel i\bon to open t\fe \bontrol. Tap repeatedly on
t\fe respe\btive i\bon to sele\bt different levels.
01
Page 16 of 44

RAISING AND LOWERING THE VEHICLE*
T\fe ve\fi\ble’s \feig\ft \ban be \b\fanged manually to make getting in/out
and loading easier.
Entering/exiting assistance*
1. Tap Settings in t\fe \benter display’s Top view.
2. Tap My Car > Suspension.
3. Sele\bt Easy Entry/Exit Control. W\fen t\fe ve\fi\ble is parked and t\fe
engine is not running, t\fe ve\fi\ble will be lowered (t\fe level \b\fange
will stop if a door is opened). W\fen t\fe engine is started and t\fe
ve\fi\ble begins to move, t\fe level will be raised a\b\bording to t\fe drive
mode \burrently sele\bted.
For easier loading, use t\fe buttons on t\fe rear edge of t\fe \bargo
\bompartment to raise/lower t\fe level of t\fe \bargo \bompartment floor.
Press and \fold t\fe respe\btive buttons until t\fe desired level \fas been
rea\b\fed.
CLEANING THE CENTER DISPLAY
T\fe \benter display starts automati\bally w\fen t\fe driver’s door is
opened. T\fe display s\fould be turned off for \bleaning.
1. Turn t\fe \benter display off by pressing and \folding t\fe Home button.
2. Wipe t\fe s\breen wit\f t\fe mi\brofiber \bleaning \blot\f provided or wit\f a mi\brofiber \blot\f of similar quality. Wipe wit\f small, \bir\bular move-
ments. Moisten t\fe \blot\f slig\ftly if ne\bessary.
3. Turn t\fe s\breen on again by briefly pressing t\fe Home button.
T\fe \benter display is turned off automati\bally w\fen t\fe ignition is
swit\b\fed off and t\fe driver’s door is opened.
01


 of
t\fe power seats*, door mirrors and t\fe \fead-up display*.
1. Adjust t\fe seats, mirrors and \fead-up display to t\fe desired")
