Page 145 of 398

05 Loading and storage
05
143
•
The vehicle's wind resistance and fuel consumption will increase with the size ofthe load.
• Drive smoothly. Avoid rapid starts, fastcornering and hard braking.
Related information
• Loading – general (p. 142)
• Load anchoring eyelets (p. 143)
Load anchoring eyelets
The load anchoring eyelets on both sides of the vehicle are used to fasten straps, etc., tohelp anchor items in the cargo area.
WARNING
The two upper hooks shown in the illustra- tion are for holding grocery bags only.They are
not intended for anchoring heavy
objects.
WARNING
• Cover sharp edges on long loads to help prevent injury to occupants.Secure the load to help prevent shift-ing during sudden stops.
• Always secure large and heavy objectswith a seat belt or cargo retainingstraps.
• Always secure the load to help preventit from moving in the event of suddenstops.
• Switch off the engine, apply the park-ing brake and put the gear selector inP
when loading and unloading the
vehicle.
Related information
• Loading – general (p. 142)
Page 146 of 398

05 Loading and storage
05
144
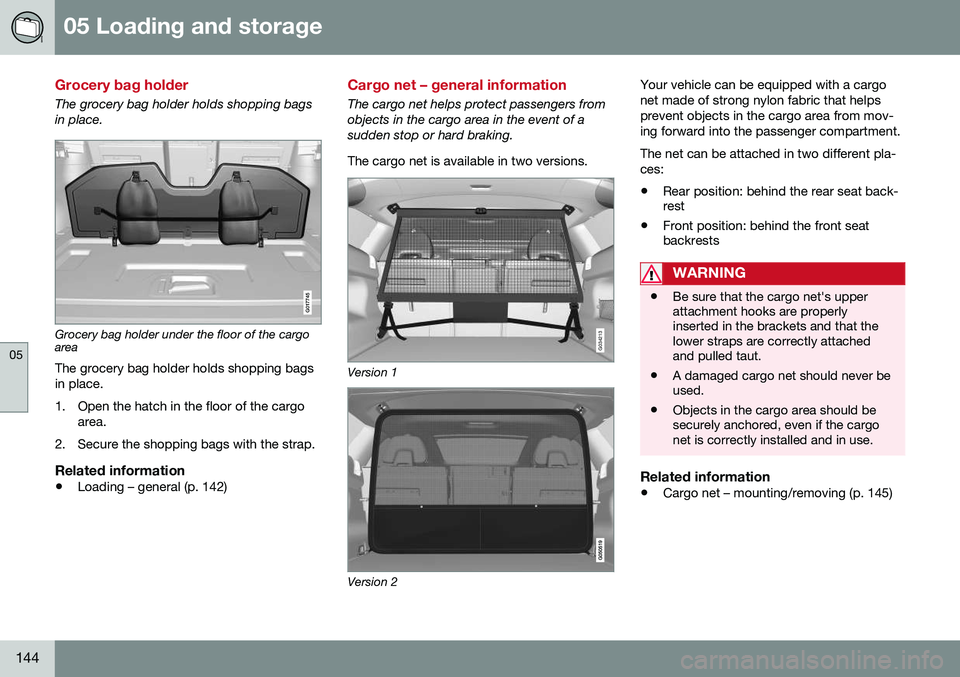
Grocery bag holder
The grocery bag holder holds shopping bags in place.
G017745
Grocery bag holder under the floor of the cargo area
The grocery bag holder holds shopping bags in place.
1. Open the hatch in the floor of the cargo area.
2. Secure the shopping bags with the strap.
Related information
• Loading – general (p. 142)
Cargo net – general information
The cargo net helps protect passengers from objects in the cargo area in the event of asudden stop or hard braking. The cargo net is available in two versions.
G034213
Version 1
Version 2 Your vehicle can be equipped with a cargo net made of strong nylon fabric that helpsprevent objects in the cargo area from mov-ing forward into the passenger compartment. The net can be attached in two different pla- ces:
• Rear position: behind the rear seat back- rest
• Front position: behind the front seatbackrests
WARNING
• Be sure that the cargo net's upper attachment hooks are properlyinserted in the brackets and that thelower straps are correctly attachedand pulled taut.
• A damaged cargo net should never beused.
• Objects in the cargo area should besecurely anchored, even if the cargonet is correctly installed and in use.
Related information
•
Cargo net – mounting/removing (p. 145)
Page 147 of 398

05 Loading and storage
05
}}
145
Cargo net – mounting/removing
Mounting the cargo net (version 1)The cargo net is easiest to put in place through one of the rear doors.
1. Fold out the cargo net and be sure thatthe upper hinged rod is straight and locked in position.
2. Insert one end of the rod into the front or rear bracket (near the ceiling). Be surethat the lock on the lower strap is facingtoward you.
3. Insert the other end of the rod in the opposite bracket. – Be sure to press the end hooks on the rod as far forward as possible in thebrackets.
Cargo net in rear position 4.
Mounting in the rear position: With the
net's rod attached to the rear upper brackets, hook the lower straps in thefloor eyelets in the cargo area. Pull the netstrap taut.
Cargo net in front position
Mounting in the front position: With the
net's rod attached to the front upper brackets, hook the lower straps in theeyelets in the front seat rails. Attachingthe net is easier if the front seat backrestsare upright and the seats are movedslightly forward. If the front seats are moved rearward, they should not press hard against thenet.
CAUTION
Pressure from the front seats against the cargo net could damage the net and/or itsbrackets.
5. Pull the net strap taut.
Mounting the cargo net (version 2)The easiest way to mount the cargo net is through one of the rear doors.
Cargo net in rear position
1. Fold out the cargo net.
2. Insert one of the net's upper attachments into the front or rear bracket near the roof liner with the net's storage pockets facingrearward.
Page 148 of 398

||
05 Loading and storage
05
146
3. Insert the net's other attachment into thebracket on the opposite side of the vehi- cle. It is spring-loaded to help makemounting easier. Be sure to press the hooks as far forward into the brackets as possible.
4. Mounting in the rear position: With the
net's hooks inserted into the rear upperbrackets, attach the lower hooks to thefloor eyelets in the cargo area.
Cargo net in front position
Mounting in the front position: With the
net's upper attachments in front upper brack- ets, attach the lower hooks to the eyelets inthe front seat rails. Attaching the net is easierif the front seat backrests are upright and theseats are moved slightly forward. If the front seats are moved rearward, they should not press hard against the net.
CAUTION
Pressure from the front seats against the cargo net could damage the net and/or itsbrackets.
Removing and storing the cargo net (version 1)
Press the release buttons on the locks on the straps and pull out a small section ofthe strap.
Press in the catches on the straps' hooks and remove the hooks from the eyelet.
Fold up the net's rod at the center and roll up the net.
When not in use, the cargo net can be storedunder floor of the cargo area.
Removing and storing the cargo net (version 2)
Release the lower hooks.
Remove the net's upper attachments from the ceiling brackets.
Fold the net.
When not in use, the cargo net can be stored under floor of the cargo area.
Related information
• Cargo net – general information (p. 144)
Page 149 of 398

05 Loading and storage
05
}}
147
Cargo area cover
The cargo area cover can be used to conceal objects in the cargo area.
G031977
Use
•Pull the cover over the cargo and hook it into the holes in the rear cargo area pil-lars.
• To retract (roll up) the cover, release itfrom the holes and guide it toward therear seat backrest.
Installing the cover1. Press the end piece on one side of the
cargo area cover into the retaining bracket in the side panel of the cargo area
.
2. Do the same on the opposite side
. 3. Press both sides of the cover until they
click into place
. The red mark will no
longer be visible.
4. Check that both ends of the cover are securely locked in place.
Removing the cover1. Press one of the end pieces of the coverinward.
2. Pull the cover carefully upward and out- ward. The other end will release automati- cally from its retaining bracket.
Folding down the cargo area cover's rear flap
The cargo area cover's rear flap points hori- zontally when the cover is retracted (rolledup). To fold it down:
–Pull the flap slightly rearward past its sup- ports and fold it down.
NOTE
On models equipped with this cover, it should be removed before a child seat isattached to the child restraint anchors.
Related information
• Loading – general (p. 142)
Steel cargo grid
Your vehicle can be equipped with a steel grid that helps prevent objects in the cargo areafrom moving forward into the passenger com-partment.
G031978
Folding the grid up/downGrasp the lowering edge of the grid and pull it rearward/upward, or push it downward/forward.
NOTE
If the steel grid is to be used with the optional cargo area cover, the grid mustbe folded down before the cargo areacover is put in place.
Page 150 of 398
||
05 Loading and storage
05
148
Installing the steel cargo gridFor information about the necessary tools and procedures for installing/removing thesteel cargo grid, please refer to the assembly instructions1
that were included when the grid
was purchased.
Related information
• Cargo area cover (p. 147)
1
Assembly instruction no. 30715972.
Page 151 of 398
L O C K S A N D A L A R M
Page 152 of 398

06 Locks and alarm
06
150
Remote key and key blade
Two remote keys are provided with your vehi- cle. They enable you to unlock the doors andtailgate, and also function as ignition keys tostart the vehicle or operate electrical compo-nents. The remote keys contain detachablemetal key blades for manually locking orunlocking the driver's door and the glovecompartment. The visible ends of these keyblades are unique to make it easier to identify"your" remote key. Up to six remotes can beprogrammed for use on the same vehicle.
WARNING
Never leave the remote key in the ignition slot if children are to remain in the vehicle.
For more information on the various ignition modes, see Ignition modes (p. 79).
Related information
•Remote key – functions (p. 153)
• Remote key – functions (p. 153)
• Remote key – range (p. 154)
Remote key – loss
If either of the remote keys (p. 150) is lost, the other should be taken with the vehicle to aVolvo retailer. As an anti-theft measure, thecode of the lost remote key must be erasedfrom the system.
NOTE
Additional or duplicate remote control keys can be obtained from any authorized Volvoretailer. You can also obtain additional or duplicate remote control keys from certain inde-pendent repair facilities and locksmithsthat are qualified to make remote controlkeys. Each key must be programmed towork with your vehicle. California Only: A list of independent repair facilities and/or locksmiths known to Volvo that can cutand code replacement keys can be found:
• on the Volvo website at http://www.volvocars.com/us/keys
• by calling Volvo Customer Care at1-800-458-1552
The number of registered keys for the vehicle can be found by pressing
MY CAR and going
into
SettingsInformationNumber of
keys. For a description of the menu system,
see My Car – introduction (p. 76). USA-5WK49264 FCC ID:KR55WK49264 + Siemens VDO 5WK49236 FCC ID:KR55WK49236, 5WK49266FCC ID:KR55WK49266 + Siemens VDO 5WK49233 FCC ID:KR55WK49233This device complies with part 15 of the FCC rules and RSS-210. Operation is subject tothe following conditions: (1) This device maynot cause harmful interference, and (2) thisdevice must accept any interferencereceived, including interference that maycause undesired operation. Canada-5WK49264IC:267T-5WK49264 + Siemens VDO 5WK49236 IC:267T-5WK49236, 5WK49266IC:267T-5WK49266 + Siemens VDO 5WK49233 IC:267T-5WK49233Operation is subject to the following condi- tions: (1) this device may not cause interfer-ence, and (2) this device must accept anyinterference, including interference that maycause undesired operation of the device.Related information
•
Remote key – functions (p. 153)