Page 449 of 688
4493-5. Other interior features
3
Interior features
VENZA_OM_OM73030U_(U) Seat heaters
: If equipped■ The seat heaters can be used when
Vehicles with smart key system
The “ENGINE START STOP” switch is in IGNITION ON mode.
Vehicles without smart key system
The engine switch is in the “ON” position. For driver’s seat
For front passenger’s seat
On The indicator light comes on.
Adjusts the seat tempera-
ture The further you turn the dial
upward, the warmer the seat
becomes.
Page 457 of 688

4573-5. Other interior features
3
Interior features
VENZA_OM_OM73030U_(U) Garage door opener The garage door opener (HomeLink
Universal Transceiver) is manufac-
tured under license from HomeLink
.
Programming HomeLink ®
(for U.S.A. owners)To ensure correct programming into the HomeLink ®
, install a new bat-
tery in the hand-held transmitter prior to programming. Failure to
install a new battery into the hand-h eld transmitter will affect both the
range and accuracy of the HomeLink ®
in your vehicle.
The battery side of the hand-held transmitter must be pointed away
from the HomeLink ®
during the programming process.
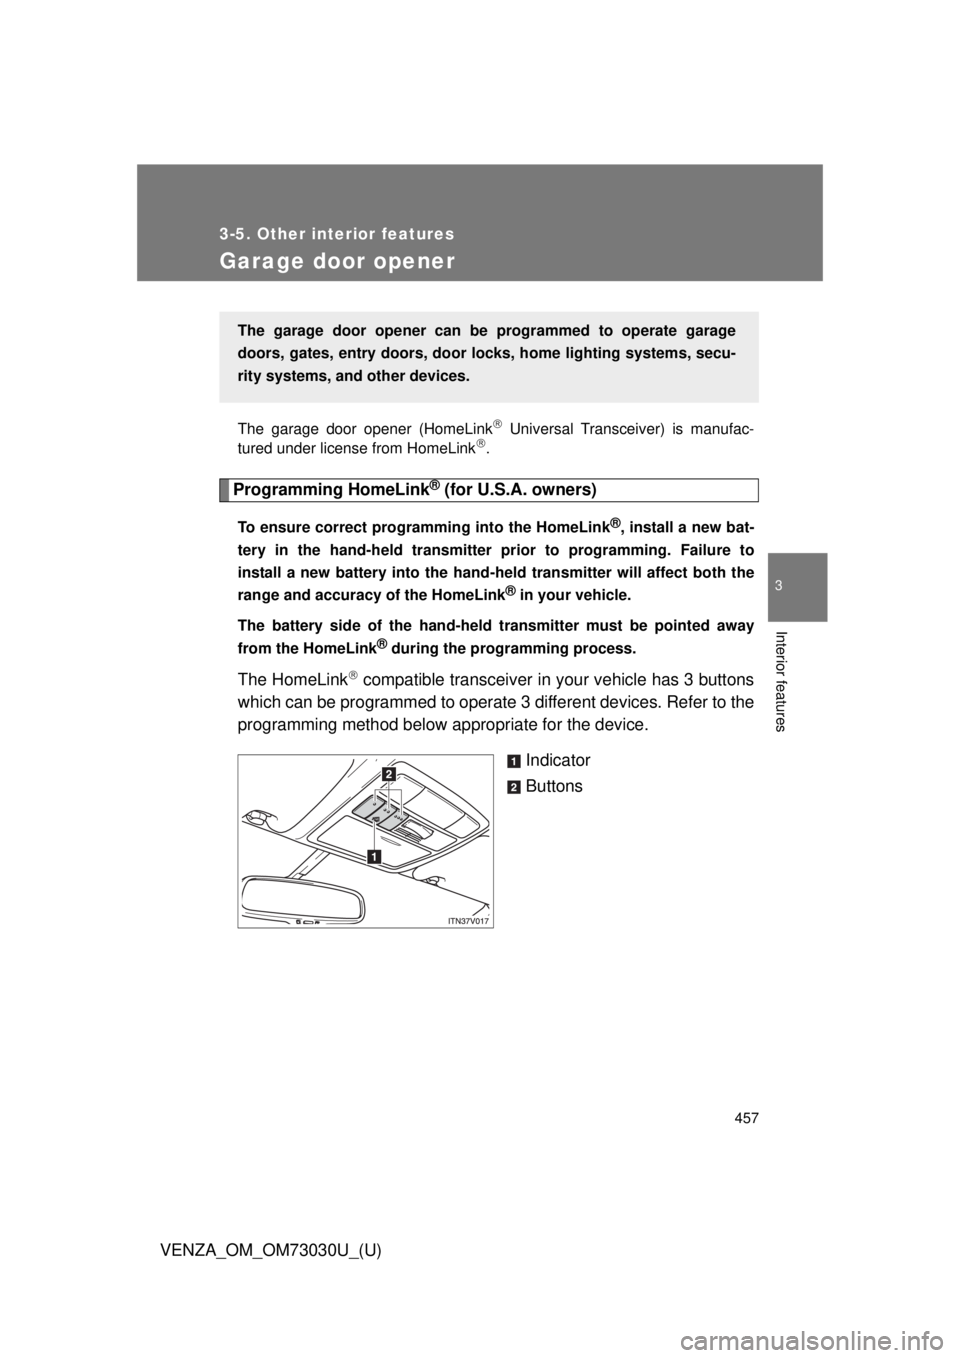
The HomeLink
compatible transceiver in your vehicle has 3 buttons
which can be programmed to operate 3 different devices. Refer to the
programming method below appropriate for the device.
Indicator
ButtonsThe garage door opener can be programmed to operate garage
doors, gates, entry do ors, door locks, home lighting systems, secu-
rity systems, and other devices.
Page 458 of 688
4583-5. Other interior features
VENZA_OM_OM73030U_(U) ■ Programming HomeLink ®
Point the remote control trans-
mitter for the device 1 to 3 in. (25
to 75 mm) from the HomeLink
buttons. Keep the HomeLink
indicator
light in view while programming.
Press and hold one of the
HomeLink
buttons and the
transmitter button. When the
HomeLink
indicator light
changes from a slow to a rapid
flash within 20 seconds, you can
release both buttons.STEP 1
STEP 2
Page 459 of 688
4593-5. Other interior features
3
Interior features
VENZA_OM_OM73030U_(U) Test the HomeLink
operation
by pressing the newly pro-
grammed button. If a HomeLink
button has been
programmed for a garage door,
check to see if the garage door
opens and closes. If the garage
door does not operate, see if your
remote control transmitter is of
the rolling code type. Press and
hold the programmed HomeLink
button. The remote control trans-
mitter is of the rolling code type if
the HomeLink
indicator light
flashes rapidly for 2 seconds and
then remains lit. If your transmit-
ter is of the rolling code type, pro-
ceed to the heading
“Programming a rolling code sys-
tem”.
Repeat the steps above to program another device for each of
the remaining HomeLink
buttons.STEP 3
STEP 4
Page 461 of 688

4613-5. Other interior features
3
Interior features
VENZA_OM_OM73030U_(U) ■ Programming an entry gate (f or U.S.A. owners)/Programming
all devices in the Canadian market
Place your transmitter 1 to 3 in. (25 to 75 mm) away from the
surface of the HomeLink
.Keep the HomeLink
indicator light in view while programming.
Press and hold the selected HomeLink
button.
Repeatedly press and releas e (cycle) the device’s remote
control button for two seconds each until step 4 is completed.
When the indicator light on the HomeLink
compatible trans-
ceiver starts to flash rapidly, release the buttons.
Test the operation of the HomeLink
by pressing the newly
programmed button. Check to see if the gate/device operates
correctly.
Repeat the steps above to program another device for each of
the remaining HomeLink
buttons.
■ Programming other devices
To program other devices such as home security systems, home
door locks or lighting, contact your authorized Toyota dealer for
assistance.
■ Reprogramming a button
The individual HomeLink
buttons cannot be erased but can be
reprogrammed. To reprogram a bu tton, follow the “Programming”
instructions. STEP 1
STEP 2
STEP 3
STEP 4
STEP 5
STEP 6
Page 462 of 688
4623-5. Other interior features
VENZA_OM_OM73030U_(U) Operating HomeLink ®
Press the appropriate HomeLink
button. The HomeLink
indicator
light should come on. The HomeLink
compatible transceiver in your vehicle continues to send
a signal for up to 20 seconds as long as the button is pressed.
Erasing the entire HomeLink ®
memory (all three programs)
Press and hold the 2 outside but-
tons for 10 seconds (or 20 sec-
onds depending on the model)
until the indicator light flashes. If you sell your vehicle, be sure to
erase the programs stored in the
HomeLink
memory.
Page 469 of 688
Maintenance and care
4
469
VENZA_OM_OM73030U_(U) 4-1. Maintenance and care
Cleaning and protecting
the vehicle exterior ......... 470
Cleaning and protecting
the vehicle interior .......... 473
4-2. Maintenance
Maintenance
requirements .................. 476
General maintenance....... 479
Emission inspection
and maintenance (I/M)
programs........................ 482
4-3. Do-it-yourself maintenance
Do-it-yourself service
precautions .................... 483
Hood ................................ 487
Positioning a floor jack ..... 489
Engine compartment ........ 491
Tires ................................. 506
Tire inflation pressure ...... 513
Wheels ............................. 517
Air conditioning filter......... 520
Key battery ....................... 523
Checking and
replacing fuses ............... 527
Light bulbs........................ 537
Page 472 of 688

4724-1. Maintenance and care
VENZA_OM_OM73030U_(U) NOTICE■ If the windshield washer nozzle become blocked
Contact your Toyota dealer. Do not try to clear it with a pin or other object.
This may damage the nozzle.
■ Cleaning the exterior lights
● Wash carefully. Do not use organic substances or scrub with a hard brush.
This may damage the surfaces of the lights.
● Do not apply wax on the surface of the lights.
Wax may cause damage to the lenses.
■ To prevent damage to the windshield wiper arms
When lifting the wiper arms away from the windshield, pull the driver side
wiper arm upward first, and repeat for the passenger side. When returning
the wipers to their original position, do so from the passenger side first.
■ When using a high pressure car wash
Do not bring the nozzle tip close to boots (rubber or resin manufactured
cover), connectors or the following parts. The parts may be damaged if they
come into contact with high-pressure water.
● Traction related parts
● Steering parts
● Suspension parts
● Brake parts