2016 TOYOTA SIENNA remote control
[x] Cancel search: remote controlPage 148 of 668
148
SIENNA_OM_OM08013U_(U)
3-2. Opening, closing and locking the doors
■Customization
Settings (e.g. smart key system) can be changed.
(Customizable features: P. 626, 627)
■ If the smart key system has been deactivated in a customized setting
●Locking and unlocking the doors:
Use the wireless remote control or mechanical key. ( P. 111, 585)
● Starting the engine and changing engine switch modes: P. 585
● Stopping the engine: P. 2 2 9
WARNING
■Caution regarding interfer ence with electronic devices
● People with implantable cardiac pacemakers, cardiac resynchronization
therapy-pacemakers or implantable cardioverter defibrillators should keep
away from the smart key system antennas. ( P. 143)
The radio waves may affect the operation of such devices. If necessary,
the entry function can be disabled. Ask your Toyota dealer for details, such
as the frequency of radio waves and timing of the emitted radio waves.
Then, consult your doctor to see if you should disable the entry function.
● Users of any electrical medical device other than implantable cardiac
pacemakers, cardiac resynchronization therapy-pacemakers or implant-
able cardioverter defibrillators should consult the manufacturer of the
device for information about its operation under the influence of radio
waves. Radio waves could have unexpected effects on the operation of
such medical devices.
Ask your Toyota dealer for details for disabling the entry function.
Page 172 of 668
172
SIENNA_OM_OM08013U_(U)
3-3. Adjusting the seats
■Recall procedure
Carry the electronic key that has been registered to the driving
position, and then unlock and open the driver’s door using the
smart key system or wi reless remote control.
The driving position will move to the recorded position.
If the driving position is in a position that has already been recorded, the
seat and outside rear view mirrors will not move.
■
Cancelation procedure
Carry only the key you want to cancel and then close the driver’s
door.
If 2 or more keys are in the vehicle, the driving position cannot be
canceled properly.
Check that the shift lever is in P.
Turn the engine switch to IGNITION ON mode.
While pressing the “SET” button, press and hold the door lock
switch (either lock or unlock) until the signal beeps twice.
If the button could not be canceled, the signal beeps continuously for
approximately 3 seconds.
■Recalling the driving position us ing the memory recall function
● Different driving positions can be registered for each electronic key. There-
fore, the driving position that is recalled may be different depending on the
key being carried.
● If a door other than the driver’s door is unlocked with the smart key system,
the driving position cannot be recalled. In this case, press the driving posi-
tion button which has been set.
■ Customization
The unlock door settings of the memory recall function can be customized.
(Customizable features: P. 628)
WARNING
■Seat adjustment caution
Take care during seat adjustment so that the seat does not strike the rear
passenger or squeeze your body against the steering wheel.
1
2
3
Page 397 of 668
SIENNA_OM_OM08013U_(U)
3975-10. Bluetooth®
5
Audio system
■Compatible models
The Bluetooth® audio system supports portable audio players with the follow-
ing specifications
● Bluetooth
® specifications:
Ver. 2.0, or higher (Recommended: Ver. 3.0+EDR or higher)
● Profiles:
• A2DP (Advanced Audio Distribution Profile) Ver. 1.0, or higher
(Recommended: Ver. 1.2 or higher)
This is a profile to transmit stereo audio or high quality sound to the audio
system.
• AVRCP (Audio/Video Remote Contro l Profile) Ver. 1.0 or higher
(Recommended: Ver. 1.4 or higher)
This is a profile to allow remote control the A/V equipment.
However, please note that some functions may be limited depending on the
type of portable audio player connected.
The hands-free system supports cellular phones with the following specifica-
tions.
● Bluetooth
® specification:
Ver. 2.0 or higher (Recommended: Ver. 3.0+EDR or higher)
● Profiles:
• HFP (Hands Free Profile) Ver. 1.0 or higher (Recommended: Ver. 1.6 or
higher)
This is a profile to allow hands-free phone calls using a cellular phone or
head set. It has outgoing and incoming call functions.
• OPP (Object Push Profile) Ver. 1.1 or higher (Recommended: Ver. 1.2) This is a profile to transfer contact data. When a Bluetooth
® compatible
cellular phone has both PBAP and OPP, OPP cannot be used.
• PBAP (Phone Book Access Profile) Ver. 1.0 or higher (Recommended: Ver. 1.1)
This is a profile to transfer contact data.
• MAP (Message Access Profile) Ver.1.0 or higher This is a profile to using phone message.
If the cellular phone does not support HFP, you cannot register it with the
hands-free system. OPP, PBAP or MAP services must be selected individu-
ally.
Page 448 of 668
448
SIENNA_OM_OM08013U_(U)
6-4. Using the other interior features
Garage door opener
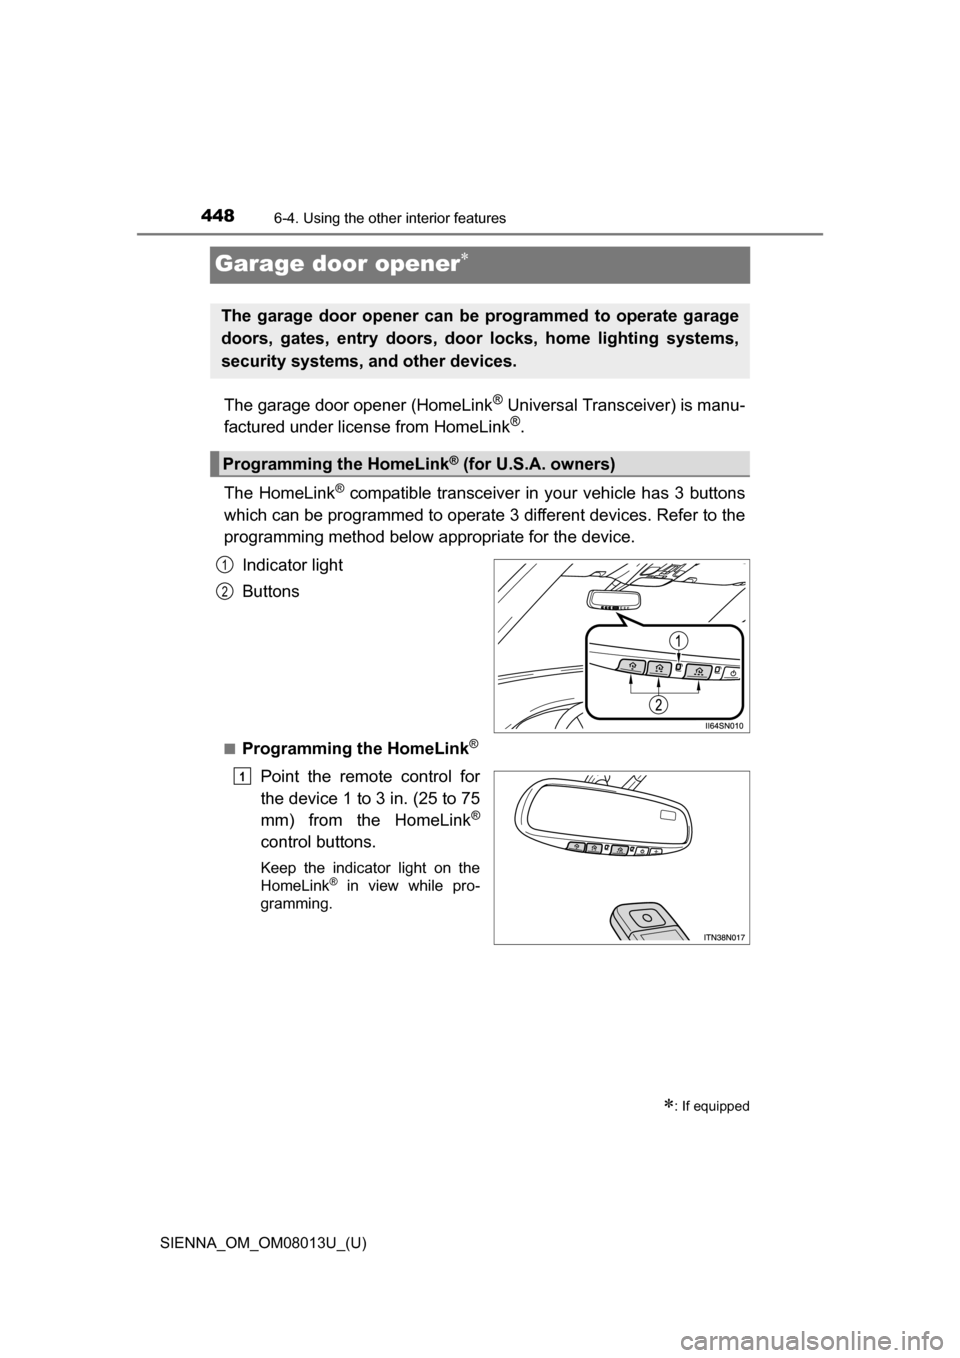
The garage door opener (HomeLink® Universal Transceiver) is manu-
factured under license from HomeLink®.
The HomeLink
® compatible transceiver in your vehicle has 3 buttons
which can be programmed to operate 3 different devices. Refer to the
programming method below appropriate for the device.
Indicator light
Buttons
■Programming the HomeLink®
Point the remote control for
the device 1 to 3 in. (25 to 75
mm) from the HomeLink
®
control buttons.
Keep the indicator light on the
HomeLink® in view while pro-
gramming.
: If equipped
The garage door opener can be programmed to operate garage
doors, gates, entry doors, door locks, home lighting systems,
security systems, and other devices.
Programming the HomeLink® (for U.S.A. owners)
1
2
1
Page 450 of 668
450
SIENNA_OM_OM08013U_(U)
6-4. Using the other interior features
■Programming a Rolling Code system (for U.S.A. owners)
If your device is Rolling Code equipped, follow the steps under the
heading “Programming the HomeLink
®” before proceeding with the
steps listed below.
Locate the training button on the ceiling mounted garage door
opener motor. The exact location and color of the button may
vary by brand of garage door opener.
Refer to the operation manual supplied with the garage door opener for
the location of the training button.
Press the training button.
Following this step, you have 30 seconds in which to initiate step 3
below.
Press and hold the vehicle’s programmed HomeLink® button for
2 seconds and release it. Repeat this step once again. The
garage door may open.
If the garage door opens, the programming process is complete. If the
door does not open, press and release the button a third time. This third
press and release will complete the programming process by opening
the garage door.
The ceiling mounted garage door opener motor should now recognize
the HomeLink
® transceiver and operate the garage door.
Repeat the steps above to program another rolling code system
for any of the remaining HomeLink® buttons.
■Programming an entry gate (for U.S.A. owners)/Programming
all devices in the Canadian market
Place your transmitter 1 to 3 in. (25 to 75 mm) away from the sur-
face of the HomeLink
®.
Keep the indicator light on the HomeLink® in view while programming.
Press and hold the selected HomeLink® button.
Repeatedly press and release (cyc le) the device’s remote control
button for two seconds each until step 4 is complete.
When the indicator light on the HomeLink
® compatible trans-
ceiver starts to flashing rapidly, release the buttons.
Test the operation of the HomeLink
® by pressing the newly pro-
grammed button. Check to see if the gate/device operates cor-
rectly.
Repeat the steps above to program another device for each of
the remaining HomeLink
® buttons.
1
2
3
4
1
2
3
4
5
6
Page 452 of 668
452
SIENNA_OM_OM08013U_(U)
6-4. Using the other interior features
■Before programming
●Install a new battery in the transmitter.
● The battery side of the transmitter must be pointed away from the
HomeLink
® button.
■ Certification for the garage door opener
For vehicles sold in the U.S.A.
FCC ID: NZLWZLHL4
NOTE:
This device complies with Part 15 of the FCC Rules.
Operation is subject to the following two conditions: (1) this device may not
cause harmful interference, and (2) this device must accept any interference
received, including interference that may cause undesired operation.
FCC WARNING:
Changes or modifications not expressly approved by the party responsible for
compliance could void the user’s authority to operate the equipment.
For vehicles sold in Canada
NOTE:
Operation is subject to the following two conditions: (1) this device may not
cause interference, and (2) this device must accept any interference, includ-
ing interference that may cause undesired operation of the device.
■ For additional programming assi stance with your HomeLink
® Universal
Transceiver
Visit on the web at www.homelink.com
or call 1-800-355-3515.
WARNING
■ When programming a garage door or other remote control device
The garage door may operate, so ensure people and objects are out of dan-
ger to prevent potential harm.
■ Conforming to federal safety standards
Do not use the HomeLink
® Compatible Transceiver with any garage door
opener or device that lacks safety stop and reverse features as required by
federal safety standards.
This includes any garage door that cannot detect an obstruction object. A
door or device without these features increases the risk of death or serious
injury.
Page 463 of 668
463
SIENNA_OM_OM08013U_(U)
7Maintenance and care
7-1. Maintenance and careCleaning and protecting the vehicle exterior .......... 464
Cleaning and protecting the vehicle interior ........... 467 7-2. Maintenance
Maintenance requirements ................... 470
General maintenance........ 473
Emission inspection and maintenance (I/M)
programs ......................... 476
7-3. Do-it-yourself maintenance Do-it-yourself service precautions ..................... 477
Hood ................................. 479
Positioning a floor jack ...... 481
Engine compartment ......... 482
Tires .................................. 492
Tire inflation pressure ....... 500
Wheels .............................. 503
Air conditioning filter.......... 505
Wireless remote control/ electronic key battery ...... 507
Checking and replacing fuses ............................... 510
Light bulbs......................... 513
Page 489 of 668
SIENNA_OM_OM08013U_(U)
4897-3. Do-it-yourself maintenance
7
Maintenance and care
■Before recharging
When recharging, the battery produces hydrogen gas which is flammable and
explosive. Therefore, observe the following before recharging:
●If recharging with the battery installed on the vehicle, be sure to disconnect
the ground cable.
● Make sure the power switch on the charger is off when connecting and dis-
connecting the charger cables to the battery.
■ After recharging/reconnecting the ba ttery (vehicles with a smart key sys-
tem)
● Unlocking the doors using the smart key system may not be possible imme-
diately after reconnecting the battery. If this happens, use the wireless
remote control or the mechanical key to lock/unlock the doors.
● Start the engine with the engine switch in ACCESSORY mode. The engine
may not start with the engine switch turned off. However, the engine will
operate normally from the second attempt.
● The engine switch mode is recorded by the vehicle. If the battery is recon-
nected, the vehicle will return the engine switch mode to the status it was in
before the battery was disconnected. Make sure to turn off the engine
before disconnecting the battery. Take extra care when connecting the bat-
tery if the engine switch mode prior to discharge is unknown.
If the system will not start even after multiple attempts, contact your Toyota
dealer.
■ Disconnecting the batt ery (vehicles with an AUTO ACCESS SEAT)
Do not disconnect the battery while operating the AUTO ACCESS SEAT. The
AUTO ACCESS SEAT will become inoperable.
For details, refer to “AUTO ACCESS SEAT OWNER’S MANUAL”.