2016 TESLA MODEL X heating
[x] Cancel search: heatingPage 20 of 179

Note: When an outside seat has tilted forward
for easy entry, its back rest resets to the
neutral position and may need to be re-
adjusted.
Note: If an obstacle is detected while a seat is
moving forward for easy entry, forward
movement stops and the seat moves back.
Folding Third Row Seats
Before folding, remove items from the seats
and the rear foot well. To allow the third row
seat backs to fold completely
flat, you may
need to move the second row seats forward.
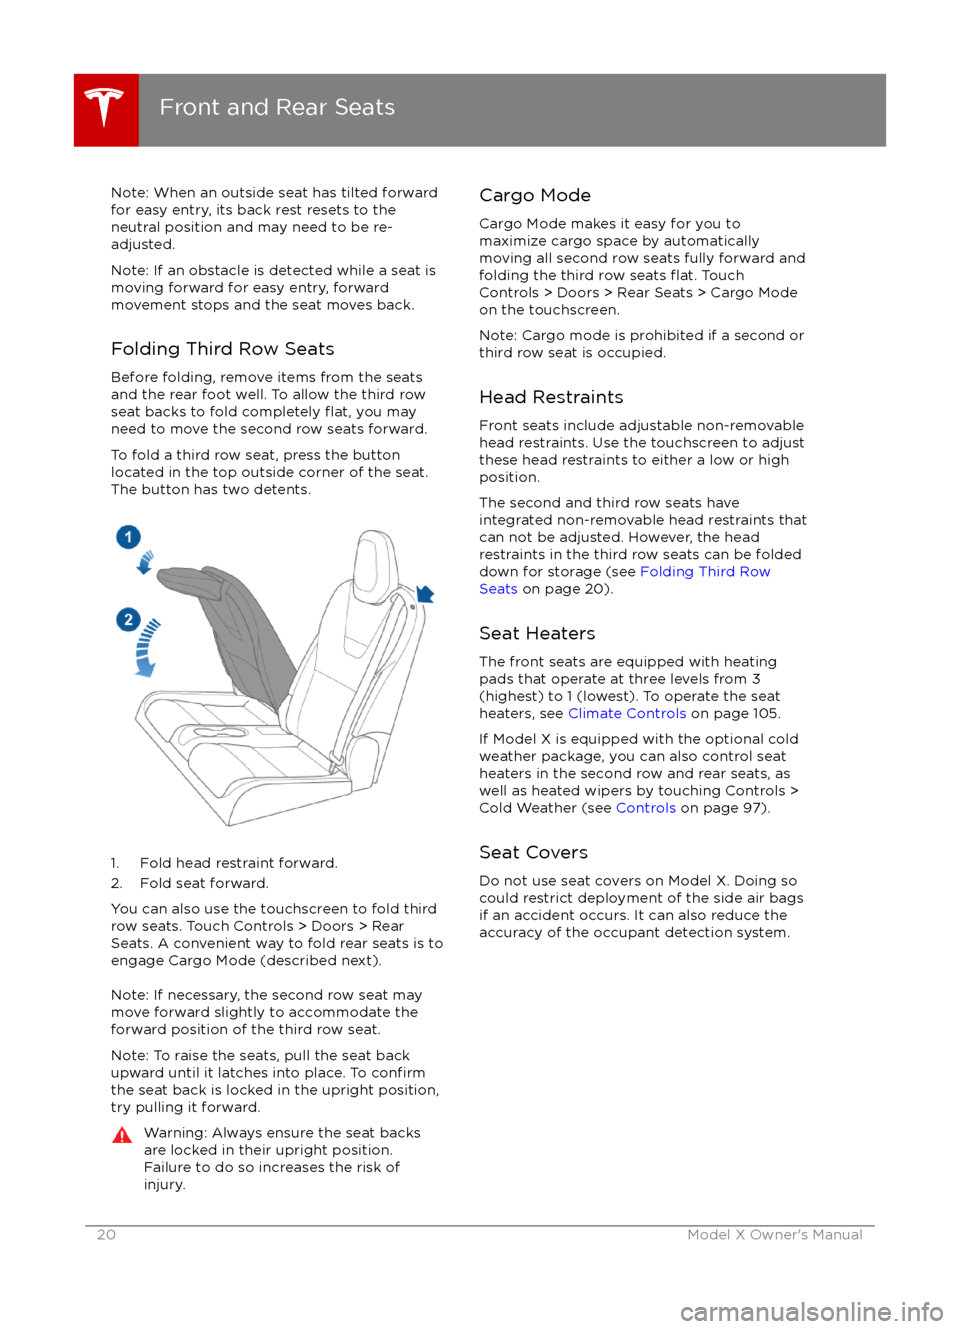
To fold a third row seat, press the button
located in the top outside corner of the seat.
The button has two detents.
1. Fold head restraint forward.
2. Fold seat forward.
You can also use the touchscreen to fold third
row seats. Touch Controls > Doors > Rear
Seats. A convenient way to fold rear seats is to engage Cargo Mode (described next).
Note: If necessary, the second row seat may
move forward slightly to accommodate the forward position of the third row seat.
Note: To raise the seats, pull the seat back
upward until it latches into place. To
confirmthe seat back is locked in the upright position, try pulling it forward.
Warning: Always ensure the seat backs
are locked in their upright position.
Failure to do so increases the risk of injury.Cargo Mode
Cargo Mode makes it easy for you to
maximize cargo space by automatically
moving all second row seats fully forward and
folding the third row seats
flat. Touch
Controls > Doors > Rear Seats > Cargo Mode
on the touchscreen.
Note: Cargo mode is prohibited if a second or
third row seat is occupied.
Head Restraints Front seats include adjustable non-removable
head restraints. Use the touchscreen to adjust
these head restraints to either a low or high
position.
The second and third row seats have
integrated non-removable head restraints that
can not be adjusted. However, the head
restraints in the third row seats can be folded
down for storage (see Folding Third Row
Seats on page 20).
Seat Heaters
The front seats are equipped with heating
pads that operate at three levels from 3
(highest) to 1 (lowest). To operate the seat
heaters, see Climate Controls on page 105.
If Model X is equipped with the optional cold
weather package, you can also control seat
heaters in the second row and rear seats, as
well as heated wipers by touching Controls >
Cold Weather (see Controls on page 97).
Seat Covers Do not use seat covers on Model X. Doing so
could restrict deployment of the side air bags
if an accident occurs. It can also reduce the
accuracy of the occupant detection system.
Front and Rear Seats
20Model X Owner
Page 105 of 179

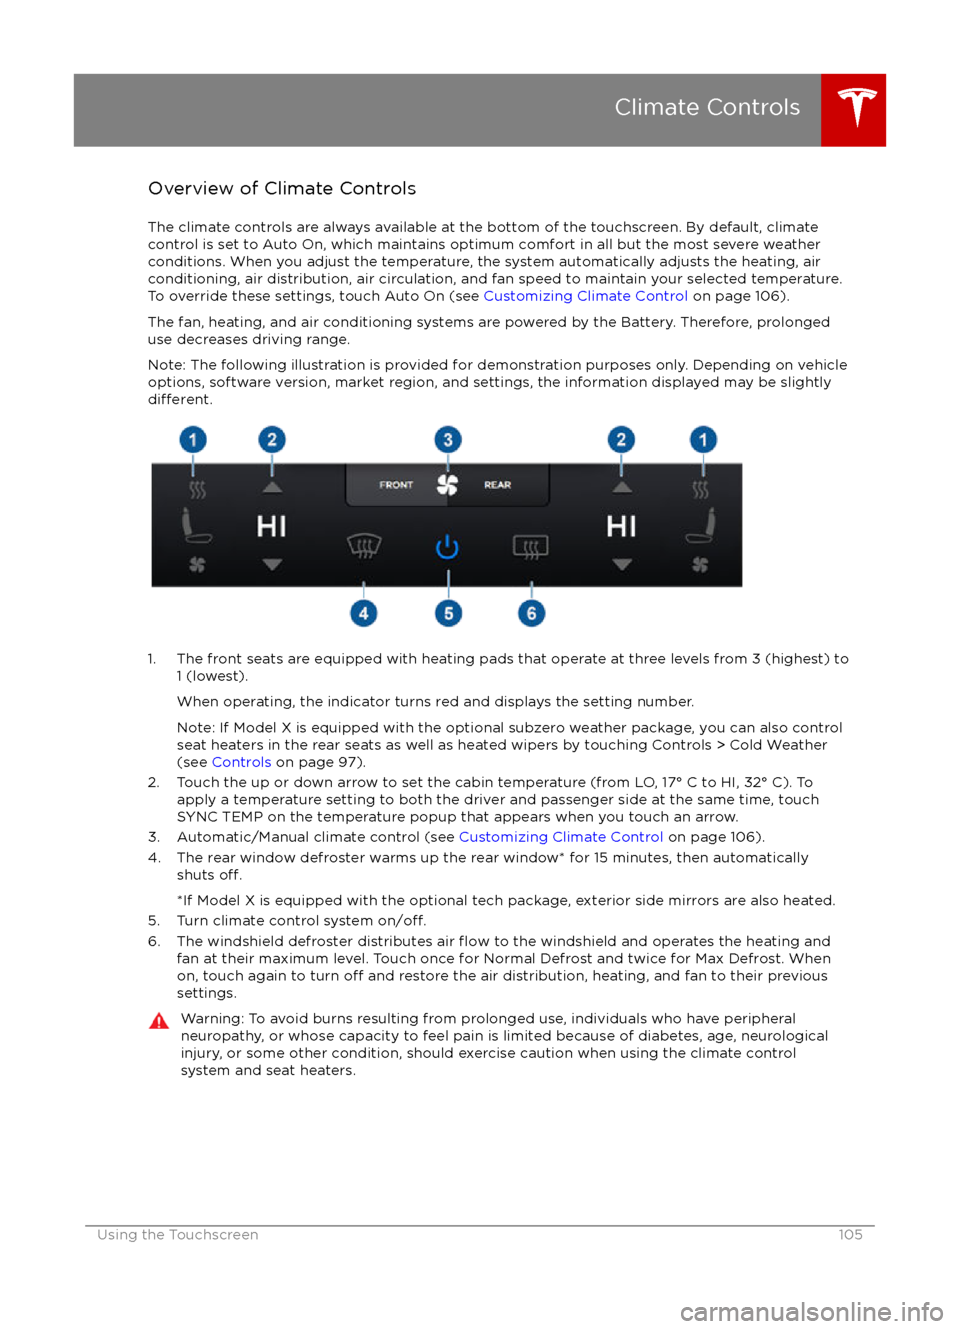
Overview of Climate Controls
The climate controls are always available at the bottom of the touchscreen. By default, climate control is set to Auto On, which maintains optimum comfort in all but the most severe weather conditions. When you adjust the temperature, the system automatically adjusts the heating, air
conditioning, air distribution, air circulation, and fan speed to maintain your selected temperature. To override these settings, touch Auto On (see Customizing Climate Control on page 106).
The fan, heating, and air conditioning systems are powered by the Battery. Therefore, prolonged use decreases driving range.
Note: The following illustration is provided for demonstration purposes only. Depending on vehicle
options, software version, market region, and settings, the information displayed may be slightly
different.
1. The front seats are equipped with heating pads that operate at three levels from 3 (highest) to 1 (lowest).
When operating, the indicator turns red and displays the setting number.
Note: If Model X is equipped with the optional subzero weather package, you can also control seat heaters in the rear seats as well as heated wipers by touching Controls > Cold Weather
(see Controls on page 97).
2. Touch the up or down arrow to set the cabin temperature (from LO, 17
Page 140 of 179

Inflating with Air Only
If you have a Tesla tire repair kit, follow these
steps to
inflate a tire with air:
1. Detach the power supply connector from the rear of the compressor and plug it into
the 12V power socket located in Model X
on the front of center console.
2. Release the black air hose from the compressor.
3. Attach the air hose to the valve and press the lever down to secure it in place.
4. Ensure the compressor is lying on a level
surface with the pressure gauge facing tothe side where you can read it.
5. To add air, turn on the compressor and
inflate until the desired pressure is
reached.
6. To release air, turn
off the compressor,
then press and hold the red button until
the desired pressure is reached.
Note: For your convenience, the tire repair kit
includes a selection of adapters that allow you to
inflate other items. These adapters are
located in a compartment on the back of the
compressor.
Caution: To avoid overheating, do not use
the compressor continuously for more
than eight minutes. Allow the compressor
to cool for 15 minutes between uses.Caution: The compressor runs slowly
when overheated from excessive use. Turn
it
off and allow it to cool.Temporary Tire Repair
140Model X Owner
Page 143 of 179

Cleaning the Interior
Frequently inspect and clean the interior to maintain its appearance and to prevent
premature wear. If possible, immediately wipe up spills and remove marks. For general
cleaning, wipe interior surfaces using a soft
cloth (such as micro
fiber) dampened with a
mixture of warm water and mild non-
detergent cleaner (test all cleaners on a
concealed area before use). To avoid streaks,
dry immediately with a soft lint-free cloth.
Interior Glass
Do not scrape, or use any abrasive cleaning
fluid on glass or mirrored surfaces. This can
damage the reflective surface of the mirror
and the heating elements in the rear window.
Airbags
Do not allow any substance to enter an airbag
cover. This could
affect correct operation.
Dashboard and Plastic Surfaces
Do not polish the upper surfaces of the
dashboard. Polished surfaces are
reflectiveand could interfere with your driving view.
Leather Seats
Leather is prone to dye-transfer which can
cause discoloration, particularly on light colored leather. White and tan leather iscoated with an anti-soiling treatment. Wipespills as soon as possible using a soft cloth
moistened with warm water and non-
detergent soap. Wipe gently in a circular
motion. Then wipe dry using a soft, lint-free
cloth. Using detergents or commercially
available leather cleaners and conditioners is
not recommended because they can discolor or dry out the leather.
Cloth Seats
Wipe spills as soon as possible using a soft
cloth moistened with warm water and non-
detergent soap. Wipe gently in a circular
motion. Then wipe dry using a soft, lint-free
cloth. Vacuum the seats as needed to remove
any loose dirt.
Carpets
Avoid over-wetting carpets. For heavily soiled
areas, use a diluted upholstery cleaner.
Seat Belts
Extend the belts to wipe. Do not use any type of detergent or chemical cleaning agent.
Allow the belts to dry naturally while
extended, preferably away from direct
sunlight.
Tesla Built-In Rear Facing Child Seats
Vacuum the seats to remove any loose dirt.
Wipe the seats with a soft cloth dampened
with warm water. You can also use an upholstery cleaner designed for automotive
use. Extend the belts to wipe. Allow the belts
to dry naturally, preferably away from direct
sunlight.
Touchscreen and Instrument Panel
Clean the touchscreen and instrument panel
using a soft lint-free cloth
specificallydesigned to clean monitors and displays. Do not use cleaners (such as a glass cleaner) and
do not use a wet wipe or a dry statically- charged cloth (such as a recently washed
microfiber). To wipe the touchscreen without
activating buttons and changing settings, you
can enable clean mode. Touch Controls > Displays > Clean Mode. The display darkens to
make it easy to see dust and smudges.
Chrome and Metal Surfaces
Polish, abrasive cleaners or hard cloths can
damage the
finish on chrome and metal
surfaces.
Cautions for Interior Cleaning
Warning: If you notice any damage on an
airbag or seat belt, contact Tesla
immediately.Warning: Do not allow any water,
cleaners, or fabric to enter a seat belt
mechanism.Caution: Using solvents (including alcohol), bleach, citrus, naphtha, orsilicone-based products or additives on
interior components can cause damage.
Cleaning
Maintenance143
Page 176 of 179

D
dashboard overview 2
data recording 168
day mode 101
declarations of conformity 173
delivery mileage 168devicesBluetooth, playing audio files 113
connecting 114
playing audio
files from 113
dimensions 155
display brightness 101
dome (map) lights 48
door labels 152
Door Unlock Mode 4
doors 4
doors, opening 4
Drive gear 42
drive-away locking 9
driverprofiles 36
seat adjustment 18driver assistanceAuto Lane Change 82
Autopark 84
Autosteer 80
blind spot warning 86
collision avoidance assist 88
forward collision warning 88
overtake acceleration 75
overview 72
settings for 101
side collision avoidance 86
side collision warning 86
staying inside lane markings 86
Traffic-Aware Cruise Control 75
drivingseating position 18
starting 41
tips to maximize range 63
E
electric parking brake 55
emergency
flashers 52
energygained from regenerative braking 55
range information 43, 46
tips to minimize usage of 63
energy & charging setting 101
energy app 63
energy saving mode 63
Erase & Reset 104
event data recording 168
exteriorcar cover 144
cleaning 142exterior (continued)dimensions 155
lights 48
overview 3
polishing, touch up, & repair 144
F
factory defaults, restoring 104
factory reset 104
fan speed, interior 106
favorites, adding and removing 113
FCC
certifications 173
features, downloading new 123
firmware (software) updates 123flash drives, playing audio files from 113flashers, warning 52flat tire repair 138floor mats 144
fluidsreplacement intervals 132
reservoirs, checking 146
fog lights 48
forward collision warning 88
front passenger detection 34
front trunk 14
fusesremoving access panel 146
G
GAWR 153
gears 42
glove box 16
Gross Axle Weight Rating 153
Gross Vehicle Weight Rating 153
ground clearance 155, 156
GVWR 153
H hazard warning
flashers 52
head restraints 20
headlightsadaptive 51
after exit 51
high beams 51
heated wipers 53
heating 105
height adjustments (suspension)auto-raising 110
automatic and manual settings 111
disabling (Jack mode) 111
high beam headlights 51
high voltageBattery specifications 159
Index
176Model X Owner