2016 TESLA MODEL X height
[x] Cancel search: heightPage 69 of 179

touchscreen (Controls > Driving > E-Brake &
Power Off > Parking Brake).Warning: Do not rely on Model X to
detect the trailer and automatically
engage Trailer Mode. Always check that
Trailer Mode is engaged before towing a trailer.Warning: Under no circumstances shouldyou exit Trailer Mode when towing a
trailer. Doing so can cause serious injury
and/or death.Warning: Do not use the air suspension setting to appropriately match the height
of the hitch with the height of the trailer.
You must choose a trailer hitch and trailer
that have the appropriate height for suitable axle loading and trailer balance.Warning: Do not use Trailer Mode when
attaching a bicycle carrier to the trailer
hitch (see Using a Bicycle Carrier on page
71).
While Towing a Trailer
Model X is designed primarily as a passenger- carrying vehicle. Towing a trailer putsadditional load on the motor, drive train,brakes, tires and suspension and
significantlydecreases range. If you decide to tow a trailer,
proceed with caution and follow these general
guidelines:
Page 111 of 179

Note: Manually lowering the suspension toStandard or Low while at a saved location alsoremoves the auto-raising location.
Automatic Lowering
When Model X is moving above typical
driveway or parking lot speeds, Smart Air
Suspension automatically lowers ride height to improve aerodynamics and handling. For most
average speed driving, the suspension is
automatically set to Standard. As described
above, when you make manual height adjustments, the suspension automatically
lowers at increased driving speeds.
When carrying loads, Smart Air Suspension
also maintains a level height between the front
and rear.
You can adjust the speed at which the Air
Suspension automatically transitions to the LOW ride height by touching Controls >Suspension > Automatic Lowering on the
touchscreen. This setting is saved to your
Driver
Profile.
Note: You can temporarily override the ride
height by pressing the brake pedal, touching
an air suspension control in Controls >
Suspension, and then manually choosing a
ride height. Your suspension
Page 155 of 179

Exterior DimensionsAOverall Length198.3 in5,035.6 mm
B
Overall Width (including mirrors)Overall Width (including folded
mirrors
Overall Width (excluding mirrors)89.4 in 81.6 in
78.7 in2,271 mm
2,073 mm 1,999 mmCOverall Height66.3 in1,684 mmDWheel Base116.7 in2,965 mmEOverhang - Front38.3 in973.6 mmFOverhang - Rear43.2 in1097.7 mmGGround Clearance:
Standard, with skis
Standard, without skis
Very high, with skis
Very high, without skis6.7 in 7.2 in
8.3 in
8.8 in171 mm
183 mm 211 mm
223 mmHTrack - Front
Track - Rear67.1 in
66.9 in1,704.5 mm 1,710 mm
Dimensions and Weights
Specifications155
Page 162 of 179

1Tire category. P indicates that the tire is for passenger vehicles.2Tire width. This 3-digit number is the width (in millimeters) of the tire from sidewall
edge to sidewall edge.3Aspect ratio. This 2-digit number is the sidewall height as a percentage of the tread
width. So, if the tread width is 205 mm, and the aspect ratio is 50, the sidewall height is 102 mm.4Tire construction. R indicates that the tire is of Radial ply construction.5Wheel diameter. This 2-digit number is the diameter of the wheel rim in inches.6Load index. This 2 or 3-digit number is the weight each tire can support. This number is
not always shown.7Speed rating. When stated, indicates the maximum speed (in mph) at which the tire can be used for extended periods. Q=99 mph (160 km/h), R=106 mph (170 km/h), S=112 mph (180 km/h), T=118 mph (190 km/h), U=124 mph (200 km/h), H=130 mph(210 km/h), V=149 mph (240 km/h), W=168 mph (270 km/h), Y=186 mph (300 km/h).8Tire composition and materials. The number of plies in both the tread area and thesidewall area indicates how many layers of rubber coated material make up the structure of the tire. Information is also provided on the type of materials used.9Maximum tire load. The maximum load which can be carried by the tire.10Maximum permissible inflation pressure. This pressure should not be used for normal
driving.11U.S. DOT Tire Identification Number (TIN). Begins with the letters DOT and indicates
that the tire meets all federal standards. The next 2 digits/letters represent the plant
code where it was manufactured, and the last 4 digits represent the week and year of
manufacture. For example, the number 1712 is used to represent the 17th week of 2012. The other numbers are marketing codes used at the manufacturer
Page 164 of 179

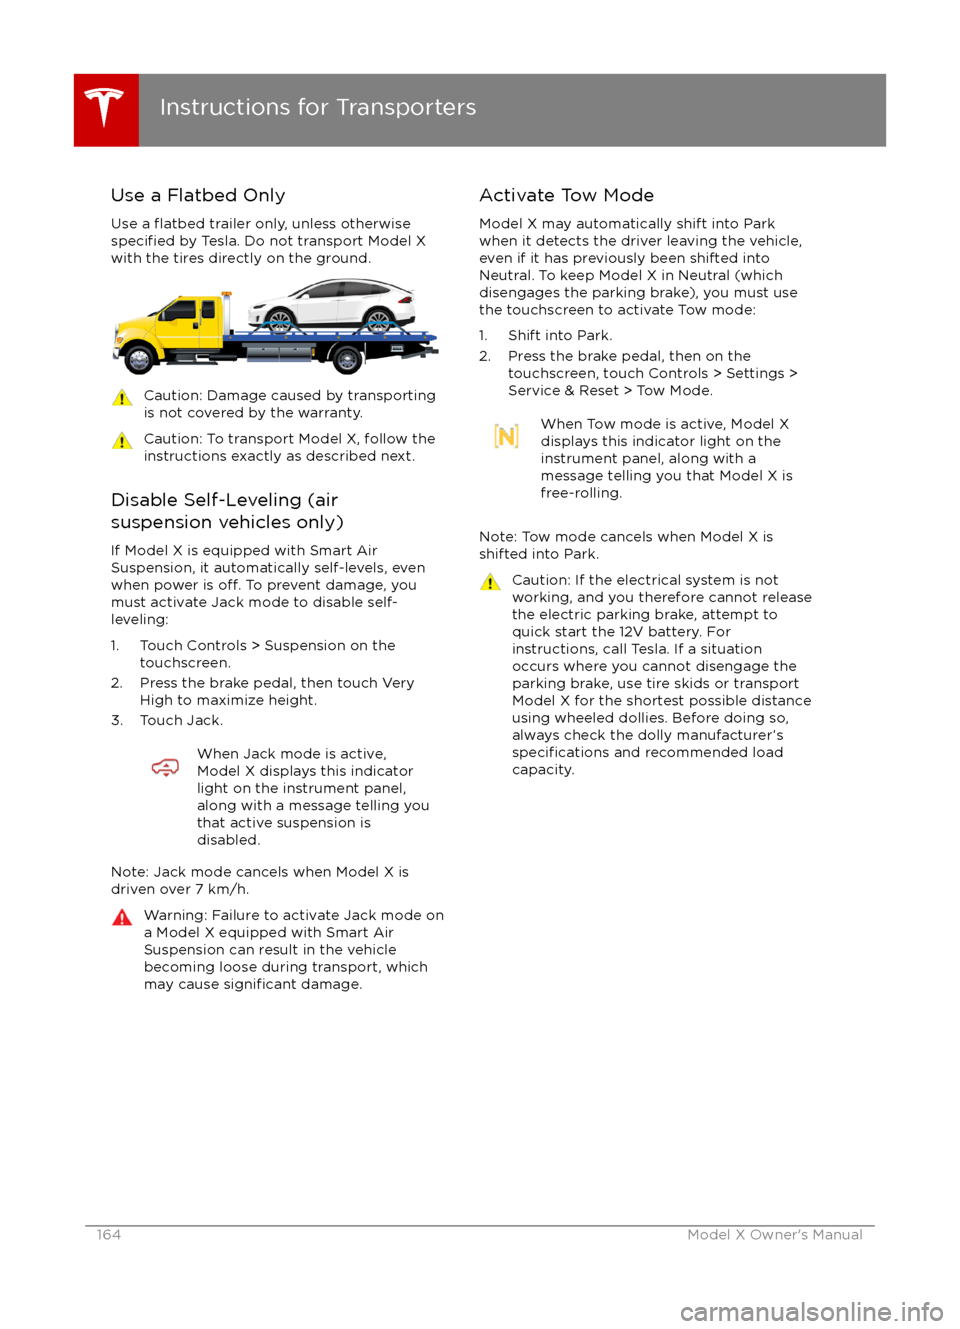
Use a Flatbed OnlyUse a
flatbed trailer only, unless otherwisespecified by Tesla. Do not transport Model X
with the tires directly on the ground.
Caution: Damage caused by transporting is not covered by the warranty.Caution: To transport Model X, follow the
instructions exactly as described next.
Disable Self-Leveling (air
suspension vehicles only)
If Model X is equipped with Smart Air
Suspension, it automatically self-levels, even
when power is
off. To prevent damage, you
must activate Jack mode to disable self-
leveling:
1. Touch Controls > Suspension on the touchscreen.
2. Press the brake pedal, then touch Very High to maximize height.
3. Touch Jack.
When Jack mode is active,
Model X displays this indicator
light on the instrument panel,
along with a message telling you
that active suspension is
disabled.
Note: Jack mode cancels when Model X is
driven over 7 km/h.
Warning: Failure to activate Jack mode on
a Model X equipped with Smart Air
Suspension can result in the vehicle
becoming loose during transport, which
may cause
significant damage.
Activate Tow Mode
Model X may automatically shift into Park
when it detects the driver leaving the vehicle,
even if it has previously been shifted into Neutral. To keep Model X in Neutral (which
disengages the parking brake), you must use
the touchscreen to activate Tow mode:
1. Shift into Park.
2. Press the brake pedal, then on the touchscreen, touch Controls > Settings >
Service & Reset > Tow Mode.When Tow mode is active, Model X
displays this indicator light on the
instrument panel, along with a
message telling you that Model X is
free-rolling.
Note: Tow mode cancels when Model X is
shifted into Park.
Caution: If the electrical system is not
working, and you therefore cannot release
the electric parking brake, attempt to
quick start the 12V battery. For
instructions, call Tesla. If a situation
occurs where you cannot disengage the
parking brake, use tire skids or transport Model X for the shortest possible distance
using wheeled dollies. Before doing so,
always check the dolly manufacturer
Page 176 of 179

D
dashboard overview 2
data recording 168
day mode 101
declarations of conformity 173
delivery mileage 168devicesBluetooth, playing audio files 113
connecting 114
playing audio
files from 113
dimensions 155
display brightness 101
dome (map) lights 48
door labels 152
Door Unlock Mode 4
doors 4
doors, opening 4
Drive gear 42
drive-away locking 9
driverprofiles 36
seat adjustment 18driver assistanceAuto Lane Change 82
Autopark 84
Autosteer 80
blind spot warning 86
collision avoidance assist 88
forward collision warning 88
overtake acceleration 75
overview 72
settings for 101
side collision avoidance 86
side collision warning 86
staying inside lane markings 86
Traffic-Aware Cruise Control 75
drivingseating position 18
starting 41
tips to maximize range 63
E
electric parking brake 55
emergency
flashers 52
energygained from regenerative braking 55
range information 43, 46
tips to minimize usage of 63
energy & charging setting 101
energy app 63
energy saving mode 63
Erase & Reset 104
event data recording 168
exteriorcar cover 144
cleaning 142exterior (continued)dimensions 155
lights 48
overview 3
polishing, touch up, & repair 144
F
factory defaults, restoring 104
factory reset 104
fan speed, interior 106
favorites, adding and removing 113
FCC
certifications 173
features, downloading new 123
firmware (software) updates 123flash drives, playing audio files from 113flashers, warning 52flat tire repair 138floor mats 144
fluidsreplacement intervals 132
reservoirs, checking 146
fog lights 48
forward collision warning 88
front passenger detection 34
front trunk 14
fusesremoving access panel 146
G
GAWR 153
gears 42
glove box 16
Gross Axle Weight Rating 153
Gross Vehicle Weight Rating 153
ground clearance 155, 156
GVWR 153
H hazard warning
flashers 52
head restraints 20
headlightsadaptive 51
after exit 51
high beams 51
heated wipers 53
heating 105
height adjustments (suspension)auto-raising 110
automatic and manual settings 111
disabling (Jack mode) 111
high beam headlights 51
high voltageBattery specifications 159
Index
176Model X Owner
Page 177 of 179

high voltage (continued)components 125
safety 132
hills, stopping on 59
hood 14
horn 39
I IC
certifications 173identification labels 151
Insane setting (dual motor) 97
instrument panelcharging status 131
cleaning 143
overview of 43, 46interiorcleaning 143
dimensions 156
lights 48
overview 2
temperature control 105
Internet radio
112
intrusion detection 121
ionizer 101
ISOFIX child seats, installing 28
J
J1772 126
Jack mode 111
jacking 149
K
keyFCC and IC certifications 173
how to use 4
key not inside 41
ordering extras 6
replacing battery 5
keyless entry 4
L
labelStatutory Plate 153
Tire and Loading Information 153
lane assist 86
lane change flash 52
lane change, automatic 82
lane departure warning 86
language setting 101
Launch Mode 60
liftgateliftgate (continued)adjust opening height 12
opening 12
lifting 149
lightsadaptive headlights 51
hazard warning 52
headlights after exit 51
turn signals 51
load limits 152
location-based suspension 110
locking and unlocking doors 4
lumbar support 18
M
maintenancebrake fluid, checking 147
cleaning 142
daily and monthly checks 132
fluid replacement intervals 132
panel, removing 146
replacing wipers 145
service intervals 132
tires 133
washer
fluid, topping up 147
map data, proprietary notice 169
maps 117
mats 144
media 112
mileage upon delivery 168
mirrors 40
mobile app 124
Mobile Connectordescription 126
using 128
modifications 150
motor specifications 157
N
naming 104
navigation 117
NCC
certifications 173
Neutral gear 42
night mode 101
nose cone, removing 165
O
odometerresetting trip odometer 62
outside temperature 37
overhang dimensions 155
overtake acceleration 75
Owner Information, about 166, 167
Index
Index177