2016 SUBARU WRX child lock
[x] Cancel search: child lockPage 52 of 594
seat are exposed another serious
danger. Since the SRS airbag de-
ploys with considerable speed and
force, the child could be injured or
even killed.
& Where to place a child re-
straint system The following are SUBARU ’ s recommen-
dations on where to place a child restraint
system in your vehicle.
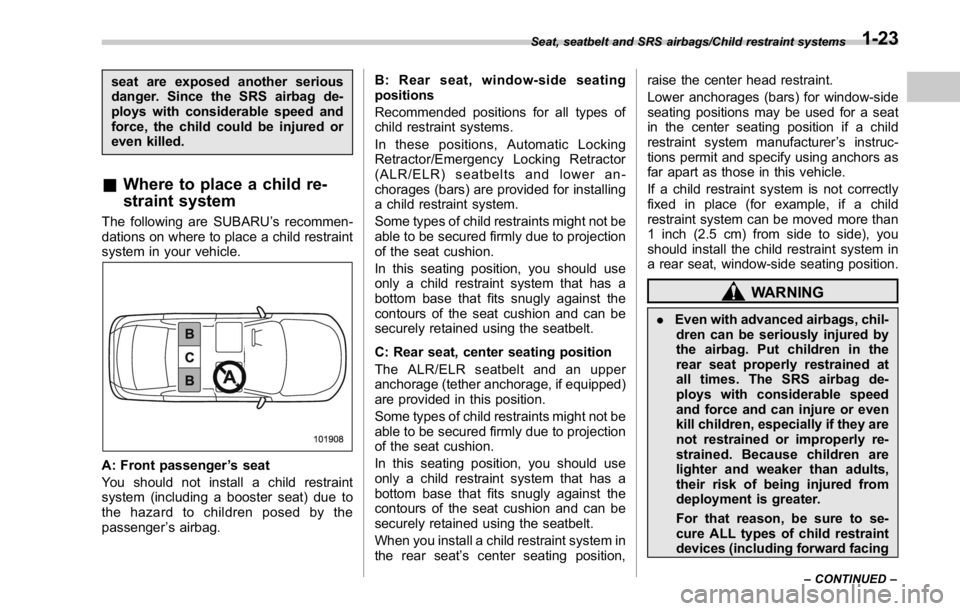
A: Front passenger ’ s seat
You should not install a child restraint
system (including a booster seat) due to
the hazard to children posed by the
passenger ’ s airbag. B: Rear seat, window-side seating
positions
Recommended positions for all types of
child restraint systems.
In these positions, Automatic Locking
Retractor/Emergency Locking Retractor
(ALR/ELR) seatbelts and lower an-
chorages (bars) are provided for installing
a child restraint system.
Some types of child restraints might not be
able to be secured firmly due to projection
of the seat cushion.
In this seating position, you should use
only a child restraint system that has a
bottom base that fits snugly against the
contours of the seat cushion and can be
securely retained using the seatbelt.
C: Rear seat, center seating position
The ALR/ELR seatbelt and an upper
anchorage (tether anchorage, if equipped)
are provided in this position.
Some types of child restraints might not be
able to be secured firmly due to projection
of the seat cushion.
In this seating position, you should use
only a child restraint system that has a
bottom base that fits snugly against the
contours of the seat cushion and can be
securely retained using the seatbelt.
When you install a child restraint system in
the rear seat ’ s center seating position, raise the center head restraint.
Lower anchorages (bars) for window-side
seating positions may be used for a seat
in the center seating position if a child
restraint system manufacturer ’ s instruc-
tions permit and specify using anchors as
far apart as those in this vehicle.
If a child restraint system is not correctly
fixed in place (for example, if a child
restraint system can be moved more than
1 inch (2.5 cm) from side to side), you
should install the child restraint system in
a rear seat, window-side seating position.
WARNING. Even with advanced airbags, chil-
dren can be seriously injured by
the airbag. Put children in the
rear seat properly restrained at
all times. The SRS airbag de-
ploys with considerable speed
and force and can injure or even
kill children, especially if they are
not restrained or improperly re-
strained. Because children are
lighter and weaker than adults,
their risk of being injured from
deployment is greater.
For that reason, be sure to se-
cure ALL types of child restraint
devices (including forward facingSeat, seatbelt and SRS airbags/Child restraint systems
– CONTINUED –1-23
Page 54 of 594
stop, turn or accident; they can
strike and injure vehicle occu-
pants as well as result in serious
injuries or death to the child.
CAUTIONWhen you install a child restraint
system, follow the manufacturer ’ s
instructions supplied with it. After
installing the child restraint system,
check to ensure that it is held
securely in position. If it is not held
tight and secure, the danger of your
child suffering personal injury in the
event of an accident may be in-
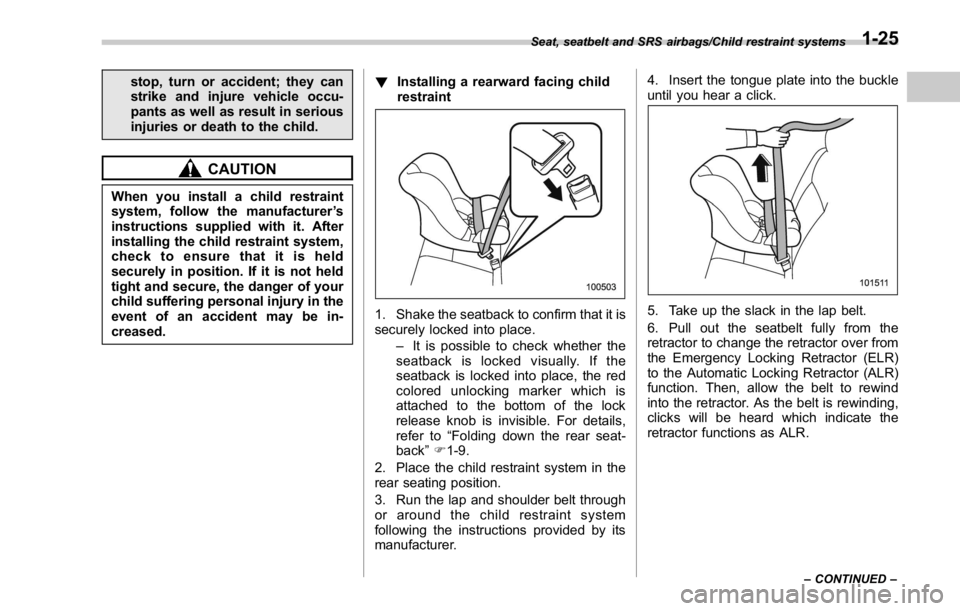
creased. ! Installing a rearward facing child
restraint
1. Shake the seatback to confirm that it is
securely locked into place.
– It is possible to check whether the
seatback is locked visually. If the
seatback is locked into place, the red
colored unlocking marker which is
attached to the bottom of the lock
release knob is invisible. For details,
refer to “ Folding down the rear seat-
back ” F 1-9.
2. Place the child restraint system in the
rear seating position.
3. Run the lap and shoulder belt through
or around the child restraint system
following the instructions provided by its
manufacturer. 4. Insert the tongue plate into the buckle
until you hear a click.
5. Take up the slack in the lap belt.
6. Pull out the seatbelt fully from the
retractor to change the retractor over from
the Emergency Locking Retractor (ELR)
to the Automatic Locking Retractor (ALR)
function. Then, allow the belt to rewind
into the retractor. As the belt is rewinding,
clicks will be heard which indicate the
retractor functions as ALR.Seat, seatbelt and SRS airbags/Child restraint systems
– CONTINUED –1-25
Page 55 of 594
Seat, seatbelt and SRS airbags/Child restraint systems
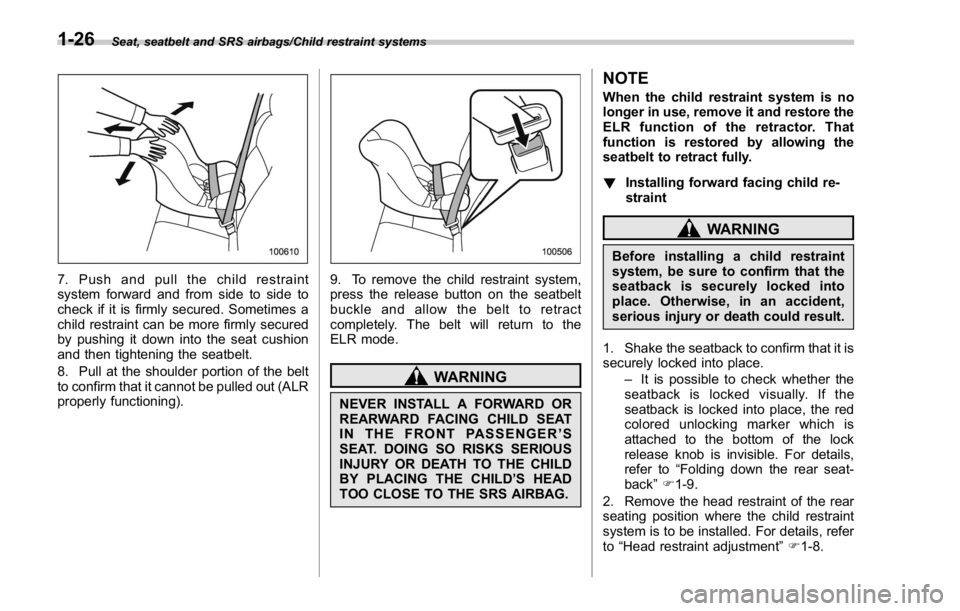
7. Push and pull the child restraint
system forward and from side to side to
check if it is firmly secured. Sometimes a
child restraint can be more firmly secured
by pushing it down into the seat cushion
and then tightening the seatbelt.
8. Pull at the shoulder portion of the belt
to confirm that it cannot be pulled out (ALR
properly functioning). 9. To remove the child restraint system,
press the release button on the seatbelt
buckle and allow the belt to retract
completely. The belt will return to the
ELR mode.
WARNING
NEVER INSTALL A FORWARD OR
REARWARD FACING CHILD SEAT
IN THE FRONT PASSENGER ’ S
SEAT. DOING SO RISKS SERIOUS
INJURY OR DEATH TO THE CHILD
BY PLACING THE CHILD ’ S HEAD
TOO CLOSE TO THE SRS AIRBAG. NOTE When the child restraint system is no
longer in use, remove it and restore the
ELR function of the retractor. That
function is restored by allowing the
seatbelt to retract fully.
! Installing forward facing child re-
straint
WARNINGBefore installing a child restraint
system, be sure to confirm that the
seatback is securely locked into
place. Otherwise, in an accident,
serious injury or death could result.
1. Shake the seatback to confirm that it is
securely locked into place.
– It is possible to check whether the
seatback is locked visually. If the
seatback is locked into place, the red
colored unlocking marker which is
attached to the bottom of the lock
release knob is invisible. For details,
refer to “ Folding down the rear seat-
back ” F 1-9.
2. Remove the head restraint of the rear
seating position where the child restraint
system is to be installed. For details, refer
to “ Head restraint adjustment ” F 1-8.1-26
Page 56 of 594
CAUTIONStore the head restraint that has
been removed in the cargo area.
Avoid placing the head restraint in
the passenger compartment to pre-
vent it from being thrown around in
the passenger compartment in a
sudden stop or a sharp turn.
3. Place the child restraint system in the
rear seating position.
WARNINGWhen you intend to install a child
restraint system on the rear center
seating position, if the child restraint
system does not fit snugly against
the contours of the rear center seat
cushion, install the child restraint
system on the window-side seating
position to be safe. For details, refer
to “ Where to place a child restraint
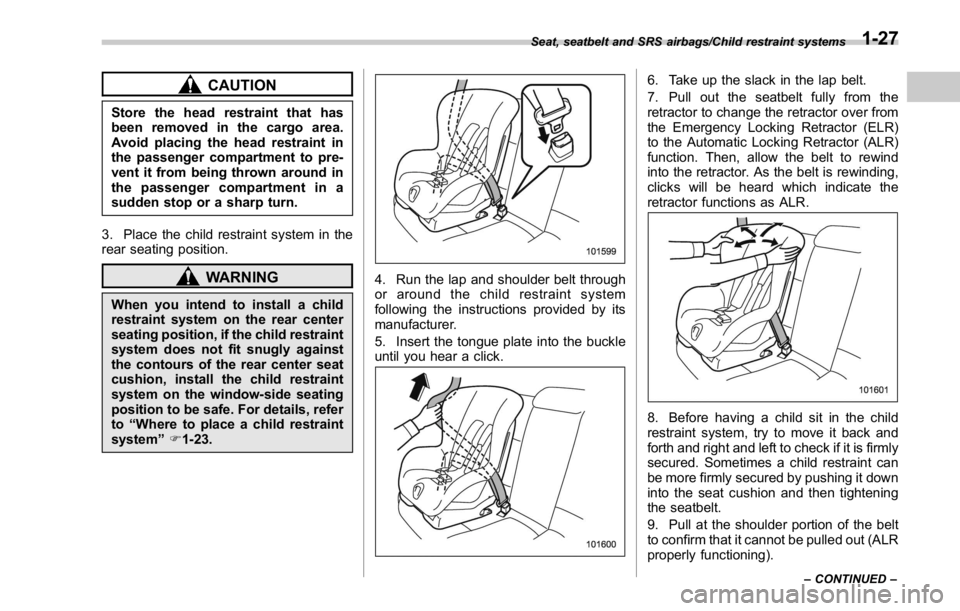
system ” F 1-23. 4. Run the lap and shoulder belt through
or around the child restraint system
following the instructions provided by its
manufacturer.
5. Insert the tongue plate into the buckle
until you hear a click. 6. Take up the slack in the lap belt.
7. Pull out the seatbelt fully from the
retractor to change the retractor over from
the Emergency Locking Retractor (ELR)
to the Automatic Locking Retractor (ALR)
function. Then, allow the belt to rewind
into the retractor. As the belt is rewinding,
clicks will be heard which indicate the
retractor functions as ALR.
8. Before having a child sit in the child
restraint system, try to move it back and
forth and right and left to check if it is firmly
secured. Sometimes a child restraint can
be more firmly secured by pushing it down
into the seat cushion and then tightening
the seatbelt.
9. Pull at the shoulder portion of the belt
to confirm that it cannot be pulled out (ALR
properly functioning).Seat, seatbelt and SRS airbags/Child restraint systems
– CONTINUED –1-27
Page 59 of 594
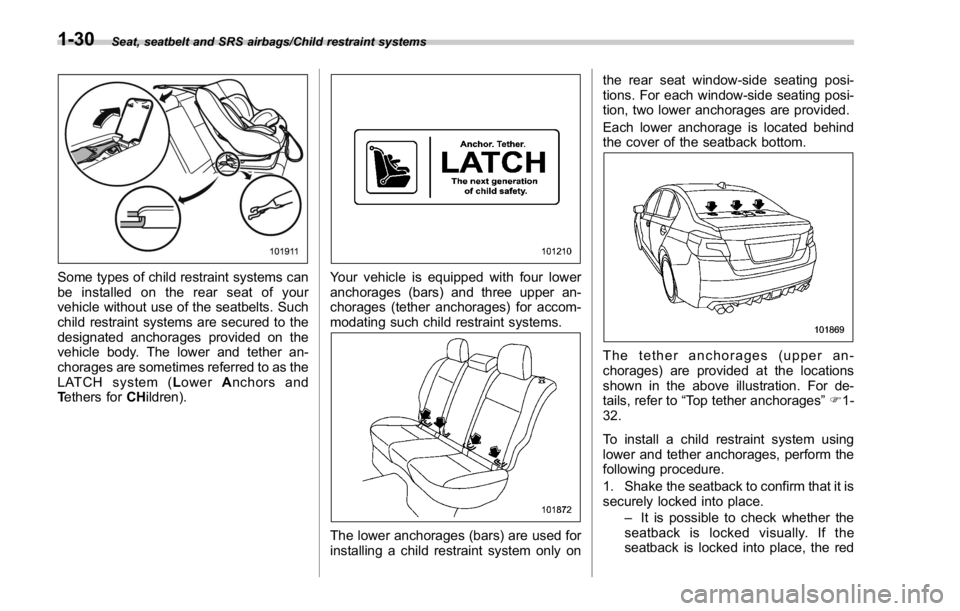
Seat, seatbelt and SRS airbags/Child restraint systems
Some types of child restraint systems can
be installed on the rear seat of your
vehicle without use of the seatbelts. Such
child restraint systems are secured to the
designated anchorages provided on the
vehicle body. The lower and tether an-
chorages are sometimes referred to as the
LATCH system ( L ower A nchors and
T ethers for CH ildren). Your vehicle is equipped with four lower
anchorages (bars) and three upper an-
chorages (tether anchorages) for accom-
modating such child restraint systems.
The lower anchorages (bars) are used for
installing a child restraint system only on the rear seat window-side seating posi-
tions. For each window-side seating posi-
tion, two lower anchorages are provided.
Each lower anchorage is located behind
the cover of the seatback bottom.
The tether anchorages (upper an-
chorages) are provided at the locations
shown in the above illustration. For de-
tails, refer to “ Top tether anchorages ” F 1-
32.
To install a child restraint system using
lower and tether anchorages, perform the
following procedure.
1. Shake the seatback to confirm that it is
securely locked into place.
– It is possible to check whether the
seatback is locked visually. If the
seatback is locked into place, the red1-30
Page 60 of 594
colored unlocking marker which is
attached to the bottom of the lock
release knob is invisible. For details,
refer to “ Folding down the rear seat-
back ” F 1-9.
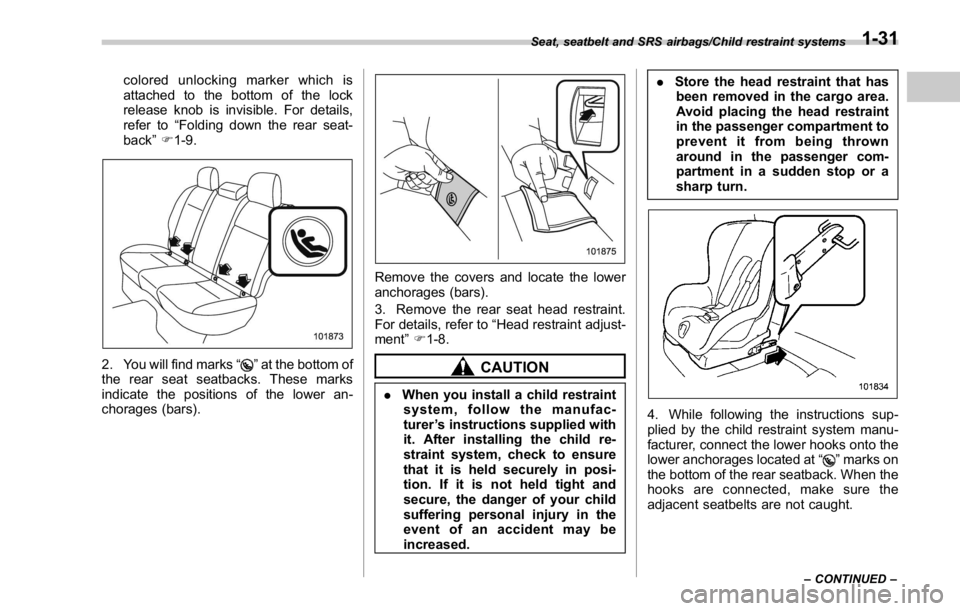
2. You will find marks “ ” at the bottom of
the rear seat seatbacks. These marks
indicate the positions of the lower an-
chorages (bars). Remove the covers and locate the lower
anchorages (bars).
3. Remove the rear seat head restraint.
For details, refer to “ Head restraint adjust-
ment ” F 1-8.
CAUTION
. When you install a child restraint
system, follow the manufac-
turer ’ s instructions supplied with
it. After installing the child re-
straint system, check to ensure
that it is held securely in posi-
tion. If it is not held tight and
secure, the danger of your child
suffering personal injury in the
event of an accident may be
increased. . Store the head restraint that has
been removed in the cargo area.
Avoid placing the head restraint
in the passenger compartment to
prevent it from being thrown
around in the passenger com-
partment in a sudden stop or a
sharp turn.
4. While following the instructions sup-
plied by the child restraint system manu-
facturer, connect the lower hooks onto the
lower anchorages located at “
” marks on
the bottom of the rear seatback. When the
hooks are connected, make sure the
adjacent seatbelts are not caught.Seat, seatbelt and SRS airbags/Child restraint systems
– CONTINUED –1-31
Page 72 of 594

communications equipment or other
critical navigation or communication
equipment operating between 0.45-30
MHz.
! Conditions in which front passen-
ger ’ s SRS frontal airbag is not
activated
The front passenger ’ s SRS frontal airbag
will not be activated when any of the
following conditions are met regarding the
front passenger ’ s seat:
. The seat is empty.
. The seat is equipped with an appro-
priate child restraint system and an infant
is restrained in it. (See WARNING that
follows.)
. The front passenger ’ s occupant detec-
tion system is malfunctioning.
WARNING
NEVER INSTALL A FORWARD OR
REARWARD FACING CHILD SEAT
IN THE FRONT PASSENGER ’ S SEAT
EVEN IF THE FRONT PASSEN-
GER ’ S SRS FRONTAL AIRBAG IS
DEACTIVATED. Be sure to install it
in the REAR seat in a correct
manner. Also, it is strongly recom-
mended that any forward facing
child seat or booster seat be in- stalled in the REAR seat, and that
even children who have outgrown a
child restraint system be also
seated in the REAR seat. This is
because children sitting in the front
passenger ’ s seat may be killed or
severely injured should the front
passenger ’ s SRS frontal airbag de-
ploy. REAR seats are the safest
place for children.
CAUTIONWhen the front passenger ’ s seat is
occupied by an infant in an appro-
priate child restraint system, ob-
serve the following precautions.
Failure to do so may interfere with
the proper operation of the occu-
pant detection system, activating
the front passenger ’ s SRS frontal
airbag even though that seat is
occupied by the infant in the child
restraint system.
. Do not place any article (includ-
ing electronic devices) on the
seat other than the infant in the
child restraint system. . Do not place more than one
infant in the child restraint sys-
tem.
! If the front passenger ’ s frontal
airbag ON indicator illuminates
and the OFF indicator turns off
even when an infant or a small
child is in a child restraint sys-
tem (including booster seat)
1. Turn the ignition switch to the “ LOCK ” /
“ OFF ” position.
2. Remove the child restraint system
from the seat.
3. By referring to the child restraint
manufacturer ’ s recommendations as well
as the child restraint system installation
procedures in “ Child restraint systems ”
F 1-21, correctly install the child restraint
system.
4. Turn the ignition switch to the “ ON ”
position and make sure that the front
passenger ’ s frontal airbag ON indicator
turns off and the OFF indicator illuminates.
If still the ON indicator remains illuminated
while the OFF indicator turns off, take the
following actions.
. Ensure that no article is placed on the
seat other than the child restraint system
and the child occupant.Seat, seatbelt and SRS airbags/*SRS airbag (Supplemental Restraint System airbag)
– CONTINUED –1-43
Page 73 of 594

Seat, seatbelt and SRS airbags/*SRS airbag (Supplemental Restraint System airbag)
. Ensure that the backward-forward po-
sition and seatback of front passenger ’ s
seat are locked into place securely by
moving the seat back and forth.
If the ON indicator still remains illuminated
while the OFF indicator turns off after
taking relevant corrective actions de-
scribed above, relocate the child restraint
system to the rear seat and immediately
contact your SUBARU dealer for an
inspection.
NOTE When a child who has outgrown a child
restraint system or a small adult is
seated in the front passenger ’ s seat,
the SUBARU advanced frontal airbag
system may or may not activate the
front passenger ’ s SRS frontal airbag
depending on the occupant ’ s seating
posture. Children should always wear a
seatbelt when sitting in the seat irre-
spective of whether the airbag is
deactivated or activated. If the front
passenger ’ s SRS frontal airbag is acti-
vated (the ON indicator remains illumi-
nated while the OFF indicator turns off),
ensure that no article is placed on the
seat other than the occupant.
If the ON indicator still remains illumi-
nated while the OFF indicator turns off
despite the fact that the actions noted above have been taken, seat the child/
small adult in the rear seat and im-
mediately contact your SUBARU dealer
for an inspection. Even if the system
has passed the dealer inspection, it is
recommended that on subsequent trips
the child/small adult always take the
rear seat.
Children who have outgrown a child
restraint system should always wear the
seatbelt irrespective of whether the airbag
is deactivated or activated.
! Conditions in which front passen-
ger ’ s SRS frontal airbag is activated
The front passenger ’ s SRS frontal airbag
will be activated for deployment upon
impact when any of the following condi-
tions are met regarding the front passen-
ger ’ s seat.
. When the seat is occupied by an adult.
. When certain items (e.g. jug of water)
are placed on the seat.
! If the passenger ’ s frontal airbag
OFF indicator illuminates and
the ON indicator turns off even
when the front passenger ’ s seat
is occupied by an adult
This can be caused by the adult incor-
rectly sitting in the front passenger ’ s seat.
1. Turn the ignition switch to the “ LOCK ” / “ OFF ” position.
2. Ask the front passenger to set the
seatback to the upright position, sit up
straight in the center of the seat cushion,
correctly fasten the seatbelt, position his/
her legs out forward, and adjust the seat to
the rearmost position.
3. Turn the ignition switch to the “ ON ”
position.
If the OFF indicator remains illuminated
while the ON indicator remains off, take
the following actions.
1. Turn the ignition switch to the “ LOCK ” /
“ OFF ” position.
2. Make sure that the front passenger
does not use a blanket, seat cushion, seat
cover, seat heater or massager, etc.
3. If wearing excessive layers of clothing,
the front passenger should remove any
unnecessary items before sitting in the
front passenger ’ s seat, or should sit in a
rear seat.
4. Turn the ignition switch to the “ ON ”
position and wait 6 seconds to allow the
system to complete self-checking. Follow-
ing the system check, both indicators turn
off for 2 seconds. Now, the ON indicator
should illuminate while the OFF indicator
remains off.
If the OFF indicator still remains illumi-1-44