2016 SUBARU WRX tire type
[x] Cancel search: tire typePage 11 of 594

frequent causes of accidents. Since alco-
hol affects all people differently, you may
have consumed too much alcohol to drive
safely even if the level of alcohol in your
blood is below the legal limit. The safest
thing you can do is never drink and drive.
However if you have no choice but to
drive, stop drinking and sober up comple-
tely before getting behind the wheel.
& Drugs and driving WARNINGThere are some drugs (over the
counter and prescription) that can
delay your reaction time and impair
your perception, judgment and at-
tentiveness. If you drive after taking
them, it may increase your, your
passengers ’ and other persons ’ risk
of being involved in a serious or
fatal accident.
If you are taking any drugs, check with
your doctor or pharmacist or read the
literature that accompanies the medication
to determine if the drug you are taking can
impair your driving ability. Do not drive
after taking any medications that can
make you drowsy or otherwise affect your
ability to safely operate a motor vehicle. If
you have a medical condition that requires you to take drugs, please consult with
your doctor.
Never drive if you are under the influence
of any illicit mind-altering drugs. For your
own health and well-being, we urge you
not to take illegal drugs in the first place
and to seek treatment if you are addicted
to those drugs.
& Driving when tired or sleepy WARNINGWhen you are tired or sleepy, your
reaction time will be delayed and
your perception, judgment and at-
tentiveness will be impaired. If you
drive when tired or sleepy, your,
your passengers ’ and other per-
sons ’ chances of being involved in
a serious accident may increase.
Please do not continue to drive but
instead find a safe place to rest if you
are tired or sleepy. On long trips, you
should make periodic rest stops to refresh
yourself before continuing on your journey.
When possible, you should share the
driving with others. & Modification of your vehicle CAUTIONYour vehicle should not be modified
other than with genuine SUBARU
parts and accessories. Other types
of modifications could affect its
performance, safety or durability,
and may even violate governmental
regulations. In addition, damage or
performance problems resulting
from modification may not be cov-
ered under warranties.
NOTE This vehicle is equipped with a function
that will record certain vehicle data in
the event the vehicle is operated or
maintained in a manner that exceeds or
varies from routine normal use.
That data may be used as a means of
determining whether or not a vehicle
condition is eligible for repair under
warranty.6
Page 428 of 594

namics Control is no guarantee
that full vehicle control will be
maintained at all times and under
all conditions, its activation
should be seen as a sign that
the speed of the vehicle should
be reduced considerably.
. Whenever suspension compo-
nents, steering components, or
an axle are removed from a
vehicle, have an inspection of
that system performed by an
authorized SUBARU dealer.
. The following precautions should
be observed in order to ensure
that the Vehicle Dynamics Con-
trol system is operating properly:
– All four wheels should be
fitted with tires of the same
size, type, and brand. Further-
more, the amount of wear
should be the same for all
four tires.
– Keep the tire pressure at the
proper level as shown on the
vehicle placard attached to
the driver ’ s side door pillar.
– Use only the specified tem-
porary spare tire to replace a
flat tire. With a temporary
spare tire, the effectiveness of the Vehicle Dynamics Con-
trol system is reduced and
this should be taken into ac-
count when driving the vehi-
cle in such a condition.
. If non-matching tires are used,
the Vehicle Dynamics Control
system may not operate cor-
rectly.
. The Vehicle Dynamics Control
system helps prevent unstable
vehicle motion such as skidding
using control of the brakes and
engine power. Do not turn off the
Vehicle Dynamics Control sys-
tem unless it is absolutely ne-
cessary. If you must turn off the
Vehicle Dynamics Control sys-
tem, drive very carefully accord-
ing to the road surface condition.
In the event of wheelspin and/or skidding
on a slippery road surface and/or during
cornering and/or an evasive maneuver,
the Vehicle Dynamics Control system
adjusts the engine ’ s output and the
wheels ’ respective braking forces to help
maintain traction and directional control.
. Traction Control Function
The traction control function is designed to
prevent spinning of the driving wheels on slippery road surfaces, thereby helping to
maintain traction and directional control.
Activation of this function is shown by
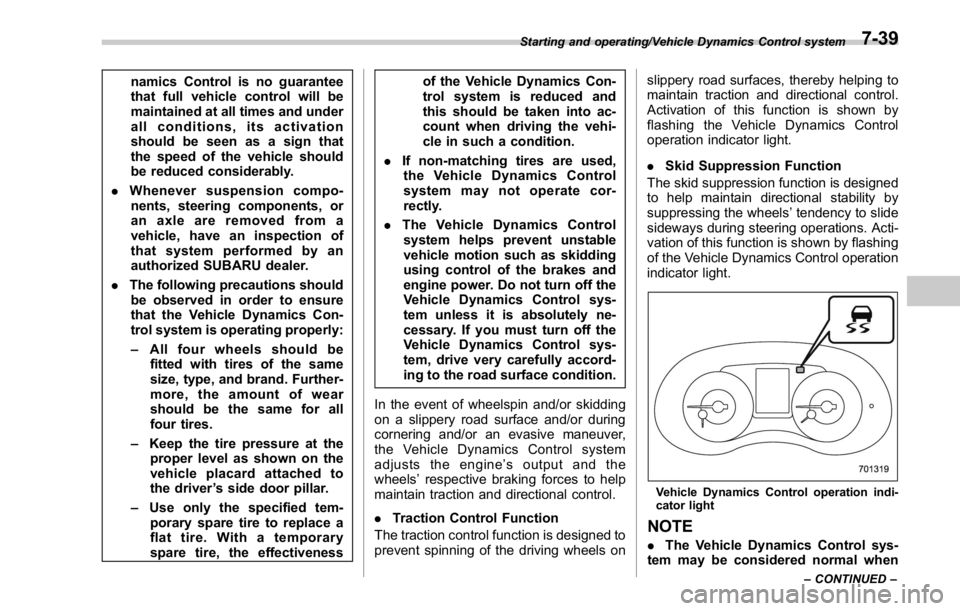
flashing the Vehicle Dynamics Control
operation indicator light.
. Skid Suppression Function
The skid suppression function is designed
to help maintain directional stability by
suppressing the wheels ’ tendency to slide
sideways during steering operations. Acti-
vation of this function is shown by flashing
of the Vehicle Dynamics Control operation
indicator light.
Vehicle Dynamics Control operation indi-
cator light
NOTE
. The Vehicle Dynamics Control sys-
tem may be considered normal whenStarting and operating/Vehicle Dynamics Control system
– CONTINUED –7-39
Page 462 of 594

Snow stuck on the wiper arm prevents the
wiper from working effectively. If snow is
stuck on the wiper arm, pull off the road to
a safe place, then remove it. If you stop
the vehicle at road side, use the hazard
warning flasher to alert other drivers.
Refer to “ Hazard warning flasher ” F 3-8.
We recommend use of non-freezing type
wiper blades (winter blades) during the
seasons you could have snow and freez-
ing temperatures. Blades of this type give
superior wiping performance in snowy
conditions. Be sure to use blades that
are suitable for your vehicle.
CAUTIONDuring high-speed driving, non-
freezing type wiper blades may not
perform as well as standard wiper
blades. If this happens, reduce the
vehicle speed.
NOTE When the season requiring non-freez-
ing type wiper blades is over, replace
them with standard wiper blades.
& Corrosion protection
Refer to “ Corrosion protection ” F 10-4. & Snow tires WARNING. When you replacing or installing
winter tire(s), all four tires must
be the same for following items.
(a) Size
(b) Circumference
(c) Speed symbol
(d) Load index
(e) Construction
(f) Manufacturer
(g) Brand (tread pattern)
(h) Degrees of wear
For the items (a) to (d), you must
obey the specification that is
printed on the tire placard. The
tire placard is located on the
bottom of driver ’ s door pillar.
If all of four winter tires are not
the same for items (a) to (h), there
is a possibility that serious me-
chanical damage could occur to
the drive train of your car, and
affect the following.
— Ride
— Handling
— Braking — Speedometer/Odometer
calibration
— Clearance between the body
and tires
It also may be dangerous and
lead to loss of vehicle control,
and it can lead to an accident.
. Do not use a combination of
radial, belted bias or bias tires
since it may cause dangerous
handling characteristics and lead
to an accident.
Your vehicle is equipped with “ summer
tires ” as original equipment, which are
inadequate for driving on slippery roads
such as on snow-covered or icy roads.
When you choose to install winter tires on
your vehicle, be sure to use the correct tire
size and type. You must install four winter
tires that are of the same size, construc-
tion, brand and load range and you should
never mix radial, belted bias or bias tires
since this may result in dangerous hand-
ling characteristics. When you choose a
tire, make sure that there is enough
clearance between the tire and vehicle
body.
Remember to drive with care at all times
regardless of the type of tires on your
vehicle. Driving tips/Winter driving
– CONTINUED –8-9
Page 463 of 594

Driving tips/Loading your vehicle
& Tire chains CAUTIONTire chains cannot be used on your
vehicle because of the lack of
clearance between the tires and
vehicle body.
NOTE When tire chains cannot be used, use
of another type of traction device (such
as spring chains) may be acceptable if
use on your vehicle is recommended
by the device manufacturer, taking into
account tire size and road conditions.
Follow the device manufacturer ’ s in-
structions, especially regarding max-
imum vehicle speed.
To help avoid damage to your vehicle,
drive slowly, readjust or remove the
device if it is contacting your vehicle,
and do not spin your wheels. Damage
caused to your vehicle by use of a
traction device is not covered under
warranty.
Make certain that any traction device
you use is an SAE class S device, and
use it on the front wheels only. Always
use the utmost care when driving with
a traction device. Overconfidence be- cause you are using a traction device
could easily lead to a serious accident.
& Rocking the vehicle If you must rock the vehicle to free it from
snow, sand, or mud, depress the accel-
erator pedal slightly and move the shift
lever/select lever back and forth between
“ 1 ” / “ D ” and “ R ” repeatedly. Do not race the
engine. For the best possible traction,
avoid spinning the wheels when trying to
free the vehicle.
When the road surface is extremely
slippery, you can obtain better traction by
starting the vehicle with the transmission
in 2nd than in 1st (MT models and CVT
models).
If your vehicle is a CVT model, for
information about holding the transmission
in the 2nd position, refer to “ Selection of
manual mode ” F 7-26. Loading your vehicle WARNINGNever allow passengers to ride on a
folded rear seatback or in the trunk.
Doing so may result in serious
injury.
WARNING
. Never stack luggage or other
cargo higher than the top of the
seatback because it could tumble
forward and injure passengers in
the event of a sudden stop or
accident. Keep luggage or cargo
low, as close to the floor as8-10
Page 491 of 594

Maintenance and service
Tires and wheels .............................................. 11-31Types of tires ................................................... 11-31
Tire pressure monitoring system (TPMS) (if
equipped) ....................................................... 11-31
Tire inspection ................................................. 11-32
Tire pressures and wear ................................... 11-33
Wheel balance .................................................. 11-35
Wear indicators ................................................ 11-35
Tire rotation direction mark .............................. 11-36
Tire rotation ..................................................... 11-36
Tire replacement .............................................. 11-36
Wheel replacement ........................................... 11-37
Aluminum wheels ............................................. 11-38
Windshield washer fluid .................................. 11-38
Replacement of wiper blades .......................... 11-39Windshield wiper blade assembly ..................... 11-40
Windshield wiper blade rubber ......................... 11-40 Battery .............................................................. 11-41
Fuses ................................................................ 11-42
Installation of accessories .............................. 11-44
Replacing bulbs ............................................... 11-44Headlights (models with LED headlights) .......... 11-44
High beam headlight ........................................ 11-44
Low beam headlight (models without LED
headlights), front side marker light (if
equipped), parking light (models without LED
headlights) and front turn signal light ............. 11-46
Front fog light (if equipped) .............................. 11-47
Rear combination lights ................................... 11-48
License plate light ........................................... 11-49
Other bulbs ..................................................... 11-49
Replacing battery ............................................. 11-50Replacing battery of access key ....................... 11-50
Replacing transmitter battery ........................... 11-51
Page 495 of 594

Maintenance and service/Maintenance tips
Maintenance tips Some clips and fender linings must be
removed before replacing the air cleaner
elements or specific bulbs.
& Removing and reinstalling
clips! Removing clips
There are several types of clips used for
your vehicle.
! Type A clips
1. Turn the clips counterclockwise using
a flat-head screwdriver until the center
portion of the clip is raised.
2. Removetheclipswithaflat-head
screwdriver using leverage. 3. Remove the entire clip by pulling it up.
! Type B clips
! Type C clips
1. Pull out the center portion of the clip using a flat-head screwdriver as shown in
the illustration.
2. Pull the protruded center portion to
remove the entire body of the clip.
! Type D clips
1. Turn the clip counterclockwise using a
Phillips screwdriver until the center portion
of the clip is raised.
2. Remove the entire clip by pulling it up.11-6
Page 496 of 594

! Type E clips
1. Push the center portion of the clip
using a Phillips screwdriver until the clip is
raised.
2. Remove the entire clip by pulling it up. ! Type F clips
1. Pull out the head of the clip using a
flat-head screwdriver as shown in the
illustration.
2. Remove the entire clip by pulling it up. ! Reinstalling clips
! Type A clips
! Type B clipsMaintenance and service/Maintenance tips
– CONTINUED –11-7
Page 520 of 594

Tires and wheels & Types of tires You should be familiar with type of tires
present on your vehicle.
! All season tires
All season tires are designed to provide
an adequate measure of traction, handling
and braking performance in year-round
driving including snowy and icy road
conditions. However all season tires do
not offer as much traction performance as
winter (snow) tires in heavy or loose snow
or on icy roads.
All season tires are identified by “ ALL
SEASON ” and/or “ M+S ” (Mud & Snow) on
the tire sidewall.
! Summer tires
Summer tires are high-speed capability
tires best suited for highway driving under
dry conditions.
Summer tires are inadequate for driving
on slippery roads such as on snow-
covered or icy roads.
If you drive your vehicle on snow-covered
or icy roads, we strongly recommend the
use of winter (snow) tires.
When installing winter tires, be sure to
replace all four tires. ! Winter (snow) tires
Winter tires are best suited for driving on
snow-covered and icy roads. However
winter tires do not perform as well as
summer tires and all season tires on roads
other than snow-covered and icy roads.
& Tire pressure monitoring
system (TPMS) (if equipped) The tire pressure monitoring system pro-
vides the driver with a warning message
by sending a signal from a sensor that is
installed in each wheel when tire pressure
is severely low. The tire pressure monitor-
ing system will activate only when the
vehicle is driven. Also, this system may
not react immediately to a sudden drop in
tire pressure (for example, a blow-out
caused by running over a sharp object).
If you adjust the tire pressures in a warm
garage and will then drive the vehicle in
cold outside air, the resulting drop in tire
pressures may cause the low tire pressure
warning light to illuminate. To avoid this
problem when adjusting the tire pressures
in a warm garage, inflate the tires to
pressures higher than those shown on the
tire placard. Specifically, inflate them by an
extra 1 psi (6.9 kPa, 0.07 kgf/cm 2
) for
every difference of 10 8 F (5.6 8 C) between
the temperature in the garage and the temperature outside. By way of example,
the following table shows the required tire
pressures that correspond to various out-
side temperatures when the temperature
in the garage is 60 8 F (15.6 8 C).
Example:
Tire size: 245/40R18 97W
Standard tire pressures:
Front: 33 psi (230 kPa, 2.3 kgf/cm 2
)
Rear: 32 psi (220 kPa, 2.2 kgf/cm 2
)
Garage temperature: 60 8 F (15.6 8 C)Outside
temperature Adjusted pressure
[psi (kPa, kgf/cm 2
)]
Front Rear
30 8 F( − 1 8 C) 36 (250, 2.5) 35 (240, 2.4)
10 8 F( − 12 8 C) 38 (260, 2.6) 37 (255, 2.55)
− 10 8 F( − 23 8 C) 40 (275, 2.75) 39 (270, 2.7)
If the low tire pressure warning light
illuminates when you drive the vehicle in
cold outside air after adjusting the tire
pressures in a warm garage, re-adjust the
tire pressures using the method described
above. Then, increase the vehicle speed
to at least 20 mph (32 km/h) and check to
see that the low tire pressure warning light
turns off a few minutes later. If the low tire
pressure warning light does not turn off,
the tire pressure monitoring system may
not be functioning normally. In this event, Maintenance and service/Tires and wheels
– CONTINUED –11-31