2016 SUBARU IMPREZA display
[x] Cancel search: displayPage 248 of 594

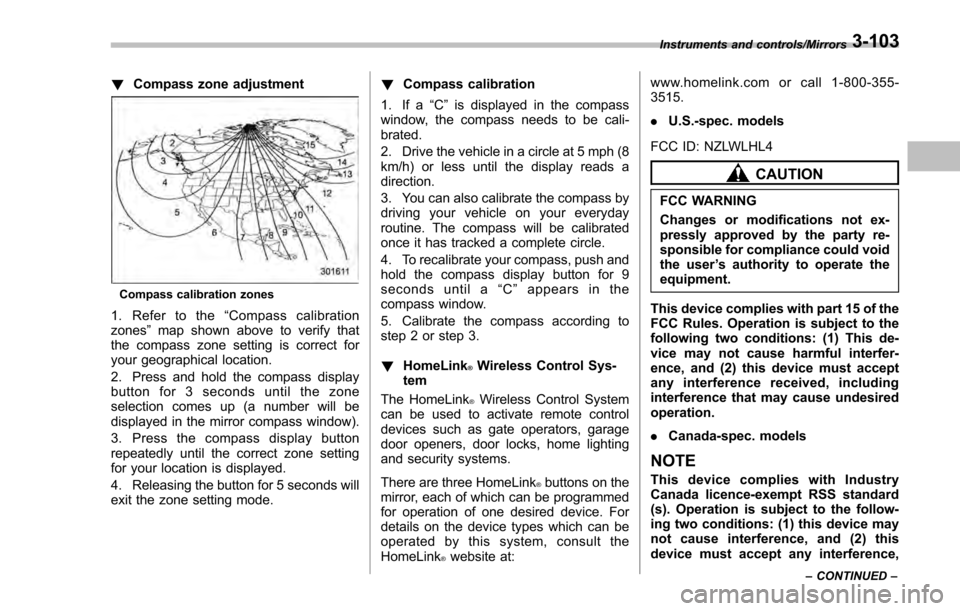
!Compass zone adjustment
Compass calibration zones
1. Refer to the “Compass calibration
zones” map shown above to verify that
the compass zone setting is correct for
your geographical location.
2. Press and hold the compass display
button for 3 seconds until the zone
selection comes up (a number will be
displayed in the mirror compass window).
3. Press the compass display button
repeatedly until the correct zone setting
for your location is displayed.
4. Releasing the button for 5 seconds will
exit the zone setting mode. !
Compass calibration
1. If a “C”is displayed in the compass
window, the compass needs to be cali-
brated.
2. Drive the vehicle in a circle at 5 mph (8
km/h) or less until the display reads a
direction.
3. You can also calibrate the compass by
driving your vehicle on your everyday
routine. The compass will be calibrated
once it has tracked a complete circle.
4. To recalibrate your compass, push and
hold the compass display button for 9
seconds until a “C ” appears in the
compass window.
5. Calibrate the compass according to
step 2 or step 3.
! HomeLink
®Wireless Control Sys-
tem
The HomeLink
®Wireless Control System
can be used to activate remote control
devices such as gate operators, garage
door openers, door locks, home lighting
and security systems.
There are three HomeLink
®buttons on the
mirror, each of which can be programmed
for operation of one desired device. For
details on the device types which can be
operated by this system, consult the
HomeLink
®website at: www.homelink.com or call 1-800-355-
3515.
.
U.S.-spec. models
FCC ID: NZLWLHL4
CAUTION
FCC WARNING
Changes or modifications not ex-
pressly approved by the party re-
sponsible for compliance could void
the user ’s authority to operate the
equipment.
This device complies with part 15 of the
FCC Rules. Operation is subject to the
following two conditions: (1) This de-
vice may not cause harmful interfer-
ence, and (2) this device must accept
any interference received, including
interference that may cause undesired
operation.
. Canada-spec. models
NOTE
This device complies with Industry
Canada licence-exempt RSS standard
(s). Operation is subject to the follow-
ing two conditions: (1) this device may
not cause interference, and (2) this
device must accept any interference,
Instruments and controls/Mirrors
–CONTINUED –3-103
Page 254 of 594

window defogger. Some models are also
equipped with an outside mirror defogger
and/or windshield wiper deicer. The de-
fogger and deicer system is activated only
when the ignition switch is in the“ON”
position.
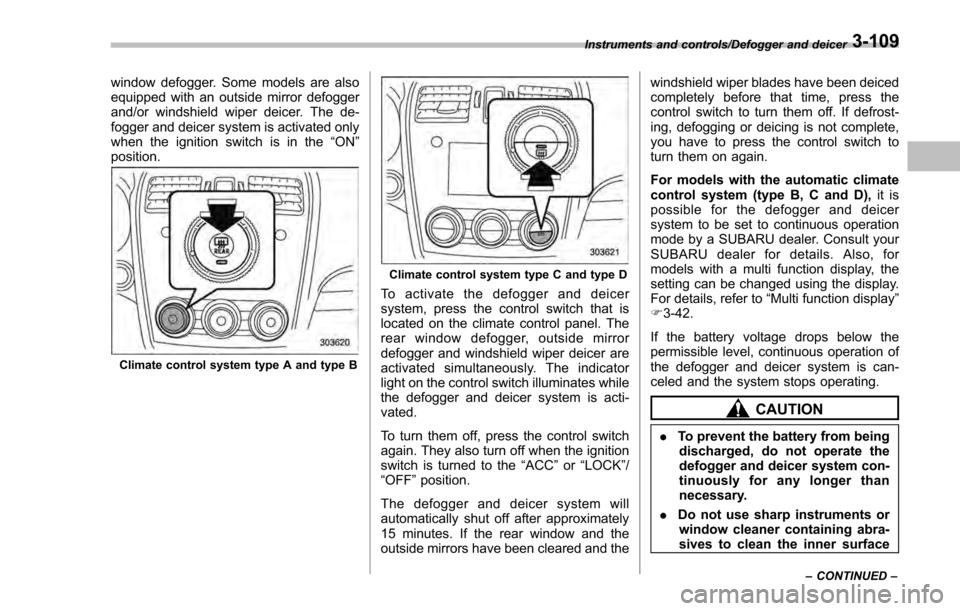
Climate control system type A and type B
Climate control system type C and type D
To activate the defogger and deicer
system, press the control switch that is
located on the climate control panel. The
rear window defogger, outside mirror
defogger and windshield wiper deicer are
activated simultaneously. The indicator
light on the control switch illuminates while
the defogger and deicer system is acti-
vated.
To turn them off, press the control switch
again. They also turn off when the ignition
switch is turned to the “ACC”or “LOCK” /
“OFF ”position.
The defogger and deicer system will
automatically shut off after approximately
15 minutes. If the rear window and the
outside mirrors have been cleared and the windshield wiper blades have been deiced
completely before that time, press the
control switch to turn them off. If defrost-
ing, defogging or deicing is not complete,
you have to press the control switch to
turn them on again.
For models with the automatic climate
control system (type B, C and D),
it is
possible for the defogger and deicer
system to be set to continuous operation
mode by a SUBARU dealer. Consult your
SUBARU dealer for details. Also, for
models with a multi function display, the
setting can be changed using the display.
For details, refer to “Multi function display”
F 3-42.
If the battery voltage drops below the
permissible level, continuous operation of
the defogger and deicer system is can-
celed and the system stops operating.
CAUTION
. To prevent the battery from being
discharged, do not operate the
defogger and deicer system con-
tinuously for any longer than
necessary.
. Do not use sharp instruments or
window cleaner containing abra-
sives to clean the inner surface
Instruments and controls/Defogger and deicer
–CONTINUED –3-109
Page 264 of 594

Automatic climate control
operation (type B, C and D)
When this mode is selected, the fan
speed, airflow distribution, air-inlet control,
and air conditioner compressor operation
are automatically controlled. To activate
this mode, perform the following.
&Type B
1. Turn the airflow mode selection dial
and fan speed control dial to the “AUTO”
position.
2. Set the preferred temperature using
the temperature control dial.
NOTE
. Each function can be individually
set to the AUTO mode independently of
the other functions. Any function set to
the AUTO mode is controlled automa-
tically. Any function not set to the
AUTO mode can be manually adjusted
as desired.
. The controllable temperature range
may vary depending on the regional
specifications of the vehicle.
To turn off the climate control system, turn
the fan speed control dial to the “OFF ”
position. Then the air inlet selection will be set as follows.
.
when the AUTO mode is selected: OFF
(outside air)
. when the AUTO mode is not selected:
the mode that was selected when turning
off the climate system will be selected.
& Type C and D
1. Depress the “AUTO ”button. The
indicator light “FULL AUTO ”on the display
illuminates.
2. Set the preferred temperature using
the temperature control dial.
NOTE
. The controllable temperature range
may vary depending on the regional
specifications of the vehicle.
. If you operate any of the buttons on
the control panel other than the “OFF”
button, rear window defogger button
and temperature control dial(s) during
FULL AUTO mode operation, the
“FULL ”indicator light on the control
panel will turn off and the “AUTO ”
indicator light will remain illuminated.
You can then manually control the
system as desired using the button
you operated. To change the system
back to the FULL AUTO mode, press
the “AUTO ”button. To turn off the climate control system,
press the
“OFF ”button. Then the air inlet
selection will be set to OFF (outside air).
& Operation tips
. Operate the automatic climate control
system when the engine is running.
. Even when cooling is not necessary,
setting the temperature much lower than
the current outlet air temperature turns on
the air conditioner compressor automati-
cally and the “A/C”indicator light on the
control panel illuminates.
Climate control/Automatic climate control operation (type B, C and D)
–CONTINUED –4-7
Page 272 of 594

Antenna................................................................ 5-2Roof antenna (for Rod type) ................................ 5-2
Roof antenna (for Shark fin type) ......................... 5-2
Audio set............................................................. 5-3Base display audio set (if equipped) .................... 5-4
STARLINKTM7.0 Multimedia Plus audio set
(U.S. spec. models only, if equipped) ................. 5-6
Tips for operating the audio/visual system ........... 5-7
Basic information before use .............................. 5-15
Basic operation .................................................. 5-18
Unit settings ...................................................... 5-19
SUBARU STARLINK (if equipped) ....................... 5-26
AM/FM radio ....................................................... 5-28
SiriusXM Satellite Radio (if equipped) ................. 5-37
aha
TMby HARMAN ............................................. 5-44
Pandora®(if equipped) ....................................... 5-50
CD ..................................................................... 5-53
USB memory ...................................................... 5-55
iPod ................................................................... 5-56
Bluetooth audio .................................................. 5-58
AUX ................................................................... 5-61
Steering switches for audio .............................. 5-63 Bluetooth
®settings
........................................... 5-66Regulatory information ...................................... 5-66
Registering/connecting Bluetooth®device .......... 5-66
Setting Bluetooth details .................................... 5-69
Hands-free phone system ................................. 5-71Control screen................................................... 5-72
Registering/connecting a Bluetooth phone ......... 5-73
Using the phone switch/microphone ................... 5-73
How to change the hands-free phone system ..... 5-74
Making a call ..................................................... 5-74
Receiving a call ................................................. 5-78
Talking on the phone ......................................... 5-78
Phone settings .................................................. 5-79
Voice command system .................................... 5-82Using the voice command system ...................... 5-82
Voice command system operation ...................... 5-83
Command list .................................................... 5-85
What to do if.... ................................................... 5-89Troubleshooting ................................................. 5-89
Appendix............................................................ 5-93Certification ....................................................... 5-93
Certification for the Hands-free system ............... 5-93
Certification for Mexico models .......................... 5-94
Audio
5
Page 275 of 594

Audio/Audio set
&Base display audio set (if equipped)
1) Power/VOLUME knob
2) Eject button
3) AUDIO/TUNE knob
4) HOME button 5) APPS button
6) Display
7) SEEK/TRACK buttons
The audio set will operate only when the
ignition switch is in the
“ACC ”or “ON ”
position.
. Power and audio controls: refer to
“Basic operation ”F 5-18.
. SUBARU STARLINK (if equipped):
refer to “SUBARU STARLINK ”F 5-26.
. Radio operation: refer to “AM/FM radio”
F 5-28.
. Satellite radio operation (if equipped):
refer to “SiriusXM Satellite Radio” F5-37.
. aha
TM: refer to “ahaTMby HARMAN ”
F 5-44.
. Pandora
®(if equipped): refer to “Pan-
dora®” F 5-50.
. CD (compact disc) player operation:
refer to “CD”F 5-53.
. USB storage device: refer to “USB
memory ”F 5-55.
. iPod operation: refer to “iPod”F 5-56.
. Bluetooth
®audio: refer to “Bluetooth
audio ”F 5-58.
. Auxiliary input jack: refer to “AUX”F 5-
61.
. Hands-free phone system: refer to
“Hands-free phone system ”F 5-71.
5-4
Page 276 of 594

NOTE
HD RadioTMTechnology (if equipped)
should be included as a feature in the
base display audio set.
This display audio set is referred to as
follows.
. U.S. customers: STARLINK
TM6.2 Mul-
timedia
. Canadian customers: 6.2-inch infotain-
ment system
Audio/Audio set
–CONTINUED –5-5
Page 282 of 594

!File information
Compatible compressed files (Audio)
Item USB DISC
Compatible
file format MP3/WMA/AAC
Folders in the
device Maximum
512 Maximum
255
Files in the
device Maximum
8000 Maximum
512
Files per
folder Maximum
255 —
Corresponding sampling frequency
(Audio)
File type Frequency (kHz)
MP3 files:
MPEG 1 LAYER 3 32/44.1/48
MP3 files:
MPEG 2 LSF LAYER 3 16/22.05/24
WMA files:
Ver. 7, 8, 9 (9.1/9.2) 32/48/64/80/96/128/
160/192
AAC files:
MPEG4/AAC-LC 48/44.1/32/24/22.05/
16/12/11.025/8
Corresponding bit rates (Audio)
File type
Bit rate (kbps)
MP3 files:
MPEG 1 LAYER 3 32 - 320
MP3 files:
MPEG 2 LSF LAYER 3 8 - 160
WMA files: Ver. 7, 8 CBR 48 - 192
WMA files:
Ver. 9 (9.1/9.2) CBR 32 - 192
AAC files:
MPEG4/AAC-LC 16 - 320
(Variable Bit Rate (VBR) compatible)
.
MP3 (MPEG Audio Layer 3), WMA
(Windows Media Audio) and AAC (Ad-
vanced Audio Coding) are audio compres-
sion standards.
. This system can play MP3/WMA/AAC
files on CD-R, CD-RW discs, USB mem-
ory, and Bluetooth device.
. This system can play disc recordings
compatible with ISO 9660 level 1 and level
2 and with the Romeo and Joliet file
system.
. When naming an MP3/WMA/AAC file,
add an appropriate file extension (.mp3/
.wma/.m4a).
. This system plays back files with .mp3/
.wma/.m4a file extensions as MP3/WMA/
AAC files respectively. To prevent noise and playback errors, use the appropriate
file extension.
.
This system can play only the first
session when using multi-session compa-
tible CDs.
. MP3 files are compatible with the ID3
Tag Ver. 1.0, Ver. 1.1, Ver. 2.2 and Ver. 2.3
formats. This system cannot display disc
title, track title and artist name in other
formats.
. WMA/AAC files can contain a WMA/
AAC tag that is used in the same way as
an ID3 tag. WMA/AAC tags carry informa-
tion such as track title and artist name.
. The emphasis function is available only
when playing MP3/WMA files recorded at
32, 44.1 and 48 kHz.
. This system can play back AAC files
encoded by iTunes.
. The sound quality of MP3/WMA files
generally improves with higher bit rates. In
order to achieve a reasonable level of
sound quality, discs recorded with a bit
rate of at least 128 kbps are recom-
mended.
. The MP3/WMA player does not play
back MP3/WMA files from discs recorded
using packet write data transfer (UDF
format). Discs should be recorded using
“pre-mastering ”software rather than pack-
etwrite software.
Audio/Audio set
–CONTINUED –5-11
Page 283 of 594

Audio/Audio set
.M3u playlists are not compatible with
the audio device.
. MP3i (MP3 interactive) and MP3PRO
formats are not compatible with the audio
device.
. The player is compatible with VBR
(Variable Bit Rate).
. When playing back files recorded as
VBR (Variable Bit Rate) files, the play time
will not be correctly displayed if the fast
forward or reverse operations are used.
. It is not possible to check folders that
do not include MP3/WMA/AAC files.
. MP3/WMA/AAC files in folders up to 8
levels deep can be played. However, the
start of playback may be delayed when
using discs containing numerous levels of
folders. For this reason, we recommend
creating discs with no more than 2 levels
of folders.
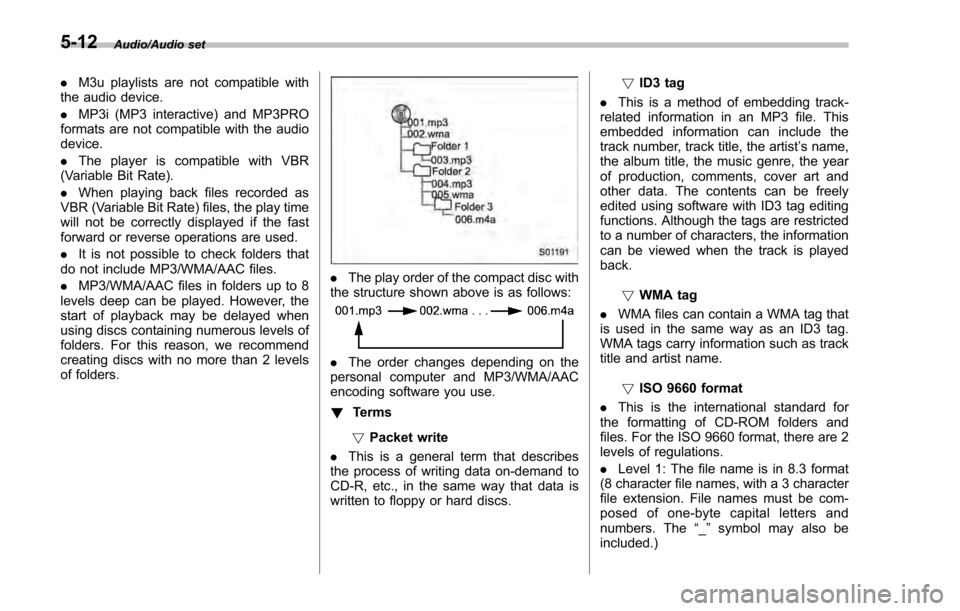
. The play order of the compact disc with
the structure shown above is as follows:
. The order changes depending on the
personal computer and MP3/WMA/AAC
encoding software you use.
! Terms
! Packet write
. This is a general term that describes
the process of writing data on-demand to
CD-R, etc., in the same way that data is
written to floppy or hard discs. !
ID3 tag
. This is a method of embedding track-
related information in an MP3 file. This
embedded information can include the
track number, track title, the artist ’s name,
the album title, the music genre, the year
of production, comments, cover art and
other data. The contents can be freely
edited using software with ID3 tag editing
functions. Although the tags are restricted
to a number of characters, the information
can be viewed when the track is played
back.
!WMA tag
. WMA files can contain a WMA tag that
is used in the same way as an ID3 tag.
WMA tags carry information such as track
title and artist name.
!ISO 9660 format
. This is the international standard for
the formatting of CD-ROM folders and
files. For the ISO 9660 format, there are 2
levels of regulations.
. Level 1: The file name is in 8.3 format
(8 character file names, with a 3 character
file extension. File names must be com-
posed of one-byte capital letters and
numbers. The “_” symbol may also be
included.)
5-12