Page 17 of 32

Driver assist systems›Speed regulating system
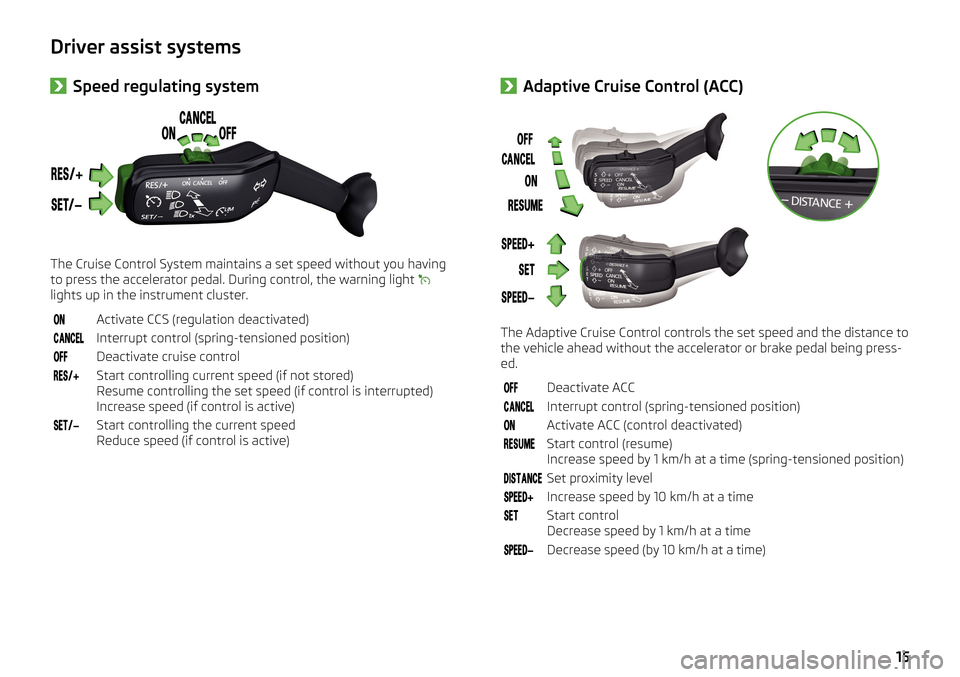
The Cruise Control System maintains a set speed without you having
to press the accelerator pedal. During control, the warning light
lights up in the instrument cluster.
Activate CCS (regulation deactivated)Interrupt control (spring-tensioned position)Deactivate cruise controlStart controlling current speed (if not stored)
Resume controlling the set speed (if control is interrupted)
Increase speed (if control is active)Start controlling the current speed
Reduce speed (if control is active)› Adaptive Cruise Control (ACC)
The Adaptive Cruise Control controls the set speed and the distance to
the vehicle ahead without the accelerator or brake pedal being press-
ed.
Deactivate ACCInterrupt control (spring-tensioned position)Activate ACC (control deactivated)Start control (resume)
Increase speed by 1 km/h at a time (spring-tensioned position)Set proximity levelIncrease speed by 10 km/h at a timeStart control
Decrease speed by 1 km/h at a timeDecrease speed (by 10 km/h at a time)15
Page 18 of 32

›Front Assist
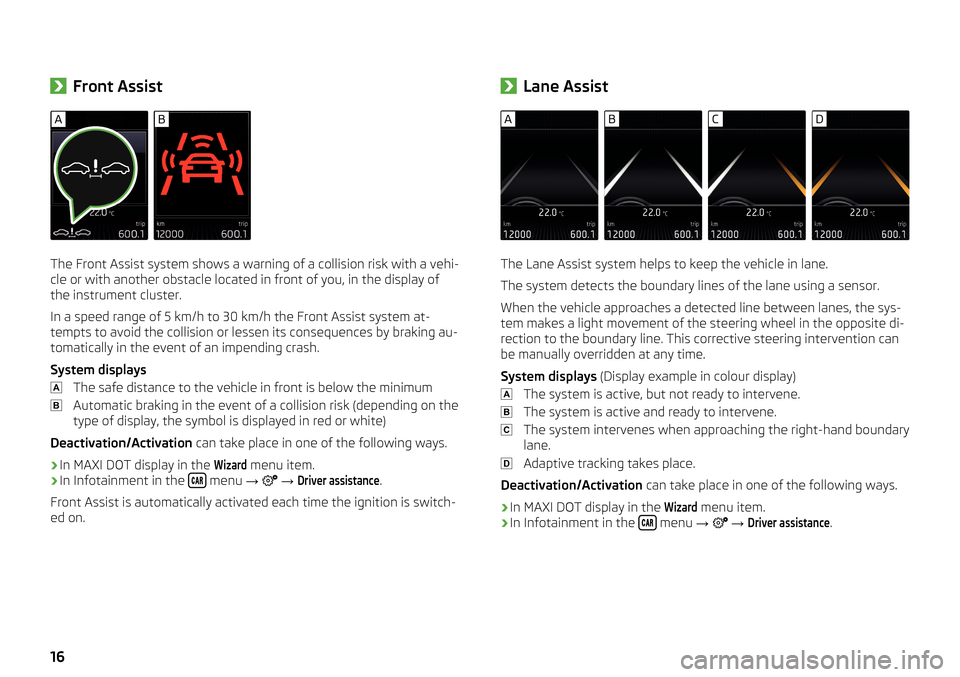
The Front Assist system shows a warning of a collision risk with a vehi-
cle or with another obstacle located in front of you, in the display of
the instrument cluster.
In a speed range of 5 km/h to 30 km/h the Front Assist system at- tempts to avoid the collision or lessen its consequences by braking au-
tomatically in the event of an impending crash.
System displays The safe distance to the vehicle in front is below the minimumAutomatic braking in the event of a collision risk (depending on the
type of display, the symbol is displayed in red or white)
Deactivation/Activation can take place in one of the following ways.
› In MAXI DOT display in the
Wizard
menu item.
› In Infotainment in the
menu
→
→
Driver assistance
.
Front Assist is automatically activated each time the ignition is switch-
ed on.
› Lane Assist
The Lane Assist system helps to keep the vehicle in lane.
The system detects the boundary lines of the lane using a sensor.
When the vehicle approaches a detected line between lanes, the sys-
tem makes a light movement of the steering wheel in the opposite di-
rection to the boundary line. This corrective steering intervention can
be manually overridden at any time.
System displays (Display example in colour display)
The system is active, but not ready to intervene.
The system is active and ready to intervene.
The system intervenes when approaching the right-hand boundary
lane.
Adaptive tracking takes place.
Deactivation/Activation can take place in one of the following ways.
› In MAXI DOT display in the
Wizard
menu item.
› In Infotainment in the
menu
→
→
Driver assistance
.
16
Page 19 of 32
At the petrol station›Refuelling›
Press the fuel flap and open it.
›
Loosen the filler cap.
›
Remove the filler cap and place it into the recess on the fuel filler
flap.
›
Insert the pump nozzle into the fuel filler neck as far as it will go, and
refuel.
› Add AdBlue ®›
Press the fuel flap and open it.
›
Loosen the filler cap for AdBlue
®
.
›
Remove the filler cap and place it onto the top of the fuel filler flap.
›
Add AdBlue ®
.
By the warning light
illuminating in the instrument cluster, the driver
is prompted to refill AdBlue ®
.
Only use AdBlue ®
that corresponds to the standard ISO 22241-1.
17
Page 20 of 32
›Opening the bonnet›
Open the driver door.
›
Pull the release lever underneath the dash panel.
›
Press the unlocking lever underneath the bonnet.
›
Lift the flap so that the gas pressure spring holds it open.
›Engine compartment overview
Coolant expansion reservoir
Engine oil dipstick
Engine oil filler opening
Brake fluid reservoir
Vehicle battery
Windscreen washer fluid reservoir
Engine Oil Specification - Petrol engines
Service intervalSpecificationFixed (QI1 - QI4)VW 502 00Variable (QI6)VW 504 00
Engine oil specification - Diesel engines
Service intervalSpecificationFixed (QI1 - QI4)VW 507 00Variable (QI6)VW 507 00
The service interval that applies to your vehicle is indicated on the ve-
hicle data carrier, which is affixed in the Owner's Manual.
ABCDEF18
Page 21 of 32
Telephone›Connection conditionsThe ignition is switched on.
The Bluetooth ®
function of Infotainment and the telephone is
switched on.
The visibility of Infotainment and the telephone is switched on.
The phone is in the passenger compartment.
The telephone is compatible with Infotainment.
A list of supported phones can be found on the Internet site
http://go.skoda.eu/compatibility , see QR Code.›Connection›
Press the
PHONE button , then tap on the function surface
Search forphone
- searching for available phones starts.
›
Tap on the function surface
Results
Select the button and the desired
phone.
›
Confirm the coupling - the phone connects to Infotainment and the
main menu phone is displayed.
19
Page 22 of 32
›Phone main menu
Information and function surfaces in the
phone main menu.
Name of the telephone service provider
Function surfaces of preferred contacts
Choice of storage group for the preferred contacts
Connecting another phone/displayed paired phones
Dialling the emergency number
Enter the telephone number
Display the telephone contact list
Messages
Displaying the call list
Settings
ABCRadio› Saving favourite stations›
Press the
RADIO button.
›
Tap on the function surface
A
and the desired broadcasting area.
›
Using the function surface
Select the desired station.
›
Press and hold one of the function surfaces
B
until you hear an
acoustic signal.
20
Page 23 of 32
Navigation›Navigation main menu›
Press the
NAV button , the main menu
navigation is displayed.
Function surfaces in range
A
.
Entering a new destination, ending the route guidance, display the
route details, entering a traffic obstruction
Storing the current location, list of saved routes and destinations,
route guidance to your home address
Search a POI in the categories ,
and tap
Map presentation options
Playback Control - Media / radio / TV tuner
Settings
› Enter new destination and start route guidance›
In the
Navigation main menu, tap the function surface
.
›
Tap the function surface
and select the type of destination entry.
›
Enter the destination and tap the function surface
Start
.
›
Select the route type:
A
The most economical
B
The fastest
C
The shortest
Selecting the type of route will start the route guidance.
21
Page 24 of 32
Media›Main menu›
Press the
MEDIA button.
The main menu appears with the following information and function
surfaces.
Information on playing track
Playback timeline with a slider
Selected audio source / display of the album image
Select the audio source
Folder and track list / Multimedia Database
Settings
ABCDConnectivity› SmartLink
The SmartLink function offers the option to display and operate certi-
fied applications supported in the connected device (e.g. telephone) in
the device screen.
The SmartLink function supports the following connections- Android
Auto, Apple CarPlay and MirrorLink ®
.
Connection set-up
›
Connect the device to the USB input.
›
Press the MENU button, then tap the function surface
SmartLink
.
›
Select the desired connection type from the menu.
During the connection process, note messages may be displayed on
the device screen, and the display of the connected device, which
must be confirmed.
22