Page 1 of 32
SIMPLY CLEVER
BEFORE YOU SET OFFBEFORE YOU SET OFF
ŠKODA Superb
Page 2 of 32
This brochure is intended to quickly acquaint you with some vehicle functions.
This does not replace the vehicle Owner's Manual, because it does not provide information on operation, e.g. the safety notices. Therefore, when
using our vehicles, proceed in accordance with the vehicle Owner's Manual in the first instance.›
Overview of this brochure by topic
› Unlocking and opening1
›Correct and safe seating position
2
›Lights and visibility
4
›Air conditioning system
6
›Instrument cluster
8
›Starting and stopping the engine
10
›Braking and parking
12
›Park Assist systems
13›
Driver assist systems15
›At the petrol station
17
›Telephone
19
›Radio
20
›Navigation
21
›Media
22
›Connectivity
22
›Warning lights overview
24This brochure is also available in each language version on the website
http://go.skoda.eu/owners-manualsSee QR code, available for download.
Page 3 of 32
Unlocking and opening›KeyLocking the vehicle
Unlocking the boot
lid
Unlocking the vehicle
›
KESSY
The KESSY system uses enables the vehicle to be unlocked and locked
without actively using the key, using sensors in the two front door
handles.
›
Grip the front door handle to unlock the door.
›
Touch the sensor on the exterior of the front door handle to lock the
vehicle.
› Luggage compartment lid
Vehicles fitted with manual lid operation
›
To
open press the button
A
and lift the flap.
›
To close , grab the mount
B
and pull in the direction of the arrow.
Vehicles fitted with electric lid operation
›
To open the button
A
the button
B
or hold
on the key.
›
To
close press the key
C
or hold the button
on the key (applies to
vehicles with KESSY).
Page 4 of 32
Correct and safe seating position›Correct seating position for the driver
For your safety, and to reduce the risk of injury in an accident, the
steering wheel, the seat and headrest must be adjusted as follows.
Distance
A
- At least 25 cm
Distance
B
- At least 10 cm
Line
C
- Top of the headrest at the same level with the top of the
head, where possible
› Adjusting front seats manuallyAdjusting a seat in a for-
ward/back direction
Adjusting height of seat
Adjusting the angle of the
seat backrest
Adjusting lumbar supportABCD›
Adjusting front seats electrically
Adjusting lumbar support
Seat adjustment
Adjusting the angle of the
seat backrestABC2
Page 5 of 32
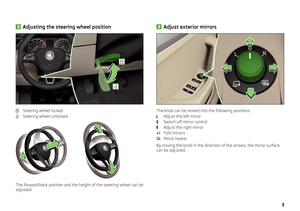
›Adjusting the steering wheel position
Steering wheel locked
Steering wheel unlocked
The forward/back position and the height of the steering wheel can be
adjusted.
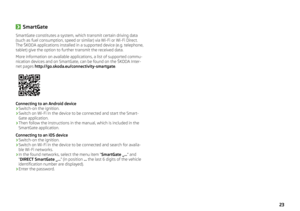
› Adjust exterior mirrors
The knob can be moved into the following positions.
Adjust the left mirror
Switch off mirror control
Adjust the right mirror
Fold mirrors
Mirror heater
By moving the knob in the direction of the arrows, the mirror surface
can be adjusted.
3
Page 6 of 32
Lights and visibility›Operate light function
Use headlights- Turn switch
Switching off lights (except daytime running lights)
Automatically switch lights on/off
Switch on parking lights
Switching on the low beam
Operate fog lights / rear fog lamp - pull switch Switching on the front fog light
Switching on the rear fog light
Headlight range control
On vehicles with Xenon headlights , headlight range control takes
place automatically.
On vehicles with Halogen headlights , headlight rang control takes
place in the Infotainment menu
→
→
Lights
.
› Main beam
Switch on main beam (spring-tensioned position)
Switch off main beam / headlight flasher on (spring-tensioned
position)
›
Turning signal system
Switch on the right turn signal
Switch on the left turn signal
4
Page 7 of 32
›Windscreen wipers and washers
Rapid windscreen wiping
Slow windscreen wiping
Depending on equipment fitted:
Periodic windscreen wiping / automatic wiping in rain
To set the wiper interval for the position
Wipers and washers off
Single windscreen wipe (spring-loaded position)
Spraying and wiping the rear window (spring-tensioned position)
Spraying the rear view camera (spring-tensioned position)
Wiping the rear window
Wipers and washers off
Spraying and wiping the windscreen (spring-tensioned position)
5
Page 8 of 32
 Brief Instructions Air conditioning system›Climatronic
Individual functions can be set or switched on by turning the control
dial or by pressing the appropriate button. If the function is switched
on, a warning light")
Air conditioning system›Climatronic
Individual functions can be set or switched on by turning the control
dial or by pressing the appropriate button. If the function is switched
on, a warning light lights up within or below the button.
Adjust the temperature for the left side
Adjust the blower speed
Adjust the temperature for the right side
Display the temperature setting for the left side
Display the temperature setting for the right side
Depending on equipment fitted:
Auxiliary heating
Heating of the passenger compartment using the residual heat
of the engine (after switching off the ignition)
Depending on equipment fitted:
Seat heating and ventilation of the left front seat
Seat heater on the front left seat
Depending on equipment fitted:
Seat heating and ventilation of the right front seat
Seat heating for the front right seat
Air flow to the windows
ABCDEFGHAir flow to the upper body
Air flow in the footwell Recirculated air mode Ventilation/defrosting of the windscreen
Heated rear window
Heated windscreen
Adjust Climatronic in Infotainment
Synchronise the temperature inside the entire vehicle according
to the temperature setting on the driver's side
Automatic mode
Cooling system
6


 Brief Instructions SIMPLY CLEVER
BEFORE YOU SET OFFBEFORE YOU SET OFF
ŠKODA Superb")
 Brief Instructions This brochure is intended to quickly acquaint you with some vehicle functions.
This does not replace the vehicle Owners Manual, because it does not provide information on operation, e.g. the safety n")
 Brief Instructions Unlocking and opening›KeyLocking the vehicle
Unlocking the boot
lid
Unlocking the vehicle
›
KESSY
The KESSY system uses enables the vehicle to be unlocked and locked
without actively usin")
 Brief Instructions Correct and safe seating position›Correct seating position for the driver
For your safety, and to reduce the risk of injury in an accident, the
steering wheel, the seat and headrest must be adjusted")
 Brief Instructions ›Adjusting the steering wheel position
Steering wheel locked
Steering wheel unlocked
The forward/back position and the height of the steering wheel can be
adjusted.
› Adjust exterior mirrors")
 Brief Instructions Lights and visibility›Operate light function
Use headlights- Turn switch
Switching off lights (except daytime running lights)
Automatically switch lights on/off
Switch on parking lights
Switching on")
 Brief Instructions ›Windscreen wipers and washers
Rapid windscreen wiping
Slow windscreen wiping
Depending on equipment fitted:
Periodic windscreen wiping / automatic wiping in rain
To set the wiper interval for the")