2016 SKODA KODIAQ pairing phone
[x] Cancel search: pairing phonePage 5 of 344

Infotainment settings - Swing138Infotainment system settings138
Radio menu settings
140
Media menu settings
140
Import contactsTelephone menu settings
140
SmartLink menu settings
141
Radio
141
service
141
Media
144
service
144
Audio sources
146
Images
151
Image viewer
151
Video DVD
153
video player
153
Media Command
154
Operation
154
Telephone
156
Introductory information
156
Pairing and connecting
159
Use the SIM card in the external module
162
rSAP
163
Telephone functions
164
Text messages (SMS)
168
Hotspot (WLAN) and data connection
170
Hotspot (WLAN)
170
Data Connection
171
SmartLink
172
Introductory information
172
Android Auto
173
Apple CarPlay
174
MirrorLink®
175
application ŠKODA One App
176Navigation 178Introductory information178
Search for destination and enter
182
Import your own goals
187
Map
189
Route guidance
192
Route
194
Waypoint mode
196
Traffic reports
199
Vehicle systems
201
CAR - Vehicle settings
201
Driving
Starting-off and Driving
202
Starting and stopping the engine
202
START-STOP-System
204
Brakes and Parking
206
Manual gear changing and pedals
208
Automatic transmission
209
Running in the engine and economical
driving
212
Avoiding damage to your vehicle
213
Assist systems
215
General information
215
Braking and stabilisation systems
215
OFF ROAD mode
218
Parking aid (ParkPilot)
220
Rear traffic alert and wizard for “Blind
spot”Monitoring
224
Rear View Camera
227
Area View (AreaView)
230
Park Assist
233
Trailer manoeuvring assistant (Trailer Assist)
237
Cruise Control System
239
Speed limiter
241
Adaptive Cruise Control (ACC)
243Front Assist248Select the driving mode (Driving Mode
Selection)251
Proactive passenger protection (Crew Protect
Assist)
253
Spurhalteassistent (Lane Assist)
254
Traffic jam assistant
256
Assistant for emergencies
257
Traffic sign recognition
257
Fatigue detection
259
Tyre pressure monitoring
260
Towing device and trailer
261
Hitch
261
Using hitch
263
General Maintenance
Care and maintenance
266
Service work, adjustments and technical
alterations
266
Service intervals
268
Cleaning and care
270
Inspecting and replenishing
274
Fuel
274
AdBlue ®
and its refilling
277
Engine compartment
278
Engine oil
280
Coolant
281
Brake fluid
282
Vehicle battery
283
Wheels
285
Wheels and tyres
285
Operating in winter conditions
2883Table of Contents
Page 129 of 344

Deactivate the automatic display of the Configuration wizard by tapping the
function surface Don´t show again
.›
To manually display in Infotainment Columbus, Amundsen, Bolero, press the
button , then tap on the function surface
→
Configuration wizard
.
›
For manual display in Infotainment Swing, press the button, then tap the
function surface
Configuration wizard
.
The Configuration wizard allows you to set the following menu items in se-
quence.
Identification of personalisation user account » page 50
Time and date format
Storing the radio stations with the currently strongest reception signal
in the first memory group of each individual broadcast area
Pairing and connecting a phone to Infotainment
Home address (applies to Infotainment Columbus, Amundsen)
Online services
The selected menu item is provided with the symbol.
Menu items which can be set by tapping on the respective function surface in the
A
» Fig. 170 area.
Operating using an application in the external device
Applies to Infotainment Columbus, Amundsen.
Some Infotainment functions can be operated using an application in the sup-
ported external device.
›
Activate data transfer in Infotainment. To do this, press and then
Tap →
Mobile device data transfer
→
Activate data transfer for ŠKODA Apps
.
›
Release Infotainment operation using the application. To do this, press
and then
→
Data transfer mobile devices
→
Use apps to operate:
→
To con-firm
/
Allow
Tap.
›
Connect Infotainment to an external device via WLAN » page 170.
›
In the external device, install an application for Infotainment operation (e.g.
Start ŠKODA Media Command).
Note
The description of Infotainment operation ŠKODA Media Command is part of
the application.Voice control
Introduction to the subject
Applies to Infotainment Columbus, Amundsen, Bolero.
The navigation, telephone, radio and media menu can be operated by voice
commands.
The voice control system can be used either by the driver or by the front pas-
senger.
Function requirements for voice control Infotainment is switched on.
There will be no telephone call using a phone connected to Infotainment.
The parking aid is not active.
Requirements for optimum voice command recognition
▶ Speak at your normal volume without intonation and long pauses.
▶ Avoid bad pronunciation.
▶ Close the doors and windows in order to avoid disturbing environmental in-
fluences on the function of the voice commands.
▶ You are recommended to speak louder at higher speeds, so that the sound of
your voice is not drowned out by the increased ambient noise.
▶ During voice control, limit additional noise in the vehicle, e.g. passengers
talking at the same time.
WARNINGThe emergency number should be dialled manually. Your voice commands
may not be recognised in such situations. The telephone connection may
not be established or the connection may take too much time to complete.
CAUTION
■ The messages are generated by Infotainment. Flawless clarity (e.g. road or
city name) cannot always be guaranteed.■
For some Infotainment languages, there is no voice control available. Info-
tainment indicates this fact through a text message that is displayed on the
screen after setting the Infotainment language.
Note
During voice control, no nav. announcements and traffic announcements are
played.127Infotainment operation
Page 143 of 344

■Hands-free - Switching a call to the phone / back to Infotainment (the menu
item is displayed during a call)
■Select telephone
- Search for available telephones/list of paired telephones/se-
lect telephone
■
Find
- search for available phones
■
Bluetooth
- Bluetooth ®
settings
■
User profile
- user profile settings
■
Manage favourites
- set the function surfaces for your favourite contacts
■
Sort by:
- Arrangement of the phone contact list
■
Surname
- Sort by contact name
■
Name
- sort by contact first name
■
Import contacts
- Import phone contacts
■
Select ring tone
- Selecting the ring tone
■
Reminder: remember your mobile phone
- Turn on/off the warning against forget-
ting the phone in the vehicle (if the phone was connected to the Infotain-
ment)
■
Simultan. calls
Simultaneous calls - enable/disable the option to hold two con-
current calls
SmartLink menu settings
›
In the SmartLink main menu, tap on the function surface
.
■
Activate data transfer for ŠKODA apps
- Turning data transfer on and off for ŠKODA
applications
■ MirrorLink® - Settings of the system MirrorLink ®
■
Allow Bluetooth automatic pairing
- Turn on / off option, which is to be connected
external device via Bluetooth ®
to pair and connect to
■
Allow MirrorLink® notification to be shown
- Turn on / off the display of messages
of Mirror link ®
applications on the Infotainment screen
Radio
service
Introduction to the subject
Infotainment allows analogue radio reception of FM and AM frequency ranges
as well as DAB digital radio reception.
CAUTION
■ For vehicles with window antennas do not stick foil or metal coated stickers
to the window - Radio signal reception could be affected.■
Car parks, tunnels, tall buildings or mountains can interfere with the radio
signal even causing it to fail completely.
main menu
Fig. 174
Radio: Main Menu (DAB)
›
To display the main menu, press the button.
Main menu » Fig. 174
The selected radio station (description or frequency)
Radio Text (FM) / Description of the group (DAB)
Preset station buttons for favourite channels
Choice of radio range (FM / AM / DAB) Choice of storage group for the preferred station Changing the station
List of available stations
Manual / semi-automatic station search
ABCDE
141Radio
Page 151 of 344

Bluetooth®
player
Infotainment allows audio files of a connected Bluetooth ®
player to play using
the A2DP and AVRCP audio profile.
With Infotainment, multiple devices can be paired using Bluetooth ®
, but only
one of them can be used as a Bluetooth ®
player.
Connect / disconnect›
To connect the Bluetooth ®
player with Infotainment- follow the same in-
structions as for pairing Infotainment with a telephone » page 160.
›
To disconnect the Bluetooth ®
player, end the connection in the list of paired
external devices » page 160.
Replace Bluetooth ®
player (applies to Infotainment Amundsen, Bolero)
If you would like to replace a Bluetooth ®
-Player which is connected to Info-
tainment as a phone at the same time, , then a relevant information message
appears on the Infotainment screen.
›
End the connection to the currently connected Bluetooth ®
player and repeat
the pairing procedure » page 160, Managing paired external devices .
CAUTION
If an external device is connected to Infotainment using Apple CarPlay or
Android Auto, then it cannot be connected using Bluetooth ®
.
Jukebox
Only valid for Infotainment Columbus.
In the Jukebox (in the Infotainment internal memory), supported audio / video files can be imported from connected external devices.
Import files
›
Tap the function surface in the Media main menu
→
Manage jukebox
→
Im-port
.
›
Select the desired source.
›
Select the desired folders or files.
›
Tap the function surface
.
Delete files
›
Tap the function surface in the Media main menu
→
Manage jukebox
→
De-lete
.
›
Select the desired folder or files in the selected category.
›
Tap the function surface
→
Delete
.
Show level of Infotainment memory›Tap the function surface in the Media main menu
Manage jukebox
.
information about the occupied and free space of the Infotainment memory
and the number of files that cannot be imported is displayed.
Note
■ Files that have already been copied are recognised and cannot be copied
again (shown in grey).■
It is not possible to copy files while simultaneously playing back audio/video
files in the CD/DVD drive.
WLAN
Applies to Infotainment Columbus, Amundsen.
Infotainment allows you to play audio files from one of the external devices
connected to the Infotainment WLAN.
›
Connect an external device that supports the DLNA (Digital Living Network
Alliance), with Infotainment WLAN » page 170.
›
If necessary use the UPnP application (Universal Plug and Play) in the con-
nected device, which allows playback to start.
›
Select the audio source WLAN .
149Media
Page 161 of 344

Telephone
Applies to Infotainment Swing.Fig. 190
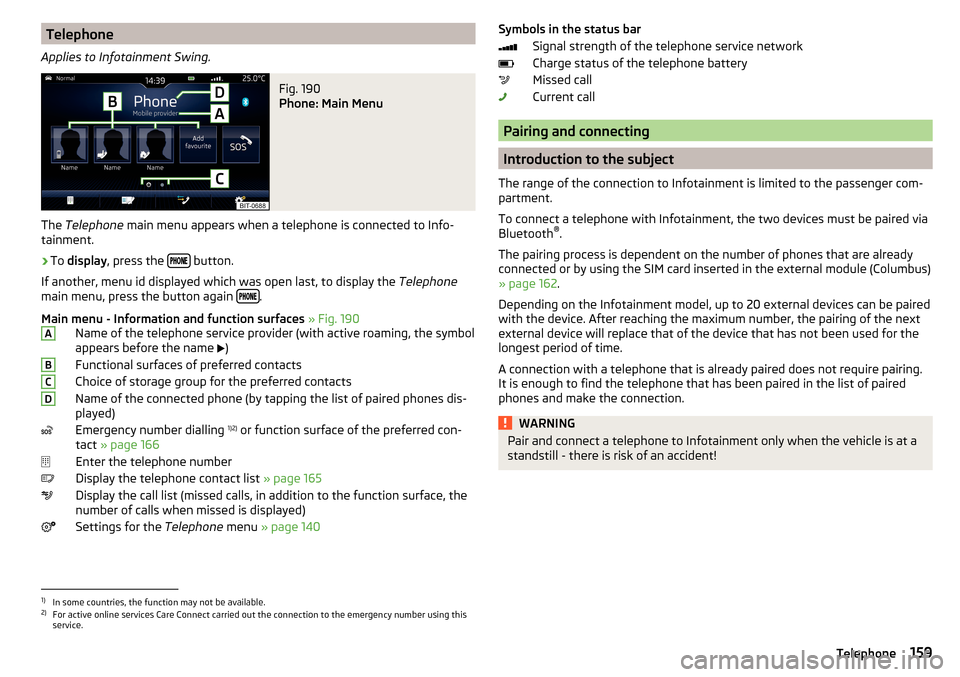
Phone: Main Menu
The Telephone main menu appears when a telephone is connected to Info-
tainment.
›
To display , press the button.
If another, menu id displayed which was open last, to display the Telephone
main menu, press the button again
.
Main menu - Information and function surfaces » Fig. 190
Name of the telephone service provider (with active roaming, the symbol
appears before the name )
Functional surfaces of preferred contacts
Choice of storage group for the preferred contacts
Name of the connected phone (by tapping the list of paired phones dis- played)
Emergency number dialling 1)2)
or function surface of the preferred con-
tact » page 166
Enter the telephone number
Display the telephone contact list » page 165
Display the call list (missed calls, in addition to the function surface, the
number of calls when missed is displayed)
Settings for the Telephone menu » page 140
ABCDSymbols in the status bar
Signal strength of the telephone service network
Charge status of the telephone battery
Missed call
Current call
Pairing and connecting
Introduction to the subject
The range of the connection to Infotainment is limited to the passenger com-
partment.
To connect a telephone with Infotainment, the two devices must be paired via
Bluetooth ®
.
The pairing process is dependent on the number of phones that are already
connected or by using the SIM card inserted in the external module (Columbus)
» page 162 .
Depending on the Infotainment model, up to 20 external devices can be paired
with the device. After reaching the maximum number, the pairing of the next
external device will replace that of the device that has not been used for the
longest period of time.
A connection with a telephone that is already paired does not require pairing.
It is enough to find the telephone that has been paired in the list of paired
phones and make the connection.
WARNINGPair and connect a telephone to Infotainment only when the vehicle is at a
standstill - there is risk of an accident!1)
In some countries, the function may not be available.
2)
For active online services Care Connect carried out the connection to the emergency number using this
service.
159Telephone
Page 162 of 344

conditions for pairingFig. 191
QR code with reference to the
ŠKODA websites
The telephone can be paired with Infotainment under the following conditions.
The ignition is switched on.
The Bluetooth ®
function of the infotainment and the telephone is switch-
ed on.
The visibility of the infotainment and the telephone is switched on.
The telephone is within range of the Bluetooth ®
signal of Infotainment.
The telephone is compatible with the infotainment.
There is no external device connected to Infotainment using Apple
CarPlay.
The pairing can be initiated from Infotainment or from the telephone.
During the pairing and connection process, information messages are dis-
played on the Infotainment screen and the telephone screen. These messages
must be observed and if necessary confirmed (e.g. enabling the contact import,
connecting the Bluetooth ®
player among others).
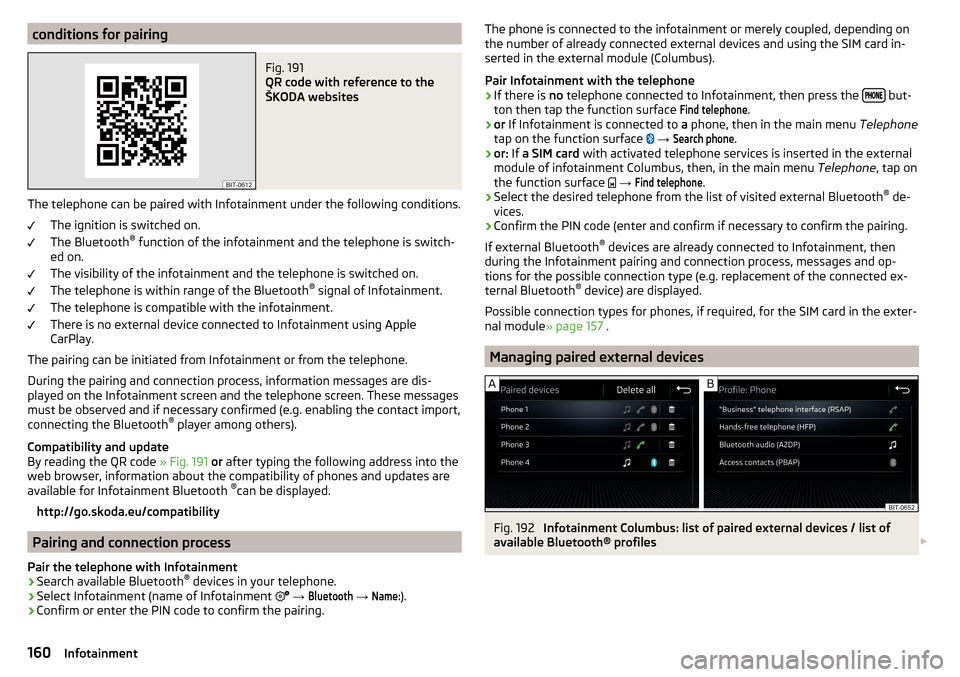
Compatibility and update
By reading the QR code » Fig. 191 or after typing the following address into the
web browser, information about the compatibility of phones and updates are
available for Infotainment Bluetooth ®
can be displayed.
http://go.skoda.eu/compatibility
Pairing and connection process
Pair the telephone with Infotainment
›
Search available Bluetooth ®
devices in your telephone.
›
Select Infotainment (name of Infotainment
→
Bluetooth
→
Name:
).
›
Confirm or enter the PIN code to confirm the pairing.
The phone is connected to the infotainment or merely coupled, depending on
the number of already connected external devices and using the SIM card in-
serted in the external module (Columbus).
Pair Infotainment with the telephone›
If there is no telephone connected to Infotainment, then press the but-
ton then tap the function surface
Find telephone
.
›
or If Infotainment is connected to a phone, then in the main menu Telephone
tap on the function surface
→
Search phone
.
›
or: If a SIM card with activated telephone services is inserted in the external
module of infotainment Columbus, then, in the main menu Telephone, tap on
the function surface
→
Find telephone
.
›
Select the desired telephone from the list of visited external Bluetooth ®
de-
vices.
›
Confirm the PIN code (enter and confirm if necessary to confirm the pairing.
If external Bluetooth ®
devices are already connected to Infotainment, then
during the Infotainment pairing and connection process, messages and op-
tions for the possible connection type (e.g. replacement of the connected ex-
ternal Bluetooth ®
device) are displayed.
Possible connection types for phones, if required, for the SIM card in the exter- nal module » page 157 .
Managing paired external devices
Fig. 192
Infotainment Columbus: list of paired external devices / list of
available Bluetooth® profiles
160Infotainment
Page 165 of 344

see SIM card›Press on the inserted SIM card.
The SIM card “jumps” into the eject position.›
Remove the SIM card from the slot.
CAUTION
■ When inserting an incorrectly sized SIM card, there is a risk of damage to In-
fotainment.■
Avoid using a an adapter for the SIM card as the SIM card may fall out while
driving due to vehicle vibrations - There is the risk of damage to the external
module.
■
If you let the SIM card protrude out from the slot, then it may fall out of the
slot while driving due to vehicle vibrations.
rSAP
Applies to Infotainment Columbus with the SIM card slot in the external mod-
ule.
The Bluetooth ®
profile RSAP (remote transmission of data SIM) also allows, in
contrast to Bluetooth ®
profile HFP, the use of data services from the connec-
ted phone (if this profile is supported by the phone and data services are ena-
bled in this phone) » page 171.
The use of Bluetooth ®
profile RSAP requires the telephone function of the ex-
ternal module to be switched on.
Switching on and off
›
In the Telephone main menu, tap on the function surface
→
Phone interface“Business”
.
The pairing and connection process takes place in the same way to the Blue-
tooth ®
profile HFP » page 159.
If the rSAP profile supported by the phone to be connected, then Infotainment
tries to connect using this profile. Depending on the phone, the connection
can be blocked or released using an rSAP profile in the phone.
If a SIM card is inserted in the external module, the phone cannot be connec-
ted to Infotainment by the rSAP profile.
Note
If an external device is connected via Apple CarPlay or Android Auto, then the
data connection using rSAP cannot be carried out.163Telephone
Page 194 of 344

For trailer towing , We recommend that you activate recognition of road signs
relevant to trailers.›
Press the button, then tap on the function surface
→
Driver assistance
→
Show road signs relevant to trailers
.
Route guidance
Introduction to the subject
A route is created by starting route guidance to a destination. Additional inter-
mediate destinations can be added to the route.
The route guidance takes place as follows
▶ Through graphical driving instructions on the Infotainment screen and in the
display of the instrument cluster.
▶ With nav. announcements.
Infotainment tries to allow for continued guidance even if the navigation data
is incomplete or there is no data at all for the given area.
The route is recalculated each time if you ignore driving recommendations or change the route.
CAUTION
The nav. announcements provided may vary from the actual situations, e.g.
due to out-of-date navigation data.
Destination details
Fig. 239
Details of: in the navigation data / online visited destination
The following menu items and information are displayed in the destination de-
tails » Fig. 239 .
Area with function surfaces
Detailed destination information
Destination position in the map
Detailed target information (if available)
Signal strength of the data services and ongoing data transmission
Google Street View ™
-Display » page 180
Display the destination details
The destination details can be displayed in one of the following ways.
▶ While entering a destination.
▶ By tapping on the function surface
in the destination list.
▶ By pressing
From the main menu
Navigation (The details of the last tar-
get indicated is shown, to where route guidance is carried out or was carried
out).
Functional surfaces
Using function surfaces in the field
A
the following functions can be per-
formed, depending on the context.
▶ Start / stop route guidance.
▶ Searching for a nearby destination » page 182.
▶ Setting route options.
▶ Store destination.
▶ Edit destination (the object can be deleted, renamed or saved).
▶ Dial the POI phone number (if Infotainment is connected to a
phone » page 159 , Pairing and connecting ).
Route calculation and start route guidance
Fig. 240
Alternative routes
Route calculation is done on the basis of the set route options. The route op-
tions can be set:
→
Route options
.
ABCDE192Infotainment