2016 SKODA KODIAQ spare tire
[x] Cancel search: spare tirePage 288 of 344
Installation of new tyres
Only fit radial tyres of the same type, size (rolling circumference) and the same
tread pattern on one axle on all 4 wheels.
When mounting new tires the tires have to be replaced axle by axle.
Unidirectional tyres
Some tires may be directional. The direction of rotation of the tyres is marked by arrows on the wall of the tyre .
The specified running direction must be strictly adhered to, otherwise the fol-
lowing tyre characteristics may be degraded. ▶ Driving stability.
▶ Traction.
▶ Tyre noise and tyre wear.
Tires with increased resistance to air loss when punctured
Some vehicles may be fitted with tyres at the factory that have increased
puncture resistance (so-called “SEAL” tyres). For some countries, vehicles are
equipped with “SEAL” tyres delivered without a spare wheel and appropriate
tools.
If “SEAL”tyres are replaced with standard tyres, the vehicle must be retrofitted
with a puncture repair kit or spare wheel and appropriate hand tools.WARNING■ Never use tyres if you do not know anything about the condition and age.■Never drive with damaged tyres – risk of accident.
CAUTION
■The tyres must be protected from contact with substances such as oil,
grease and fuel, which could damage them. If the tyres come into contact with
these substances, then we recommend you have this checked out in a special-
ist workshop.■
Do not use rims with ground or polished surface in winter conditions - there
is a risk of wheel damage (e.g. from the road grit).
Note
■ We recommend that any work on the wheels or tyres is carried out by a spe-
cialist garage.■
We recommend that you use wheel rims, tyres, full wheel trims and snow
chains from ŠKODA Original Accessories.
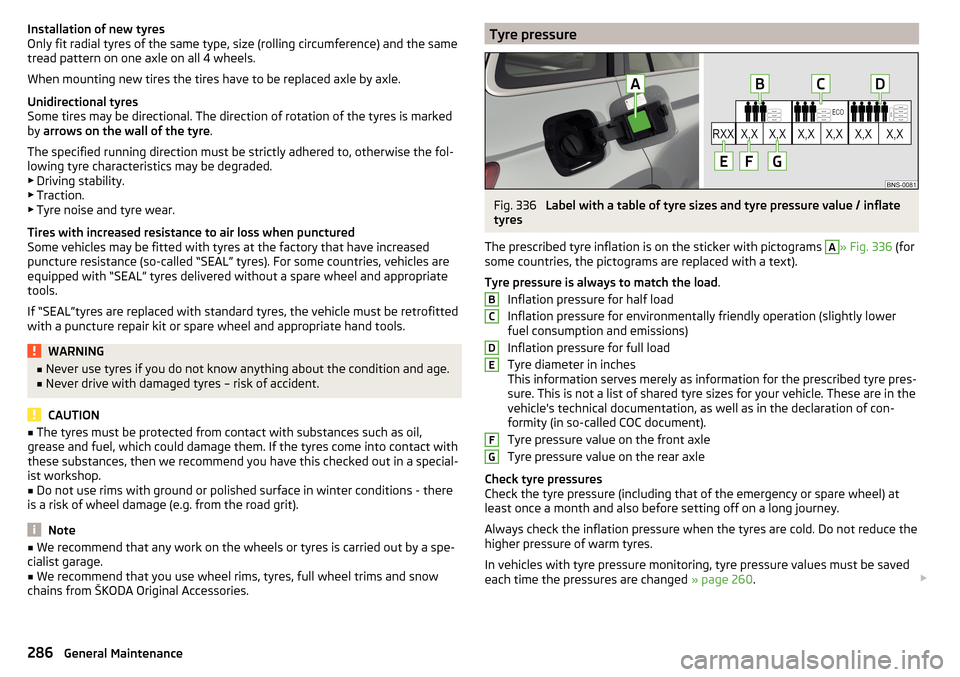
Tyre pressureFig. 336
Label with a table of tyre sizes and tyre pressure value / inflate
tyres
The prescribed tyre inflation is on the sticker with pictograms
A
» Fig. 336 (for
some countries, the pictograms are replaced with a text).
Tyre pressure is always to match the load .
Inflation pressure for half load
Inflation pressure for environmentally friendly operation (slightly lower
fuel consumption and emissions)
Inflation pressure for full load
Tyre diameter in inches
This information serves merely as information for the prescribed tyre pres-
sure. This is not a list of shared tyre sizes for your vehicle. These are in the
vehicle's technical documentation, as well as in the declaration of con-
formity (in so-called COC document).
Tyre pressure value on the front axle
Tyre pressure value on the rear axle
Check tyre pressures
Check the tyre pressure (including that of the emergency or spare wheel) at
least once a month and also before setting off on a long journey.
Always check the inflation pressure when the tyres are cold. Do not reduce the
higher pressure of warm tyres.
In vehicles with tyre pressure monitoring, tyre pressure values must be saved
each time the pressures are changed » page 260.
BCDEFG286General Maintenance
Page 290 of 344

Please note the following if you intend to use the temporary spare wheel.▶ Do not cover the signs.
▶ Be particularly observant when driving.
▶ Inflate the temporary spare wheel to the maximum inflation pressure for the
vehicle » page 286 (the prescribed tyre pressure of the spare wheel R 18 is
4.2 bar).
In vehicles with tyre pressure monitoring, save the tyre pressure values in the system » page 260 .WARNING■
Never drive with more than one spare wheel mounted!■When driving with the temporary spare wheel at full throttle acceleration,
avoid sharp braking and fast cornering.■
Do not use snow chains on the temporary spare wheel.
■
Observe instructions on the warning sign of the emergency wheel.
Tyre marking
Explanation of tyre markings - e.g. 235/55 R 18 100 V
235Tyre width in mm55Height/width ratio in %RCode letter for the type of tyre – Radial18Diameter of wheel in inches100load indexVSpeed symbol
Load index - indicates the maximum permissible load for each individual tyre
load index9596979899100101102103Load
(In kg)690710730750775800825850875Speed symbol - indicates the maximum permissible speed for a vehicle fitted
with tyres in the category concernedspeed
symbolMTUHVWYMaximum speed
(in km/h)130190200210240270300WARNINGNever exceed the maximum permissible load bearing capacity and speed
for the tyres fitted – risk of accident.
Operating in winter conditions
All-year (or “winter”) tyres
All-year or “winter” tyres (indicated by an M+S or a mountain peak/snowflake
symbol ) to improve the performance of the vehicle in winter conditions.
For the best possible handling, use all-season or “winter” tyres on all four
wheels with a minimum tread depth of 4 mm.
If using “winter” tyres, fit the summer tyres on again in good time as they pro-
vide better handling properties, a shorter braking distance, less tyre noise, and
reduced tyre wear on roads which are free of snow and ice as well as at tem-
peratures above 7 °C.
Speed symbol
All-season or “winter” tyres (marked with M+S and a peak/snowflake symbol
) of a lower speed category than stated in the technical vehicle documenta-
tion can be used, provided the permissible maximum speed of these tyres is
not exceeded even if the possible maximum speed of the vehicle is higher.
The speed limit for all-season or “Winter” tires can be adjusted in the Infotain-
ment menu
→
→
Tyres
.
If the vehicle has all-season or “winter” tires of a lower speed category then
the specified maximum speed of the vehicle (referring to tyres that have not
been delivered by the factory, a warning label with the maximum value of the
speed category provided for the mounted tyres must be fixed in the interior of
288General Maintenance
Page 295 of 344
›Restore the original position of the third seat row (applies to the seven-seat
version).
CAUTION
■ When handling the wheel, do not put this down on the lining parts in the
area next to the wheel, otherwise there is a risk of damaging these parts.■
Before lowering the seats, unlock the lock tongues of the seat belts (the
straps must be completely rolled up behind the lining of the rear body pillar) -
otherwise there is a risk of damage to the locks, lock tongues as well as the
seats.
Removing/stowing wheel in vehicles with sound system
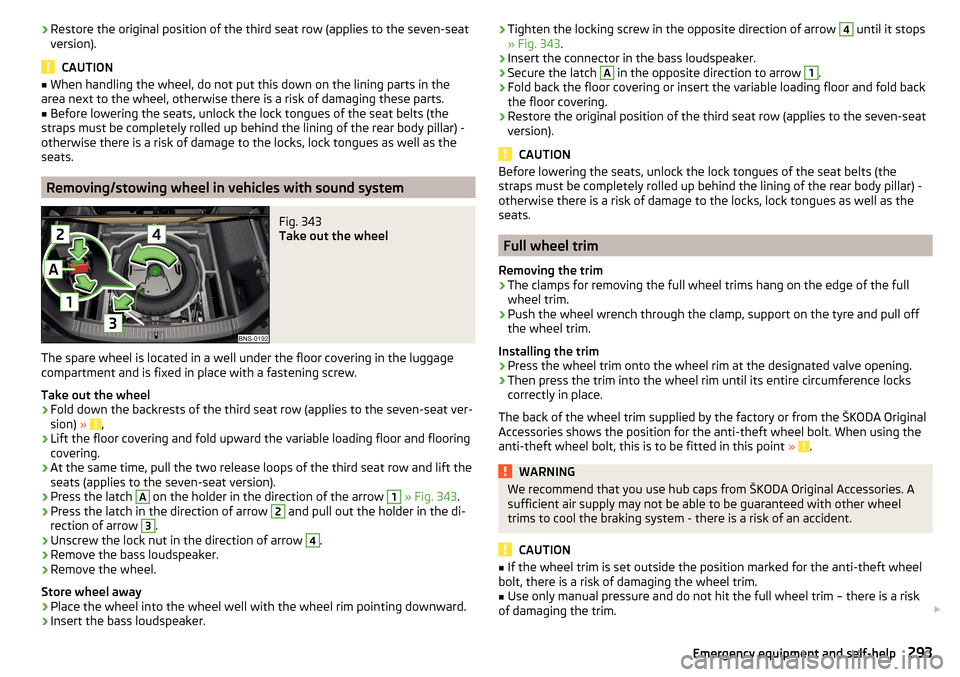
Fig. 343
Take out the wheel
The spare wheel is located in a well under the floor covering in the luggage
compartment and is fixed in place with a fastening screw.
Take out the wheel
›
Fold down the backrests of the third seat row (applies to the seven-seat ver-
sion) » ,
›
Lift the floor covering and fold upward the variable loading floor and flooring
covering.
›
At the same time, pull the two release loops of the third seat row and lift the
seats (applies to the seven-seat version).
›
Press the latch
A
on the holder in the direction of the arrow
1
» Fig. 343 .
›
Press the latch in the direction of arrow
2
and pull out the holder in the di-
rection of arrow
3
.
›
Unscrew the lock nut in the direction of arrow
4
.
›
Remove the bass loudspeaker.
›
Remove the wheel.
Store wheel away
›
Place the wheel into the wheel well with the wheel rim pointing downward.
›
Insert the bass loudspeaker.
› Tighten the locking screw in the opposite direction of arrow 4 until it stops
» Fig. 343 .›
Insert the connector in the bass loudspeaker.
›
Secure the latch
A
in the opposite direction to arrow
1
.
›
Fold back the floor covering or insert the variable loading floor and fold back
the floor covering.
›
Restore the original position of the third seat row (applies to the seven-seat
version).
CAUTION
Before lowering the seats, unlock the lock tongues of the seat belts (the
straps must be completely rolled up behind the lining of the rear body pillar) -
otherwise there is a risk of damage to the locks, lock tongues as well as the
seats.
Full wheel trim
Removing the trim
›
The clamps for removing the full wheel trims hang on the edge of the full
wheel trim.
›
Push the wheel wrench through the clamp, support on the tyre and pull off
the wheel trim.
Installing the trim
›
Press the wheel trim onto the wheel rim at the designated valve opening.
›
Then press the trim into the wheel rim until its entire circumference locks
correctly in place.
The back of the wheel trim supplied by the factory or from the ŠKODA Original
Accessories shows the position for the anti-theft wheel bolt. When using the
anti-theft wheel bolt, this is to be fitted in this point »
.
WARNINGWe recommend that you use hub caps from ŠKODA Original Accessories. A
sufficient air supply may not be able to be guaranteed with other wheel
trims to cool the braking system - there is a risk of an accident.
CAUTION
■ If the wheel trim is set outside the position marked for the anti-theft wheel
bolt, there is a risk of damaging the wheel trim.■
Use only manual pressure and do not hit the full wheel trim – there is a risk
of damaging the trim.
293Emergency equipment and self-help