Page 129 of 324

Opening and closing
Note
Before closing the rear lid, make sure that the
key h
as not been left inside the luggage com-
partment. Electric windows
Electric w
indows: functionsRead the additional information carefully
›› ›
page 11
After turning off the ignition, the windows
can be opened and closed for a short time
using the buttons on the door as long as the
driver door or passenger side door is not
open. When the key is removed from the igni-
tion and the driver door is open, all of the
electric windows can be opened or closed at
the same time keeping the button on the
driver’s door pressed down. After a few sec-
onds, the convenience opening or closing
function will begin ›››
page 127.
One-touch opening and closing
The one-touch automatic opening and clos-
ing is used to open or close the windows
completely. It will not be necessary to hold
the button of the corresponding electric win-
dow. For the one-touch closing function: p
u
l
l the
button for the corresponding window up-
wards until it reaches the second position.
For the one-touch opening function: push the
button for the corresponding window down-
wards until it reaches the second position.
To stop the one touch function: push or pull
on the button of the corresponding window.
Restoring one-touch opening and closing
The one-touch opening and closing function
is not active after the vehicle battery has
been disconnected or is flat and will have to
be reset.
● Close all windows and doors.
● Pull the button of the corresponding win-
dow and hol
d it for one second in this posi-
tion.
● Release the button and pull upwards and
hold ag
ain. The one-touch function is now
ready for operation.
The automatic one-touch electric windows
can be reinitialised individually or several at
a time.
Convenience opening/closing
The electric windows can be opened or
closed from outside using the vehicle key: ●
Keep the v
ehicle unlocking or locking but-
ton pressed. All windows which function elec-
trically will be either opened or closed.
● To interrupt the function, release the lock-
ing or un
locking button.
During convenience closing, first the win-
dows and then the sliding sunroof will be
closed.
In the Configuration - convenience
menu, there are different settings for operat-
ing the windows ›››
page 26. WARNING
Careless use of the electric windows can
cau se seriou
s injury.
● Only operate the electric windows when
nobody i
s in the way.
● Never leave children or disabled people
alone in the v
ehicle if the doors are to be
locked. The windows cannot be opened in
case of an emergency.
● Always take all the keys with you whenever
you le
ave the vehicle. After turning off the ig-
nition, the windows can be opened and
closed for a short time using the buttons on
the door as long as the driver door or passen-
ger side door is not open.
● When transporting children in the rear
seats, a
lways deactivate the rear electric win-
dows with the child safety lock so that they
cannot be opened and closed. » 127
Technical data
Advice
Operation
Emergencies
Safety
Page 130 of 324

Operation
Note
The one-touch function and roll-back function
wi l
l not work if there is a malfunction in the
electric windows. Visit an authorised work-
shop. Roll-back function on electric win-
dow
s The anti-trap function of the electric windows
can r
educ
e the risk of injury when opening
and closing the electric windows ››› . If a
w indo
w i
s not able to close because it is stiff
or because of an obstruction, it will automati-
cally open again.
● Check why the window does not close.
● Attempt to close the window again.
● If you try within the following 10 seconds
and the window c
loses with difficulty or there
is an obstruction once again, the one-touch
closing will stop working for 10 seconds.
● If the window is still obstructed, it will stop
at the corr
esponding position. When the but-
ton is operated within 10 seconds, the win-
dow will close without the anti-trap function
››› . To close windows without the anti-trap func-
tion
●
Attempt to close the corresponding electric
w indo
w w
ithin 10 seconds after by holding
the button. The window is closed without the
anti-trap function, deactivated for a short
time.
● After more than 10 seconds, the anti-trap
function i
s reactivated. The window will stop
once again if there is another difficulty or ob-
stacle.
● If the window will still not close, visit a spe-
ciali
sed workshop. WARNING
Closing the electric windows without the an-
ti-trap f u
nction can cause serious injury.
● Always close the electric windows careful-
ly.
● Nobody
should be in the way of the electric
window
s, especially when the anti-trap func-
tion is deactivated.
● The anti-trap function does not prevent fin-
gers
or other parts of the body getting
pinched against the window frame and caus-
ing injury. Note
The anti-trap function also operates if the
windo w
s are closed from the outside of the
vehicle using the ignition key for convenience
closing ››› page 127. Panoramic sliding sunroof*
P anor
amic
sliding sunroof: operating Read the additional information carefully
›› ›
page 12
The panoramic sliding sunroof will only work
with the ignition on. It can be opened or
closed for a few minutes after the ignition
has been switched off, provided the driver
door and the front passenger door are not
opened.
Convenience open/close function
The panoramic sliding sunroof can be
opened or closed from outside the vehicle
using the vehicle key:
● Keep the vehicle unlocking or locking but-
ton pr e
ssed. The panoramic sliding sunroof
is adjusted or closes.
● Release the unlock or lock button to stop
the function.
D
uring convenience closing, first the win-
dows and then the panoramic sliding sunroof
will be closed. WARNING
Careless or uncontrolled use of the panoram-
ic s lidin
g sunroof can cause serious injuries.128
Page 131 of 324

Opening and closing
●
Only c
lose the panoramic sliding sunroof
and the sun blind when nobody is in the way.
● Always take all the keys with you whenever
you le
ave the vehicle.
● Never leave children or disabled persons in
the vehic
le, particularly if they have access to
the keys. Uncontrolled use of the key could
lock the vehicle, start the engine, turn on the
ignition and operate the panoramic sliding
sunroof.
● The panoramic sliding sunroof can be oper-
ated for up t
o about ten minutes after the ig-
nition has been switched off, provided the
driver door and the front passenger door are
not opened. Note
● In ca se of
a fault in the operation of the
panoramic sliding sunroof, the anti-trap func-
tion will not operate correctly. Visit a special-
ised workshop.
● The rotary button of the panoramic sliding
sunr
oof remains in the last position selected
if the roof is closed using convenience clos-
ing from outside the vehicle, and will have to
be re-positioned the next time you drive. Opening or closing the sun blind
Fig. 140
On the interior roof lining: switches
f or the s
u
n blind
FunctionNecessary operations
To open com-
pletely (automat- ic):Press button ››› Fig. 140 1 briefly.
To stop automatic
operation:Briefly press the button ››› Fig. 140
1 o ››› Fig. 140 2.
To set the inter-
mediate position:Hold the button ››› Fig. 140 1or
››› Fig. 140 2 until the required
position is reached.
To close com-
pletely (automat- ic):Press button ››› Fig. 140 2 briefly. The panoramic sliding sunroof can be operat-
ed f
or up t
o about
ten minutes after the igni-
tion has been switched off, provided the driv-
er door and the front passenger door are not
opened. Anti-trap function of the panoramic
sliding s
unroof and the sun blind The anti-trap function reduces the risk of in-
jury
when openin
g and closing the panoram-
ic sliding sunroof and sun blind ››› . When
they enc ou
nter an obstacle while closing,
they reopen.
● Check why the panoramic sliding sunroof
or the sun b
lind did not close.
● Attempt to close the panoramic sliding
sunr
oof or sun blind once again.
● If the panoramic sliding sunroof or sun
blind i s
still obstructed, it will stop at the cor-
responding position. Close it without the an-
ti-trap function.
Closing without the roll-back function
● The switch ›››
Fig. 13 should be in the
“closed” position 1 .
● Panoramic sliding sunroof: within fiv
e sec
-
onds of triggering the anti-trap function, pull
the control all the way back ›››
Fig. 13 (ar-
row 5 ) until the panoramic sliding sunroof
c lo
se
s fully.
● Sun blind: Within 5 second
s of triggering
the anti-trap function, push button
››› Fig. 140 2 until the sun blind closes com-
p l
et
ely.
● The panoramic sliding sunroof or sun blind
close
s without the anti-trap function. »
129
Technical data
Advice
Operation
Emergencies
Safety
Page 132 of 324

Operation
● If the p
anor
amic sliding sunroof still cannot
be closed, visit a specialised workshop. WARNING
Closing the panoramic sliding sunroof or sun
blind w ithout
the anti-trap function can cause
serious injuries.
● Always close the panoramic sliding sunroof
caref
ully.
● Nobody should be in the way of the panor-
amic slidin
g sunroof or sun blind, especially
when they are closed without the anti-trap
function.
● The anti-trap function does not prevent fin-
gers
or other parts of the body getting
pinched against the window frame and caus-
ing injury. Note
The anti-trap function is activated if the win-
dow s
and the panoramic sliding sunroof are
closed from the outside of the vehicle using
the ignition key for convenience closing
››› page 127. Lights and visibility
Light s
C ontr
ol lamps
It lights up
Driving light totally or
partially faulty.
Replace the corresponding bulb
››› page 91.
If all the bulbs are OK, the vehi-
cle should be taken to a speci-
alised workshop if necessary.
Fault in adaptive
light.››› page 132.
Flashes
Fault in the adaptive
light system.Contact a specialised workshop
››› page 131.
It lights up
Rear fog light switch-
ed on.›››
page 24.
It lights up
Front fog lights
switched on›››
page 24.
It lights up
Left or right turn sig-
nal.
The control lamp
flashes twice as fast
when a vehicle or
trailer turn signal is
faulty.
If necessary, check the vehicle
and trailer lighting.
It lights up
Main beam on or
flasher on.›››
page 131.
It lights up
Headlight adjustment
(Light Assist) on.›››
page 131. Several warning and indication lamps light
up f
or a f
ew sec
onds when the ignition is
switched on, signalling that the function is
being verified. They will switch off after a few
seconds. WARNING
Observe the safety warnings ›››
in Warning
and indication l amp
s on page 105. Switching lights on and off
Read the additional information carefully
› ›
›
page 24
130
Page 133 of 324

Lights and visibility
The legal requirements regarding the use of
v ehic
l
e lights in each country must be ob-
served.
The driver is personally responsible for the
correct use and adjustment of the lights in all
situations.
In vehicles with tow hitch fitted as standard:
if the trailer is connected electrically and is
fitted with a rear fog light, the vehicle’s fog
light is automatically switched off.
Audible warnings to advise the driver that
the lights have not been switched off
If the key is not in the ignition and the driver
door is open, an audible warning signal is
heard in the following cases: this is a remind-
er to turn off the lights.
● When the parking light is on ›››
page 131.
● When the light switch is in position .WARNING
The side lights or daytime driving lights are
not bright enough t
o illuminate the road
ahead and to ensure that other road users are
able to see you.
● Always use your dipped beam head lights if
it is
raining or if visibility is poor. WARNING
If the headlights are set too high and the
main be am i
s not used correctly, there is a
risk of dazzling or distracting other road
users. This could result in a serious accident.
● Always make sure that the headlights are
correctly
adjusted.
● Never use the main beam or headlight
flasher when it
can dazzle others on the road. Turn signal and main beam lever
Read the additional information carefully
› ›
›
page 25
Convenience turn signals
For the convenience turn signals, move the
lever as far as possible upwards or down-
wards and release the lever. The turn signal
will flash three times.
The control turn signals are switched on and
off from the menu Lights & Visibility
on the instrument panel display
››› page 26. This function can be discon-
nected at a specialised workshop for those
vehicles which do not have the menu
Lights & Visibility . Note
● If the c on
venience turn signals are operat-
ing (three flashes) and the other convenience turn signals are switched on, the active part
st
op
s flashing and only flashes once in the
new part selected.
● The turn signal only works when the igni-
tion is sw
itched on. The hazard warning
lights also work when the ignition is switch-
ed off ››› page 82.
● If a turn signal on the vehicle or trailer is
faulty
, the warning lamp flashes twice as fast
as usual.
● The main beam headligh
ts can only be
switched on if the dipped beam headlights
are already on. Lights and visibility: functions
Parking light
When the p ark
in
g light is switched on, (right
or left turn signal), the front side light and
the rear light on the corresponding side of
the vehicle stay lit. The parking lights will on-
ly work with the ignition off.
Daytime running lights
The daytime running lights reduce the risk of
accidents by increasing the visibility of the
vehicle. These are independent lights that
are built into the headlights and come on
each time the ignition is turned on if the light
switch is in position or 0. »
131
Technical data
Advice
Operation
Emergencies
Safety
Page 134 of 324

Operation
When the light switch is in position
, a
phot o sen
sor automatically turns the instru-
ment and switch lighting on and off.
Automatic dipped beam control
The automatic dipped beam control is merely
intended as an aid and is not able to recog-
nise all driving situations.
When the light switch is in position , the
vehicle lights and the instrument panel and
switch lighting switch on and off automatical-
ly in the following situations ››› :
Automatic switching
onAutomatic switching
off or switch to day-
time running lighting
The photo sensor detects
darkness, for example,
when driving through a
tunnel.When adequate lighting is
detected.
The rain sensor detects
rain and activates the
windscreen wipers.When the windscreen wip-
er has been inactive for a
few minutes.
Adaptive headlights (AFS)
The a
d
aptiv
e headlights only operate when
the dipped beam is on and at speeds of over
10 km/h (6 mph). On bends, the adaptive
headlights automatically improve lighting on
the road ahead.
The adaptive headlights can be switched on
and off from the infotainment system. Static cornering lights
When turning s
lowly to change direction or
going round a tight bend, the static cornering
lights automatically come on. The static cor-
nering lights only work at speeds of less than
40 km/h (25 mph).
The static cornering lights may be incorpora-
ted into the fog lights or the front headlights,
depending upon the equipment. WARNING
If the road is not well lit and other road users
cannot see the
vehicle well enough or at all,
accidents may occur.
● The automatic dipped beam control ( )
only sw
itches on the dipped beam when
there are no changes in brightness, and not,
for example when it is foggy.
● Never drive with daytime lights if the road
is not
well lit due to weather or lighting con-
ditions. Daytime lights do not provide
enough light to illuminate the road properly
or be seen by other road users.
● The rear lights do not come on with the
daytime driv
ing light. A vehicle which does
not have the rear lights on may not be visible
to other drivers in the darkness, if it is rain-
ing or in conditions of poor visibility. Headlight adjustment
Headlight adjustment (Light Assist)
The hea
dlight
adjustment automatically con-
nects and disconnects these lights depend-
ing on the environmental and traffic condi-
tions and on the speed, within the limitations
of the system ››› . This is monitored by a
sensor loc at
ed on the inside of the wind-
screen, above the interior rear vision mirror.
The automatic headlight adjustment auto-
matically switches on the lights depending
on the vehicles travelling in front and in the
opposite direction, and on other environmen-
tal and traffic conditions from an approxi-
mate speed of 60 km/h (37 mph) and turns
them off again at speeds below approximate-
ly 30 km/h (18 mph).
Switching on and off
Action
Switch-
ing on:– With the ignition on, turn the lights control
to the position and put the turn signal
and main beam lever in the main beam posi-
tion ››› page 131. When the headlight adjust-
ment (automatic lights also) is activated, the
warning lamp lights up in the dash panel
display
. 132
Page 135 of 324

Lights and visibilitySwitch-
ing off:– Disconnect the on button.
– OR: turn the lights control to a different po-
sition to
››› page 130.
– OR: place the turn signal and main beam
lever in the headlight flasher or main beam
position ››› page 131. The following conditions can cause the head-
light a
dju
stment to fail to turn off the main
beam or fail to do so in time:
● On roads with insufficient lighting with very
reflectiv
e signs
● If road users are insufficiently lit up, e.g.
pedes tri
ans or cyclists.
● On closed curves, when the traffic in the
oppos
ite direction is partially hidden, on pro-
nounced slopes
● On roads with traffic in the opposite direc-
tion and with a centr
al reservation barrier
where the driver can see through gaps or
over it e.g. lorry drivers.
● If the camera is damaged or if the power
supp
ly has been cut off
● In the event of fog, snow or heavy rain
● In the event of dust or sand storms
● If the windscreen is damaged by the impact
from a st
one in the camera's field of vision
● If the camera's field of vision is misted up,
dirty or c
overed by a sticker, snow or ice. WARNING
The greater comfort that the headlight ad-
jus tment
provides (automatic also) must not
cause you to take risks. The system is not a
replacement for driver awareness.
● Always monitor the lights yourself and ad-
just
them depending on the light, visibility
and traffic conditions.
● The headlight adjustment (automatic also)
may
not correctly detect all situations and in
certain situations may only provide limited
function.
● If the windscreen is damaged or modifica-
tions ar
e made to the vehicle lighting, this
may harm the functioning of the headlight
adjustment (automatic lights also), for exam-
ple, if additional headlight are fitted. Note
Main beam and flashed headlights can be
turned on and off m
anually at any time with
the turn signal and main beam lever
››› page 131. “Coming home” and “Leaving home”
f
u
nction (guid
ance lights) The “Coming home” function should be
sw
it
c
hed on manually. However the “Leav-
ing home” function is automatically control-
led by a photo sensor.
“Coming home”: necessary operations
To switch
system on:
– Switch off the ignition.
– Briefly flash the headlights for approxi-
mately one second ››› page 131.
The “Coming home” lighting comes on
when the driver door is opened. The delay
in switching off the headlights is counted
from when the last door or boot hatch is
closed.
To switch
system off:
– Automatically at the end of the delay pe-
riod.
– Automatically, if 30 seconds after com-
ing on, a vehicle door or the boot hatch re-
mains open.
– When the light switch is turned to posi-
tion
.
– When the ignition is switched on.
“Leaving home”: necessary operations
To switch
system on:– Unlock the vehicle when the light switch
is in position and the photo sensor
detects darkness.
To switch
system off:
– Automatically, at the end of the delay
period.
– When the vehicle is locked.
– When the light switch is turned to posi-
tion
.
– When the ignition is switched on. Lighting around the exterior mirrors
The lightin
g ar
ou
nd the exterior mirrors illu-
minates the door area on entering and leav-
ing the vehicles. It comes on when the vehi-
cle is unlocked, when the vehicle door is »
133
Technical data
Advice
Operation
Emergencies
Safety
Page 136 of 324

Operation
opened and when the “Coming home” or
“L e
av
ing home” function is switched on. If
the equipment includes the light sensor, the
lighting around the exterior mirrors only
comes when it is dark. Note
● The time tak en f
or the headlights to go off
can be changed in the Lights & Visibil- ity menu and the function can be switched
on or off ›››
page 26.
● When the “Coming home” function is on, if
the vehic
le door is opened there is no audible
warning signal to advise that the light is still
on. Hazard warning lights
Fig. 141
In the centre of the dash panel: push
b utt
on f
or hazard warning lights. Read the additional information carefully
› ›
›
page 25 Always fulfil legal requirements for securing a
broken do
wn vehicle. In a number of coun-
tries it is now obligatory, for example, to turn
on the hazard warning lights and use a re-
flective safety vest ››› page 82.
When being towed with the hazard warning
lights on, a change in direction or traffic lane
can be indicated as usual using the turn sig-
nal lever. The hazard lights will be interrup-
ted temporarily.
If your vehicle breaks down:
Park the vehicle a safe distance from
traffic and on suitable ground ››› .
T urn on the h
az
ard warning lights with
the button
› ›
› Fig. 141
.
Connect the electronic parking brake
››› page 189.
Move the selector lever to its intermedi-
ate position or to P ››› page 194.
Stop the engine and remove the key
from the ignition ››› page 185.
Have all occupants leave the vehicle and
move to safety, for example behind a
guard rail.
When leaving the vehicle, take all keys
with you.
Place an emergency warning triangle to
indicate the position of your vehicle to
other road users.
1.
2.
3.
4.
5.
6.
7.
8. Allow the engine to cool and check if a
speci
alist is required.
If the hazard warning lights are not working,
you must use an alternative method of draw-
ing attention to your vehicle. This method
must comply with traffic legislation. WARNING
A faulty vehicle in traffic represents a risk of
acc ident
for the driver and for other road
users.
● Stop the vehicle safely as soon as possible.
Park the
vehicle a safe distance from sur-
rounding traffic to lock all the doors in case of
an emergency. Turn on the hazard warning
lights to warn other road users.
● Never leave children or disabled people
alone in the v
ehicle if the doors are to be
locked. In case of an emergency, passengers
will be trapped inside the vehicle. Individuals
locked in the vehicle can be exposed to very
high or very low temperatures. WARNING
The components of the exhaust system reach
ver y
high temperatures. This could cause a
fire and considerable damage.
● Always park your vehicle so that no part of
the exhau
st system can come in contact with
flammable materials (such as dried grass or
fuel). 9.
134
 1
1 2
2 3
3 4
4 5
5 6
6 7
7 8
8 9
9 10
10 11
11 12
12 13
13 14
14 15
15 16
16 17
17 18
18 19
19 20
20 21
21 22
22 23
23 24
24 25
25 26
26 27
27 28
28 29
29 30
30 31
31 32
32 33
33 34
34 35
35 36
36 37
37 38
38 39
39 40
40 41
41 42
42 43
43 44
44 45
45 46
46 47
47 48
48 49
49 50
50 51
51 52
52 53
53 54
54 55
55 56
56 57
57 58
58 59
59 60
60 61
61 62
62 63
63 64
64 65
65 66
66 67
67 68
68 69
69 70
70 71
71 72
72 73
73 74
74 75
75 76
76 77
77 78
78 79
79 80
80 81
81 82
82 83
83 84
84 85
85 86
86 87
87 88
88 89
89 90
90 91
91 92
92 93
93 94
94 95
95 96
96 97
97 98
98 99
99 100
100 101
101 102
102 103
103 104
104 105
105 106
106 107
107 108
108 109
109 110
110 111
111 112
112 113
113 114
114 115
115 116
116 117
117 118
118 119
119 120
120 121
121 122
122 123
123 124
124 125
125 126
126 127
127 128
128 129
129 130
130 131
131 132
132 133
133 134
134 135
135 136
136 137
137 138
138 139
139 140
140 141
141 142
142 143
143 144
144 145
145 146
146 147
147 148
148 149
149 150
150 151
151 152
152 153
153 154
154 155
155 156
156 157
157 158
158 159
159 160
160 161
161 162
162 163
163 164
164 165
165 166
166 167
167 168
168 169
169 170
170 171
171 172
172 173
173 174
174 175
175 176
176 177
177 178
178 179
179 180
180 181
181 182
182 183
183 184
184 185
185 186
186 187
187 188
188 189
189 190
190 191
191 192
192 193
193 194
194 195
195 196
196 197
197 198
198 199
199 200
200 201
201 202
202 203
203 204
204 205
205 206
206 207
207 208
208 209
209 210
210 211
211 212
212 213
213 214
214 215
215 216
216 217
217 218
218 219
219 220
220 221
221 222
222 223
223 224
224 225
225 226
226 227
227 228
228 229
229 230
230 231
231 232
232 233
233 234
234 235
235 236
236 237
237 238
238 239
239 240
240 241
241 242
242 243
243 244
244 245
245 246
246 247
247 248
248 249
249 250
250 251
251 252
252 253
253 254
254 255
255 256
256 257
257 258
258 259
259 260
260 261
261 262
262 263
263 264
264 265
265 266
266 267
267 268
268 269
269 270
270 271
271 272
272 273
273 274
274 275
275 276
276 277
277 278
278 279
279 280
280 281
281 282
282 283
283 284
284 285
285 286
286 287
287 288
288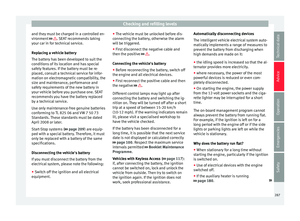 289
289 290
290 291
291 292
292 293
293 294
294 295
295 296
296 297
297 298
298 299
299 300
300 301
301 302
302 303
303 304
304 305
305 306
306 307
307 308
308 309
309 310
310 311
311 312
312 313
313 314
314 315
315 316
316 317
317 318
318 319
319 320
320 321
321 322
322 323
323