2016 Peugeot Expert VU tow
[x] Cancel search: towPage 172 of 520
170
Airbags
System designed to contribute towards
improving the safety of the occupants (with the
exception of the centre seat in rows 2 and 3, if
so equipped) in the event of violent collisions.
th
e airbags supplement the action of the seat
belts fitted with force limiters.
If a collision occurs, the electronic detectors
record and analyse the front and side impacts
sustained in the impact detection zones:
-
i
n the case of a serious impact, the airbags
are deployed instantly and contribute
towards better protection of the occupants
of the vehicle (with the exception of
the centre seat in rows 2 and 3, if so
equipped); immediately after the impact,
the airbags deflate rapidly so that they
do not hinder visibility or the exit of the
occupants,
-
i
n the case of a minor or rear impact or in
certain roll-over conditions, the airbags
may not be deployed; the seat belt
alone contributes towards ensuring your
protection in these situations. The airbags do not operate when the
ignition is switched off.th
is equipment will only deploy once.
If a second impact occurs (during the
same or a subsequent accident), the
airbag will not be deployed again. Deployment of one or more of the
airbags is accompanied by a slight
emission of smoke and a noise, due
to the activation of the pyrotechnic
cartridge incorporated in the system.
th
is smoke is not harmful, but sensitive
individuals may experience slight
irritation.
th
e noise of detonation related to the
deployment of one or more airbags may
result in a slight loss of hearing for a
short time.
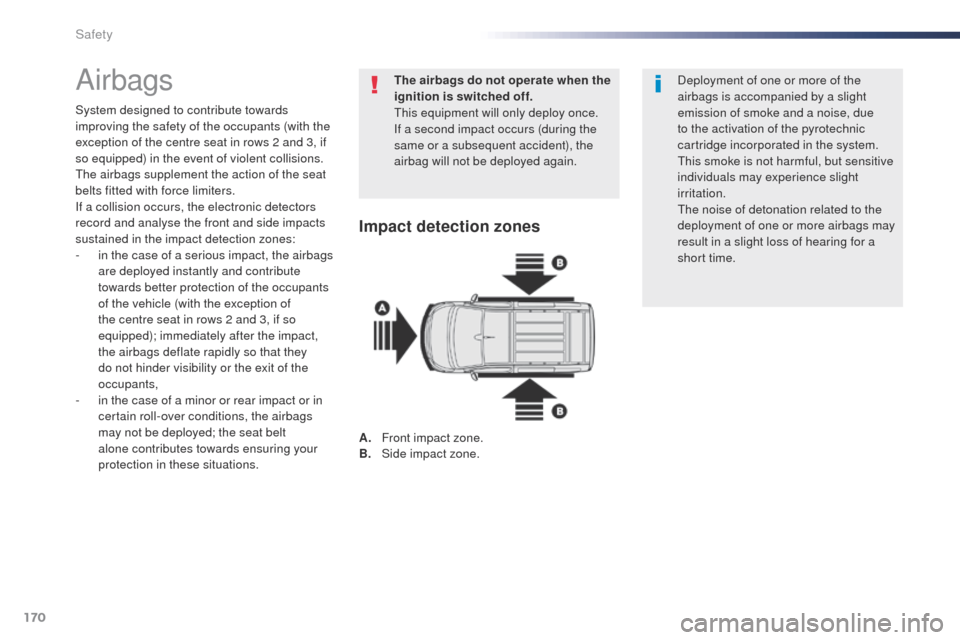
Impact detection zones
A. Front impact zone.
B. S ide impact zone.
Safety
Page 174 of 520
172
Deactivating the passenger front
airbag
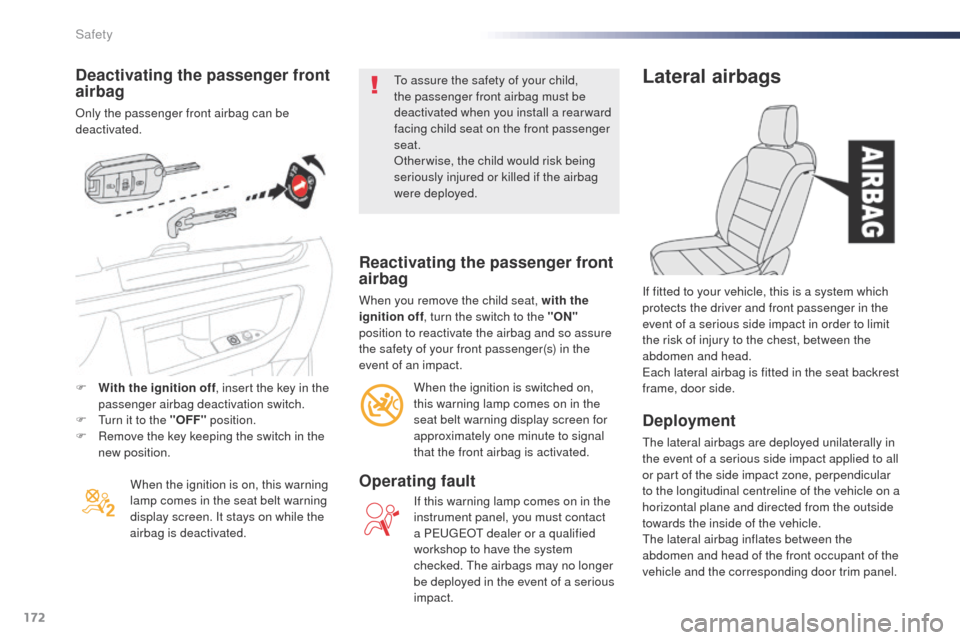
only the passenger front airbag can be
deactivated.When the ignition is on, this warning
lamp comes in the seat belt warning
display screen. It stays on while the
airbag is deactivated.
to a
ssure the safety of your child,
the passenger front airbag must be
deactivated when you install a rear ward
facing child seat on the front passenger
seat.
ot
herwise, the child would risk being
seriously injured or killed if the airbag
were deployed.
Reactivating the passenger front
airbag
When you remove the child seat, with the
ignition off , turn the switch to the "ON"
position to reactivate the airbag and so assure
the safety of your front passenger(s) in the
event of an impact.
When the ignition is switched on,
this warning lamp comes on in the
seat belt warning display screen for
approximately one minute to signal
that the front airbag is activated.
Operating fault
If this warning lamp comes on in the
instrument panel, you must contact
a P
e
ugeot dealer or a qualified
workshop to have the system
checked.
t
h
e airbags may no longer
be deployed in the event of a serious
impact.
Lateral airbags
Deployment
the lateral airbags are deployed unilaterally in
the event of a serious side impact applied to all
or part of the side impact zone, perpendicular
to the longitudinal centreline of the vehicle on a
horizontal plane and directed from the outside
towards the inside of the vehicle.
th
e lateral airbag inflates between the
abdomen and head of the front occupant of the
vehicle and the corresponding door trim panel. If fitted to your vehicle, this is a system which
protects the driver and front passenger in the
event of a serious side impact in order to limit
the risk of injury to the chest, between the
abdomen and head.
ea
ch lateral airbag is fitted in the seat backrest
frame, door side.
F
W
ith the ignition off
, insert the key in the
passenger airbag deactivation switch.
F
t
u
rn it to the "OFF"
position.
F
R
emove the key keeping the switch in the
new position.
Safety
Page 185 of 520
183
(a) universal child seat: child seat that can be installed in any vehicle using the seat belt.
(b)
g
r
oup 0: from birth to 10 kg. Infant car
seats and "car cots" cannot be installed on
the front passenger seat.
(c)
C
onsult the legislation in force in your
country before installing your child on this
seat.
(d)
W
hen a rear ward facing child seat is
installed on the front passenger seat,
the front passenger airbag must be
deactivated.
o
t
herwise the child risks
being seriously injured or killed if the airbag
is deployed.
(e)
t
o i
nstall a child seat on a rear seat, move
the seat in front for ward, then straighten
the backrest to allow sufficient space for
the child seat and the child's legs. Remove and stow the head restraint
before installing a child seat with
backrest on a passenger seat.
Refit the head restraint once the child
seat has been removed.
U
S eat suitable for the installation of a child
seat secured using the seat belt and
universally approved, rearward facing and/
or forward facing.
X
S
eat not suitable for the installation of a
child seat of the weight group indicated.
5
Safety
Page 188 of 520
186
"ISoFIX" mountings
the incorrect installation of a child seat
in a vehicle compromises the child's
protection in the event of an accident.
For information on the possibilities for
installing IS
oF
IX child seats in your
vehicle, refer to the locations table.
ob
serve strictly the fitting instructions
provided with the child seat.
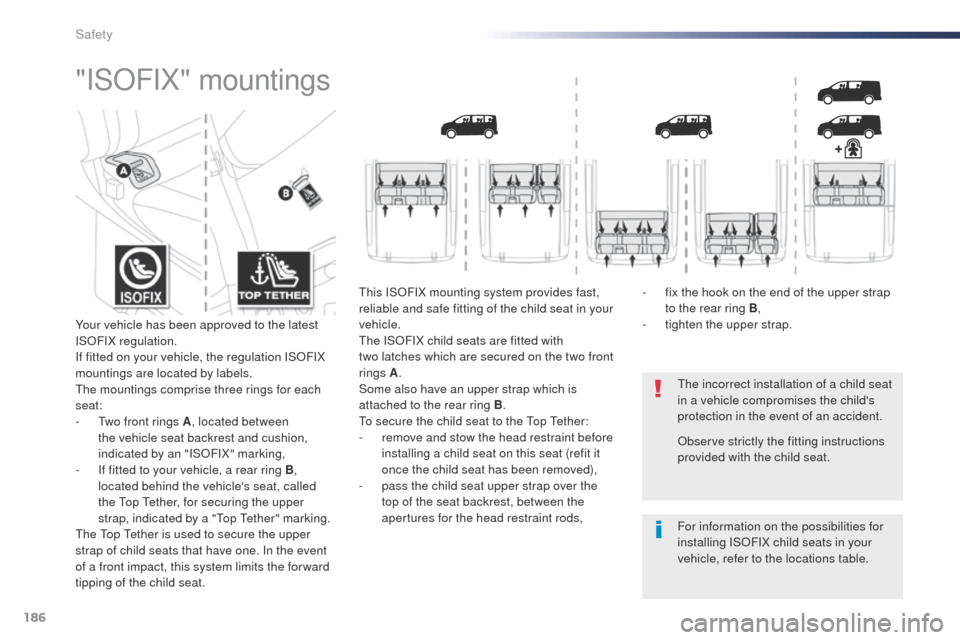
Your vehicle has been approved to the latest
IS
oF
IX regulation.
If fitted on your vehicle, the regulation IS
oF
IX
mountings are located by labels.the
mountings comprise three rings for each
seat:
-
t
w
o front rings A , located between
the vehicle seat backrest and cushion,
indicated by an "IS
o
F
IX" marking,
-
I
f fitted to your vehicle, a rear ring B ,
located behind the vehicle's seat, called
the
t
o
p
t
e
ther, for securing the upper
strap, indicated by a "
to
p
t
e
ther" marking.
th
e
t
o
p
t
e
ther is used to secure the upper
strap of child seats that have one. In the event
of a front impact, this system limits the for ward
tipping of the child seat.
th
is IS
oF
IX mounting system provides fast,
reliable and safe fitting of the child seat in your
vehicle.
th
e IS
oF
IX child seats are fitted with
two
latches which are secured on the two front
rings A .
Some also have an upper strap which is
attached to the rear ring B .
to s
ecure the child seat to the
t
o
p
t
e
ther:
-
r
emove and stow the head restraint before
installing a child seat on this seat (refit it
once the child seat has been removed),
-
p
ass the child seat upper strap over the
top of the seat backrest, between the
apertures for the head restraint rods, -
f
ix the hook on the end of the upper strap
to the rear ring B ,
-
t
ighten the upper strap.
Safety
Page 195 of 520
193
Child seatsInstalling a booster
cushion
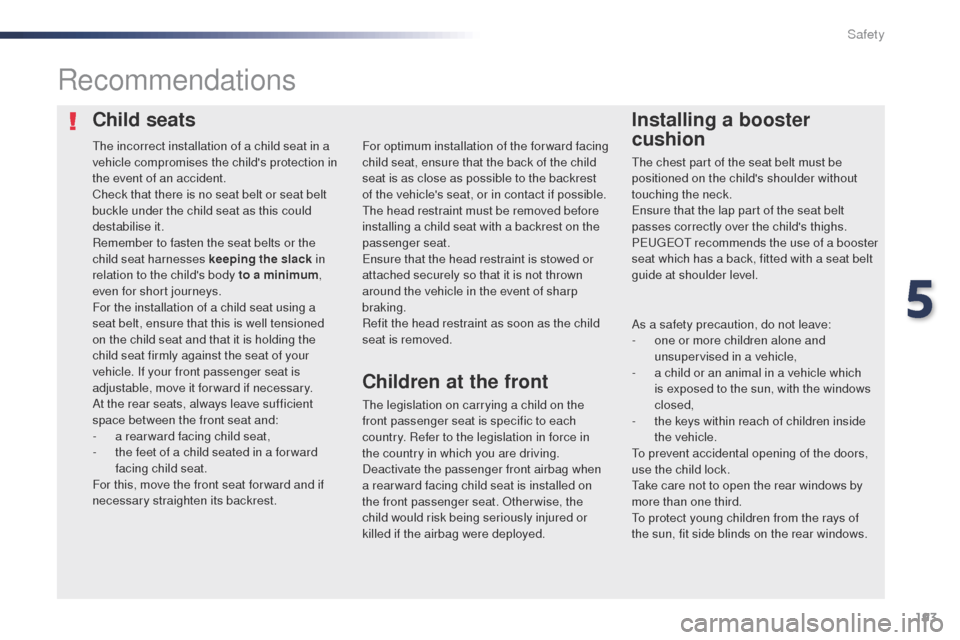
Recommendations
the legislation on carrying a child on the
front passenger seat is specific to each
country. Refer to the legislation in force in
the country in which you are driving.
Deactivate the passenger front airbag when
a rear ward facing child seat is installed on
the front passenger seat.
o
t
herwise, the
child would risk being seriously injured or
killed if the airbag were deployed. For optimum installation of the forward facing
child seat, ensure that the back of the child
seat is as close as possible to the backrest
of the vehicle's seat, or in contact if possible.
th
e head restraint must be removed before
installing a child seat with a backrest on the
passenger seat.
en
sure that the head restraint is stowed or
attached securely so that it is not thrown
around the vehicle in the event of sharp
braking.
Refit the head restraint as soon as the child
seat is removed.
th
e incorrect installation of a child seat in a
vehicle compromises the child's protection in
the event of an accident.
Check that there is no seat belt or seat belt
buckle under the child seat as this could
destabilise it.
Remember to fasten the seat belts or the
child seat harnesses keeping the slack in
relation to the child's body to a minimum ,
even for short journeys.
For the installation of a child seat using a
seat belt, ensure that this is well tensioned
on the child seat and that it is holding the
child seat firmly against the seat of your
vehicle. If your front passenger seat is
adjustable, move it forward if necessary.
At the rear seats, always leave sufficient
space between the front seat and:
-
a r
ear ward facing child seat,
-
t
he feet of a child seated in a for ward
facing child seat.
For this, move the front seat for ward and if
necessary straighten its backrest.
Children at the front
the chest part of the seat belt must be
positioned on the child's shoulder without
touching the neck.
en
sure that the lap part of the seat belt
passes correctly over the child's thighs.
P
e
ugeot recommends the use of a booster
seat which has a back, fitted with a seat belt
guide at shoulder level.
As a safety precaution, do not leave:
-
o
ne or more children alone and
unsupervised in a vehicle,
-
a c
hild or an animal in a vehicle which
is exposed to the sun, with the windows
closed,
-
t
he keys within reach of children inside
the vehicle.
to p
revent accidental opening of the doors,
use the child lock.
ta
ke care not to open the rear windows by
more than one third.
to p
rotect young children from the rays of
the sun, fit side blinds on the rear windows.
5
Safety
Page 200 of 520

198
When towing
Distribution of loads
F Distribute the load in the trailer so that the
heaviest items are as close as possible to
the axle and the nose weight approaches
the maximum permitted without exceeding it.
Air density decreases with altitude, thus
reducing engine performance. Above
1 000 metres, the maximum towed load must
be reduced by 10
% for every 1 000 metres of
altitude.
Side wind
F take into account the increased sensitivity to side wind.
Cooling
towing a trailer on a slope increases the
temperature of the coolant.
As the fan is electrically controlled, its cooling
capacity is not dependent on the engine speed.
F
t
o l
ower the engine speed, reduce your
speed.
th
e maximum towed load on a long incline
depends on the gradient and the ambient
temperature.
In all cases, keep a check on the coolant
temperature.
F
I
f the warning lamp and the
STOP warning lamp come on,
stop the vehicle and switch off
the engine as soon as possible.
Braking
towing a trailer increases the braking distance.to a void overheating of the brakes, the use of
engine braking is recommended.
Ty r e s
F Check the tyre pressures of the towing vehicle and of the trailer, observing the
recommended pressures.
Lighting
F Check the electrical lighting and signalling on the trailer and the headlamp beam
height of your vehicle.
For more information on Weights
, refer
to the corresponding section.
th
e rear parking sensors will be
deactivated automatically to avoid the
audible signal if a genuine P
e
ugeot
towbar is used.
If the ambient temperature is high, it
is recommended that the engine be
allowed to idle for 1 to 2 minutes after
the vehicle comes to a stop, to facilitate
its cooling. For more information on Adjusting the
headlamp beam height
, refer to the
corresponding section.
Driving
Page 203 of 520
201
Avoid attaching heavy objects to the
key, which would weigh down on its
blade in the ignition switch and could
cause a malfunction.
Switching off the engine leads to a loss
of braking assistance.
Key left in the "Ignition on"
position
If the key has been left in the ignition switch
at position 2 (Ignition on)
, the ignition will
be switched off automatically after one hour.
to s
witch the ignition back on, turn the key
to position 1 (Stop) , then back to position 2
(Ignition on) .
Never switch off the ignition until the vehicle
has been brought to a complete stop.
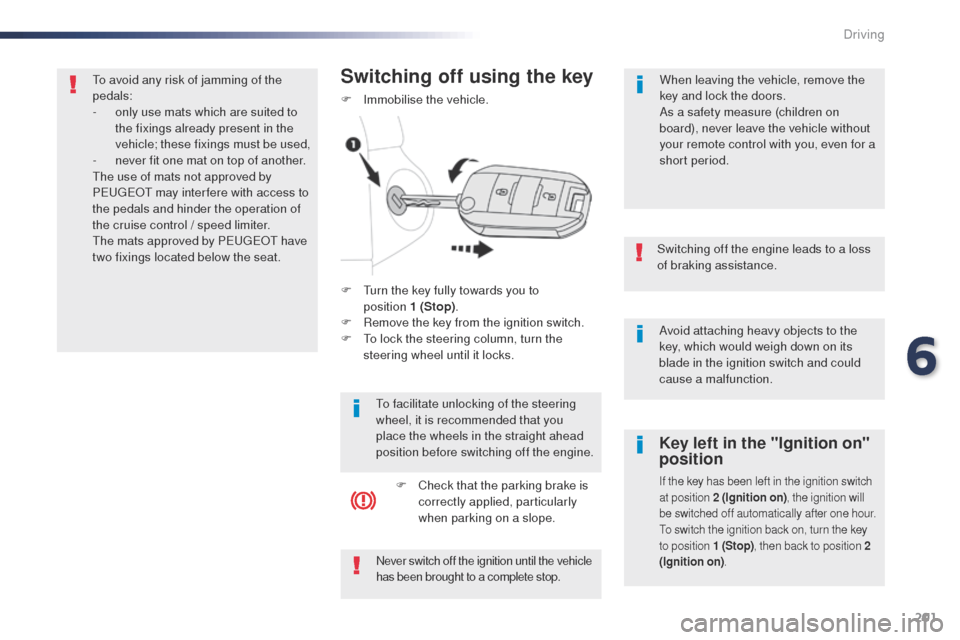
F turn the key fully towards you to
position 1 (Stop) .
F
R
emove the key from the ignition switch.
F
t
o l
ock the steering column, turn the
steering wheel until it locks.
Switching off using the key
F Immobilise the vehicle.
to f
acilitate unlocking of the steering
wheel, it is recommended that you
place the wheels in the straight ahead
position before switching off the engine.
F
C
heck that the parking brake is
correctly applied, particularly
when parking on a slope. When leaving the vehicle, remove the
key and lock the doors.
As a safety measure (children on
board), never leave the vehicle without
your remote control with you, even for a
short period.
to a
void any risk of jamming of the
pedals:
-
o
nly use mats which are suited to
the fixings already present in the
vehicle; these fixings must be used,
-
n
ever fit one mat on top of another.
th
e use of mats not approved by
P
e
ugeot
may inter fere with access to
the pedals and hinder the operation of
the cruise control / speed limiter.
th
e mats approved by P
e
ugeot
have
two fixings located below the seat.
6
Driving
Page 211 of 520
209
Automatic gearbox
Six speed automatic gearbox which offers
a choice between the comfort of automatic
operation or manual gear changing.
tw
o driving modes are offered:
-
a
utomatic operation for electronic
management of the gears by the gearbox,
-
m
anual operation for sequential changing
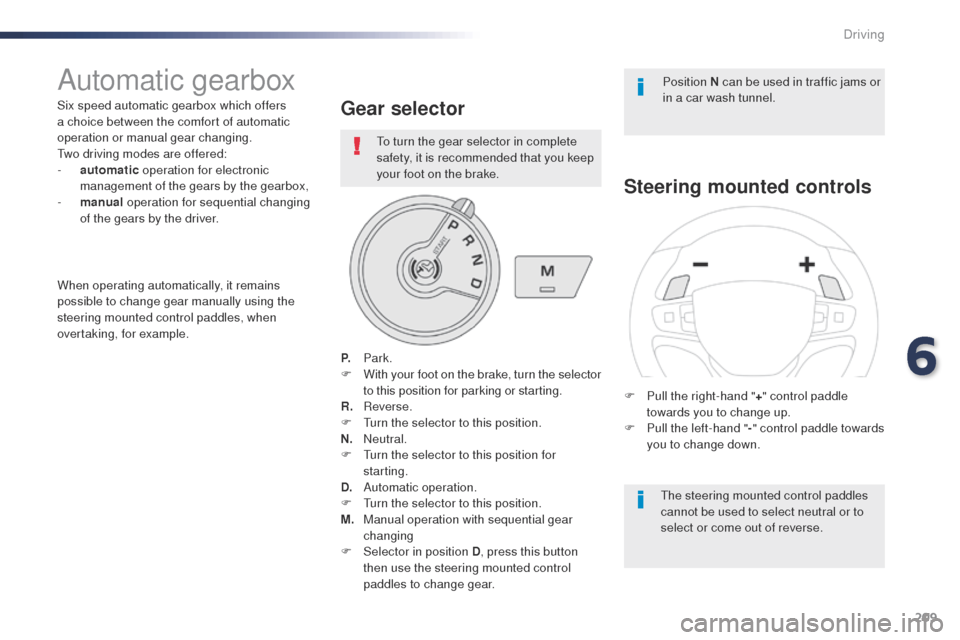
of the gears by the driver.Gear selector
P. Park.
F W ith your foot on the brake, turn the selector
to this position for parking or starting.
R.
R
everse.
F
t
u
rn the selector to this position.
N.
N
eutral.
F
t
u
rn the selector to this position for
starting.
D.
A
utomatic operation.
F
t
u
rn the selector to this position.
M.
M
anual operation with sequential gear
changing
F
Sel
ector in position D , press this button
then use the steering mounted control
paddles to change gear.
Steering mounted controls
the steering mounted control paddles
cannot be used to select neutral or to
select or come out of reverse.
When operating automatically, it remains
possible to change gear manually using the
steering mounted control paddles, when
overtaking, for example. Position N can be used in traffic jams or
in a car wash tunnel.
F
P
ull the right-hand "
+" control paddle
towards you to change up.
F
P
ull the left-hand "
-" control paddle towards
you to change down.
to t
urn the gear selector in complete
safety, it is recommended that you keep
your foot on the brake.
6
Driving