Page 203 of 364

201
508_en_Chap07_info-pratiques_ed01-2016
Low fuel level
When the low fuel level in the tank is
reached, this warning lamp comes on
in the instrument panel, accompanied
by an audible warning and a message
in the instrument panel screen.
Fuel supply cut-off
Your vehicle is equipped with a safety device
which cuts off the fuel supply in the event of
a
collision. It is still possible to use a fuel can to fill
the tank but this must be done slowly.
In order to ensure a good flow of fuel,
do not place the nozzle of the fuel can
in direct contact with the flap of the
misfuel prevention device.
Diesel misfuel prevention
Travelling abroad
As Diesel fuel pump nozzles may be different
in other countries, the presence of the misfuel
prevention device may make refuelling
impossible.
Not all Diesel vehicles are fitted with misfuel
protection, so before travelling abroad, we
recommend that you check with the P
e
uge
Ot
dealer network, whether your vehicle is suitable
for the fuel pumps in the country in which you
want to travel.
When it first comes on, around 7 litres of fuel
remain in the tank.
You must refuel as soon as possible to avoid
running out.
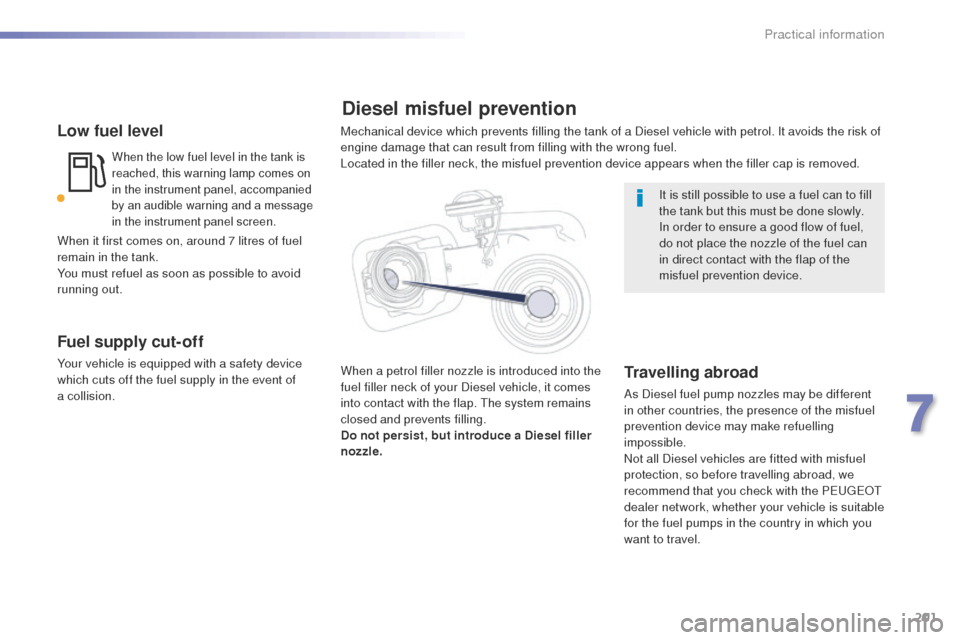
Mechanical device which prevents filling the tank of a Diesel vehicle with petrol. It avoids the risk of
engine damage that can result from filling with the wrong fuel.
Located in the filler neck, the misfuel prevention device appears when the filler cap is removed.
When a petrol filler nozzle is introduced into the
fuel filler neck of your Diesel vehicle, it comes
into contact with the flap.
th
e system remains
closed and prevents filling.
Do not persist, but introduce a Diesel filler
nozzle.
7
Practical information
Page 206 of 364
204
508_en_Chap07_info-pratiques_ed01-2016
Very cold climate screen
Before fitting or removing the screen,
ensure that the engine is off and
the cooling fan has stopped. It is
recommended that the screen be fitted
and removed by a P
e
uge
Ot
dealer or
a qualified workshop.
Do not forget to remove the very cold
climate screen:
-
when the ambient temperature exceeds
10° C (for example: in summer, ...),
- when towing,- at speeds above 75 mph (120 km/h).
Removable protective screen which prevents the accumulation of snow at the radiator cooling fan.
Fitting
F Offer up the screen to the front of the top section of the front bumper upper grille.
F
P
ress on the screen to engage its fixing
clips.
Removal
F use a screwdriver as a lever to unclip each retaining clip in turn.
Practical information
Page 213 of 364
211
508_en_Chap07_info-pratiques_ed01-2016
Changing a wiper blade
Before removing a front
wiper blade
F Within one minute after switching off the ignition, operate the wiper stalk to
position the wiper blades vertically on
the
windscreen.
Removing
F Raise the corresponding wiper arm.
F un clip the wiper blade and remove it.
Fitting
F Put the corresponding new wiper blade in place and clip it.
F
F
old down the wiper arm carefully.
After fitting a front wiper
blade
F Switch on the ignition.
F O perate the wiper stalk again to park the
wiper blades.
7
Practical information
Page 214 of 364
212
508_en_Chap07_info-pratiques_ed01-2016
Fitting roof bars
Maximum authorised weight on the roof
bars, for a loading height not exceeding
40 cm (with the exception of bicycle
c a r r i e r s):
-
Saloon: 70 kg
-
S
W and non-hybrid RHX: 100 kg
Saloon
- there are retaining pins in the door
apertures.
When fitting transverse roof bars, take care to
position them correctly.
SW and non-hybrid RHX
- there are markings on each of the
longitudinal bars.
use accessories recommended by
PeugeOt observing the manufacturer's
recommendations and fitting instructions
so as to avoid the risk of damaging the
body (deformation, scratches,
...).
If the height exceeds 40 cm, adapt the
speed of the vehicle to the profile of the
road to avoid damaging the roof bars
and the fixings on the roof.
Be sure to refer to national legislation in
order to comply with the regulations for
transporting objects which are longer
than the vehicle.
Practical information
Page 217 of 364
215
508_en_Chap07_info-pratiques_ed01-2016
1. Power steering fluid reservoir.
2. Screenwash and headlamp wash fluid
reservoir.
3.
C
oolant header tank.
4.
B
rake fluid reservoir.
5.
B
attery / Fuses.
6.
Fusebox.
7.
R
emote earth point (-).
8.
A
i r f i l t e r.
9.
e
n
gine oil dipstick.
10.
e
n
gine oil filler cap.
Petrol engines
1.6 litre THP 1501.6 litre THP 156
1.6 litre e-THP 165 S&S
7
Practical information
Page 218 of 364
216
508_en_Chap07_info-pratiques_ed01-2016
1. Power steering fluid reservoir.
2. Screenwash and headlamp wash fluid
reservoir.
3.
C
oolant reservoir.
4.
B
rake fluid reservoir.
5.
B
attery / Fuses.
6.
Fusebox.
7.
e
ar
th point ("-" terminal).
8.
A
i r f i l t e r.
9.
e
n
gine oil dipstick.
10.
e
n
gine oil filler cap.
11.
P
riming pump*.
12 .
B
leed screw*.
* According to engine.
Diesel engines
2.0 litre HDi 140 2.0 litre HDi 136
2.0 litre HDi 163
Practical information
Page 219 of 364
217
508_en_Chap07_info-pratiques_ed01-2016
BlueHDi Diesel
engines
1. Power steering fluid reservoir.
2. Screenwash and headlamp wash fluid
reservoir.
3.
C
oolant header tank.
4.
B
rake fluid reservoir.
5.
B
attery / Fuses.
6.
Fusebox.
7.
e
ar
th point ("-" terminal).
8.
A
i r f i l t e r.
9.
e
n
gine oil dipstick.
10.
e
n
gine oil filler cap.
2.0 litre BlueHDi 136 S&S
2.0 litre BlueHDi 150 S&S
2.0 litre BlueHDi 180 S&S
1.6 litre BlueHDi 120 S&S
7
Practical information
Page 221 of 364

219
508_en_Chap07_info-pratiques_ed01-2016
Power steering fluid level
the power steering fluid level should
be close to the "MA X" mark. With
the engine cold, unscrew the cap to
check the level.
th
e brake fluid level should be close
to the "MA X" mark. If it is not, check
the brake pad wear.
Brake fluid level
Changing the fluid
Refer to the manufacturer's service schedule
for details of the interval for this operation.
Fluid specification
the brake fluid must conform to the
manufacturer's recommendations.
Topping-up the engine oil level
the location of the oil filler cap is shown in the
corresponding underbonnet layout view.
F
u
n
screw the oil filler cap to reveal the filler
aperture.
F
A
dd oil in small quantities, avoiding any
spills on engine components (risk of fire).
F
W
ait a few minutes before checking the
level again using the dipstick.
F
A
dd more oil if necessary.
F
A
fter checking the level, carefully refit the
oil filler cap and the dipstick in its tube.
After topping-up the oil, the check when
switching on the ignition with the oil level
indicator in the instrument panel is not valid
during the 30 minutes after topping up.
Engine oil change
Refer to the manufacturer's service schedule
for details of the interval for this operation.
In order to maintain the reliability of the engine
and emission control system, never use
additives in the engine oil.
7
Practical information