Page 237 of 364

235
508_en_Chap08_en-cas-de-pannes_ed01-2016
Spare wheel
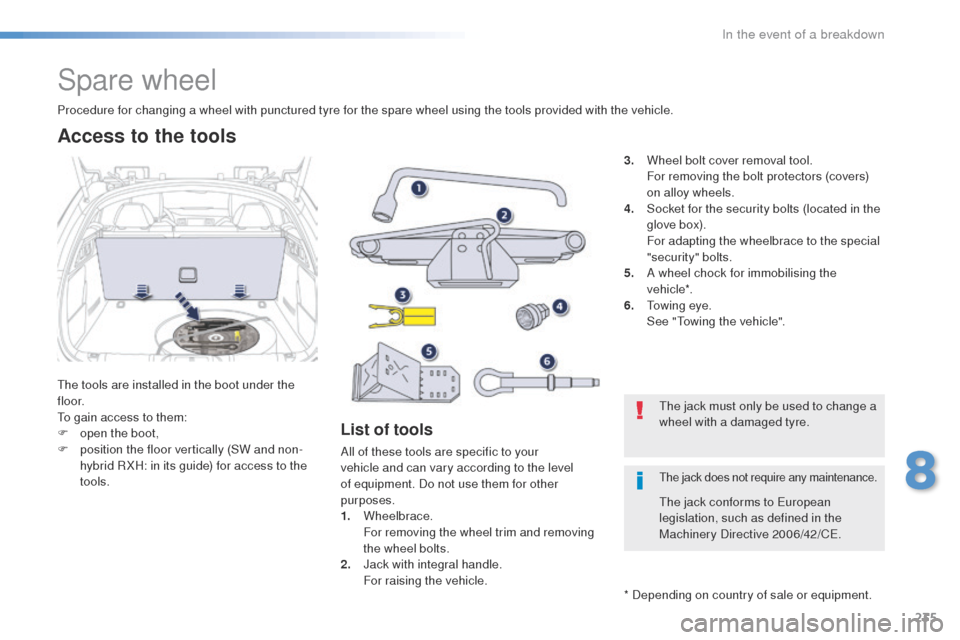
the tools are installed in the boot under the
f l o o r.
to g
ain access to them:
F
o
pen the boot,
F
p
osition the floor vertically (SW and non-
hybrid R XH: in its guide) for access to the
tools.
Procedure for changing a wheel with punctured tyre for the spare wheel using the tools provided with the vehicle.
List of tools
All of these tools are specific to your
vehicle and can vary according to the level
of equipment. Do not use them for other
purposes.
1.
Wheelbrace.
F
or removing the wheel trim and removing
the wheel bolts.
2.
J
ack with integral handle.
F
or raising the vehicle. 3.
W
heel bolt cover removal tool.
F
or removing the bolt protectors (covers)
on alloy wheels.
4.
S
ocket for the security bolts (located in the
glove box).
F
or adapting the wheelbrace to the special
"security" bolts.
5.
A w
heel chock for immobilising the
vehicle*.
6.
t
o
wing eye.
S
ee "
to
wing the vehicle".
Access to the tools
* Depending on country of sale or equipment.
th
e jack must only be used to change a
wheel with a damaged tyre.
th
e jack conforms to e
u
ropean
legislation, such as defined in the
Machinery Directive 2006/42/C
e.
the jack does not require any maintenance.
8
In the event of a breakdown
Page 240 of 364

238
508_en_Chap08_en-cas-de-pannes_ed01-2016
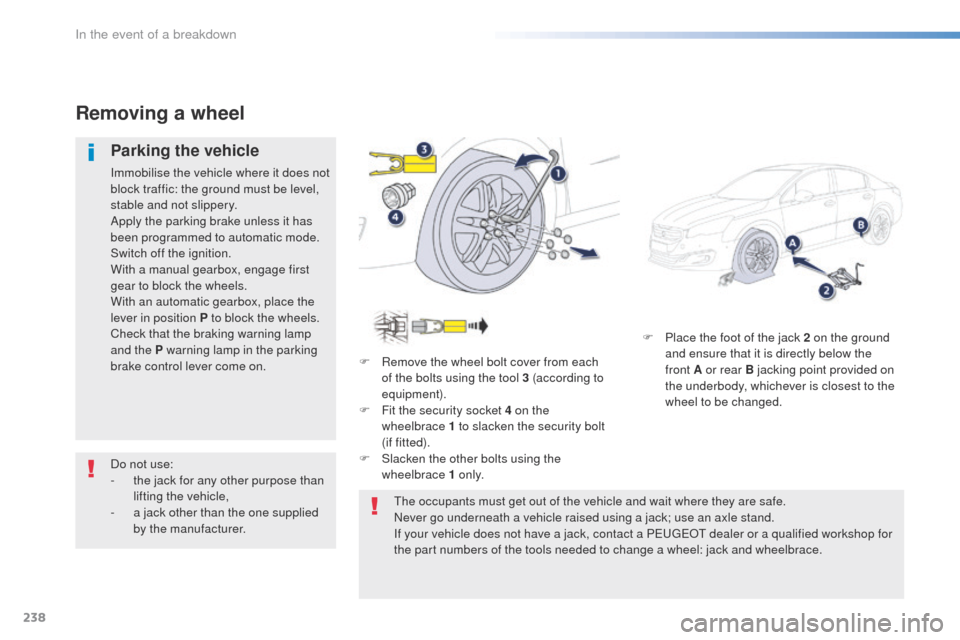
F Place the foot of the jack 2 on the ground and ensure that it is directly below the
front
A or rear B jacking point provided on
the underbody, whichever is closest to the
wheel to be changed.
Removing a wheel
Parking the vehicle
Immobilise the vehicle where it does not
block traffic: the ground must be level,
stable and not slippery.
Apply the parking brake unless it has
been programmed to automatic mode.
Switch off the ignition.
With a manual gearbox, engage first
gear to block the wheels.
With an automatic gearbox, place the
lever in position P to block the wheels.
Check that the braking warning lamp
and the P warning lamp in the parking
brake control lever come on. F
R
emove the wheel bolt cover from each
of the bolts using the tool 3 (according to
equipment).
F
F
it the security socket 4 on the
wheelbrace
1 to slacken the security bolt
(if
fitted).
F
S
lacken the other bolts using the
wheelbrace 1 o n l y.
th
e occupants must get out of the vehicle and wait where they are safe.
Never go underneath a vehicle raised using a jack; use an axle stand.
If your vehicle does not have a jack, contact a P
e
uge
Ot
dealer or a qualified workshop for
the part numbers of the tools needed to change a wheel: jack and wheelbrace.
Do not use:
-
t
he jack for any other purpose than
lifting the vehicle,
-
a j
ack other than the one supplied
by the manufacturer.
In the event of a breakdown
Page 241 of 364
239
508_en_Chap08_en-cas-de-pannes_ed01-2016
F Raise the vehicle until there is sufficient space between the wheel and the ground
to admit the spare (not punctured) wheel
easily.
F
R
emove the bolts and store them in a clean
place.
F
R
emove the wheel.
F
e
x
tend the jack 2 until its head comes into
contact with the jacking point A or B used;
the vehicle's contact sur face at A or B must
engage with the central part of the head of
the jack.
en
sure that the jack is stable. If the
ground is slippery or loose, the jack
might slip or drop - Risk of injury!
ta
ke care to position the jack only at
one of the vehicle's jacking points A
or B under the vehicle, ensuring that the
contact sur face of the vehicle's jacking
point is centred on the head of the jack.
Otherwise there is a risk of damage to
the vehicle and/or that the jack might
drop - Risk of injury!
8
In the event of a breakdown
Page 242 of 364

240
508_en_Chap08_en-cas-de-pannes_ed01-2016
Fitting a wheel
Fitting the "space-saver"
spare wheel
If your vehicle is fitted with alloy wheels,
when tightening the bolts on fitting, it
is normal to notice that the washers
do not come into contact with the
"space-saver" spare wheel. t
h
e wheel
is secured by the conical sur face of
each bolt.
After changing a wheel
to store the punctured wheel in the
boot correctly, first remove the central
c ove r.
When using the "space-saver" type
spare wheel, do not exceed 50 mph
(80
km/h).
Have the tightening of the bolts and the
pressure of the spare wheel checked
by a P
e
uge
Ot
dealer or a qualified
workshop without delay.
Have the punctured wheel repaired
and refitted to the vehicle as soon as
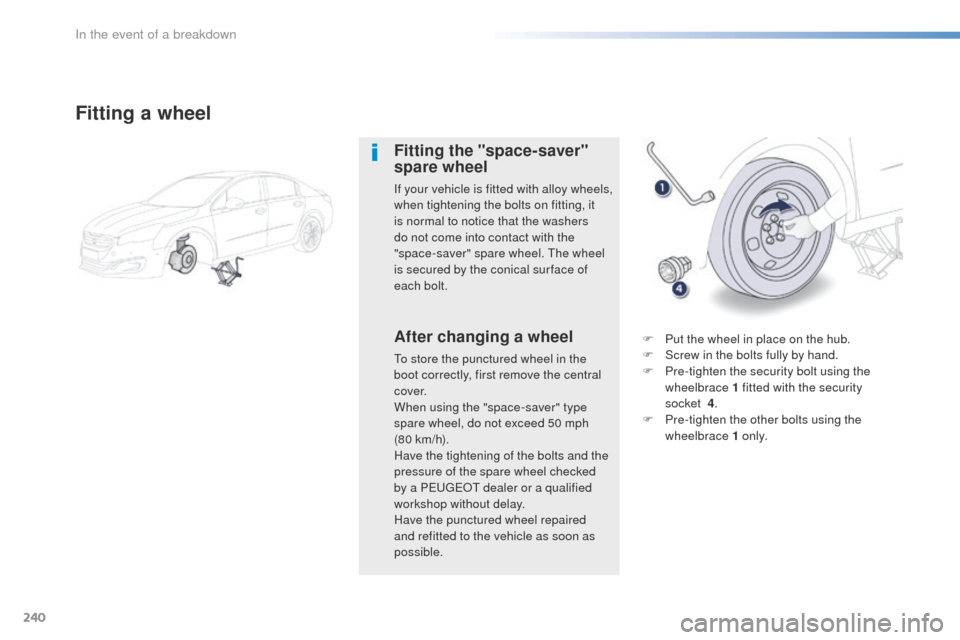
possible. F
P
ut the wheel in place on the hub.
F S crew in the bolts fully by hand.
F P re-tighten the security bolt using the
wheelbrace 1 fitted with the security
socket
4.
F
P
re-tighten the other bolts using the
wheelbrace 1 o n l y.
In the event of a breakdown
Page 243 of 364
241
508_en_Chap08_en-cas-de-pannes_ed01-2016
F Lower the vehicle fully.
F F old the jack 2 and detach it. F
ti ghten the security bolt using the
wheelbrace 1 fitted with the security
socket
4.
F
t
i
ghten the other bolts using the
wheelbrace 1 o n l y.
F
R
efit the wheel bolt cover to each of the
bolts (according to equipment).
F
S
tore the tools in the box.
8
In the event of a breakdown