2016 Peugeot 508 fold seats
[x] Cancel search: fold seatsPage 70 of 371
68
508_en_Chap02_ouvertures_ed01-2016
Back-up release (Saloon,
SW and non-hybrid RHX)
System for mechanically unlocking the boot in
the event of a battery or central locking fault.
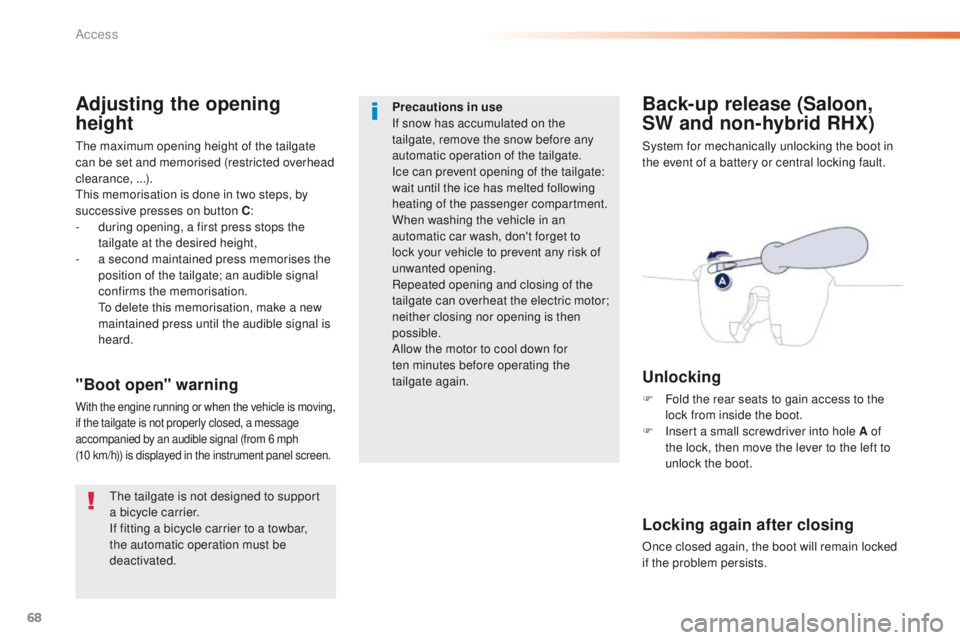
Unlocking
F Fold the rear seats to gain access to the lock from inside the boot.
F
I
nsert a small screwdriver into hole A of
the lock, then move the lever to the left to
unlock the boot."Boot open" warning
With the engine running or when the vehicle is moving,
if the tailgate is not properly closed, a message
accompanied by an audible signal (from 6 mph
(10
km/h)) is displayed in the instrument panel screen.
Locking again after closing
Once closed again, the boot will remain locked
if the problem persists.
Adjusting the opening
height
the maximum opening height of the tailgate
can be set and memorised (restricted overhead
clearance, ...).
th
is memorisation is done in two steps, by
successive presses on button C :
-
d
uring opening, a first press stops the
tailgate at the desired height,
-
a s
econd maintained press memorises the
position of the tailgate; an audible signal
confirms the memorisation.
t
o d
elete this memorisation, make a new
maintained press until the audible signal is
heard.
th
e tailgate is not designed to support
a bicycle carrier.
If fitting a bicycle carrier to a towbar,
the automatic operation must be
deactivated. Precautions in use
If snow has accumulated on the
tailgate, remove the snow before any
automatic operation of the tailgate.
Ice can prevent opening of the tailgate:
wait until the ice has melted following
heating of the passenger compartment.
When washing the vehicle in an
automatic car wash, don't forget to
lock your vehicle to prevent any risk of
unwanted opening.
Repeated opening and closing of the
tailgate can overheat the electric motor;
neither closing nor opening is then
possible.
Allow the motor to cool down for
ten
minutes before operating the
tailgate again.
Access
Page 111 of 371
109
508_en_Chap03_ergonomie-et-confort_ed01-2016
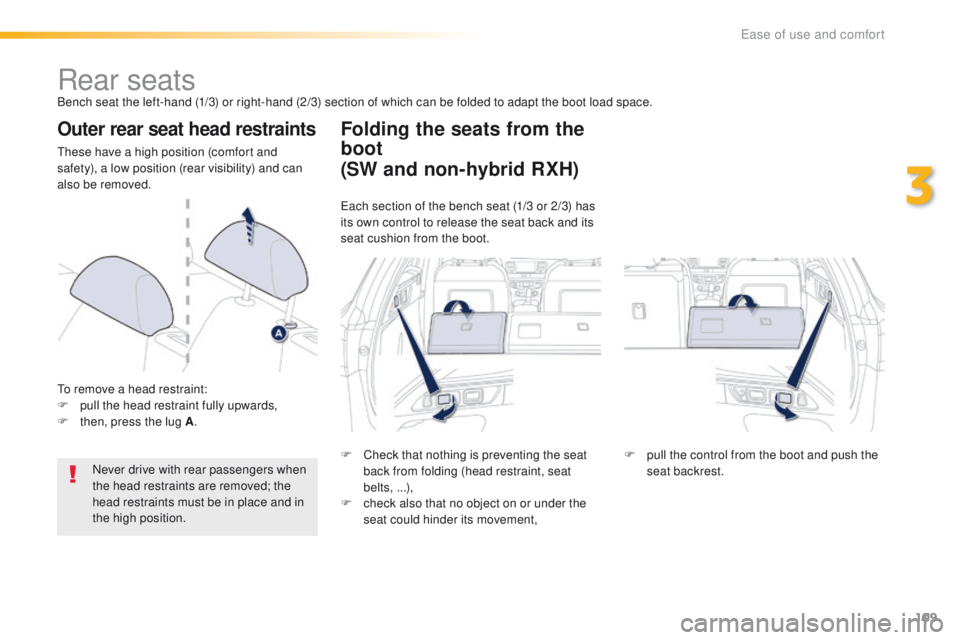
Rear seatsBench seat the left-hand (1/3) or right-hand (2/3) section of which can be folded to adapt the boot load space.
Outer rear seat head restraints
these have a high position (comfort and
safety), a low position (rear visibility) and can
also be removed.
to r
emove a head restraint:
F
p
ull the head restraint fully upwards,
F
t
hen, press the lug A .
Never drive with rear passengers when
the head restraints are removed; the
head restraints must be in place and in
the high position.
Folding the seats from the
boot
F Check that nothing is preventing the seat back from folding (head restraint, seat
belts, ...),
F
c
heck also that no object on or under the
seat could hinder its movement, F
p ull the control from the boot and push the
seat backrest.
(SW and non-hybrid RXH)
each section of the bench seat (1/3 or 2/3) has
its own control to release the seat back and its
seat cushion from the boot.
3
ease of use and comfort
Page 115 of 371
113
508_en_Chap03_ergonomie-et-confort_ed01-2016
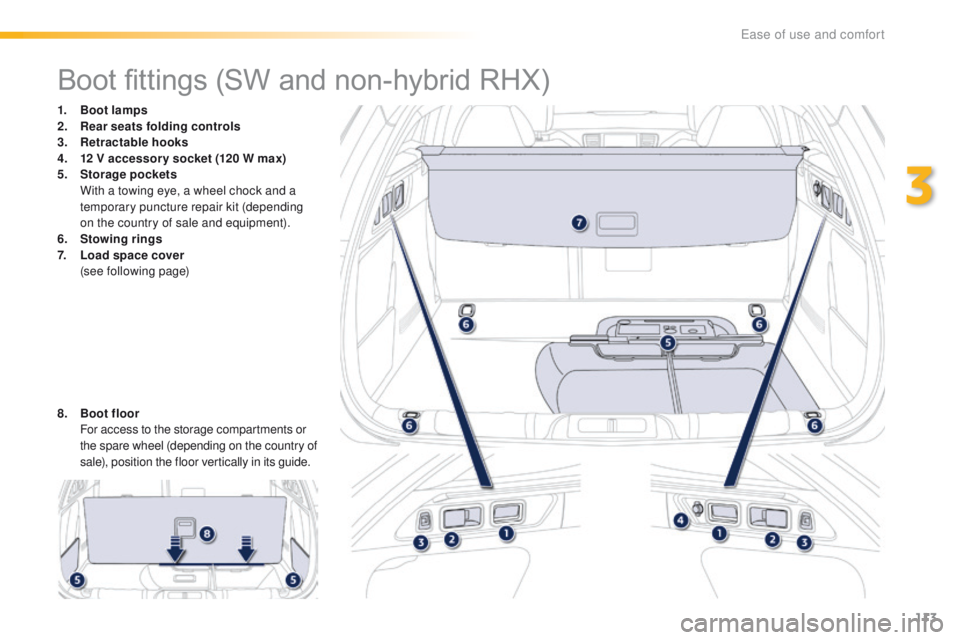
Boot fittings (SW and non-hybrid RHX)
1. Boot lamps
2. Rear seats folding controls
3.
R
etractable hooks
4.
1
2 V accessor y socket (120 W max)
5.
Sto
rage pockets
W
ith a towing eye, a wheel chock and a
temporary puncture repair kit (depending
on the country of sale and equipment).
6.
S
towing rings
7.
L
oad space cover
(
see following page)
8.
B
oot floor
F
or access to the storage compartments or
the spare wheel (depending on the country of
sale), position the floor vertically in its guide.
3
ease of use and comfort
Page 117 of 371
115
508_en_Chap03_ergonomie-et-confort_ed01-2016
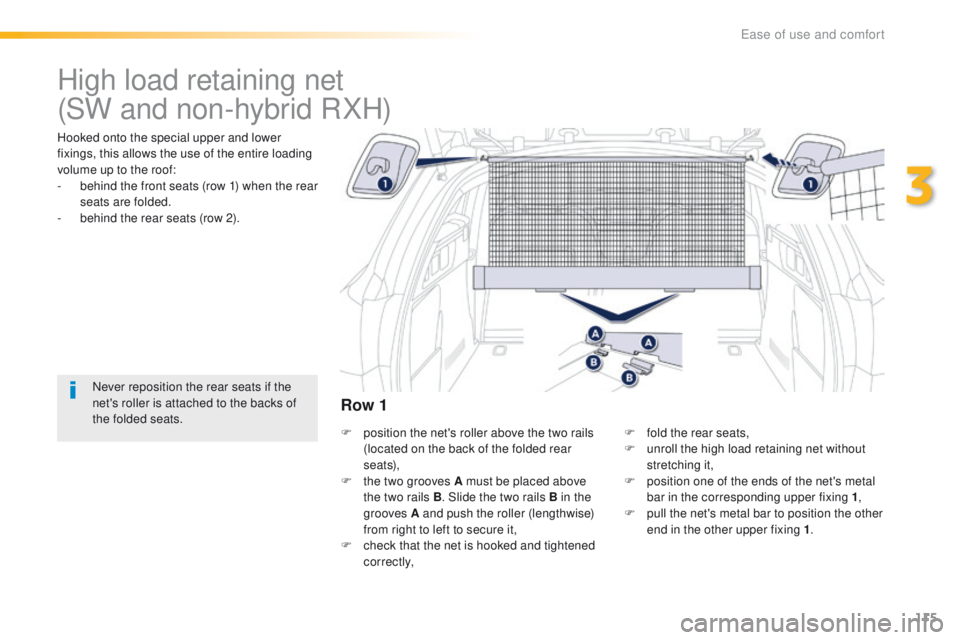
High load retaining net
Hooked onto the special upper and lower
fixings, this allows the use of the entire loading
volume up to the roof:
-
b
ehind the front seats (row 1) when the rear
seats are folded.
-
b
ehind the rear seats (row 2).
Never reposition the rear seats if the
net's roller is attached to the backs of
the folded seats. F
p
osition the net's roller above the two rails
(located on the back of the folded rear
seats),
F
t
he two grooves A must be placed above
the two rails B . Slide the two rails B in the
grooves A and push the roller (lengthwise)
from right to left to secure it,
F
c
heck that the net is hooked and tightened
c o r r e c t l y, F
f
old the rear seats,
F
u
nroll the high load retaining net without
stretching it,
F
p
osition one of the ends of the net's metal
bar in the corresponding upper fixing 1 ,
F
p
ull the net's metal bar to position the other
end in the other upper fixing 1 .
Row 1
(SW and non-hybrid RXH)
3
ease of use and comfort
Page 140 of 371
138
508_en_Chap05_securite_ed01-2016
the driver must ensure that passengers use
the seat belts correctly and that they are all
fastened before setting off.
Wherever you are seated in the vehicle,
always fasten your seat belt, even for short
journeys.
Do not interchange the seat belt buckles as
they will not fulfil their role fully.
th
e seat belts are fitted with an inertia reel
permitting automatic adjustment of the
length of the strap to your size.
t
h
e seat belt
is stowed automatically when not in use.
Before and after use, ensure that the seat
belt is reeled in correctly.
th
e lower part of the strap must be
positioned as low as possible on the pelvis.
th
e upper part must be positioned in the
hollow of the shoulder.
th
e inertia reels are fitted with an automatic
locking device which comes into operation in
the event of a collision, emergency braking
or if the vehicle rolls over. You can release
the device by pulling the strap firmly and
then releasing it so that it reels in slightly.Recommendations for children
use a suitable child seat if the passenger is
less than 12 years old or shorter than one
and a half metres.
Never use the same seat belt to secure more
than one person.
Never allow a child to travel on your lap.
For more information on child seats, refer to
the corresponding section.
In order to be effective, a seat belt must:
-
b
e tightened as close to the body as
possible,
-
b
e pulled in front of you with a smooth
movement, checking that it does not
twist,
-
b
e used to restrain only one person,
-
n
ot bear any trace of cuts or fraying,
-
n
ot be converted or modified to avoid
affecting its performance.
In accordance with current safety
regulations, for all repairs on your vehicle's
seat belts, go to a qualified workshop with
the skills and equipment needed, which a
P
e
uge
Ot d
ealer is able to provide.
Have your seat belts checked regularly by a
P
e
uge
Ot
dealer or a qualified workshop,
particularly if the straps show signs of
damage.
Clean the seat belt straps with soapy
water or a textile cleaning product, sold by
P
e
uge
Ot d
ealers.
After folding or moving a seat or rear bench
seat, ensure that the seat belt is positioned
and reeled in correctly.
In the event of an impact
Depending on the nature and
seriousness of the impact , the
pretensioning device may be deployed
before and independently of the airbags.
Deployment of the pretensioners is
accompanied by a slight discharge of
harmless smoke and a noise, due to the
activation of the pyrotechnic cartridge
incorporated in the system.
In all cases, the airbag warning lamp comes
on.
Following an impact, have the seat belts
system checked, and if necessary replaced,
by a P
e
uge
Ot
dealer or a qualified
workshop.
Advice
Safety
Page 356 of 371

354
508_en_Chap11_index-alpha_ed01-2016
gauge, fuel.............................................. 13, 20 0ge
arbox,
automatic
........ 1
1, 16, 176, 180, 183, 222, 253
ge
arbox, manual
......11, 16, 174, 180, 183, 222
gea
r lever, automatic gearbox
..................... 17
6
ge
ar lever, manual gearbox
.........................174
ge
ar shift indicator
....................................... 175
gl
ove box ...................................................... 101
gr
ound clearance
......................................... 272
gu
ide-me-home
.................................... 121, 124Identification, vehicle
....................................
2
73
Immobiliser, electronic
................
52, 61, 69, 167
Indicator, coolant temperature
........................ 3
0
Indicator, engine oil level ................................
31
Indicator lamps ................................................
14
Indicators, direction ......................................120
Inflating tyres
..........................................11, 2 7 3
Inflating tyres and accessories (using the kit)
..............................
................234
Input, auxiliary
.............................. 1
08, 292, 346
Instrument panel
...............................
..............13
Instruments and controls
..................................7
I
ntelligent t
ra
ction Control
............................13
4
ISOFIX
...................................................152-15 6
Hazard warning lamps
..........................
132, 2 27
Headlamp adjustment
...................................
126
Headlamps, automatic illumination
......
118 , 12 1
Headlamps, dipped beam
.............
117, 242, 244
Headlamps, halogen
.............................
242, 244
Headlamps, main beam
................ 1
17, 242, 244
Headlamp wash
............................................
128
Head restraints, front ................................
75, 78
Head restraints, rear .....................................
109
Head-up display
............................
18 4, 188, 19 0
Heating
.........................................
83, 86, 88, 91
Heating, programmable (Webasto)
................ 97
H
ill start assist
...............................................
18
3
Horn ............................................................... 132
Filling the fuel tank
............................... 20
0, 202
Filter, air
...............
......................................... 221
Filter, oil
......................................................... 221
Filter, particle
........................................ 220, 221
G
I
E
H
F
Driving positions (storing) ...............................77
Dynamic stability control (DSC) ........ 1
8, 22, 133Filter, passenger compartment
.....................221
Fitting a wheel ............................... ................240
Fitting roof bars
.............................................212
Fittings, boot
......................................... 11
2 , 113
Fittings, front
...................................................99
Fittings, rear
...............................
...................111
Flap, fuel filler
...............................
.................200
Flashing indicators
................................120, 125
Foglamps, front
.............................119, 123, 242
Foglamps, rear
..............................119, 245, 246
Folding the rear seats
...................................109
Folding/unfolding the door mirrors
.................80
Frequency (radio)
..........................................288
Fuel ................................................................ 202
Fuel consumption
............................................ 11
F
usebox, dashboard
.....................................250
Fusebox, engine compartment
.....................252
Fuses
.............................................................249
e
BA
............................................................... 13 3
ec
o-driving (advice)
........................................ 11
el
ectronic brake force distribution
(
eB
FD)
........................................................ 13 3
em
ergency call
..................................... 1
3 2 , 2 74
em
ergency switching off
............................... 16
6
em
ergency warning lamps
................... 13
2, 2 27
em
issions control system, SCR .............25, 223
en
ergy economy mode
.................................261
en
gine compartment
.............................215 -217
en
gine,
Diesel
............16, 202, 216, 217, 228, 266, 268
en
gine, petrol
....................... 202, 215, 264, 265
en
vironment
......................... 1
1, 54, 63, 96, 179,
186, 220, 226, 253
Alphabetical index