2016 Peugeot 508 lock
[x] Cancel search: lockPage 212 of 371
210
508_en_Chap07_info-pratiques_ed01-2016
Maintenance
Correct operation is only possible if the towball
and its carrier remain clean.
Before cleaning the vehicle with a high
pressure jet wash, the towbar harness socket
carrier must be folded away, the towball
removed and the protective blanking plug
inserted in the carrier.
For any work on the towbar, go to a P
e
uge
Ot
dealer or a qualified workshop.
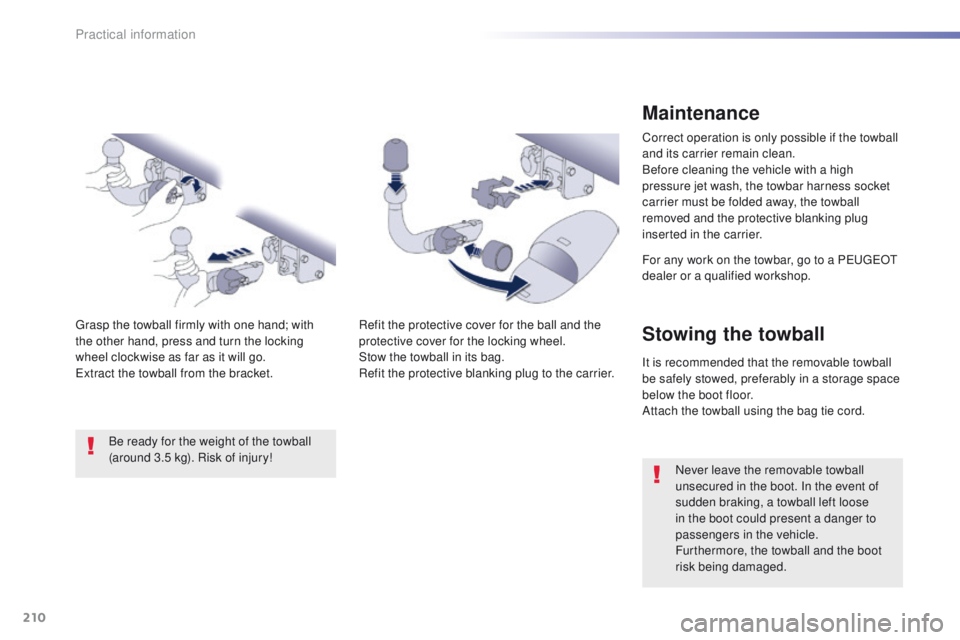
Refit the protective cover for the ball and the
protective cover for the locking wheel.
Stow the towball in its bag.
Refit the protective blanking plug to the carrier.
gr
asp the towball firmly with one hand; with
the other hand, press and turn the locking
wheel
clockwise as far as it will go.
ex
tract the towball from the bracket. Be ready for the weight of the towball
(around 3.5 kg). Risk of injury!
Stowing the towball
It is recommended that the removable towball
be safely stowed, preferably in a storage space
below the boot floor.
Attach the towball using the bag tie cord. Never leave the removable towball
unsecured in the boot. In the event of
sudden braking, a towball left loose
in the boot could present a danger to
passengers in the vehicle.
Furthermore, the towball and the boot
risk being damaged.
Practical information
Page 227 of 371
225
508_en_Chap07_info-pratiques_ed01-2016
Never store bottles of AdBlue® in your
vehicle.
Recommendations on storage
AdBlue® freezes at about -11°C and
deteriorates above 25°C. It is recommended
that bottles be stored in a cool area and
protected from direct sunlight.
und
er these conditions, the additive can be
kept for at least a year.
If the additive has frozen, it can be used once it
has completely thawed out.
Procedure
Before topping-up, ensure that the vehicle is
parked on a flat and level sur face.
In wintry conditions, ensure that the
temperature of the vehicle is above -11°C.
Otherwise the AdBlue
® may be frozen and
so cannot be poured into its tank. Park your
vehicle in a warmer area for a few hours to
allow the top-up to be carried out.
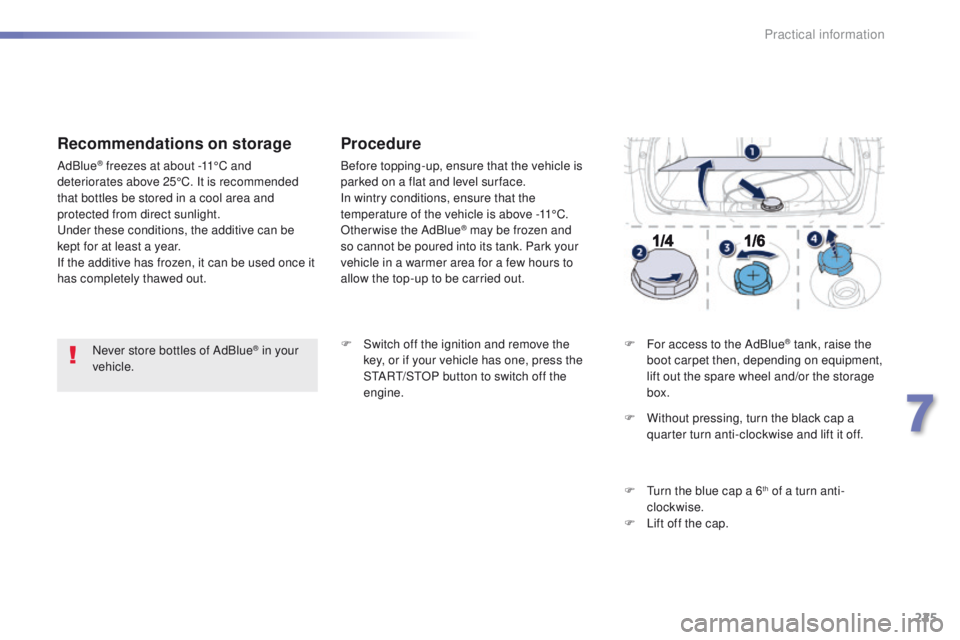
F
S
witch off the ignition and remove the
key, or if your vehicle has one, press the
S
tA
R
t/
S
tO
P button to switch off the
engine. F
F
or access to the AdBlue
® tank, raise the
boot carpet then, depending on equipment,
lift out the spare wheel and/or the storage
box.
F
W
ithout pressing, turn the black cap a
quarter turn anti-clockwise and lift it off.
F
t
u
rn the blue cap a 6
th of a turn anti-
clockwise.
F
L
ift off the cap.
7
Practical information
Page 228 of 371
226
508_en_Chap07_info-pratiques_ed01-2016
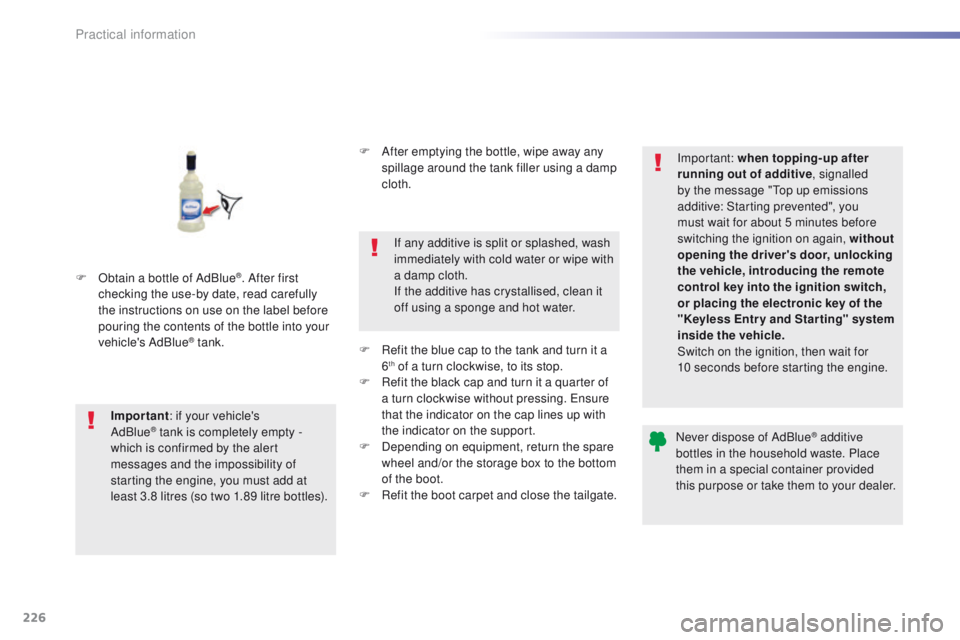
F Obtain a bottle of AdBlue®. After first
checking the use-by date, read carefully
the instructions on use on the label before
pouring the contents of the bottle into your
vehicle's AdBlue
® tank.
Important : if your vehicle's
AdBlue
® tank is completely empty -
w
hich is confirmed by the alert
messages and the impossibility of
starting the engine, you must add at
least 3.8 litres (so two 1.89 litre bottles). F
A
fter emptying the bottle, wipe away any
spillage around the tank filler using a damp
cloth.
If any additive is split or splashed, wash
immediately with cold water or wipe with
a damp cloth.
If the additive has crystallised, clean it
off using a sponge and hot water.
F
R
efit the blue cap to the tank and turn it a
6
th of a turn clockwise, to its stop.
F
R
efit the black cap and turn it a quarter of
a turn clockwise without pressing.
e
n
sure
that the indicator on the cap lines up with
the indicator on the support.
F
D
epending on equipment, return the spare
wheel and/or the storage box to the bottom
of the boot.
F
R
efit the boot carpet and close the tailgate. Important: when topping-up after
running out of additive
, signalled
by the message "
to
p up emissions
additive: Starting prevented", you
must wait for about 5 minutes before
switching the ignition on again, without
opening the driver's door, unlocking
the vehicle, introducing the remote
control key into the ignition switch,
or placing the electronic key of the
"Keyless Entr y and Star ting" system
inside the vehicle.
Switch on the ignition, then wait for
10 seconds before starting the engine.
Never dispose of AdBlue
® additive
bottles in the household waste. Place
them in a special container provided
this purpose or take them to your dealer.
Practical information
Page 231 of 371
229
508_en_Chap08_en-cas-de-pannes_ed01-2016
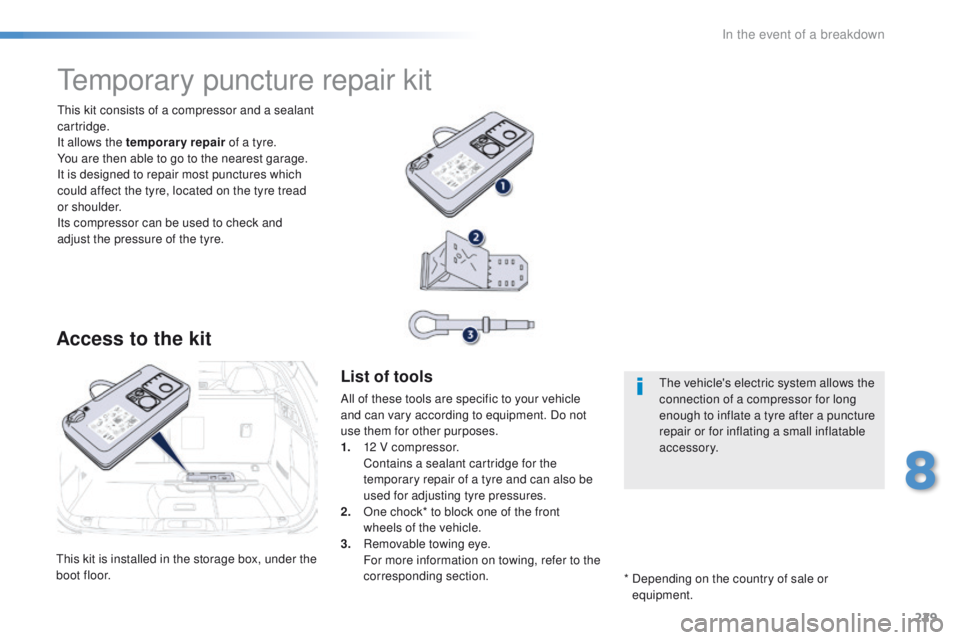
this kit is installed in the storage box, under the
boot floor.
th
is kit consists of a compressor and a sealant
cartridge.
It allows the temporary repair of a tyre.
You are then able to go to the nearest garage.
It is designed to repair most punctures which
could affect the tyre, located on the tyre tread
or shoulder.
Its compressor can be used to check and
adjust the pressure of the tyre.
temporary puncture repair kit
Access to the kit
List of tools
All of these tools are specific to your vehicle
and can vary according to equipment. Do not
use them for other purposes.
1.
1
2 V compressor.
C
ontains a sealant cartridge for the
temporary repair of a tyre and can also be
used for adjusting tyre pressures.
2.
O
ne chock* to block one of the front
wheels of the vehicle.
3.
R
emovable towing eye.
F
or more information on towing, refer to the
corresponding section. *
D
epending on the country of sale or
equipment.th e vehicle's electric system allows the
connection of a compressor for long
enough to inflate a tyre after a puncture
repair or for inflating a small inflatable
accessory.
8
In the event of a breakdown
Page 240 of 371
238
508_en_Chap08_en-cas-de-pannes_ed01-2016
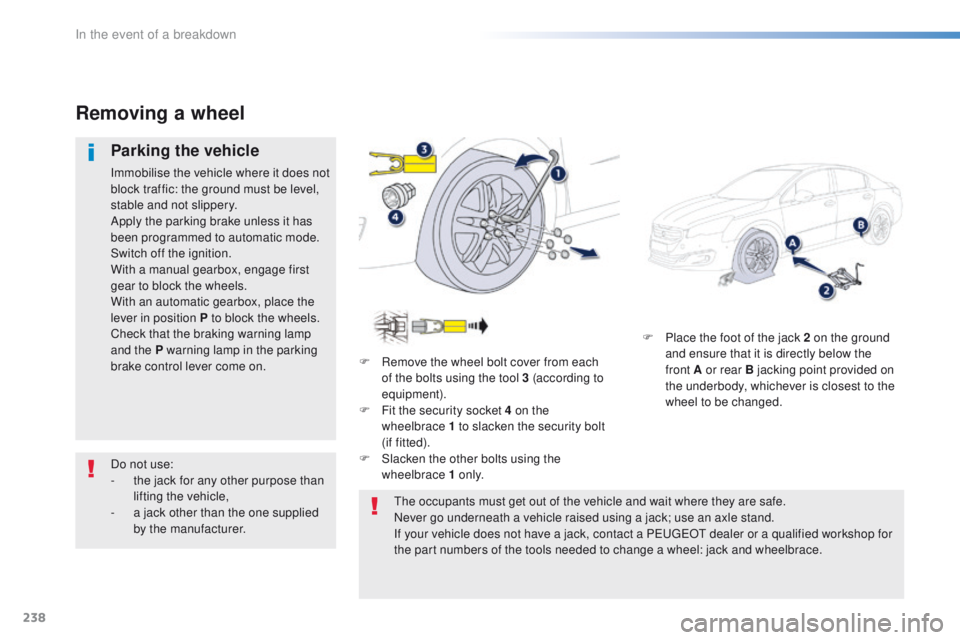
F Place the foot of the jack 2 on the ground and ensure that it is directly below the
front
A or rear B jacking point provided on
the underbody, whichever is closest to the
wheel to be changed.
Removing a wheel
Parking the vehicle
Immobilise the vehicle where it does not
block traffic: the ground must be level,
stable and not slippery.
Apply the parking brake unless it has
been programmed to automatic mode.
Switch off the ignition.
With a manual gearbox, engage first
gear to block the wheels.
With an automatic gearbox, place the
lever in position P to block the wheels.
Check that the braking warning lamp
and the P warning lamp in the parking
brake control lever come on. F
R
emove the wheel bolt cover from each
of the bolts using the tool 3 (according to
equipment).
F
F
it the security socket 4 on the
wheelbrace
1 to slacken the security bolt
(if
fitted).
F
S
lacken the other bolts using the
wheelbrace 1 o n l y.
th
e occupants must get out of the vehicle and wait where they are safe.
Never go underneath a vehicle raised using a jack; use an axle stand.
If your vehicle does not have a jack, contact a P
e
uge
Ot
dealer or a qualified workshop for
the part numbers of the tools needed to change a wheel: jack and wheelbrace.
Do not use:
-
t
he jack for any other purpose than
lifting the vehicle,
-
a j
ack other than the one supplied
by the manufacturer.
In the event of a breakdown
Page 258 of 371
256
508_en_Chap08_en-cas-de-pannes_ed01-2016
Do not force the lever as locking will
not be possible if the clamp is not
positioned correctly; start the procedure
again.
Disconnecting the battery
In order to maintain an adequate state
of charge for starting the engine, it is
recommended that the battery be disconnected
if the vehicle is taken out of service for a long
period.
Wait 2 minutes after switching off the ignition
before disconnecting the battery.
F
c
lose the windows and the doors before
disconnecting the battery,
F
s
witch off all electrical consumers (audio
system, wipers, lighting, ...),
F
s
witch off the ignition and wait for
four
minutes.
Having exposed the battery, it is only
necessary to disconnect the (+) terminal.Following reconnection of
the battery
After reconnecting the battery, switch on the
ignition and wait 1 minute before starting to
allow initialisation of the electronic systems.
However, if minor problems persist following
this operation, contact a P
e
uge
Ot
dealer or a
qualified workshop.
Referring to the corresponding section, you
must yourself reinitialise or reset certain
systems, such as:
-
t
he remote control or electronic key
(depending on version),
-
t
he electric blind(s),
-
t
he electric windows
-
t
he date and time,
-
t
he radio preset stations.
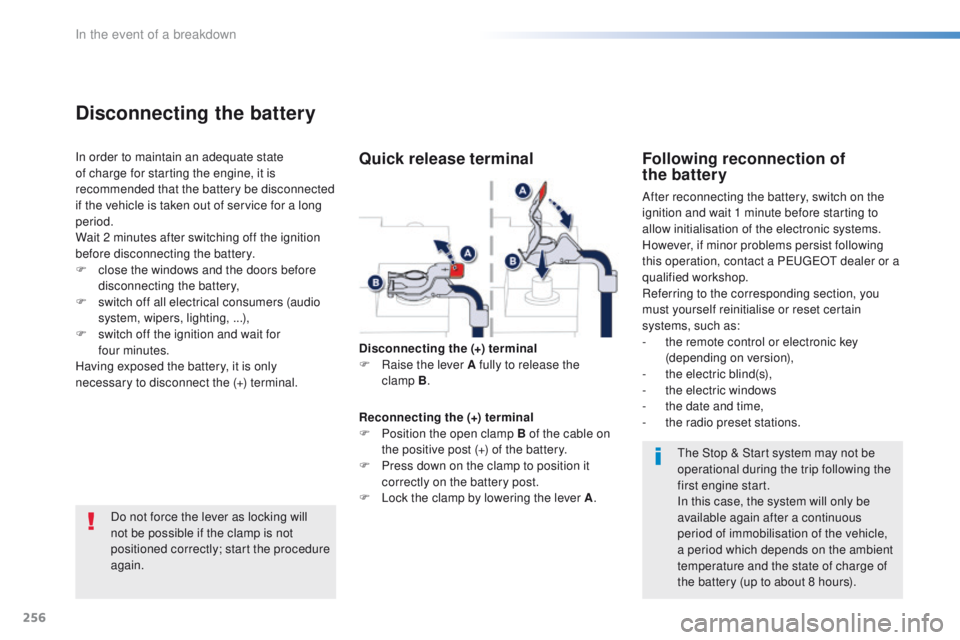
Quick release terminal
Disconnecting the (+) terminal
F Ra ise the lever A fully to release the
clamp
B.
Reconnecting the (+) terminal
F
P
osition the open clamp B of the cable on
the positive post (+) of the battery.
F
P
ress down on the clamp to position it
correctly on the battery post.
F
L
ock the clamp by lowering the lever A .
th
e Stop & Start system may not be
operational during the trip following the
first engine start.
In this case, the system will only be
available again after a continuous
period of immobilisation of the vehicle,
a period which depends on the ambient
temperature and the state of charge of
the battery (up to about 8 hours).
In the event of a breakdown
Page 259 of 371
257
508_en_Chap08_en-cas-de-pannes_ed01-2016
Removing - refitting the battery*
* Valid only for Saloon, SW and non-hybrid
RHX.
th
is procedure allows you to safely remove the
battery when needed to change a failed bulb.
You can also call on a P
e
uge
Ot
dealer or a qualified workshop to carry
out this procedure.
Before removal
- Place the vehicle in a ventilated location, with free access and preferably on a level
sur face.
-
A
pply the parking brake.
-
P
ut the gear lever into neutral (position N
for an automatic gearbox).
-
I
f the vehicle has an alarm, leave the
bonnet open to avoid triggering the alarm.
-
L
eave at least one window open if in a
secure location, other wise lock all the
doors and the boot. -
I f the vehicle has a motorised tailgate,
it will not be possible to open it after
disconnecting the battery.
-
S
witch off the ignition and remove the key.
-
I
f the vehicle has Keyless e
n
try and
Starting, take the remote control at least
3
metres away from the vehicle.
-
W
ait about 4 minutes (or 12 minutes
with an automatic gearbox) before
disconnecting the battery.
8
In the event of a breakdown
Page 265 of 371
263
508_en_Chap08_en-cas-de-pannes_ed01-2016
General recommendations
Observe the legislation in force in your country.ensure that the weight of the towing vehicle is higher than that of the towed vehicle.
th
e driver must remain at the wheel of the towed vehicle and must have a valid driving
licence.
When towing a vehicle with all four wheels on the ground, always use an approved towing
arm; rope and straps are prohibited.
th
e towing vehicle must move off gently.
When towing a vehicle with the engine off, there is no longer any power assistance for
braking or steering.
In the following cases, you must always call on a professional recovery service:
-
v
ehicle broken down on a motor way or fast road,
-
f
our-wheel drive vehicle,
-
w
hen it is not possible to put the gearbox into neutral, unlock the steering, or release
the parking brake,
-
t
owing with only two wheels on the ground,
-
w
here there is no approved towing arm available...
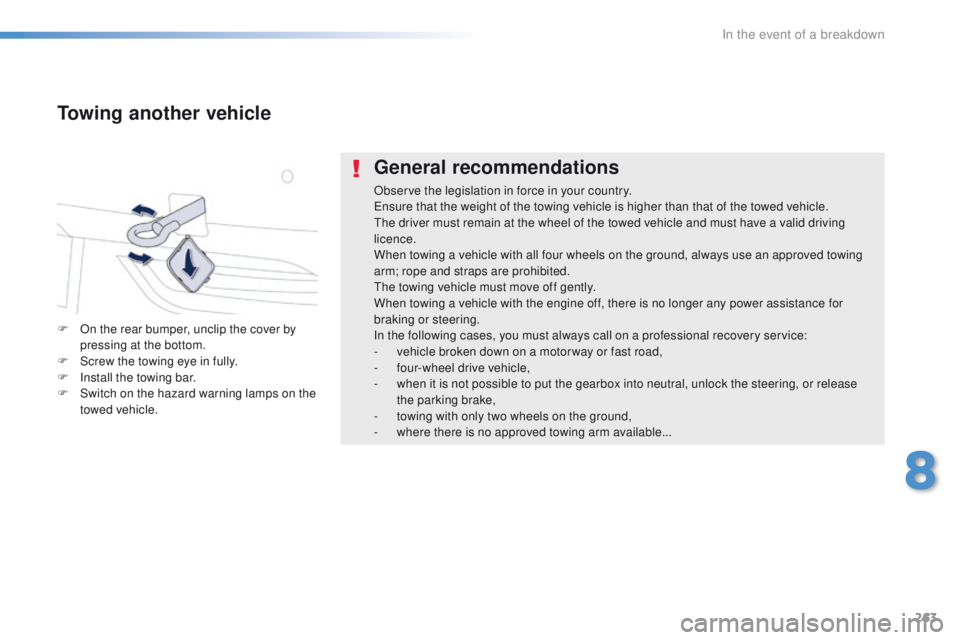
Towing another vehicle
F On the rear bumper, unclip the cover by pressing at the bottom.
F
S
crew the towing eye in fully.
F
I
nstall the towing bar.
F
S
witch on the hazard warning lamps on the
towed vehicle.
8
In the event of a breakdown