Page 4 of 371

.
.
508_en_Chap00a_sommaire_ed01-2016
Instrument panel 13
Indicator and warning lamps
1
4
Indicators
29
Distance recorders
2
9
tr
ip computer
3
9
to
uch screen
4
3
Setting the date and time
4
7
Remote control key
4
9
Back-up procedure - Remote controls
5
3
"Keyless
e
n
try and Starting"
electronic key
5
5
Back-up procedure -
e
le
ctronic keys
6
2
Boot
65
Motorised tailgate (SW and non-hybrid RHX)
6
6
Alarm
70
el
ectric windows
7
3Front seats
7
5
Steering wheel adjustment
7
9
Mirrors 80
Heating and Ventilation
8
3
Manual air conditioning
8
6
Dual-zone digital air conditioning
8
8
Quad-zone digital air conditioning
9
1
Front demist - defrost
9
6
Rear screen demist - defrost 96
Programmable Heating / Ventilation 9 7
Front fittings
9
9
Courtesy lamps
1
02
Interior mood lighting
1
03
Sunroof
104
Panoramic sunroof (SW and non-hybrid RHX)
1
06
Centre console
1
07
Rear seats
1
09
Rear fittings
1
11
Boot fittings (Saloon)
1
12
Boot fittings (SW and non-hybrid RHX)
1
13Lighting controls
1
17
Direction indicators
1
20
Daytime running lamps
1
20
Automatic illumination of headlamps
1
21
Adaptive lighting
1
22
Cornering lighting
1
23
gu
ide-me-home lighting
1
24
Headlamp beam height adjustment
1
26
Wiper controls 1 27
Automatic rain sensitive wipers 1 29
ge
neral safety
recommendations
131
Hazard warning lamps
1
32
H or n
132
em
ergency or assistance call
1
32
ele
ctronic stability control
(
e
SC) 133
Seat belts
1
36
Airbags
139
Child seats
1
43
Deactivating the passenger's front airbag
146
ISOFIX child seats
1
52
Child lock
1
58
Over view
e
co-driving
Instruments
Accessea se of use and comfort
Lighting and visibility
Safety
Contents
Page 77 of 371
75
508_en_Chap03_ergonomie-et-confort_ed01-2016
Front seats
Manual adjustments
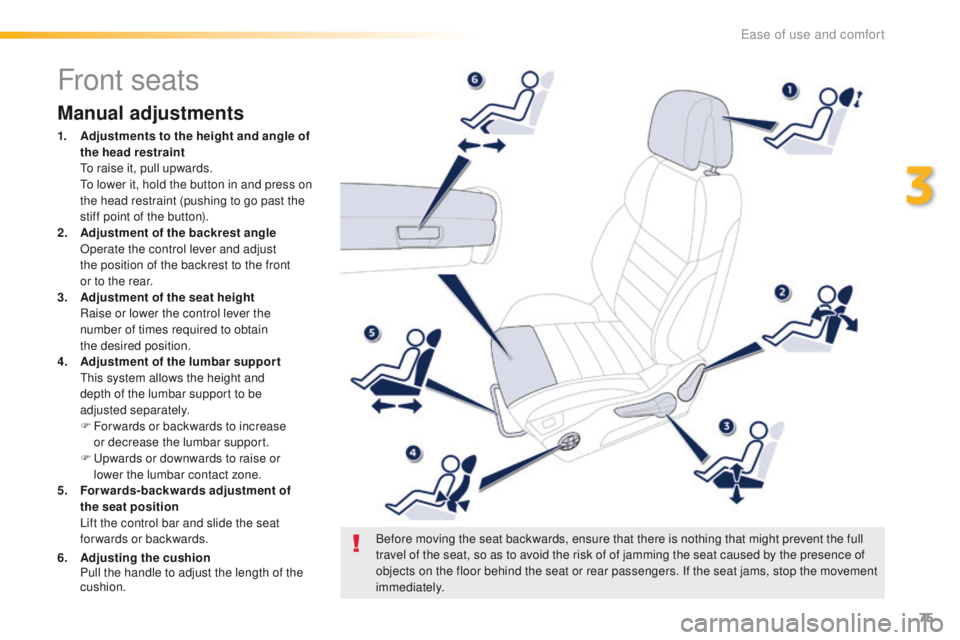
1. Adjustments to the height and angle of the head restraint
t
o r
aise it, pull upwards.
t
o l
ower it, hold the button in and press on
the head restraint (pushing to go past the
stiff point of the button).
2.
A
djustment of the backrest angle
O
perate the control lever and adjust
the
position of the backrest to the front
or
to the rear.
3.
A
djustment of the seat height
R
aise or lower the control lever the
number
of times required to obtain
the
desired position.
4.
A
djustment of the lumbar suppor t
t
h
is system allows the height and
depth
of the lumbar support to be
adjusted
separately.
F
F
or wards or backwards to increase
or
decrease the lumbar support.
F
u
p
wards or downwards to raise or
lower
the lumbar contact zone.
5.
F
orwards-backwards adjustment of
the
seat position
L
ift the control bar and slide the seat
forwards or backwards.
6.
A
djusting the cushion
P
ull the handle to adjust the length of the
cushion. Before moving the seat backwards, ensure that there is nothing that might prevent the full
travel of the seat, so as to avoid the risk of of jamming the seat caused by the presence of
objects on the floor behind the seat or rear passengers. If the seat jams, stop the movement
immediately.
3
ease of use and comfort
Page 78 of 371
76
508_en_Chap03_ergonomie-et-confort_ed01-2016
Electric adjustments
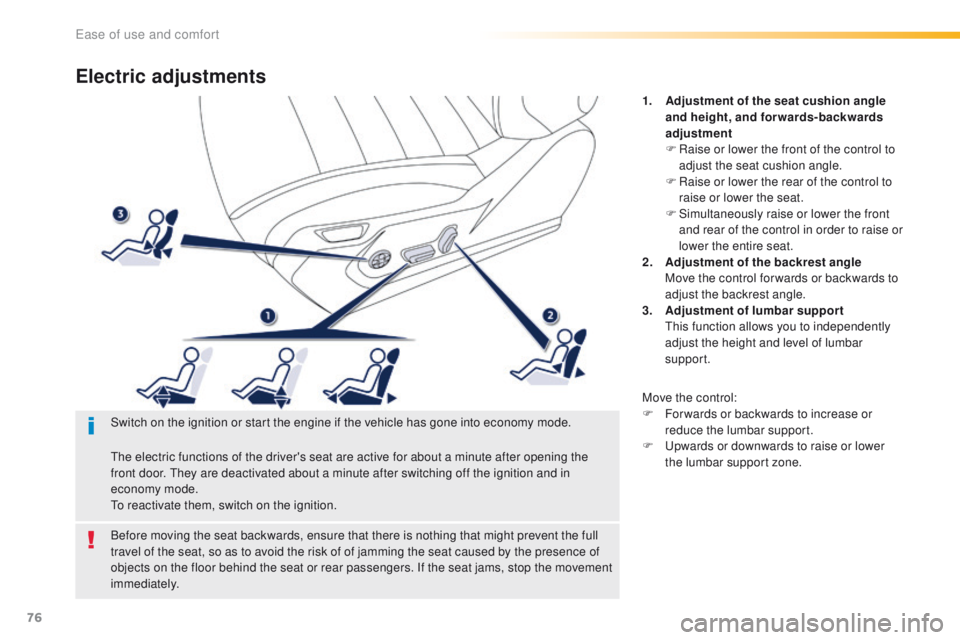
1. Adjustment of the seat cushion angle and height, and forwards-backwards
adjustment
F
R
aise or lower the front of the control to
adjust the seat cushion angle.
F
R
aise or lower the rear of the control to
raise or lower the seat.
F
S
imultaneously raise or lower the front
and rear of the control in order to raise or
lower the entire seat.
2.
A
djustment of the backrest angle
M
ove the control for wards or backwards to
adjust the backrest angle.
3.
A
djustment of lumbar support
t
h
is function allows you to independently
adjust the height and level of lumbar
support.
Move the control:
F
F
or wards or backwards to increase or
reduce the lumbar support.
F
u
p
wards or downwards to raise or lower
the lumbar support zone.
Before moving the seat backwards, ensure that there is nothing that might prevent the full
travel of the seat, so as to avoid the risk of of jamming the seat caused by the presence of
objects on the floor behind the seat or rear passengers. If the seat jams, stop the movement
immediately. Switch on the ignition or start the engine if the vehicle has gone into economy mode.
th
e electric functions of the driver's seat are active for about a minute after opening the
front door.
t
h
ey are deactivated about a minute after switching off the ignition and in
economy mode.
to r
eactivate them, switch on the ignition.
ease of use and comfort
Page 80 of 371
78
508_en_Chap03_ergonomie-et-confort_ed01-2016
Head restraint height and angle
adjustment
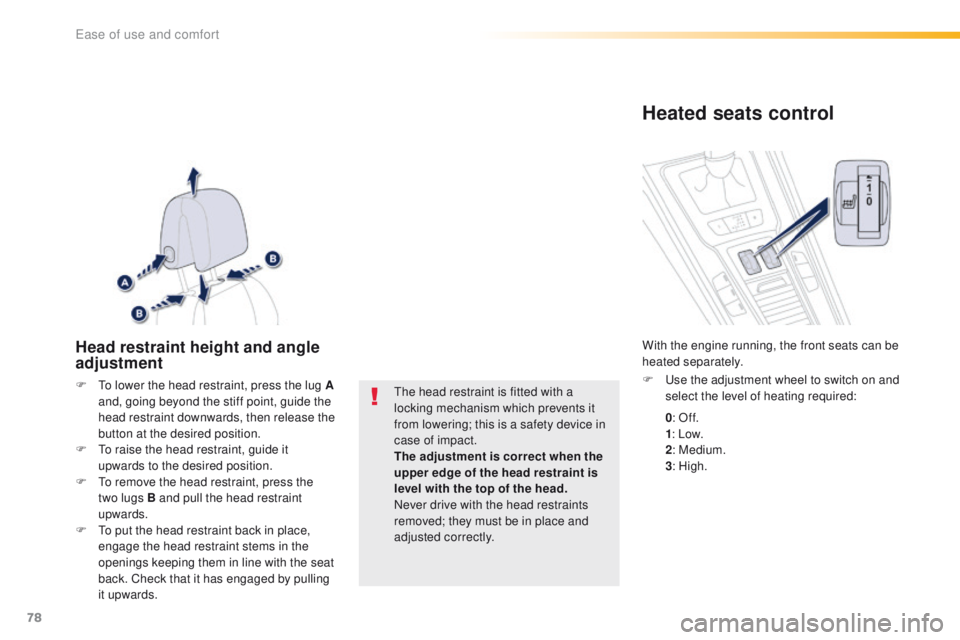
F to lower the head restraint, press the lug A and, going beyond the stiff point, guide the
head restraint downwards, then release the
button at the desired position.
F
t
o r
aise the head restraint, guide it
upwards to the desired position.
F
t
o r
emove the head restraint, press the
two
lugs B and pull the head restraint
upwards.
F
t
o p
ut the head restraint back in place,
engage the head restraint stems in the
openings keeping them in line with the seat
back. Check that it has engaged by pulling
it upwards.th e head restraint is fitted with a
locking mechanism which prevents it
from lowering; this is a safety device in
case of impact.
The adjustment is correct when the
upper edge of the head restraint is
level with the top of the head.
Never drive with the head restraints
removed; they must be in place and
adjusted correctly.
Heated seats control
F use the adjustment wheel to switch on and select the level of heating required:
With the engine running, the front seats can be
heated separately.
0: Of f.
1 : Low.
2 : Medium.
3 : High.
ease of use and comfort
Page 81 of 371
79
508_en_Chap03_ergonomie-et-confort_ed01-2016
Massage function
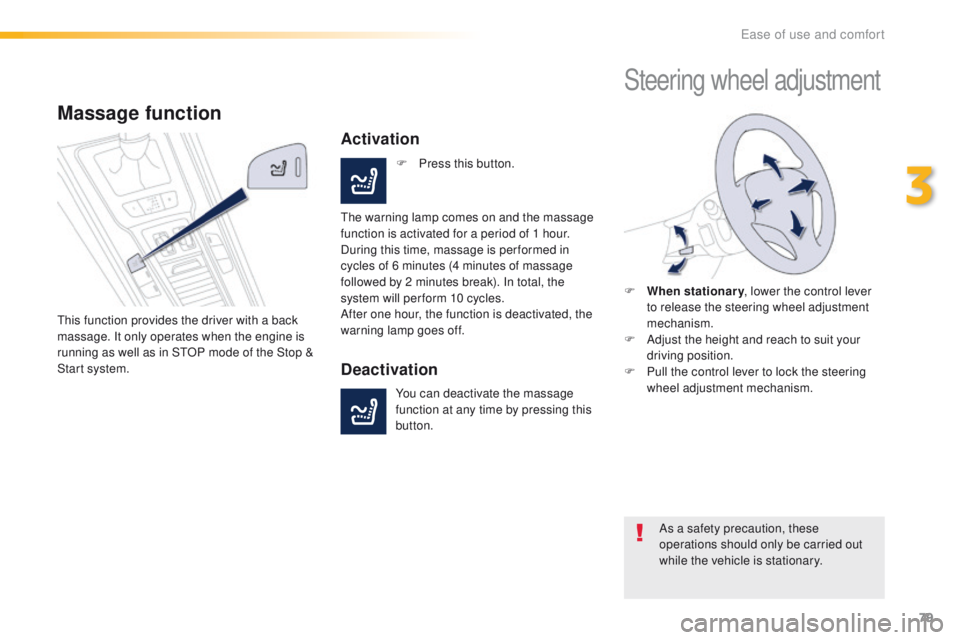
this function provides the driver with a back
massage. It only operates when the engine is
running as well as in S
tO
P mode of the Stop &
Start system.
Activation
F Press this button.
th
e warning lamp comes on and the massage
function is activated for a period of 1 hour.
During this time, massage is per formed in
cycles of 6 minutes (4 minutes of massage
followed by 2 minutes break). In total, the
system will per form 10 cycles.
After one hour, the function is deactivated, the
warning lamp goes off.
Deactivation
You can deactivate the massage
function at any time by pressing this
button.
Steering wheel adjustment
F When stationary , lower the control lever
to release the steering wheel adjustment
mechanism.
F
A
djust the height and reach to suit your
driving position.
F
P
ull the control lever to lock the steering
wheel adjustment mechanism.
As a safety precaution, these
operations should only be carried out
while the vehicle is stationary.
3
ease of use and comfort
Page 109 of 371
107
508_en_Chap03_ergonomie-et-confort_ed01-2016
Centre console
Front armrest
the height and longitudinal position of the
armrest cover can be adjusted for greater
comfort.
Storage
A storage space is arranged below the armrest
lid. It gives access to a 12 V socket (maximum
power: 120 Watts) as well as a u
S
B port and a
Jack auxiliary socket.
F
P
ress the opening control.
F
Ra
ise the cover fully.
Longitudinal adjustment
F Slide the cover fully for wards or rear wards.
3
ease of use and comfort
Page 128 of 371
126
508_en_Chap04_eclairage-et-visibilite_ed01-2016
Manual adjustment of
halogen headlampsAutomatic adjustment of
"full-LED" headlamps
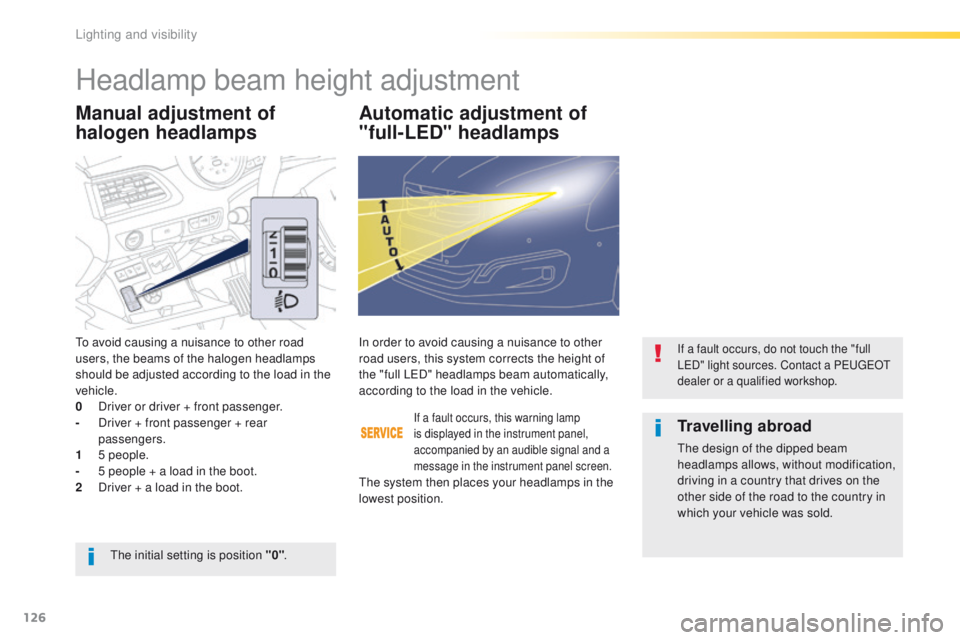
to avoid causing a nuisance to other road
users, the beams of the halogen headlamps
should be adjusted according to the load in the
vehicle.
0
D
river or driver + front passenger.
-
D
river + front passenger + rear
passengers.
1
5
people.
-
5 p
eople + a load in the boot.
2
D
river + a load in the boot.
If a fault occurs, this warning lamp
is displayed in the instrument panel,
accompanied by an audible signal and a
message in the instrument panel screen.
In order to avoid causing a nuisance to other
road users, this system corrects the height of
the "full L e
D
" headlamps beam automatically,
according to the load in the vehicle.If a fault occurs, do not touch the "full
LeD " light sources. Contact a Pe ugeOt
dealer or a qualified workshop.
the initial setting is position "0" .
Travelling abroad
the design of the dipped beam
headlamps allows, without modification,
driving in a country that drives on the
other side of the road to the country in
which your vehicle was sold.
th
e system then places your headlamps in the
lowest position.
Headlamp beam height adjustment
Lighting and visibility
Page 139 of 371
137
508_en_Chap05_securite_ed01-2016
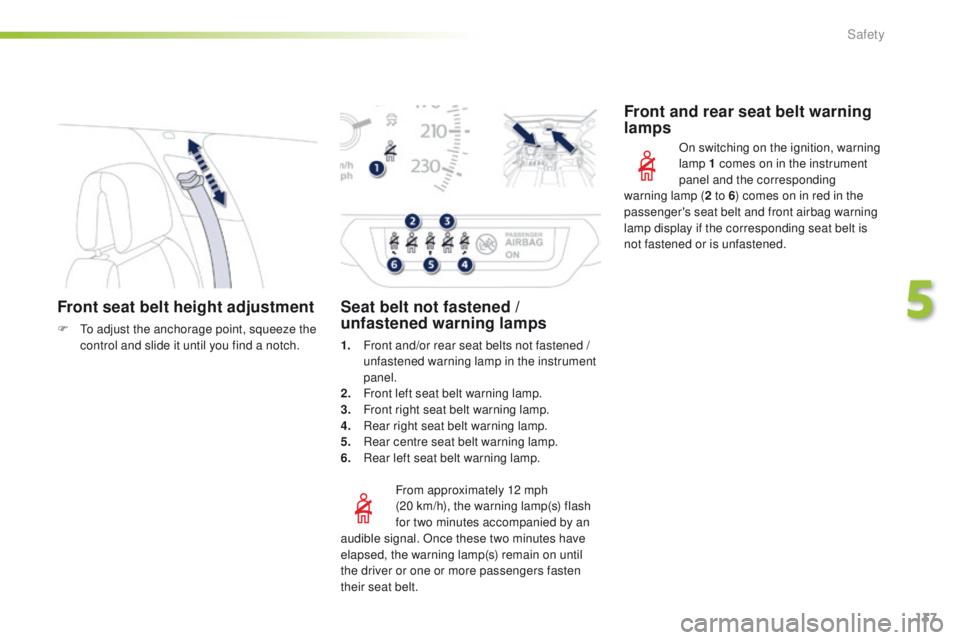
Front seat belt height adjustment
F to adjust the anchorage point, squeeze the control and slide it until you find a notch.
From approximately 12 mph
(20
km/h), the warning lamp(s) flash
for two
minutes accompanied by an
Seat belt not fastened /
unfastened warning lamps
1. Front and/or rear seat belts not fastened / unfastened warning lamp in the instrument
panel.
2.
F
ront left seat belt warning lamp.
3.
F
ront right seat belt warning lamp.
4.
R
ear right seat belt warning lamp.
5.
R
ear centre seat belt warning lamp.
6.
R
ear left seat belt warning lamp.
Front and rear seat belt warning
lamps
On switching on the ignition, warning
lamp 1 comes on in the instrument
panel and the corresponding
audible signal. Once these two minutes have
elapsed, the warning lamp(s) remain on until
the driver or one or more passengers fasten
their seat belt. warning lamp (
2 to 6) comes on in red in the
passenger's seat belt and front airbag warning
lamp display if the corresponding seat belt is
not fastened or is unfastened.
5
Safety