2016 Peugeot 508 lock
[x] Cancel search: lockPage 167 of 371
165
508_en_Chap06_conduite_ed01-2016
For Diesel vehicles, in very cold
weather the engine will not start
until the pre-heater warning
lamp has gone off.
If this warning lap comes on
after pressing the "S TA R T/
STOP " button, you should
maintain pressure on the brake
or clutch pedal until the warning
lamp goes off and not press the
" START/STOP " button, until the
engine starts. If the vehicle is not immobilised, the
engine will not stop.
Switching off
F Immobilise the vehicle.
F
W
ith the electronic key inside
the vehicle, press the " S TA R T/
STOP " button.
th
e engine stops and the steering column is
locked.
Ignition on (accessory) position
With the electronic key inside the vehicle,
press the "StA Rt/ StO P" button, with no
action on the pedals, to switch the ignition
on or off and so allow the use of the ancillary
equipment.
If one of the starting conditions is not
met, a reminder message appears in
the instrument panel screen. In some
circumstances, it is necessary to turn
the steering wheel slightly while pressing
the "S
tA
R
t/
S
tO
P" button to assist
unlocking of the steering; a message
warns you when this is needed.
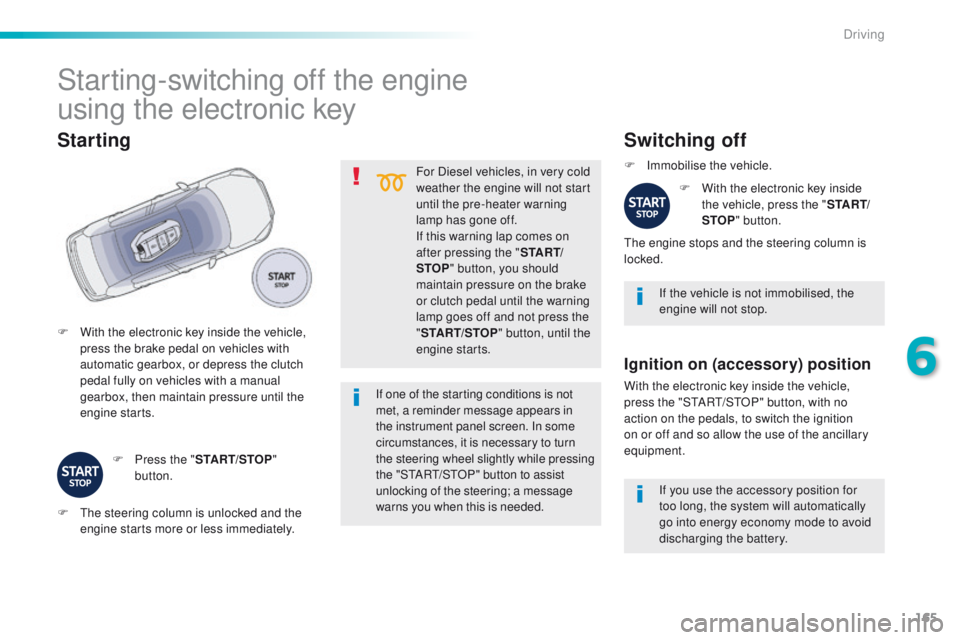
F
W
ith the electronic key inside the vehicle,
press the brake pedal on vehicles with
automatic gearbox, or depress the clutch
pedal fully on vehicles with a manual
gearbox, then maintain pressure until the
engine starts.
Starting
F Press the " START/STOP"
button.
Starting-switching off the engine
using the electronic key
F the steering column is unlocked and the engine starts more or less immediately. If you use the accessory position for
too long, the system will automatically
go into energy economy mode to avoid
discharging the battery.
6
Driving
Page 168 of 371
166
508_en_Chap06_conduite_ed01-2016
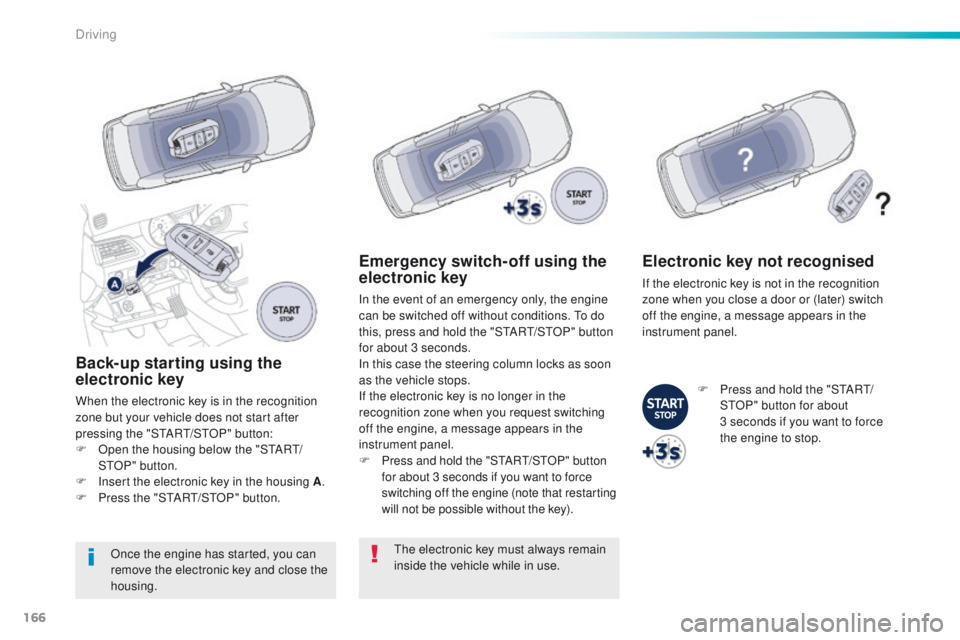
Back-up starting using the
electronic key
When the electronic key is in the recognition
zone but your vehicle does not start after
pressing the "S
tA
R
t/
S
tO
P" button:
F
O
pen the housing below the "S
tA
R
t/
St
OP " button.
F
I
nsert the electronic key in the housing A .
F
P
ress the "S
tA
R
t/
S
tO
P" button.
Once the engine has started, you can
remove the electronic key and close the
housing.
Emergency switch-off using the
electronic key
In the event of an emergency only, the engine
can be switched off without conditions. to d o
this, press and hold the "S
tA
R
t/
S
tO
P" button
for about 3 seconds.
In this case the steering column locks as soon
as the vehicle stops.
If the electronic key is no longer in the
recognition zone when you request switching
off the engine, a message appears in the
instrument panel.
F
P
ress and hold the "S
tA
R
t/
S
tO
P" button
for about 3 seconds if you want to force
switching off the engine (note that restarting
will not be possible without the key).
th
e electronic key must always remain
inside the vehicle while in use.
Electronic key not recognised
If the electronic key is not in the recognition
zone when you close a door or (later) switch
off the engine, a message appears in the
instrument panel.
F
P
ress and hold the "S
tA
R
t/
StO
P" button for about
3
seconds if you want to force
the engine to stop.
Driving
Page 169 of 371
167
508_en_Chap06_conduite_ed01-2016
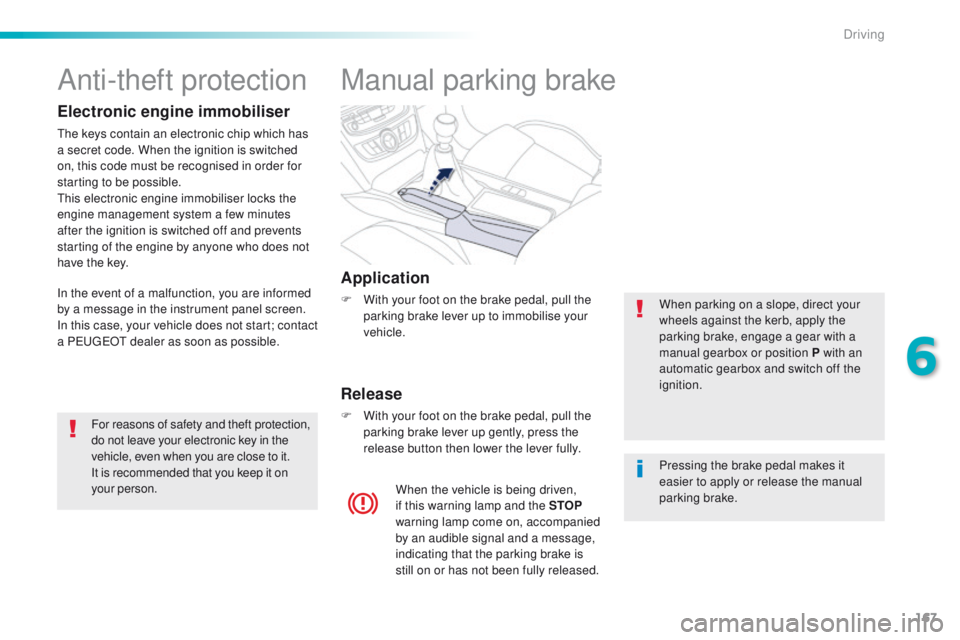
Manual parking brake
Application
F With your foot on the brake pedal, pull the parking brake lever up to immobilise your
vehicle.
Release
F With your foot on the brake pedal, pull the parking brake lever up gently, press the
release button then lower the lever fully. When parking on a slope, direct your
wheels against the kerb, apply the
parking brake, engage a gear with a
manual gearbox or position P with an
automatic gearbox and switch off the
ignition.
When the vehicle is being driven,
if this warning lamp and the STOP
warning lamp come on, accompanied
by an audible signal and a message,
indicating that the parking brake is
still on or has not been fully released. Pressing the brake pedal makes it
easier to apply or release the manual
parking brake.
Anti-theft protection
Electronic engine immobiliser
the keys contain an electronic chip which has
a secret code. When the ignition is switched
on, this code must be recognised in order for
starting to be possible.
th
is electronic engine immobiliser locks the
engine management system a few minutes
after the ignition is switched off and prevents
starting of the engine by anyone who does not
have the key.
In the event of a malfunction, you are informed
by a message in the instrument panel screen.
In this case, your vehicle does not start; contact
a P
e
uge
Ot
dealer as soon as possible.
For reasons of safety and theft protection,
do not leave your electronic key in the
vehicle, even when you are close to it.
It is recommended that you keep it on
your person.
6
Driving
Page 181 of 371
179
508_en_Chap06_conduite_ed01-2016
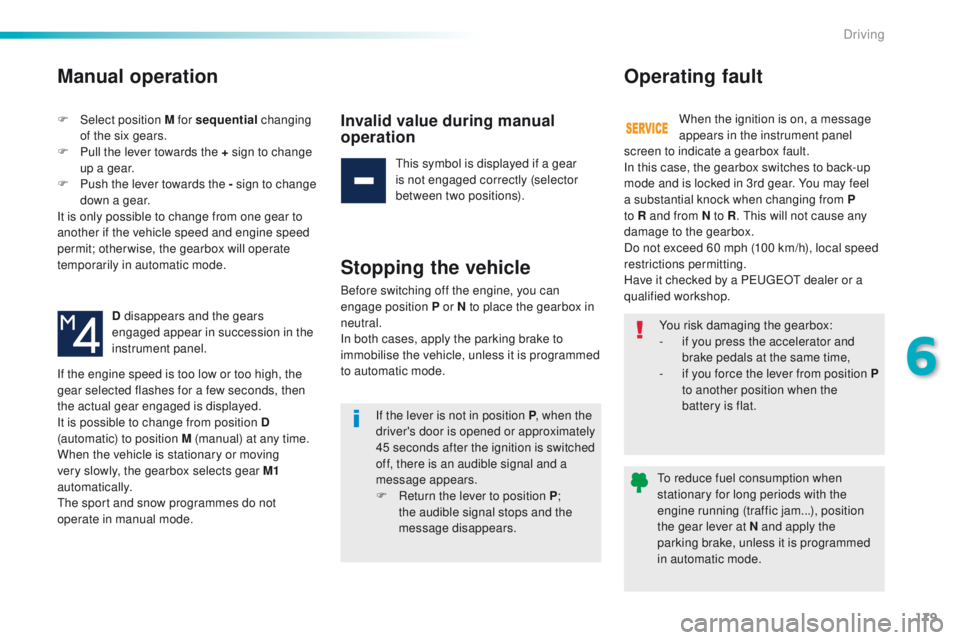
Manual operation
F Select position M for sequential changing
of the six gears.
F
P
ull the lever towards the + sign to change
up a gear.
F
P
ush the lever towards the - sign to change
down a gear.
It is only possible to change from one gear to
another if the vehicle speed and engine speed
permit; otherwise, the gearbox will operate
temporarily in automatic mode.
D disappears and the gears
engaged appear in succession in the
instrument panel.Invalid value during manual
operation
this symbol is displayed if a gear
is not engaged correctly (selector
between two positions).
Stopping the vehicle
Before switching off the engine, you can
engage position P or N to place the gearbox in
neutral.
In both cases, apply the parking brake to
immobilise the vehicle, unless it is programmed
to automatic mode.
Operating fault
When the ignition is on, a message
appears in the instrument panel
If the engine speed is too low or too high, the
gear selected flashes for a few seconds, then
the actual gear engaged is displayed.
It is possible to change from position D
(automatic) to position M (manual) at any time.
When the vehicle is stationary or moving
very slowly, the gearbox selects gear M1
automatically.
th
e sport and snow programmes do not
operate in manual mode. You risk damaging the gearbox:
-
i
f you press the accelerator and
brake pedals at the same time,
-
i
f you force the lever from position P
to another position when the
battery is flat.
If the lever is not in position P , when the
driver's door is opened or approximately
45 seconds after the ignition is switched
off, there is an audible signal and a
message appears.
F
R
eturn the lever to position P ;
the audible signal stops and the
message disappears.
to r
educe fuel consumption when
stationary for long periods with the
engine running (traffic jam...), position
the gear lever at N and apply the
parking brake, unless it is programmed
in automatic mode.
screen to indicate a gearbox fault.
In this case, the gearbox switches to back-up
mode and is locked in 3rd gear. You may feel
a substantial knock when changing from P
to R and from N to R
.
t
h
is will not cause any
damage to the gearbox.
Do not exceed 60 mph (100 km/h), local speed
restrictions permitting.
Have it checked by a P
e
uge
Ot
dealer or a
qualified workshop.
6
Driving
Page 208 of 371
206
508_en_Chap07_info-pratiques_ed01-2016
towbar with quickly detachable towball
Presentation
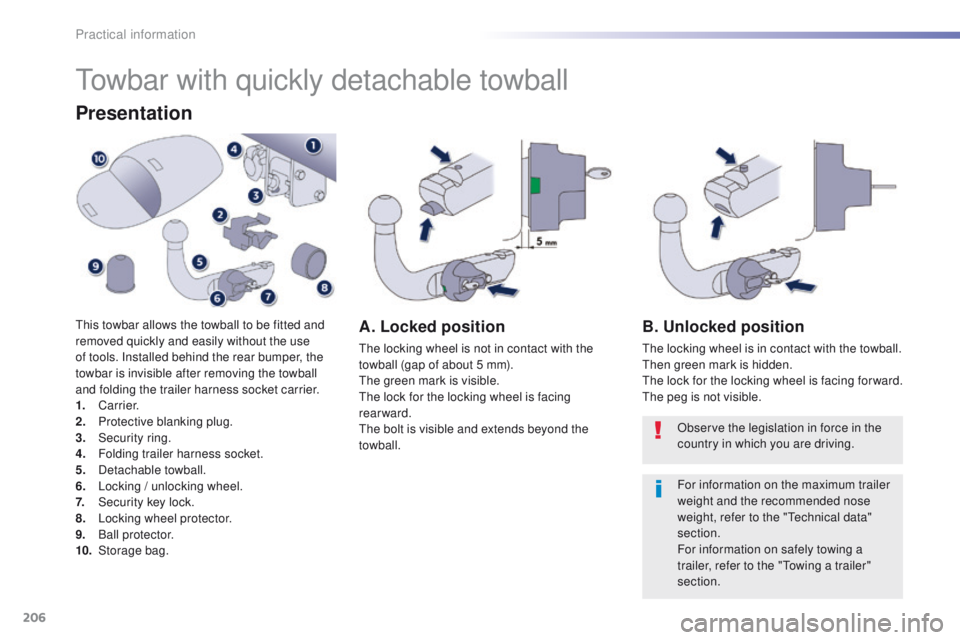
this towbar allows the towball to be fitted and
removed quickly and easily without the use
of tools. Installed behind the rear bumper, the
towbar is invisible after removing the towball
and folding the trailer harness socket carrier.
1.
Carrier.
2.
P
rotective blanking plug.
3.
S
ecurity ring.
4.
F
olding trailer harness socket.
5.
D
etachable towball.
6.
L
ocking / unlocking wheel.
7.
Sec
urity key lock.
8.
L
ocking wheel protector.
9.
Ba
ll protector.
10.
St
orage bag.A. Locked position
the locking wheel is not in contact with the
towball (gap of about 5 mm).
the
green mark is visible.
th
e lock for the locking wheel is facing
rearward.
th
e bolt is visible and extends beyond the
towball.
B. Unlocked position
the locking wheel is in contact with the towball.then green mark is hidden.
th
e lock for the locking wheel is facing for ward.
th
e peg is not visible. Observe the legislation in force in the
country in which you are driving.
For information on the maximum trailer
weight and the recommended nose
weight, refer to the "
te
chnical data"
section.
For information on safely towing a
trailer, refer to the "
to
wing a trailer"
section.
Practical information
Page 209 of 371
207
508_en_Chap07_info-pratiques_ed01-2016
Before each use
Check that the towball is correctly fitted by verifying the following points:
- t he towball is correctly locked in place (position A ),
-
t
he security key lock is on and the key removed; the locking wheel can no longer be
operated,
-
t
he towball must no longer move at all in its carrier; try to shake it by hand.
During use
Never unlock the towball when a trailer or load carrier is fitted.
Never exceed the maximum authorised weight for the vehicle plus trailer (gr oss tr ain
Weight -
gt
W
).
Before driving, check the adjustment of the headlamp beam height.
For more information on adjusting the headlamps, refer to the corresponding section.
After use
For journeys made without a trailer or load carrier, the trailer harness socket must be folded
away, the towball removed and the protective blanking plug inserted in the carrier. th is
measure applies particularly if the towball could hinder visibility of the number plate or
lighting.
7
Practical information
Page 210 of 371
208
508_en_Chap07_info-pratiques_ed01-2016
Fitting the towball
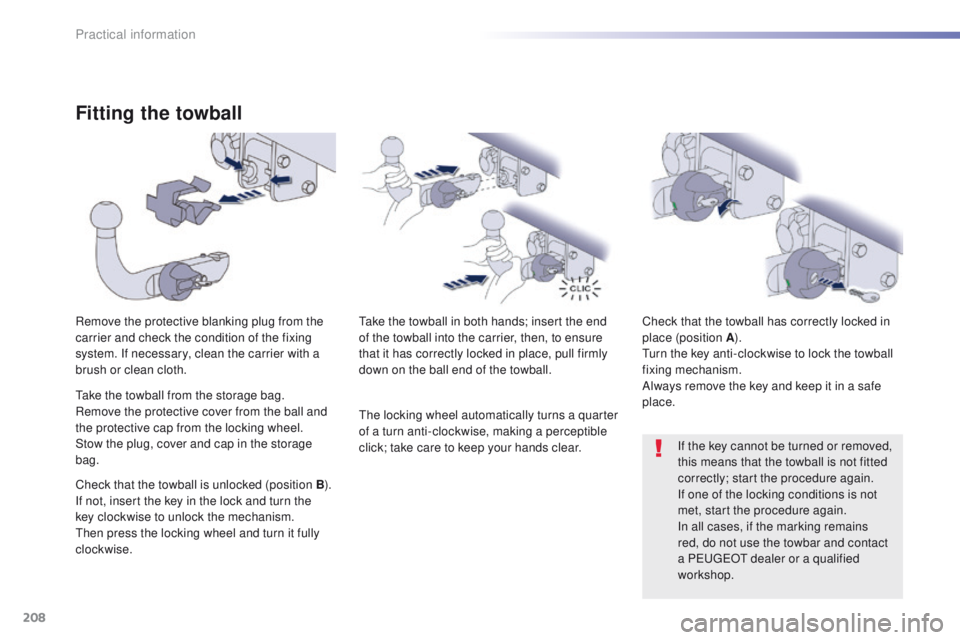
Remove the protective blanking plug from the
carrier and check the condition of the fixing
system. If necessary, clean the carrier with a
brush or clean cloth.take the towball in both hands; insert the end
of the towball into the carrier, then, to ensure
that it has correctly locked in place, pull firmly
down on the ball end of the towball. Check that the towball has correctly locked in
place (position A
).
tu
rn the key anti-clockwise to lock the towball
fixing mechanism.
Always remove the key and keep it in a safe
place.
If the key cannot be turned or removed,
this means that the towball is not fitted
correctly; start the procedure again.
If one of the locking conditions is not
met, start the procedure again.
In all cases, if the marking remains
red, do not use the towbar and contact
a P
e
uge
Ot
dealer or a qualified
workshop.
ta
ke the towball from the storage bag.
Remove the protective cover from the ball and
the protective cap from the locking wheel.
Stow the plug, cover and cap in the storage
bag.
Check that the towball is unlocked (position
B).
If not, insert the key in the lock and turn the
key clockwise to unlock the mechanism.
th
en press the locking wheel and turn it fully
clockwise.
th
e locking wheel automatically turns a quarter
of a turn anti-clockwise, making a perceptible
click; take care to keep your hands clear.
Practical information
Page 211 of 371
209
508_en_Chap07_info-pratiques_ed01-2016
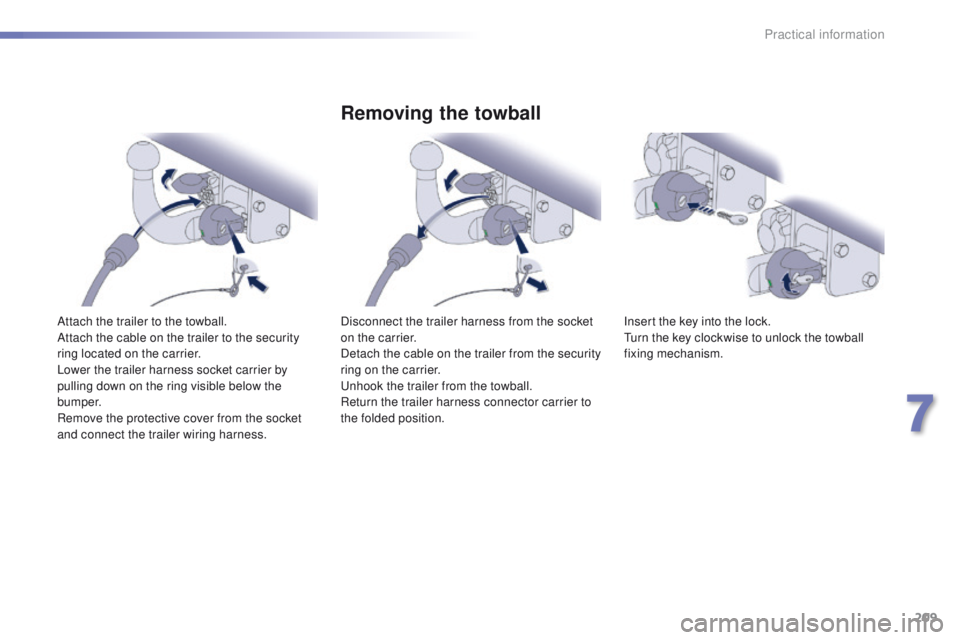
Attach the trailer to the towball.
Attach the cable on the trailer to the security
ring located on the carrier.
Lower the trailer harness socket carrier by
pulling down on the ring visible below the
b u m p e r.
Remove the protective cover from the socket
and connect the trailer wiring harness.
Removing the towball
Disconnect the trailer harness from the socket
on the carrier.
Detach the cable on the trailer from the security
ring on the carrier.
un
hook the trailer from the towball.
Return the trailer harness connector carrier to
the folded position. Insert the key into the lock.tu
rn the key clockwise to unlock the towball
fixing mechanism.
7
Practical information