2016 Peugeot 308 Stop
[x] Cancel search: StopPage 218 of 398
216
308_en_Chap07_info-pratiques_ed02-2015
Snow chains
In wintry conditions, snow chains improve traction as well as the behaviour of the vehicle
when braking.
the s
now chains must be fitted only
to the front wheels.
the
y must never
be fitted to "space-saver" type spare
wheels.
tak
e account of the legislation in force
in your country on the use of snow
chains and the maximum running speed
authorised.
Avoid driving with snow chains on roads
that have been cleared of snow, to
avoid damaging your vehicle's tyres and
the road sur face. If your vehicle is fitted
with alloy wheels, check that no part of
the chain or its fixings is in contact with
the wheel rim.
use o
nly the chains designed to be fitted to the
type of wheel fitted to your vehicle:
You can also use snow socks.
For more information on snow chains, contact a
P
eu
ge
Ot d
ealer or a qualified workshop.
Advice on installation
F If you have to fit the chains during a
journey, stop the vehicle on a flat sur face
on the side of the road.
F
Ap
ply the parking brake and position any
wheel chocks to prevent movement of
your
v
ehicle.
F
Fit
the chains following the instructions
provided by the manufacturer.
F
Mov
e off gently and drive for a few
moments, without exceeding 30 mph
(50
k
m/h).
F
St
op your vehicle and check that the snow
chains are correctly tightened.
Original tyre size
typ
e of chain.
195/65 R15 9 mm links
205/55 R16
2 2 5 /4 5 R17
225/40 R18 K-Summit K23
235/35 R19 Michelin
eas
ygrip
L1 2 *
It is strongly recommended that before
you leave, you practise fitting the snow
chains on a level and dry sur face.
*
exc
ept Italy and Austria.
Practical information
Page 219 of 398
217
308_en_Chap07_info-pratiques_ed02-2015
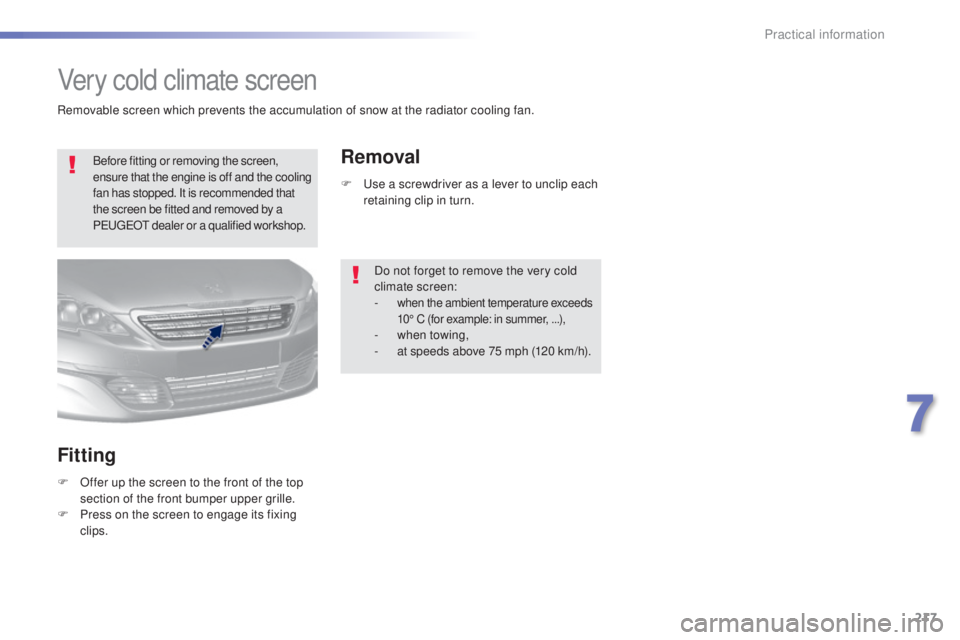
Very cold climate screen
Before fitting or removing the screen,
ensure that the engine is off and the cooling
fan has stopped. It is recommended that
the screen be fitted and removed by a
P
eu
ge
Ot d
ealer or a qualified workshop.
Fitting
F Offer up the screen to the front of the top
section of the front bumper upper grille.
F
Pr
ess on the screen to engage its fixing
clips.
Removal
F use a screwdriver as a lever to unclip each
r etaining clip in turn.
Do not forget to remove the very cold
climate screen:
-
when the ambient temperature exceeds
10° C (for example: in summer, . ..),
- when towing,
- at s peeds above 75 mph (120 km/h).
Removable screen which prevents the accumulation of snow at the radiator cooling fan.
7
Practical information
Page 221 of 398
219
308_en_Chap07_info-pratiques_ed02-2015
System which manages the duration of use of certain functions to conserve a sufficient level of
charge in the battery.
After the engine has stopped, you can still use functions such as the audio and telematics
system,
w
indscreen wipers, dipped beam headlamps,
c
ourtesy lamps, etc. for a maximum
combined duration of about forty minutes.
energy economy mode
Switching to economy
mode
A message then appears in the instrument
panel screen indicating that the vehicle has
switched to economy mode and the active
functions are put on standby.
If a telephone call is being made at this time, it
will be maintained for around 10 minutes with
the Bluetooth hands-free system of your audio
system.
Exiting economy mode
these functions are reactivated automatically
n ext time the vehicle is driven.
In order to restore the use of these functions
immediately, start the engine and let it run:
-
fo
r less than ten minutes, to use the
equipment for approximately five minutes,
-
fo
r more than ten minutes, to use the
equipment for up to approximately
thirty
m
inutes.
Let the engine run for the duration specified to
ensure that the battery charge is sufficient.
Do not repeatedly and continuously restart the
engine in order to charge the battery.
A flat battery prevents the engine from starting.
For more information on the battery, refer to the
corresponding section.
Load reduction mode
System which manages the use of certain
functions according to the level of charge
remaining in the battery.
When the vehicle is being driven, the load
reduction function temporarily deactivates
certain functions, such as the air conditioning,
the heated rear screen...
the d
eactivated functions are reactivated
automatically as soon as conditions permit.
7
Practical information
Page 228 of 398
226
308_en_Chap07_info-pratiques_ed02-2015
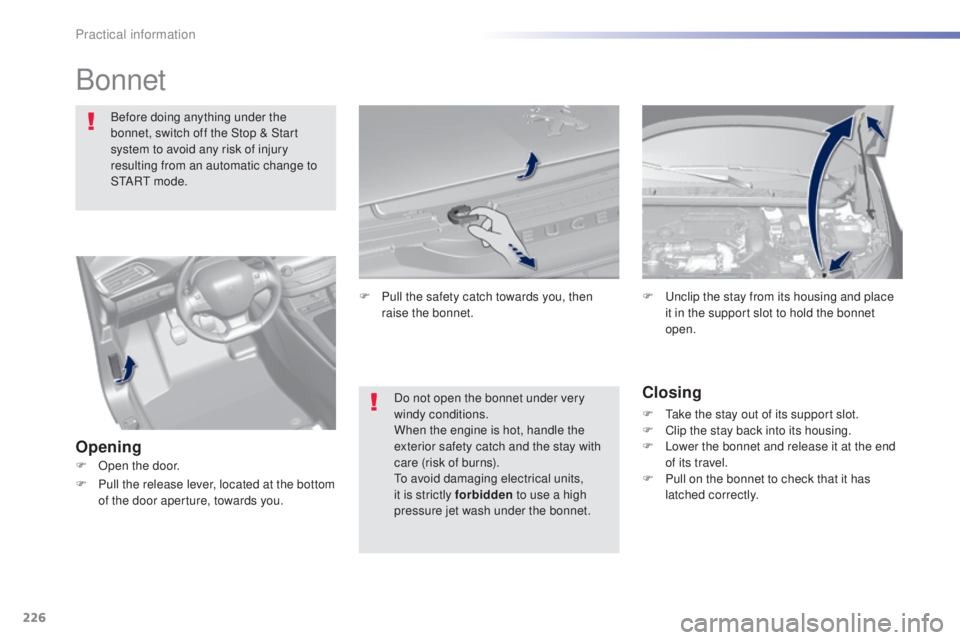
Bonnet
Before doing anything under the
bonnet, switch off the Stop & Start
system to avoid any risk of injury
resulting from an automatic change to
S
tA
R
t m o
d e .
Opening Closing
F take the stay out of its support slot.
F Cl ip the stay back into its housing.
F
Lo
wer the bonnet and release it at the end
of its travel.
F
Pu
ll on the bonnet to check that it has
latched correctly.
F
u
nc
lip the stay from its housing and place
it in the support slot to hold the bonnet
open.
Do not open the bonnet under very
windy conditions.
When the engine is hot, handle the
exterior safety catch and the stay with
care (risk of burns).
to a
void damaging electrical units,
it is strictly forbidden to use a high
pressure jet wash under the bonnet.
F
Pu
ll the safety catch towards you, then
raise the bonnet.
F
Op
en the door.
F
Pu
ll the release lever, located at the bottom
of the door aperture, towards you.
Practical information
Page 233 of 398

231
308_en_Chap07_info-pratiques_ed02-2015
the brake fluid level must be
b etween the marking " A" (MA X
located on the remote reservoir) and
the marking " B" (MIN located on the
main reservoir). If it is not, check the
brake pad wear.
Brake fluid level
Changing the fluid
Refer to the personalised service schedule for
your vehicle for details of the interval for this
operation.
Fluid specification
the brake fluid must conform to the
ma nufacturer's recommendations.
Coolant level
the coolant level should be close
t o the "MA X" mark but should never
exceed it.
In addition, as the cooling system is pressurised,
wait at least one hour after switching off the
engine before carrying out any work.
to av
oid any risk of scalding, unscrew the cap
by two turns to allow the pressure to drop. When
the pressure has dropped, remove the cap and
top up the level.
Changing the coolant
the coolant does not have to be replaced at routine services.
Fluid specification
the coolant must conform to the
ma nufacturer's recommendations.
The cooling fan may star t after switching
off the engine: take care with ar ticles and
clothing that might be caught by the fan
blades. When the engine is warm, the temperature of
the coolant is regulated by the fan.
Fluid specification
For optimum cleaning and to avoid freezing,
this fluid must not be topped up with or
replaced with plain water.
Screenwash and headlamp
wash fluid
In the case of vehicles fitted with
headlamp washers, the low fluid level
is indicated by an audible signal and
a message in the instrument panel
screen.
top u
p the reservoir when you next
stop the vehicle.
In wintry conditions, the use of an ethyl alcohol
or methanol base fluid is recommended.
7
Practical information
Page 235 of 398

233
308_en_Chap07_info-pratiques_ed02-2015
Checks
12 V battery
the battery does not require any maintenance.
H owever, check that the terminals are clean
and correctly tightened, particularly in summer
and winter.Refer to the manufacturer's
service schedule for details of the
replacement intervals for these
components.
Air filter and passenger compartment filter
Replace the oil filter each time the
engine oil is changed.
Refer to the manufacturer's
service schedule for details of
the replacement interval for this
component.Oil filterthe presence of this label, in particular with
t he Stop & Start system, indicates the use of
a specific 12 V lead-acid battery with special
technology and specification.
the
involvement
of a P
eu
ge
Ot d
ealer or a qualified workshop
is essential when replacing or disconnecting
the battery.
Particle filter (Diesel)
the start of saturation of the particle
f ilter is indicated by the temporary
illumination of this warning lamp
accompanied by a message in the
multifunction screen.
As soon as the traffic conditions permit,
regenerate the filter by driving at a
speed of at least 40 mph (60 km/h) until
the warning lamp goes off.
If the warning lamp stays on, this
indicates a low additive level.
For more information on checking
levels, refer to the corresponding
section.
On a new vehicle, the first particle
filter regeneration operations may be
accompanied by a "burning" smell,
which is per fectly normal.
Following prolonged operation of the
vehicle at very low speed or at idle,
you may, in exceptional circumstances,
notice the emission of water vapour at
the exhaust on acceleration.
thi
s does
not affect the behaviour of the vehicle
or the environment.
unl
ess otherwise indicated, check these components in accordance with the manufacturer's
service schedule and according to your engine.
Other wise, have them checked by a Peu
geOt d
ealer or a qualified workshop.
When carrying out work on the battery, refer
to the "12 V battery" section for details of the
precautions to be taken before disconnecting
the battery and following its reconnection. Depending on the environment (e.g. dusty
atmosphere) and the use of the vehicle (e.g.
city driving), replace them twice as often if
necessary
.
A clogged passenger compartment filter may
have an adverse effect on the per formance
of the air conditioning system and generate
undesirable odours.
7
Practical information
Page 242 of 398
240
308_en_Chap07_info-pratiques_ed02-2015
Recommendations on storage
Never store bottles of AdBlue® in your
vehicle.
AdBlue
® freezes at about -11°C and
deteriorates above 25°C. It is recommended
that bottles be stored in a cool area and
protected from direct sunlight.
under
these conditions, the additive can be
kept for at least a year.
If the additive has frozen, it can be used once it
has completely thawed out.
Procedure
Before topping-up, ensure that the vehicle is
parked on a flat and level sur face.
In wintry conditions, ensure that the
temperature of the vehicle is above -11°C.
Otherwise the AdBlue
® may be frozen and
so cannot be poured into its tank. Park your
vehicle in a warmer area for a few hours to
allow the top-up to be carried out.
F
Sw
itch off the ignition and remove the
key, or if your vehicle has one, press
the S
tARt/StOP b
utton to switch off
the
eng
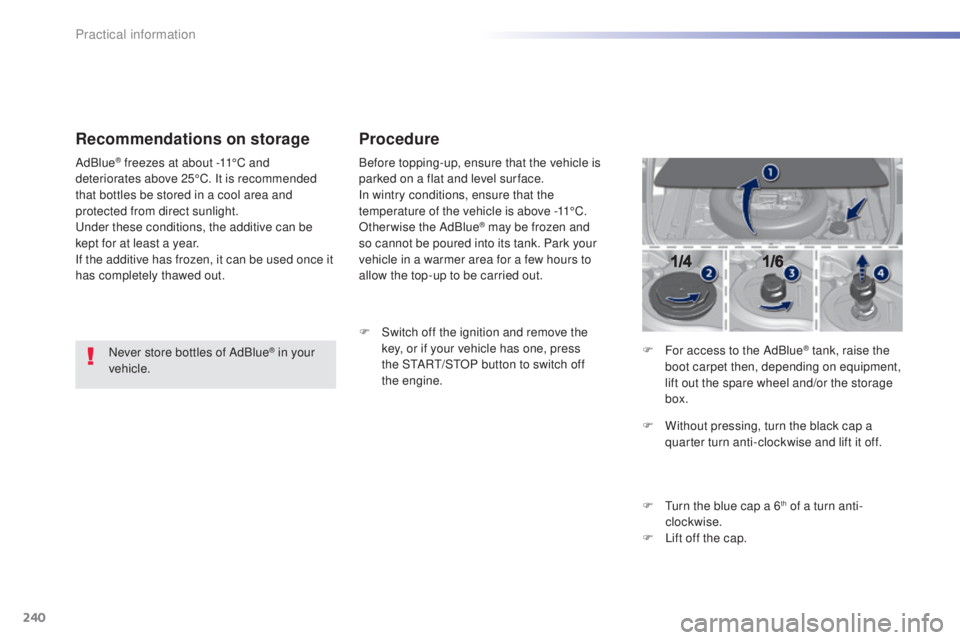
ine. F
Fo
r access to the AdBlue
® tank, raise the
boot carpet then, depending on equipment,
lift out the spare wheel and/or the storage
box.
F
Wi
thout pressing, turn the black cap a
quarter turn anti-clockwise and lift it off.
F
t
ur
n the blue cap a 6
th of a turn anti-
clockwise.
F
Li
ft off the cap.
Practical information
Page 243 of 398

241
308_en_Chap07_info-pratiques_ed02-2015
Never dispose of AdBlue® additive
bottles in the household waste. Place
them in a special container provided
this purpose or take them to your dealer.
F
Af
ter emptying the bottle, wipe away any
spillage around the tank filler using a damp
cloth. If any additive is split or splashed, wash
immediately with cold water or wipe with
a damp cloth.
If the additive has crystallised, clean it
off using a sponge and hot water.
F
Re
fit the blue cap to the tank and turn it a
6
th of a turn clockwise, to its stop.
F Re fit the black cap and turn it a quarter of
a turn clockwise without pressing.
ens
ure
that the indicator on the cap lines up with
the indicator on the support.
F
De
pending on equipment, return the spare
wheel and/or the storage box to the bottom
of the boot.
F
Re
fit the boot carpet and close the tailgate. Important: when topping
-up after
running out of additive , signalled
by the message "
top u
p emissions
additive: Starting prevented", you
must wait for about 5 minutes before
switching on the ignition, without
opening the driver's door, unlocking
the vehicle, introducing the key
into the ignition switch, or placing
the key of the "Keyless Entr y and
Star ting" system inside the vehicle .
Switch on the ignition, then wait for
10
se
conds before starting the engine.
F
Ob
tain a bottle of AdBlue
®. After first
checking the use-by date, read carefully
the instructions on use on the label before
pouring the contents of the bottle into your
vehicle's AdBlue
® tank.
Freezing of the AdBlue
® additive
the
AdBlue
® additive freezes at
temperatures below around -11°C.
the S
CR system includes a heater
for the AdBlue
® tank, allowing you to
continue driving in very cold conditions.
7
Practical information