2016 NISSAN FRONTIER clock
[x] Cancel search: clockPage 3 of 28

NEW SYSTEM FEATURESRear Sonar System (if so equipped).................................................. 2
RearView Monitor (if so equipped) ................................................... 2
Hill Start Assist (HSA) (if so equipped) ............................................... 2
Hill Descent Control (HDC) (if so equipped) ........................................... 3
Hands-free Text Messaging Assistant (if so equipped) .................................. 3
Vehicle Dynamic Control (VDC) ..................................................... 4
Siri
® Eyes Free (if so equipped) ..................................................... 4
SiriusXM Travel Link and SiriusXM Traffic (if so equipped) ............................... 5
Heated Seats (if so equipped) ...................................................... 5
ESSENTIAL INFORMATIONTire Pressure Monitoring System (TPMS) .............................................6
Loose Fuel Cap ................................................................... 6
Fuel-filler Door .................................................................... 7
Power Moonroof (if so equipped) .................................................... 7
Clock Set/Adjustment ............................................................. 7
FIRST DRIVE FEATURESRemote Keyless Entry System (if so equipped)......................................... 9
Opening the Tailgate .............................................................. 9
Power Seat Adjustments (if so equipped) ............................................. 9
Outside Mirror Control Switch (if so equipped) .......................................10
Starting/Stopping the Engine ...................................................... 10
Headlight Control Switch .......................................................... 11
Wiper and Washer Switch ......................................................... 12
FM/AM/SiriusXM
® Satellite Radio with CD Player (if so equipped) ....................... 12
Heater and Air Conditioner (automatic) (if so equipped) ................................ 13
USB (Universal Serial Bus) Connection Port/Aux Jack and iPod
® Interface (if so equipped) ...15
Cruise Control (if so equipped) ..................................................... 15
SYSTEM GUIDE
Trip Computer (if so equipped)..................................................... 16
NissanConnectSM Mobile Apps (if so equipped) ....................................... 16
Bluetooth® Hands-free Phone System (if so equipped) .................................17
System Operating Tips ......................................................... 17
Bluetooth
® System without Navigation (if so equipped) .................................17
Bluetooth® System with Navigation (if so equipped) ................................... 19
Navigation System (if so equipped) ................................................. 21
HomeLink
® Universal Transceiver (if so equipped) ..................................... 22
Please see your Owner’s Manual for important safety information and system operation limitations.
• A cellular telephone should not be used for any purpose while driving so\
full attention may be given to
vehicle operation.
• Always wear your seat belt.
• Supplemental air bags do not replace proper seat belt usage.
• Children 12 and under should always ride in the rear seat properly secur\
ed in child restraints or seat belts
according to their age and weight.
• Do not drink and drive.
For more information, refer to the “Safety — Seats, seat belts and supplemental restraint system (se\
ction 1)” ,
the “Monitor, climate, audio, phone and voice recognition systems (section 4)” \
and the “Starting and driving
(section 5)” of your Owner’s Manual.
Additional information about your vehicle is also available in your Owne\
r’s Manual, Navigation System
Owner’s Manual and at www.NissanUSA.com.
TAB LE OF CONTE NTS
1938136_16b_Frontier_QRG_012016.indd 51/20/16 5:06 PM
Page 8 of 28

6
ESSE NTIAL I N FOR MATION
TIRE PRESSURE MONITORING SYSTEM (TPMS)
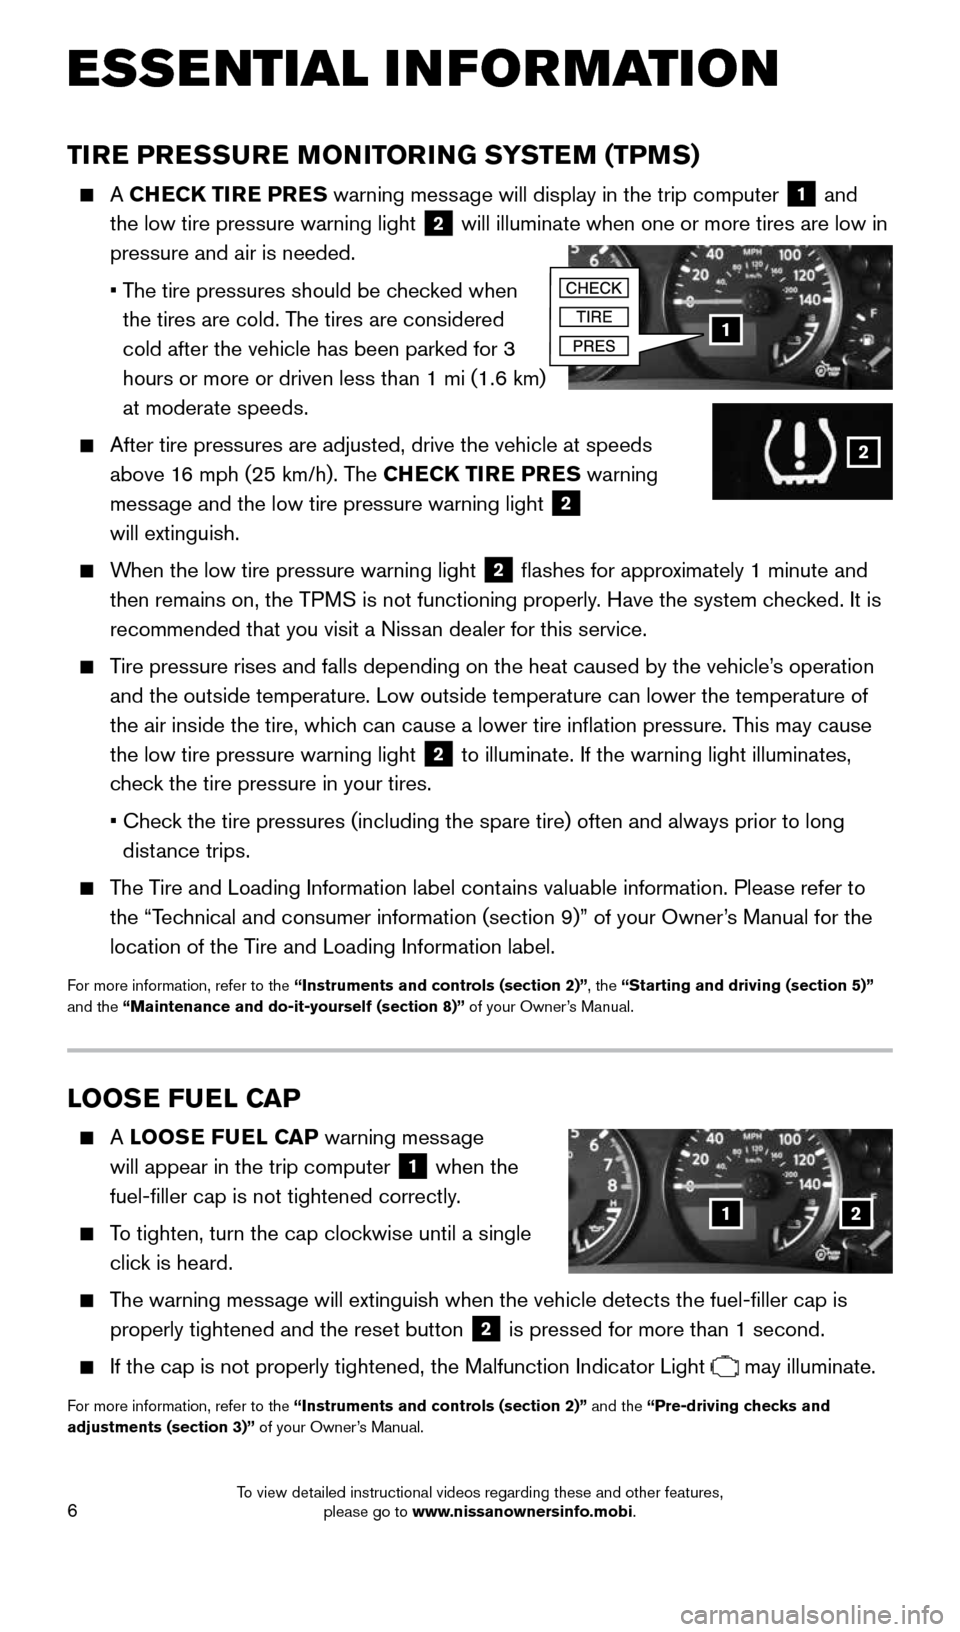
A CHECK TIRE PRES warning message will display in the trip computer 1 and
the low tire pressure warning light 2 will illuminate when one or more tires are low in
pressure and air is needed.
• The tire pressures should be checked when
the tires are cold. The tires are considered
cold after the vehicle has been parked for 3
hours or more or driven less than 1 mi (1.6 km)
at moderate speeds.
After tire pressures are adjusted, drive the vehicle at speeds
above 16 mph (25 km/h). The CHECK TIRE PRES warning
message and the low tire pressure warning light
2
will extinguish.
When the low tire pressure warning light 2 flashes for approximately 1 minute and
then remains on, the TPMS is not functioning properly. Have the system checked. It is
recommended that you visit a Nissan dealer for this service.
Tire pressure rises and falls depending on the heat caused by the vehicle\
’s operation
and the outside temperature. Low outside temperature can lower the tempe\
rature of
the air inside the tire, which can cause a lower tire inflation pressure. This may cause
the low tire pressure warning light
2 to illuminate. If the warning light illuminates,
check the tire pressure in your tires.
• Check the tire pressures (including the spare tire) often and always prior\
to long
distance trips.
The Tire and Loading Information label contains valuable information. Please refer to
the “Technical and consumer information (section 9)” of your Owner’s Manual for the
location of the Tire and Loading Information label.
For more information, refer to the “Instruments and controls (section 2)”, the “Starting and driving (section 5)”
and the “Maintenance and do-it-yourself (section 8)” of your Owner’s Manual.
1
2
LOOSE FUEL CAP
A LOOSE FUEL CAP warning message
will appear in the trip computer
1 when the
fuel-filler cap is not tightened correctly.
To tighten, turn the cap clockwise until a single
click is heard.
The warning message will extinguish when the vehicle detects the fuel-filler cap is
properly tightened and the reset button
2 is pressed for more than 1 second.
If the cap is not properly tightened, the Malfunction Indicator Light may illuminate.
For more information, refer to the “Instruments and controls (section 2)” and the “Pre-driving checks and
adjustments (section 3)” of your Owner’s Manual.
12
1938136_16b_Frontier_QRG_012016.indd 61/20/16 5:06 PM
To view detailed instructional videos regarding these and other features, please go to www.nissanownersinfo.mobi.
Page 9 of 28

7
CLOCK SET/ADJUSTMENT
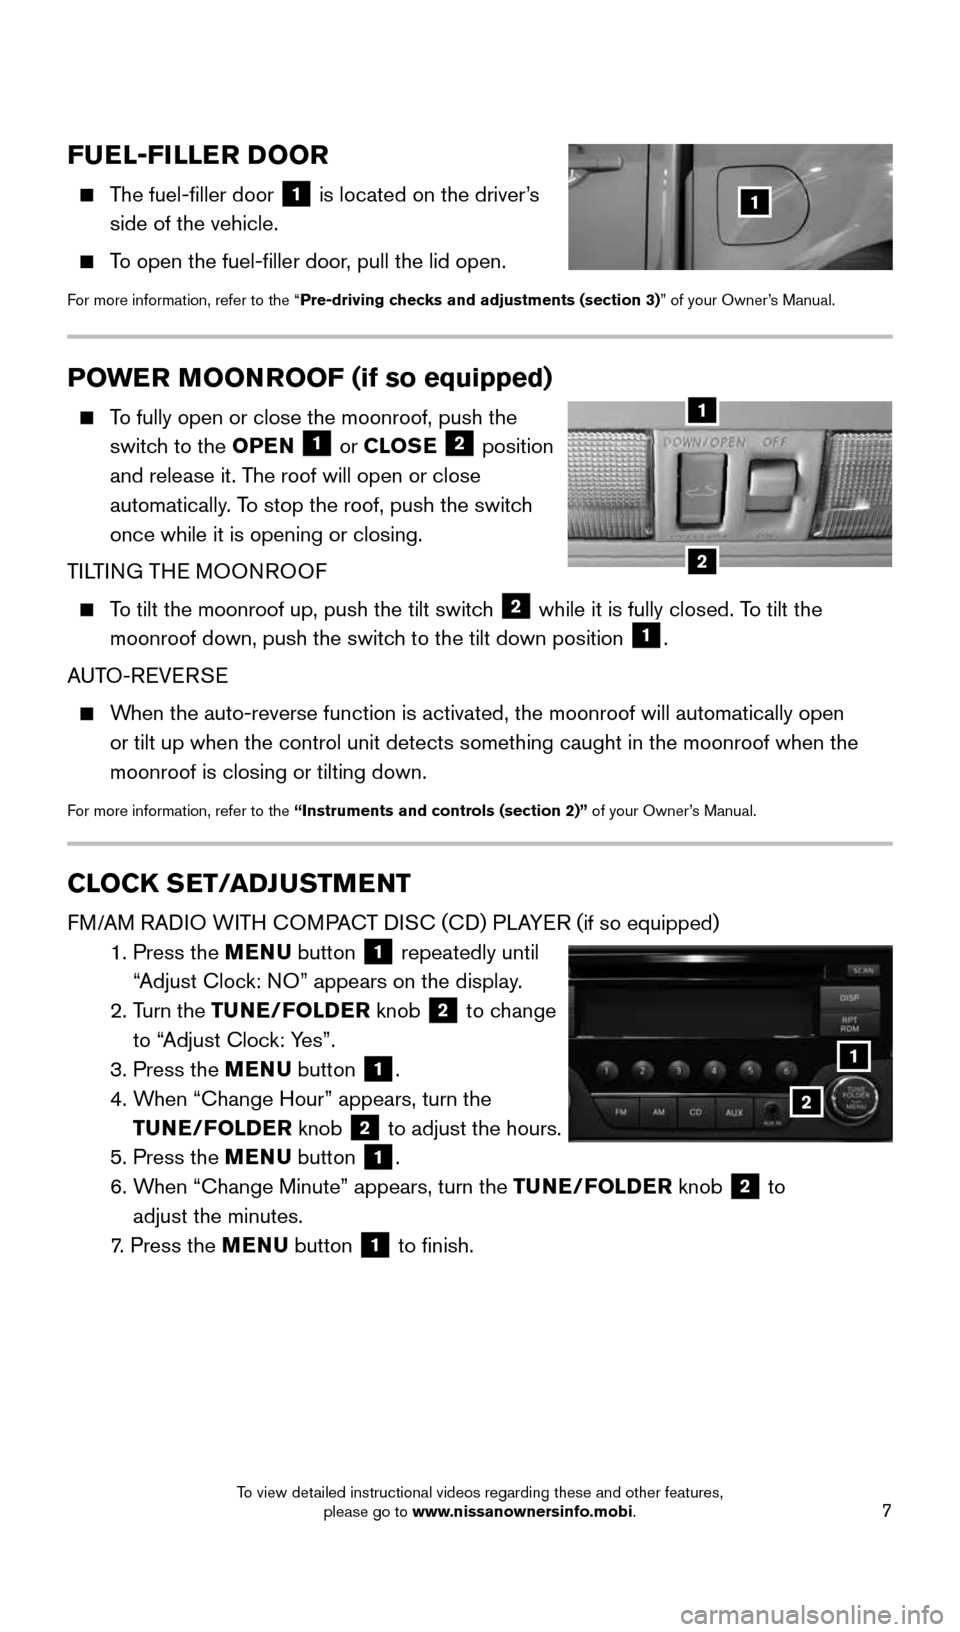
FM/AM RADIO WITH COMPACT DISC (CD) PLAYER (if so equipped)
1. Press the MENU button
1 repeatedly until
“Adjust Clock: NO” appears on the display.
2. Turn the TUNE/FOLDER knob
2 to change
to “Adjust Clock: Yes”.
3. Press the MENU button
1.
4. When “Change Hour” appears, turn the
TUNE/FOLDER knob
2 to adjust the hours.
5. Press the MENU button 1.
6. When “Change Minute” appears, turn the TUNE/FOLDER knob
2 to
adjust the minutes.
7. Press the MENU button
1 to finish.
POWER MOONROOF (if so equipped)
To fully open or close the moonroof, push the
switch to the OPEN 1 or CLOSE 2 position
and release it. The roof will open or close
automatically. To stop the roof, push the switch
once while it is opening or closing.
TILTING THE MOONROOF
To tilt the moonroof up, push the tilt switch 2 while it is fully closed. To tilt the
moonroof down, push the switch to the tilt down position 1.
AUTO-REVERSE
When the auto-reverse function is activated, the moonroof will automatica\
lly open
or tilt up when the control unit detects something caught in the moonroo\
f when the
moonroof is closing or tilting down.
For more information, refer to the “Instruments and controls (section 2)” of your Owner’s Manual.
2
1
FUEL-FILLER DOOR
The fuel-filler door
1 is located on the driver’s
side of the vehicle.
To open the fuel-filler door, pull the lid open.
For more information, refer to the “Pre-driving checks and adjustments (section 3)” of your Owner’s Manual.
1
1
2
1938136_16b_Frontier_QRG_012016.indd 71/20/16 5:06 PM
To view detailed instructional videos regarding these and other features, please go to www.nissanownersinfo.mobi.
Page 10 of 28

8
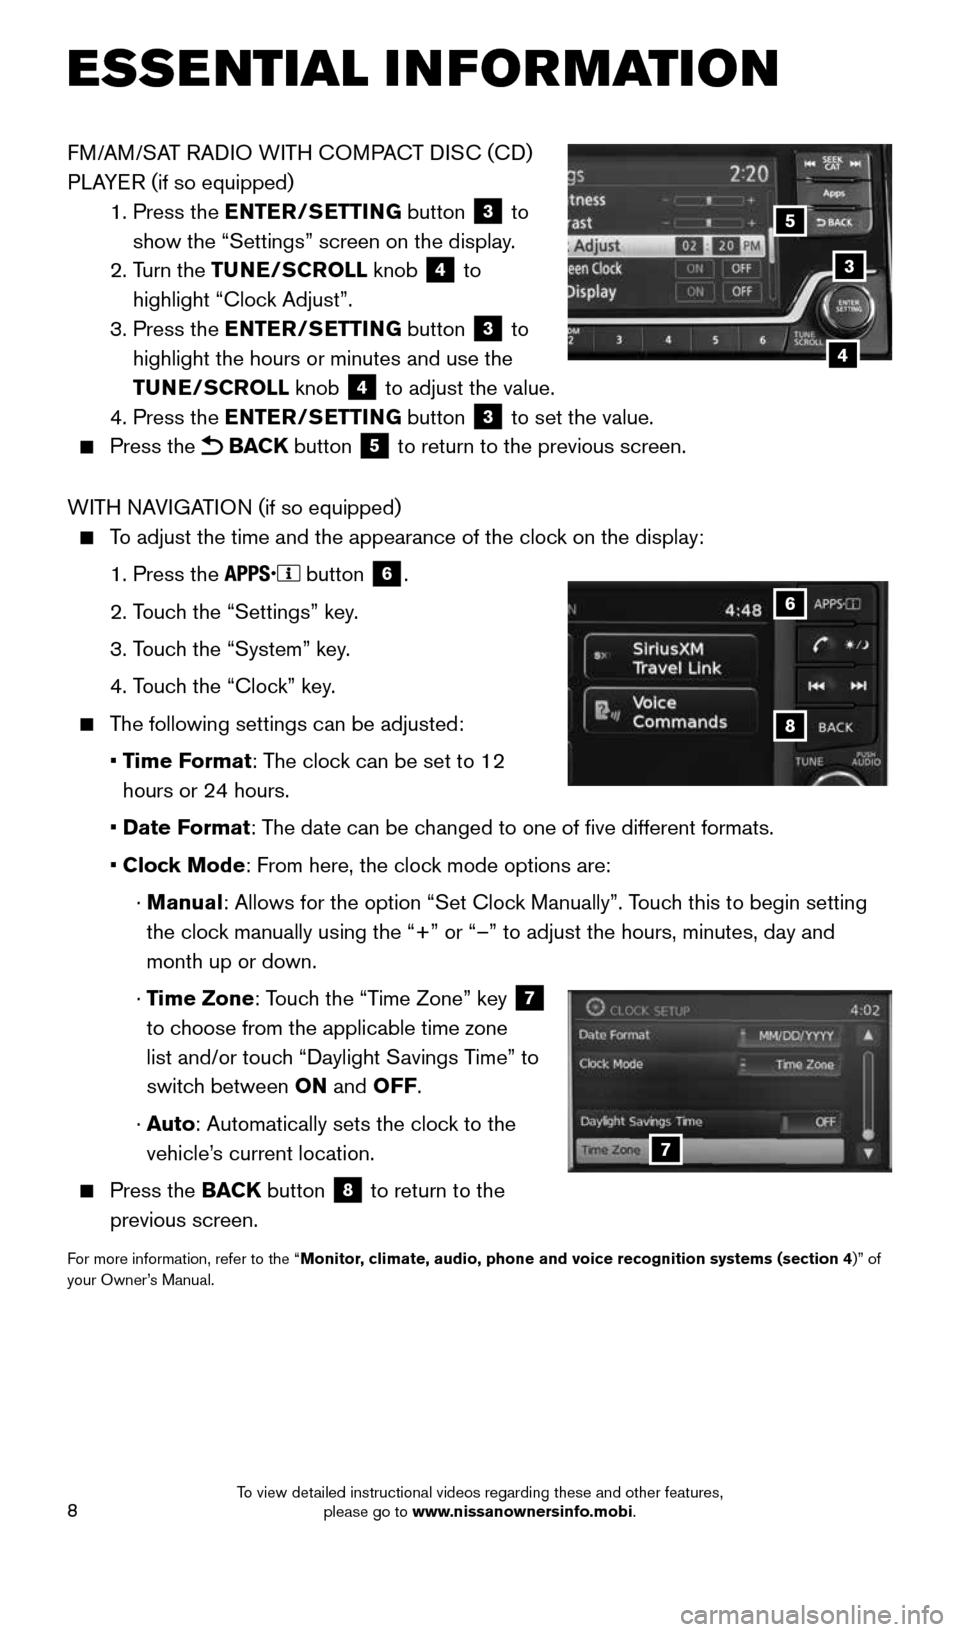
FM/AM/SAT RADIO WITH COMPACT DISC (CD)
PLAYER (if so equipped)
1. Press the ENTER/SETTING button
3 to
show the “Settings” screen on the display.
2. Turn the TUNE/SCROLL knob
4 to
highlight “Clock Adjust”.
3. Press the ENTER/SETTING button
3 to
highlight the hours or minutes and use the
TUNE/SCROLL knob
4 to adjust the value.
4. Press the ENTER/SETTING button 3 to set the value.
Press the BACK button 5 to return to the previous screen.
WITH NAVIGATION (if so equipped)
To adjust the time and the appearance of the clock on the display:
1. Press the
button
6.
2. Touch the “Settings” key.
3. Touch the “System” key.
4. Touch the “Clock” key.
The following settings can be adjusted:
• Time Format: The clock can be set to 12
hours or 24 hours.
• Date Format: The date can be changed to one of five different formats.
• Clock Mode: From here, the clock mode options are:
· Manual: Allows for the option “Set Clock Manually”. Touch this to begin setting
the clock manually using the “+” or “–” to adjust the hours, minu\
tes, day and
month up or down.
· Time Zone: Touch the “Time Zone” key
7
to choose from the applicable time zone
list and/or touch “Daylight Savings Time” to
switch between ON and OFF.
· Auto: Automatically sets the clock to the
vehicle’s current location.
Press the BACK button
8 to return to the
previous screen.
For more information, refer to the “Monitor, climate, audio, phone and voice recognition systems (section 4 )” of
your Owner’s Manual.
8
6
7
3
5
4
ESSE NTIAL I N FOR MATION
1938136_16b_Frontier_QRG_012016.indd 81/20/16 5:06 PM
To view detailed instructional videos regarding these and other features, please go to www.nissanownersinfo.mobi.