2016 NISSAN FRONTIER ECO mode
[x] Cancel search: ECO modePage 6 of 28
4
NEW SYSTEM FEATURES
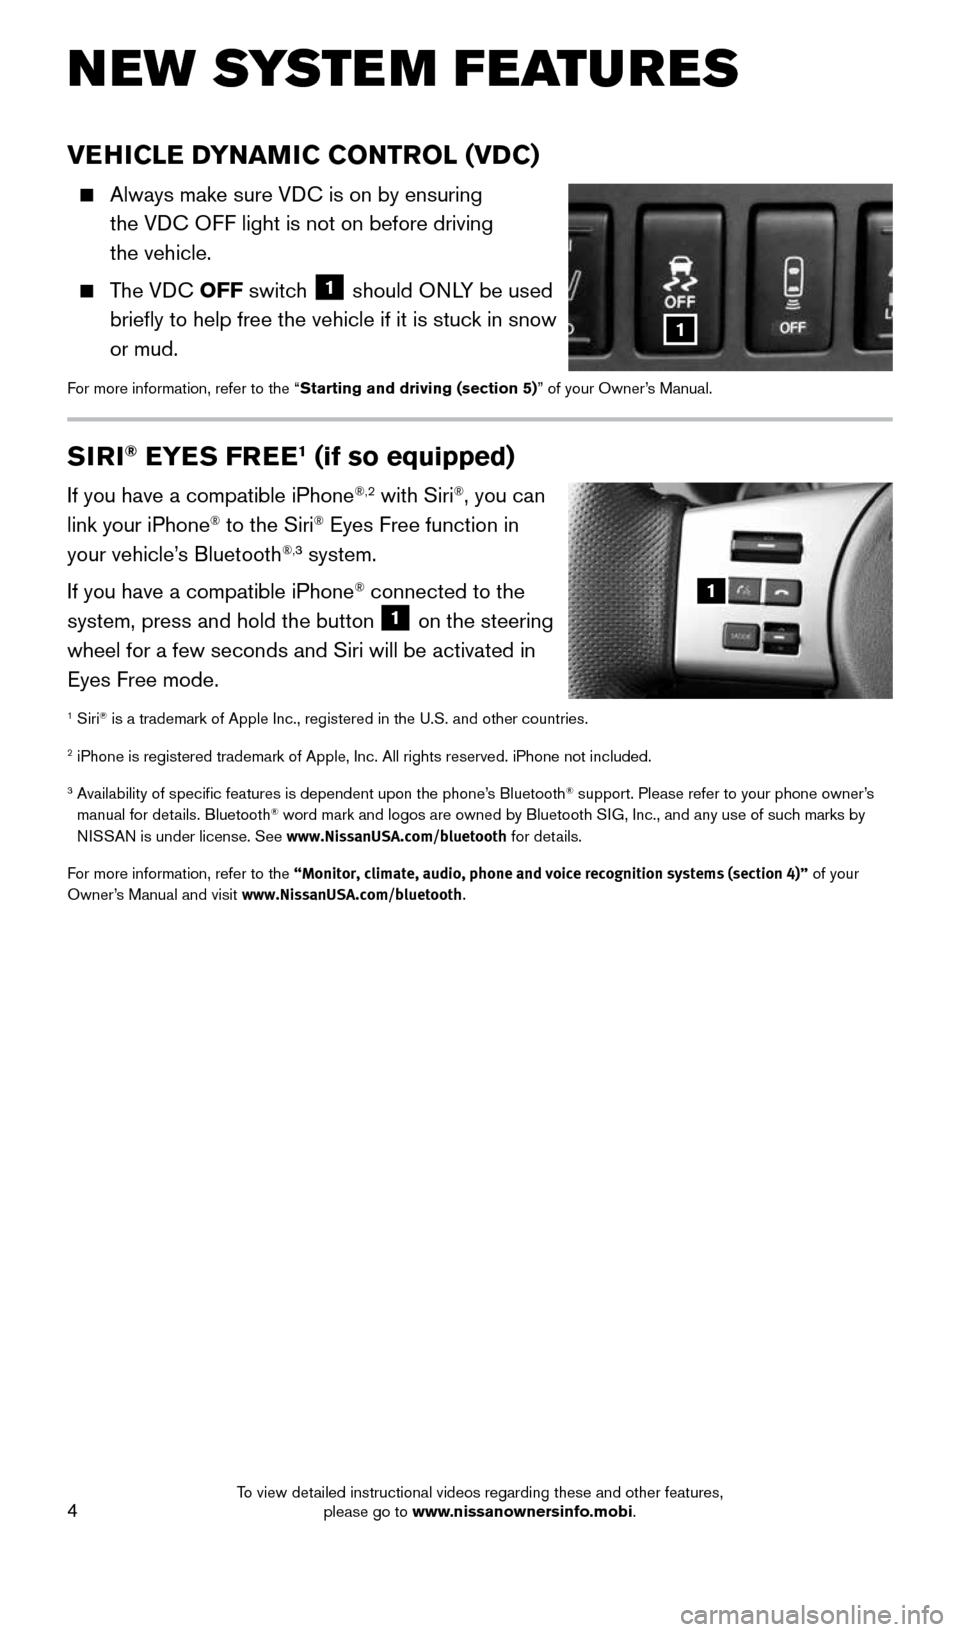
VEHICLE DYNAMIC CONTROL (VDC)
Always make sure VDC is on by ensuring
the VDC OFF light is not on before driving
the vehicle.
The VDC OFF switch 1 should ONLY be used
briefly to help free the vehicle if it is stuck in snow
or mud.
For more information, refer to the “Starting and driving (section 5)” of your Owner’s Manual.
1
SIRI® EYES FREE1 (if so equipped)
If you have a compatible iPhone®,2 with Siri®, you can
link your iPhone® to the Siri® Eyes Free function in
your vehicle’s Bluetooth®,3 system.
If you have a compatible iPhone
® connected to the
system, press and hold the button 1 on the steering
wheel for a few seconds and Siri will be activated in
Eyes Free mode.
1 Siri® is a trademark of Apple Inc., registered in the U.S. and other countrie\
s.
2 iPhone is registered trademark of Apple, Inc. All rights reserved. iPho\
ne not included.
3 Availability of specific features is dependent upon the phone’s Bluetooth® support. Please refer to your phone owner’s
manual for details. Bluetooth® word mark and logos are owned by Bluetooth SIG, Inc., and any use of such marks by
NISSAN is under license. See www.NissanUSA.com/bluetooth for details.
For more information, refer to the “Monitor, climate, audio, phone and voice recognition systems (secti\
on 4)” of your
Owner’s Manual and visit www.NissanUSA.com/bluetooth.
1
1938136_16b_Frontier_QRG_012016.indd 41/20/16 5:06 PM
To view detailed instructional videos regarding these and other features, please go to www.nissanownersinfo.mobi.
Page 8 of 28
6
ESSE NTIAL I N FOR MATION
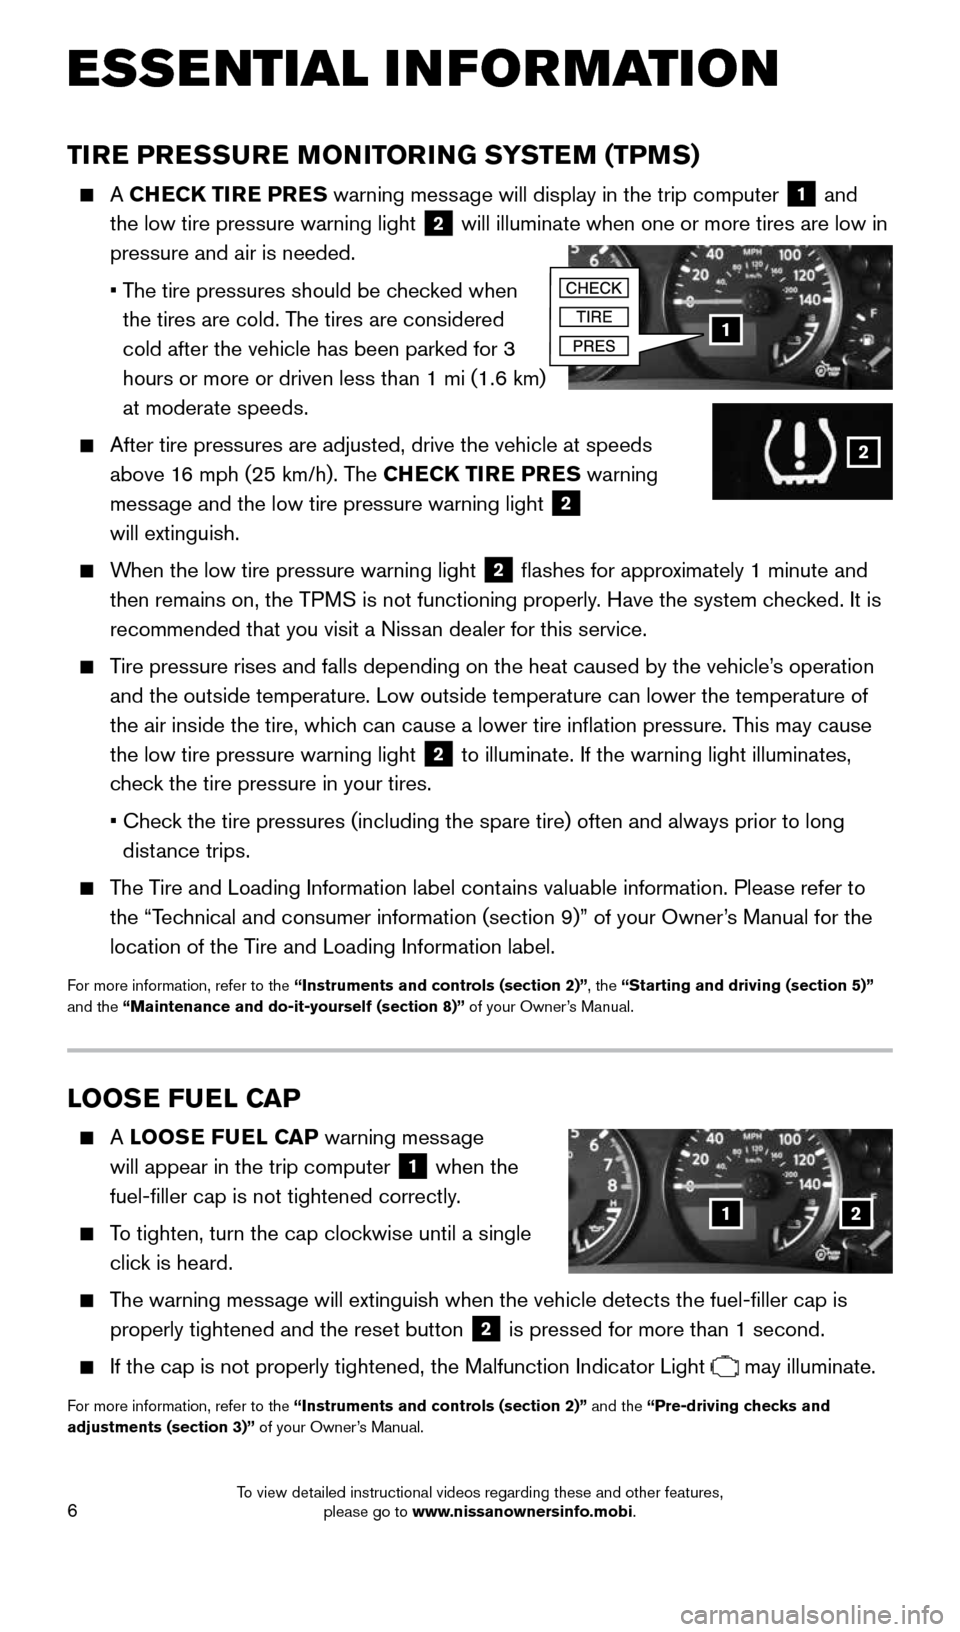
TIRE PRESSURE MONITORING SYSTEM (TPMS)
A CHECK TIRE PRES warning message will display in the trip computer 1 and
the low tire pressure warning light 2 will illuminate when one or more tires are low in
pressure and air is needed.
• The tire pressures should be checked when
the tires are cold. The tires are considered
cold after the vehicle has been parked for 3
hours or more or driven less than 1 mi (1.6 km)
at moderate speeds.
After tire pressures are adjusted, drive the vehicle at speeds
above 16 mph (25 km/h). The CHECK TIRE PRES warning
message and the low tire pressure warning light
2
will extinguish.
When the low tire pressure warning light 2 flashes for approximately 1 minute and
then remains on, the TPMS is not functioning properly. Have the system checked. It is
recommended that you visit a Nissan dealer for this service.
Tire pressure rises and falls depending on the heat caused by the vehicle\
’s operation
and the outside temperature. Low outside temperature can lower the tempe\
rature of
the air inside the tire, which can cause a lower tire inflation pressure. This may cause
the low tire pressure warning light
2 to illuminate. If the warning light illuminates,
check the tire pressure in your tires.
• Check the tire pressures (including the spare tire) often and always prior\
to long
distance trips.
The Tire and Loading Information label contains valuable information. Please refer to
the “Technical and consumer information (section 9)” of your Owner’s Manual for the
location of the Tire and Loading Information label.
For more information, refer to the “Instruments and controls (section 2)”, the “Starting and driving (section 5)”
and the “Maintenance and do-it-yourself (section 8)” of your Owner’s Manual.
1
2
LOOSE FUEL CAP
A LOOSE FUEL CAP warning message
will appear in the trip computer
1 when the
fuel-filler cap is not tightened correctly.
To tighten, turn the cap clockwise until a single
click is heard.
The warning message will extinguish when the vehicle detects the fuel-filler cap is
properly tightened and the reset button
2 is pressed for more than 1 second.
If the cap is not properly tightened, the Malfunction Indicator Light may illuminate.
For more information, refer to the “Instruments and controls (section 2)” and the “Pre-driving checks and
adjustments (section 3)” of your Owner’s Manual.
12
1938136_16b_Frontier_QRG_012016.indd 61/20/16 5:06 PM
To view detailed instructional videos regarding these and other features, please go to www.nissanownersinfo.mobi.
Page 10 of 28
8
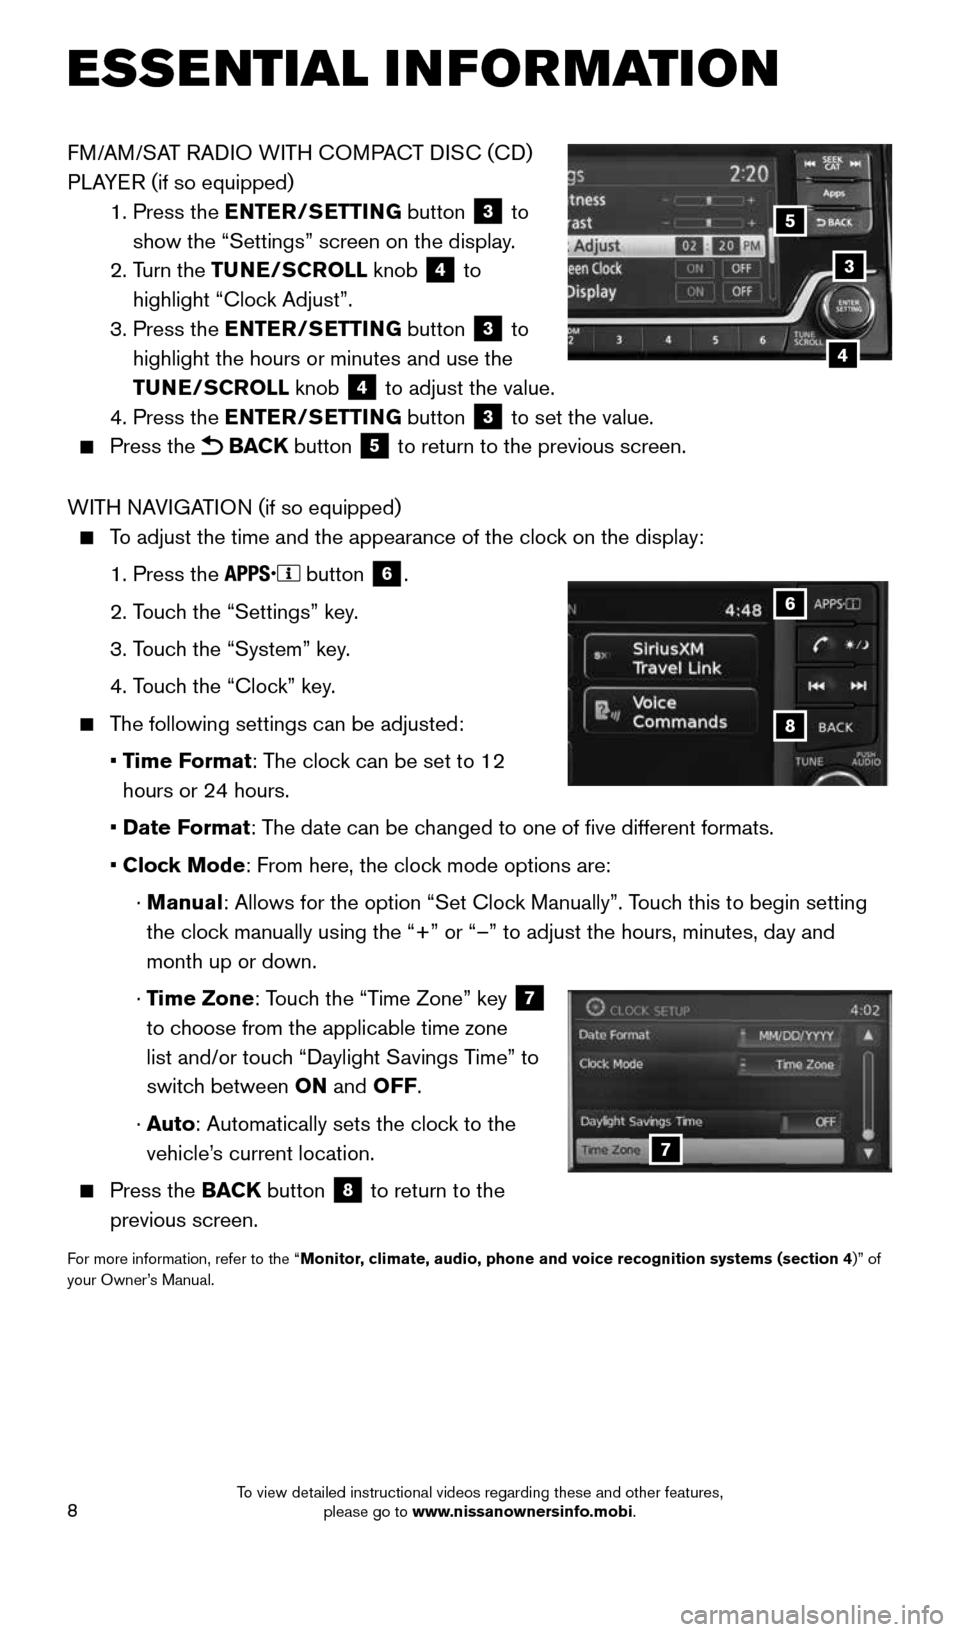
FM/AM/SAT RADIO WITH COMPACT DISC (CD)
PLAYER (if so equipped)
1. Press the ENTER/SETTING button
3 to
show the “Settings” screen on the display.
2. Turn the TUNE/SCROLL knob
4 to
highlight “Clock Adjust”.
3. Press the ENTER/SETTING button
3 to
highlight the hours or minutes and use the
TUNE/SCROLL knob
4 to adjust the value.
4. Press the ENTER/SETTING button 3 to set the value.
Press the BACK button 5 to return to the previous screen.
WITH NAVIGATION (if so equipped)
To adjust the time and the appearance of the clock on the display:
1. Press the
button
6.
2. Touch the “Settings” key.
3. Touch the “System” key.
4. Touch the “Clock” key.
The following settings can be adjusted:
• Time Format: The clock can be set to 12
hours or 24 hours.
• Date Format: The date can be changed to one of five different formats.
• Clock Mode: From here, the clock mode options are:
· Manual: Allows for the option “Set Clock Manually”. Touch this to begin setting
the clock manually using the “+” or “–” to adjust the hours, minu\
tes, day and
month up or down.
· Time Zone: Touch the “Time Zone” key
7
to choose from the applicable time zone
list and/or touch “Daylight Savings Time” to
switch between ON and OFF.
· Auto: Automatically sets the clock to the
vehicle’s current location.
Press the BACK button
8 to return to the
previous screen.
For more information, refer to the “Monitor, climate, audio, phone and voice recognition systems (section 4 )” of
your Owner’s Manual.
8
6
7
3
5
4
ESSE NTIAL I N FOR MATION
1938136_16b_Frontier_QRG_012016.indd 81/20/16 5:06 PM
To view detailed instructional videos regarding these and other features, please go to www.nissanownersinfo.mobi.
Page 15 of 28
13
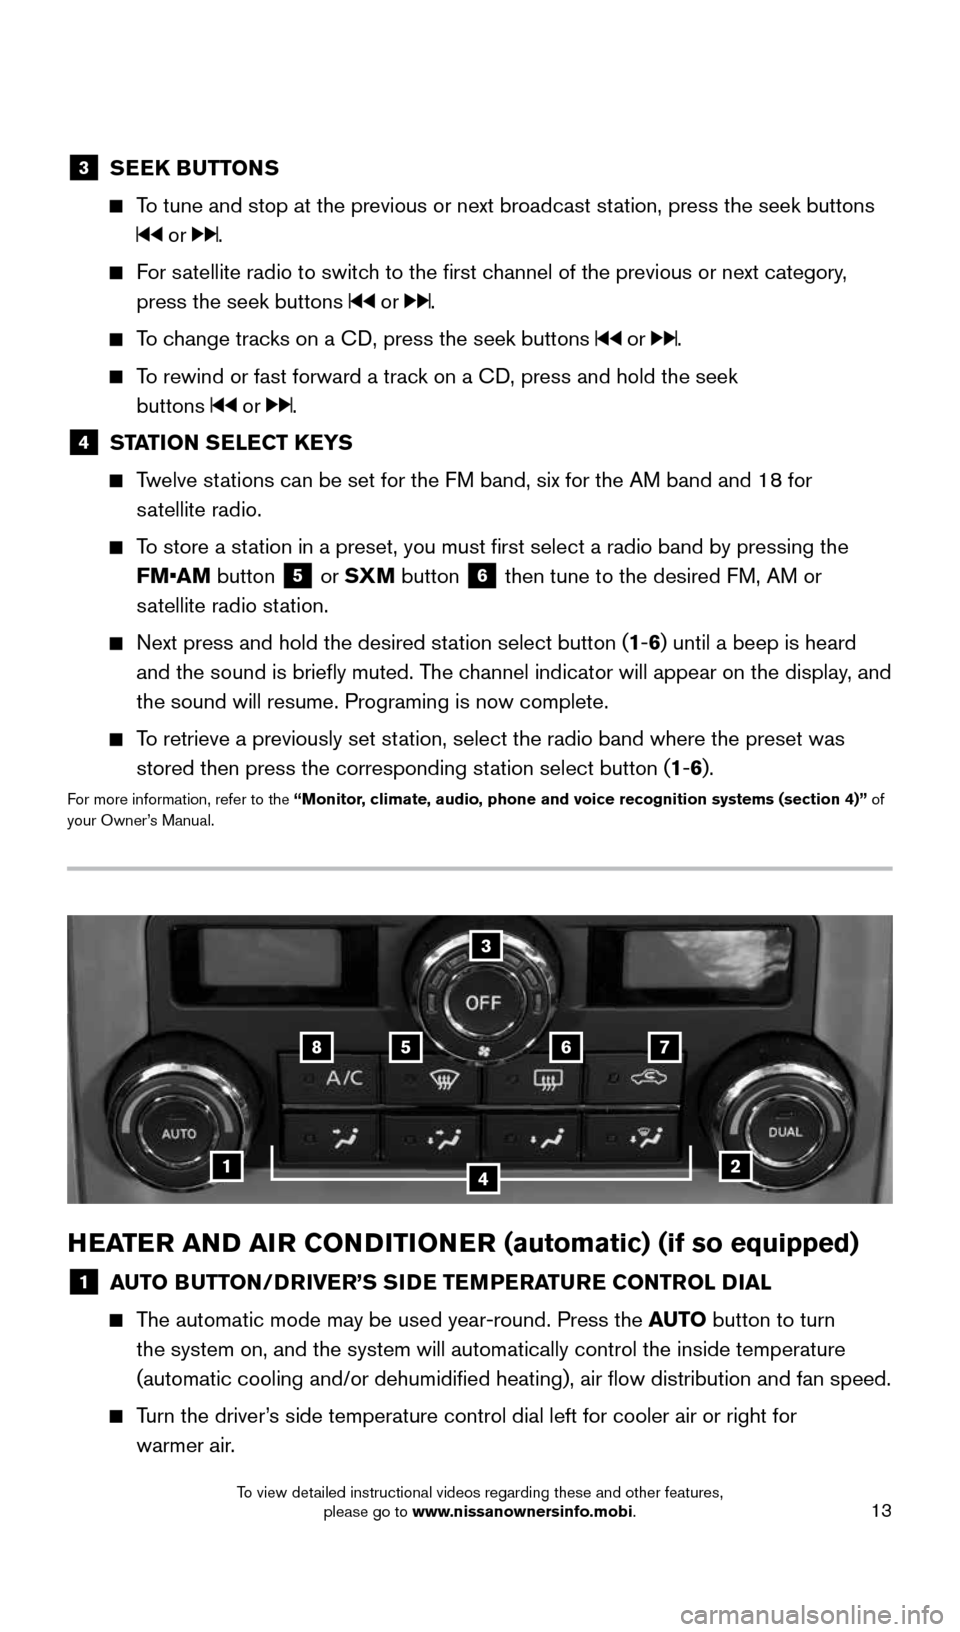
HEATER AND AIR CONDITIONER (automatic) (if so equipped)
1 AUTO BUTTON/DRIVER’S SIDE TEMPERATURE CONTROL DIAL
The automatic mode may be used year-round. Press the AUTO button to turn
the system on, and the system will automatically control the inside temp\
erature
(automatic cooling and/or dehumidified heating), air flow distribu\
tion and fan speed.
Turn the driver’s side temperature control dial left for cooler air or right for
warmer air.
3 SEEK BUTTONS
To tune and stop at the previous or next broadcast station, press the seek buttons
or .
For satellite radio to switch to the first channel of the previous or next category,
press the seek buttons
or .
To change tracks on a CD, press the seek buttons or .
To rewind or fast forward a track on a CD, press and hold the seek
buttons
or .
4 STATION SELECT KEYS
Twelve stations can be set for the FM band, six for the AM band and 18 for
satellite radio.
To store a station in a preset, you must first select a radio band by pressing the \
FM•AM button
5 or SXM button
6 then tune to the desired FM, AM or
satellite radio station.
Next press and hold the desired station select button (1-6) until a beep is heard
and the sound is briefly muted. The channel indicator will appear on the display, and
the sound will resume. Programing is now complete.
To retrieve a previously set station, select the radio band where the preset was
stored then press the corresponding station select button (1-6).
For more information, refer to the “Monitor, climate, audio, phone and voice recognition systems (section 4)” of
your Owner’s Manual.
1
5
2
6
3
7
4
8
1938136_16b_Frontier_QRG_012016.indd 131/20/16 5:06 PM
To view detailed instructional videos regarding these and other features, please go to www.nissanownersinfo.mobi.
Page 16 of 28

14
FIRST DRIVE FEATURES
2 DUAL BUTTON/PASSENGER’S SIDE TEMPERATURE CONTROL DIAL
Press the D UAL button to turn the passenger’s side temperature controls on or off.
This will allow the passenger’s side temperature to be adjusted independently from
the driver’s side.
Turn the passenger’s side temperature control dial left for cooler air or right for
warmer air.
3 FAN SPEED CONTROL DIAL/OFF BUTTON
Turn the dial to the left to decrease fan speed or to the right to increa\
se fan speed.
Press the button to turn the system off.
To stop air from coming through the vents with the blower off, press the \
air
recirculation button
7 .
4 AIR FLOW CONTROL BUTTONS
Press one of the following air flow control buttons to manually contro\
l air flow:
Air flows from the center and side vents.
Air flows from the center, side and foot vents.
Air flows mainly from the foot vents.
Air flows from the front defroster and foot vents.
5 DEFROSTING FRONT AND SIDE WINDOWS
Press the front defroster button
to turn the system on. The A/C automatically
turns on when the front defroster mode is selected. This feature removes humidity
from the air.
Set the temperature control dial
1 and the fan speed control dial 3 to their
maximum settings.
6 REAR WINDOW AND OUTSIDE MIRROR DEFROSTER SWITCH
(if so equipped)
Push the rear window defroster switch
to turn the system on or off.
The rear window defroster automatically turns off after approximately 15 minutes.
7 AIR RECIRCULATION BUTTON
Press the air recirculation button
to recirculate air inside the vehicle. The
indicator light on the button will illuminate. This system is used to avoid certain
outside odors and to help adjust the inside vehicle temperature more eff\
ectively.
Press the air recirculation button
again to turn air recirculation off. This allows
outside air to be drawn into the passenger compartment to prevent foggin\
g in the
front defroster, foot vent or front defroster/foot vent mode.
The air recirculation mode cannot be activated when the climate control s\
ystem is
in the front defroster mode
or the front defroster and foot vent mode .
8 A/C BUTTON
Press the A/C button to manually turn the A/C on or off.
For more information, refer to the “Instruments and controls (section 2)” and the “Monitor, climate, audio, phone
and voice recognition systems (section 4)” of your Owner’s Manual.
1938136_16b_Frontier_QRG_012016.indd 141/20/16 5:06 PM
To view detailed instructional videos regarding these and other features, please go to www.nissanownersinfo.mobi.
Page 18 of 28
16
TRIP COMPUTER (if so equipped)
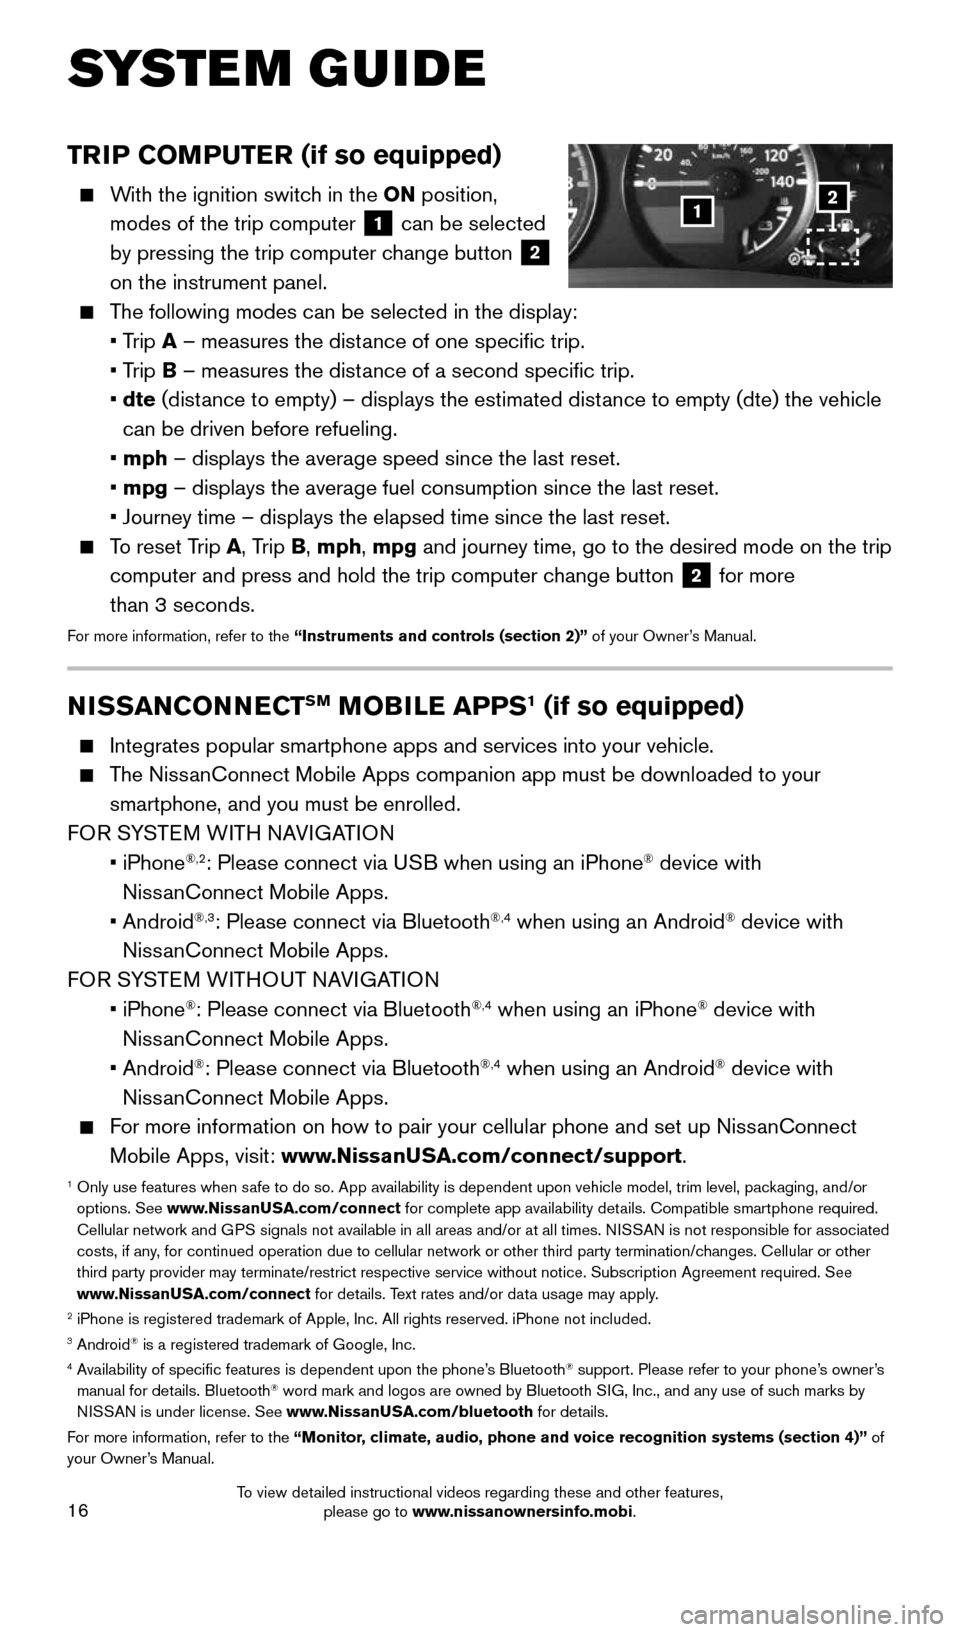
With the ignition switch in the ON position,
modes of the trip computer
1 can be selected
by pressing the trip computer change button 2
on the instrument panel.
The following modes can be selected in the display:
• Trip A – measures the distance of one specific trip.
• Trip B – measures the distance of a second specific trip.
• dte (distance to empty) – displays the estimated distance to empty (dte) the vehicle
can be driven before refueling.
• mph – displays the average speed since the last reset.
• mpg – displays the average fuel consumption since the last reset.
• Journey time – displays the elapsed time since the last reset.
To reset Trip A, Trip B, mph, mpg and journey time, go to the desired mode on the trip
computer and press and hold the trip computer change button
2 for more
than 3 seconds.
For more information, refer to the “Instruments and controls (section 2)” of your Owner’s Manual.
1
SYSTEM GUIDE
2
NISSANCONNECTSM MOBILE APPS1 (if so equipped)
Integrates popular smartphone apps and services into your vehicle.
The NissanConnect Mobile Apps companion app must be downloaded to your
smartphone, and you must be enrolled.
FOR SYSTEM WITH NAVIGATION
• iPhone
®,2: Please connect via USB when using an iPhone® device with
NissanConnect Mobile Apps.
• Android
®,3: Please connect via Bluetooth®,4 when using an Android® device with
NissanConnect Mobile Apps.
FOR SYSTEM WITHOUT NAVIGATION
• iPhone
®: Please connect via Bluetooth®,4 when using an iPhone® device with
NissanConnect Mobile Apps.
• Android
®: Please connect via Bluetooth®,4 when using an Android® device with
NissanConnect Mobile Apps.
For more information on how to pair your cellular phone and set up NissanConnect
Mobile Apps, visit: www.NissanUSA.com/connect/support.
1 Only use features when safe to do so. App availability is dependent upon vehicle model, trim lev\
el, packaging, and/or
options. See www.NissanUSA.com/connect for complete app availability details. Compatible smartphone required.
Cellular network and GPS signals not available in all areas and/or at all times. NISSAN is not responsible for associated
costs, if any, for continued operation due to cellular network or other third party t\
ermination/changes. Cellular or other
third party provider may terminate/restrict respective service without n\
otice. Subscription Agreement required. See
www.NissanUSA.com/connect for details. Text rates and/or data usage may apply.
2 iPhone is registered trademark of Apple, Inc. All rights reserved. iPho\
ne not included.3 Android® is a registered trademark of Google, Inc.4 Availability of specific features is dependent upon the phone’s Bluetooth® support. Please refer to your phone’s owner’s
manual for details. Bluetooth® word mark and logos are owned by Bluetooth SIG, Inc., and any use of such marks by
NISSAN is under license. See www.NissanUSA.com/bluetooth for details.
For more information, refer to the “Monitor, climate, audio, phone and voice recognition systems (section 4)” of
your Owner’s Manual.
1938136_16b_Frontier_QRG_012016.indd 161/20/16 5:06 PM
To view detailed instructional videos regarding these and other features, please go to www.nissanownersinfo.mobi.
Page 20 of 28

18
SYSTEM GUIDE
3. Say: “Add Phone”. The system acknowledges the command and asks you to initiate
connecting from the cellular phone handset.
4. Initiate connecting from the cellular phone:
• The connecting procedure varies according to each cellular phone model.
For detailed connecting instructions and a list of compatible cellular phones, \
please
visit www.NissanUSA.com/bluetooth.
• When prompted for a PIN, enter “1234” from the handset. (The PIN is assigned by
NISSAN and cannot be changed.)
5. Say a name for the cellular phone when the system asks you to provide one\
. You can
give the cellular phone a name of your choice.
PHONEBOOK SETUP
The phonebook stores up to 1,000 entries for each cellular phone paired with
the system.
Depending on your cellular phone, the system may automatically download \
your
cellular phone’s entire phonebook to the vehicle’s Bluetooth®,2 system.
If the phonebook does not download automatically, entries can be
individually downloaded.
To manually download entries:
1. Press the
button on the steering wheel.
2. After the tone, say “Phonebook”.
3. After the next tone, say “Transfer Entry”. The system acknowledges the command
and asks you to initiate the transfer from the cellular phone handset. T\
he new
contact phone number will be transferred from the cellular phone to the vehi\
cle.
• The transfer procedure varies according to each cellular phone.
See your cellular phone’s Owner’s Manual for details. You can also visit
www.NissanUSA.com/bluetooth for instructions on transferring
phone numbers from NISSAN-recommended cellular phones.
4. The system repeats the number and prompts you for the next command. When you
have finished entering numbers or transferring an entry, choose “Store”.
5. The system confirms the name, location and number.
MAKING A CALL FROM THE PHONEBOOK
1. Press the
button on the steering wheel.
2. After waiting for the tone, say “Call”.
3. After the next tone, speak a name of a phonebook entry. For example, “Michael Smith”.
4. Confirm that the correct name is recognized by saying “Dial” after the tone.
In some cases, names stored using all UPPERCASE letters may not be recognized by
the system.
MAKING A CALL BY PHONE NUMBER
1. Press the
button on the steering wheel. A tone will sound.
2. Say: “Call”. The system acknowledges the command and announces the next set of
available commands.
1938136_16b_Frontier_QRG_012016.indd 181/20/16 5:06 PM
To view detailed instructional videos regarding these and other features, please go to www.nissanownersinfo.mobi.
Page 23 of 28
21
NAVIGATION SYSTEM (if so equipped)
Your Navigation System can calculate a route from your current location t\
o a preferred
destination. The real-time map display and turn-by-turn voice guidance will lead you
along the route.
The Navigation System will continually update your vehicle’s position. If you have
deviated from the original route, it will recalculate the route from you\
r current location.
To help promote safe driving, some functions cannot be operated or have limited
operation when the vehicle speed is above 5 mph (8 km/h). The on-screen text and
keys for these restricted functions will be grayed-out or muted and cann\
ot be selected
while driving. These functions will become available again when the vehicle speed
is reduced to 5 mph (8 km/h). Voice commands may be available for some of the
restricted functions. For more information, refer to the “Monitor, climate, audio, phone
and voice recognition systems (section 4)” of your Owner’s Manual.
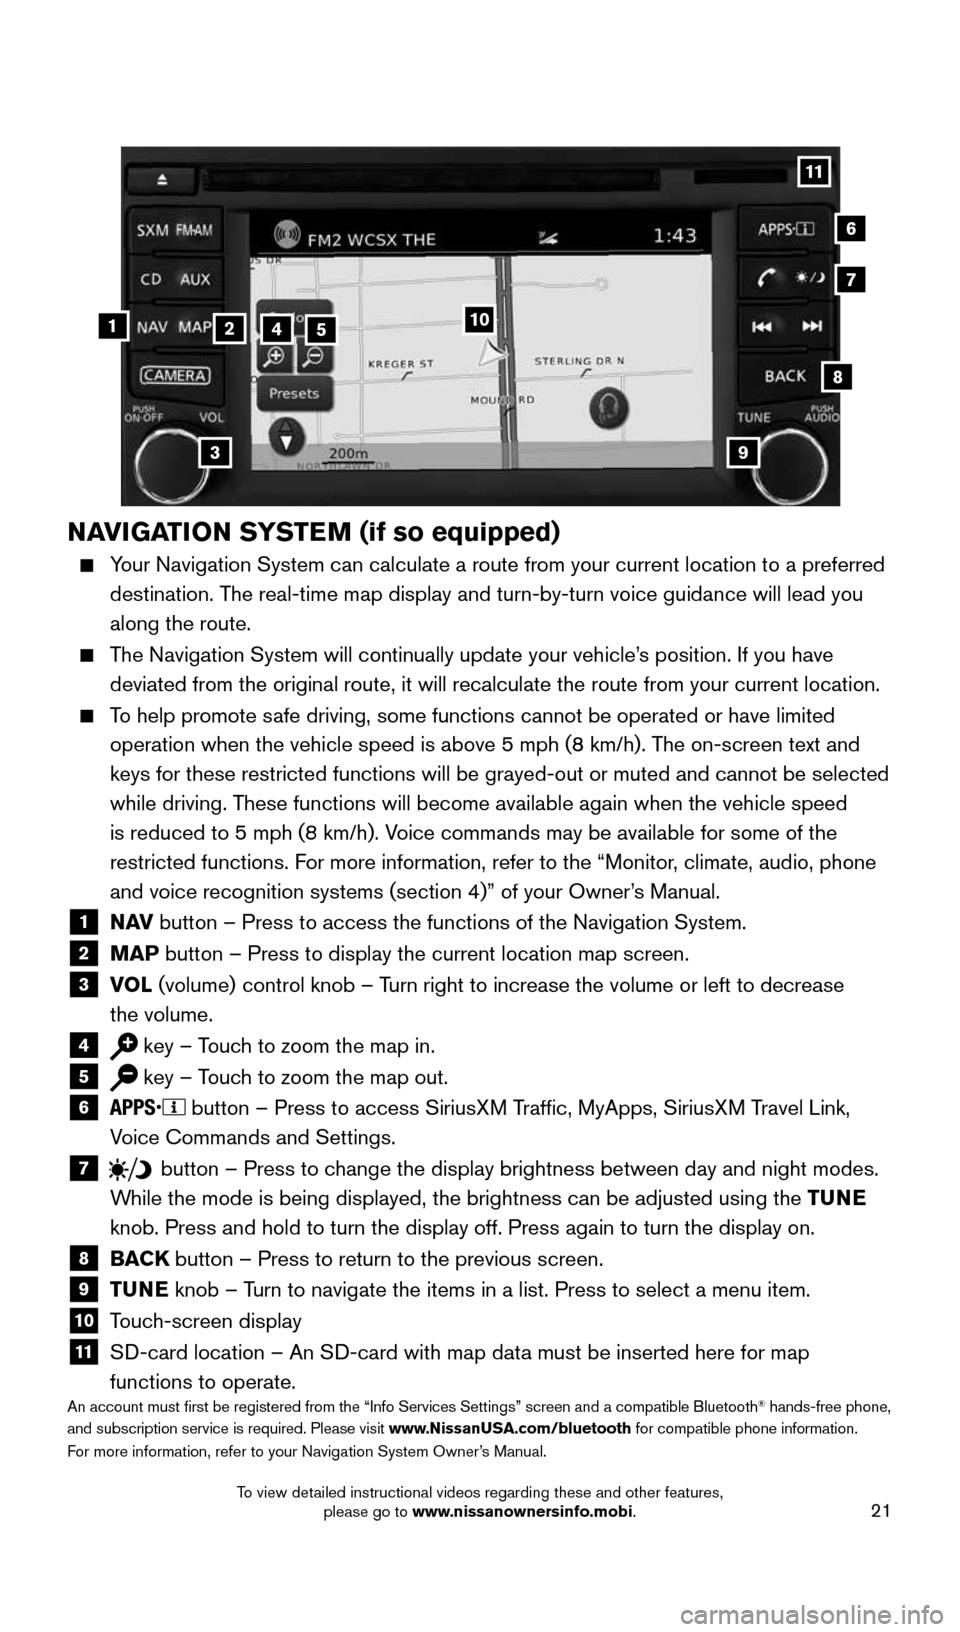
1 N AV
button – Press to access the functions of the Navigation System.2 MAP button – Press to display the current location map screen.3 VOL (volume) control knob – Turn right to increase the volume or left to decrease
the volume.
4 key – Touch to zoom the map in.5 key – Touch to zoom the map out.6
button – Press to access SiriusXM Traffic, MyApps, SiriusXM Travel Link,
Voice Commands and Settings.
7 button
– Press to change the display brightness between day and night modes.
While the mode is being displayed, the brightness can be adjusted using t\
he TUNE
knob. Press and hold to turn the display off. Press again to turn the di\
splay on.
8
BACK button – Press to return to the previous screen.9 TUNE knob – Turn to navigate the items in a list. Press to select a menu item.10 Touch-screen display11 SD-card location – An SD-card with map data must be inserted here for map
functions to operate.
An account must first be registered from the “Info Services Setting\
s” screen and a compatible Bluetooth® hands-free phone,
and subscription service is required. Please visit www.NissanUSA.com/bluetooth for compatible phone information.
For more information, refer to your Navigation System Owner’s Manual.
4
3
6
7
512
8
9
10
11
1938136_16b_Frontier_QRG_012016.indd 211/20/16 5:06 PM
To view detailed instructional videos regarding these and other features, please go to www.nissanownersinfo.mobi.