2016 NISSAN 370Z COUPE key
[x] Cancel search: keyPage 2 of 28
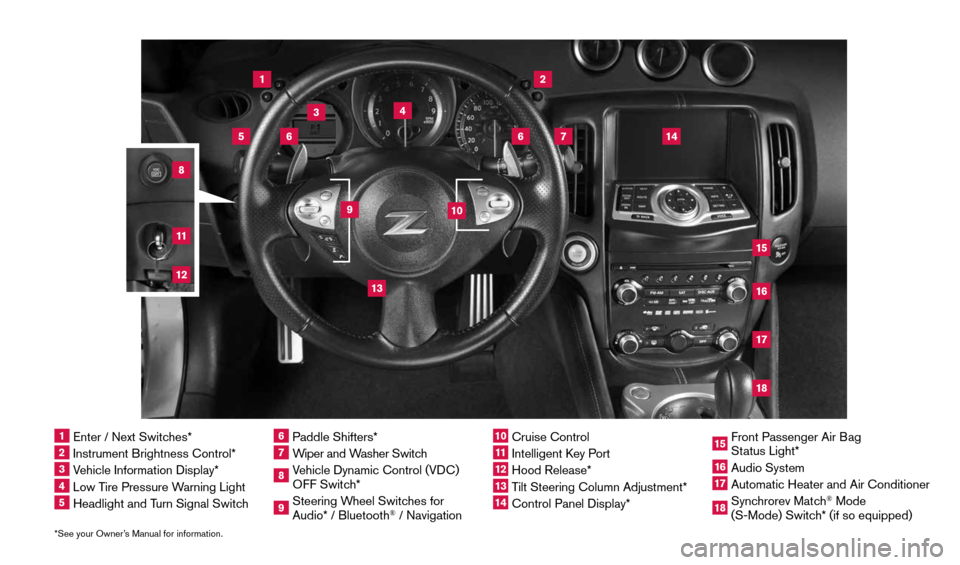
*See your Owner’s Manual for information.1 Enter / Next Switches*2 Instrument Brightness Control*3 Vehicle Information Display*4 Low Tire Pressure Warning Light5 Headlight and Turn Signal Switch
6 Paddle Shifters*7 Wiper and Washer Switch8 Vehicle Dynamic Control (VDC)
OFF Switch* 9 Steering Wheel Switches for
Audio* / Bluetooth
® / Navigation
10 Cruise Control11 Intelligent Key Port 12 Hood Release*13 Tilt Steering Column Adjustment*14 Control Panel Display*
15 Front Passenger Air Bag
Status Light*16 Audio System17 Automatic Heater and Air Conditioner18 Synchrorev Match
® Mode
(S-Mode) Switch* (if so equipped)
2
3
1
4
6
6
15
5
13
16
14
9
7
10
1718
81211
1870658_16_370Z_QRG_012315.indd 41/23/15 12:08 PM
Page 3 of 28
NEW SYSTEM FEATURES
RearView Monitor (if so equipped) ........................................................................\
....................................2
Opening the Soft Top (Roadster models) ........................................................................\
........................ 2
USB (Universal Serial Bus) Connection Port/AUX Jack (if so equipped) and iPod
® Interface ... 2
NavTraffic and NavWeather (if so equipped) ........................................................................\
................... 3
ESSENTIAL INFORMATION
Tire Pressure Monitoring System (TPMS) ........................................................................\
....................... 4
Loose Fuel Cap ........................................................................\
...................................................................... 4
Fuel-filler Door ........................................................................\
........................................................................ 5
Clock Set/Adjustment ........................................................................\
........................................................... 5
Engine Oil Temperature Gauge ........................................................................\
.......................................... 6
Automatic Power Windows ........................................................................\
................................................. 6
FIRST DRIVE FEATURES
NISSAN Intelligent Key® System ........................................................................\
....................................... 7
Rear Hatch/Trunk Lid Release ........................................................................\
............................................ 8
Soft Top Operation (Roadster models) ........................................................................\
............................. 8
Power Seat Adjustments (if so equipped) ........................................................................\
....................... 9
Power Outside Mirror Control Switch ........................................................................\
............................... 9
Starting/Stopping the Engine ........................................................................\
........................................... 10
Headlight Control Switch ........................................................................\
................................................... 10
Wiper and Washer Switch ........................................................................\
................................................. 11
Automatic Heater and Air Conditioner ........................................................................\
............................ 12
FM/AM/SiriusXM
® Satellite Radio with CD/DVD Player (if so equipped) ......................................13
Cruise Control ........................................................................\
...................................................................... 14
SYSTEM GUIDE
Trip Computer ........................................................................\
.......................................................................15
Bluetooth® Streaming Audio with Navigation (if so equipped) ......................................................... 16
Bluetooth® Hands-free Phone System ........................................................................\
........................... 18
• System Operating Tips ........................................................................\
............................................... 18
Bluetooth® System with Navigation (if so equipped) ........................................................................\
.. 18
Bluetooth® System without Navigation (if so equipped) .................................................................... 20
Navigation System (if so equipped) ........................................................................\
................................. 21
HomeLink
® Universal Transceiver (if so equipped) ........................................................................\
...... 23
TAB LE OF CONTE NTS
Please see your Owner’s Manual for important safety information and system operation limitations.
• A cellular telephone should not be used for any purpose while driving
so full attention may be given to vehicle operation.
• Always wear your seat belt.
• Supplemental air bags do not replace proper seat belt usage.
• Children 12 and under should always ride in the rear seat properly secur\
ed
in child restraints or seat belts according to their age and weight.
• Do not drink and drive.
For more information, refer to the “Safety –– Seats, seat belts and supplemental restraint system (section 1)”, the
“Center display, heater, air conditioner, audio, phone and voice recognition systems (section 4)” and the “Starting
and driving (section 5)” of your Owner’s Manual.
Additional information about your vehicle is also available in your Owne\
r’s Manual, Navigation System
Owner’s Manual and at www.nissanusa.com.
1870658_16_370Z_QRG_012315.indd 51/23/15 12:08 PM
Page 4 of 28
2
OPENING THE SOFT TOP (Roadster models)
It is important to make sure the NISSAN Intelligent
Key® is with you (that is, in your pocket or purse).
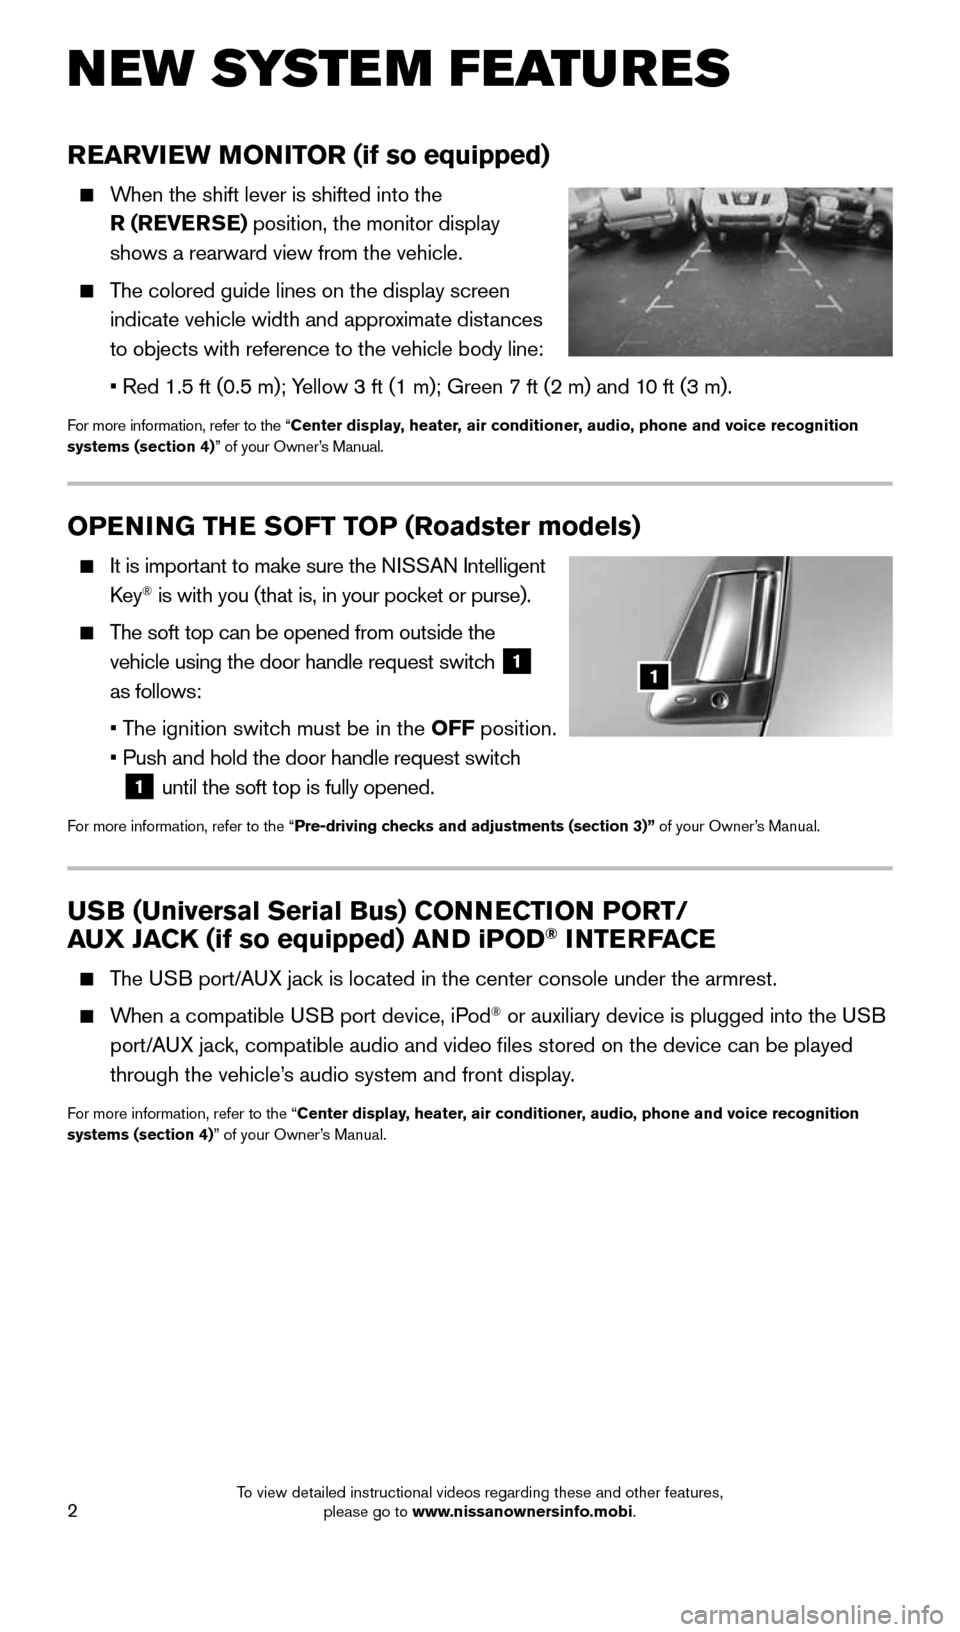
The soft top can be opened from outside the
vehicle using the door handle request switch
1
as follows:
• The ignition switch must be in the OFF position.
• Push and hold the door handle request switch
1 until the soft top is fully opened.
For more information, refer to the “Pre-driving checks and adjustments (section 3)” of your Owner’s Manual.
1
N EW SYSTE M FEATU R ES
REARVIEW MONITOR (if so equipped)
When the shift lever is shifted into the
R (REVERSE) position, the monitor display
shows a rearward view from the vehicle.
The colored guide lines on the display screen
indicate vehicle width and approximate distances
to objects with reference to the vehicle body line:
• Red 1.5 ft (0.5 m); Yellow 3 ft (1 m); Green 7 ft (2 m) and 10 ft (3 m).
For more information, refer to the “Center display, heater, air conditioner, audio, phone and voice recognition
systems (section 4)” of your Owner’s Manual.
USB (Universal Serial Bus) CONNECTION PORT/
AUX JACK (if so equipped) AND iPOD® INTERFACE
The USB port/AUX jack is located in the center console under the armrest.
When a compatible USB port device, iPod® or auxiliary device is plugged into the USB
port/AUX jack, compatible audio and video files stored on the device can be played\
through the vehicle’s audio system and front display.
For more information, refer to the “Center display, heater, air conditioner, audio, phone and voice recognition
systems (section 4)” of your Owner’s Manual.
1870658_16_370Z_QRG_012315.indd 21/23/15 12:08 PM
To view detailed instructional videos regarding these and other features, please go to www.nissanownersinfo.mobi.
Page 7 of 28
5
CLOCK SET/ADJUSTMENT
WITHIN THE TRIPLE METER
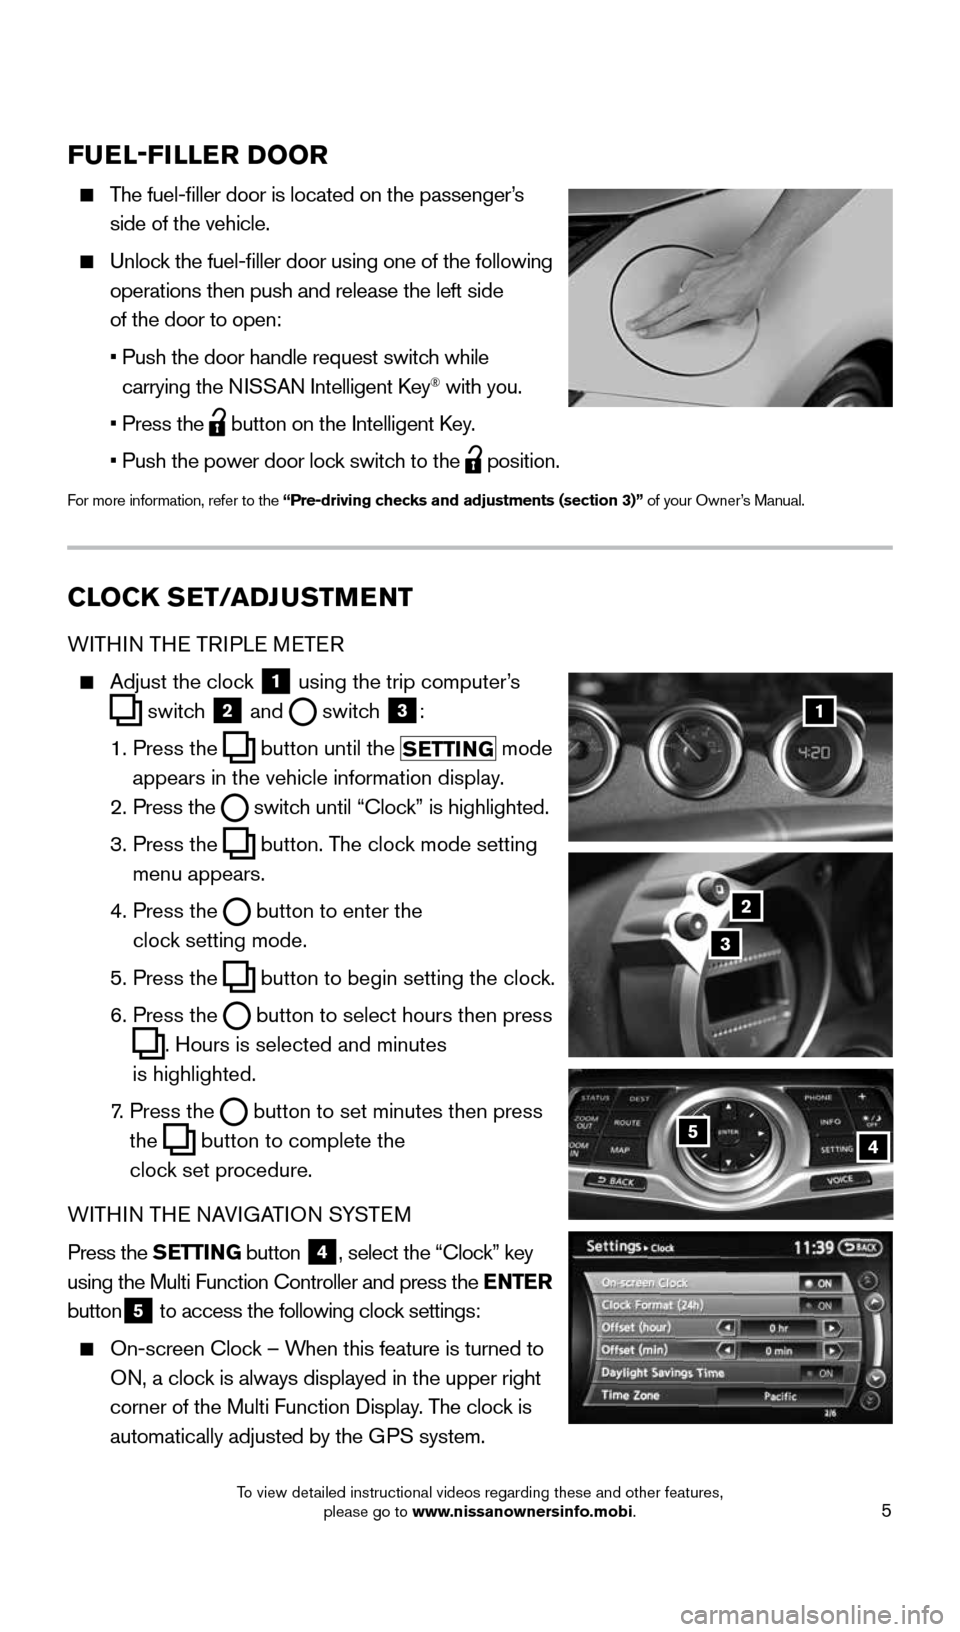
Adjust the clock
1 using the trip computer’s
switch
2 and
switch
3:
1. Press the
button
until the
SETTING mode
appears in the vehicle information display.
2. Press the
switch
until “Clock” is highlighted.
3. Press the
button. The clock mode setting
menu appears.
4. Press the
button
to enter the
clock setting mode.
5. Press the
button
to begin setting the clock.
6. Press the
button
to select hours then press
. Hours is selected and minutes
is highlighted.
7. Press the
button
to set minutes then press
the
button to complete the
clock set procedure.
WITHIN THE NAVIGATION SYSTEM
Press the SETTING button
4, select the “Clock” key
using the Multi Function Controller and press the ENTER
button
5 to access the following clock settings:
On-screen Clock – When this feature is turned to
ON, a clock is always displayed in the upper right
corner of the Multi Function Display. The clock is
automatically adjusted by the GPS system.
1
2
3
FUEL-FILLER DOOR
The fuel-filler door is located on the passenger’s
side of the vehicle.
Unlock the fuel-filler door using one of the following
operations then push and release the left side
of the door to open:
• Push the door handle request switch while
carrying the NISSAN Intelligent Key
® with you.
• Press the
button on the Intelligent Key.
• Push the power door lock switch to the
position.
For more information, refer to the “Pre-driving checks and adjustments (section 3)” of your Owner’s Manual.
54
1870658_16_370Z_QRG_012315.indd 51/23/15 12:08 PM
To view detailed instructional videos regarding these and other features, please go to www.nissanownersinfo.mobi.
Page 9 of 28
7
FI RST DR IVE FEATU R ES
NISSAN INTELLIGENT KEY® SYSTE M
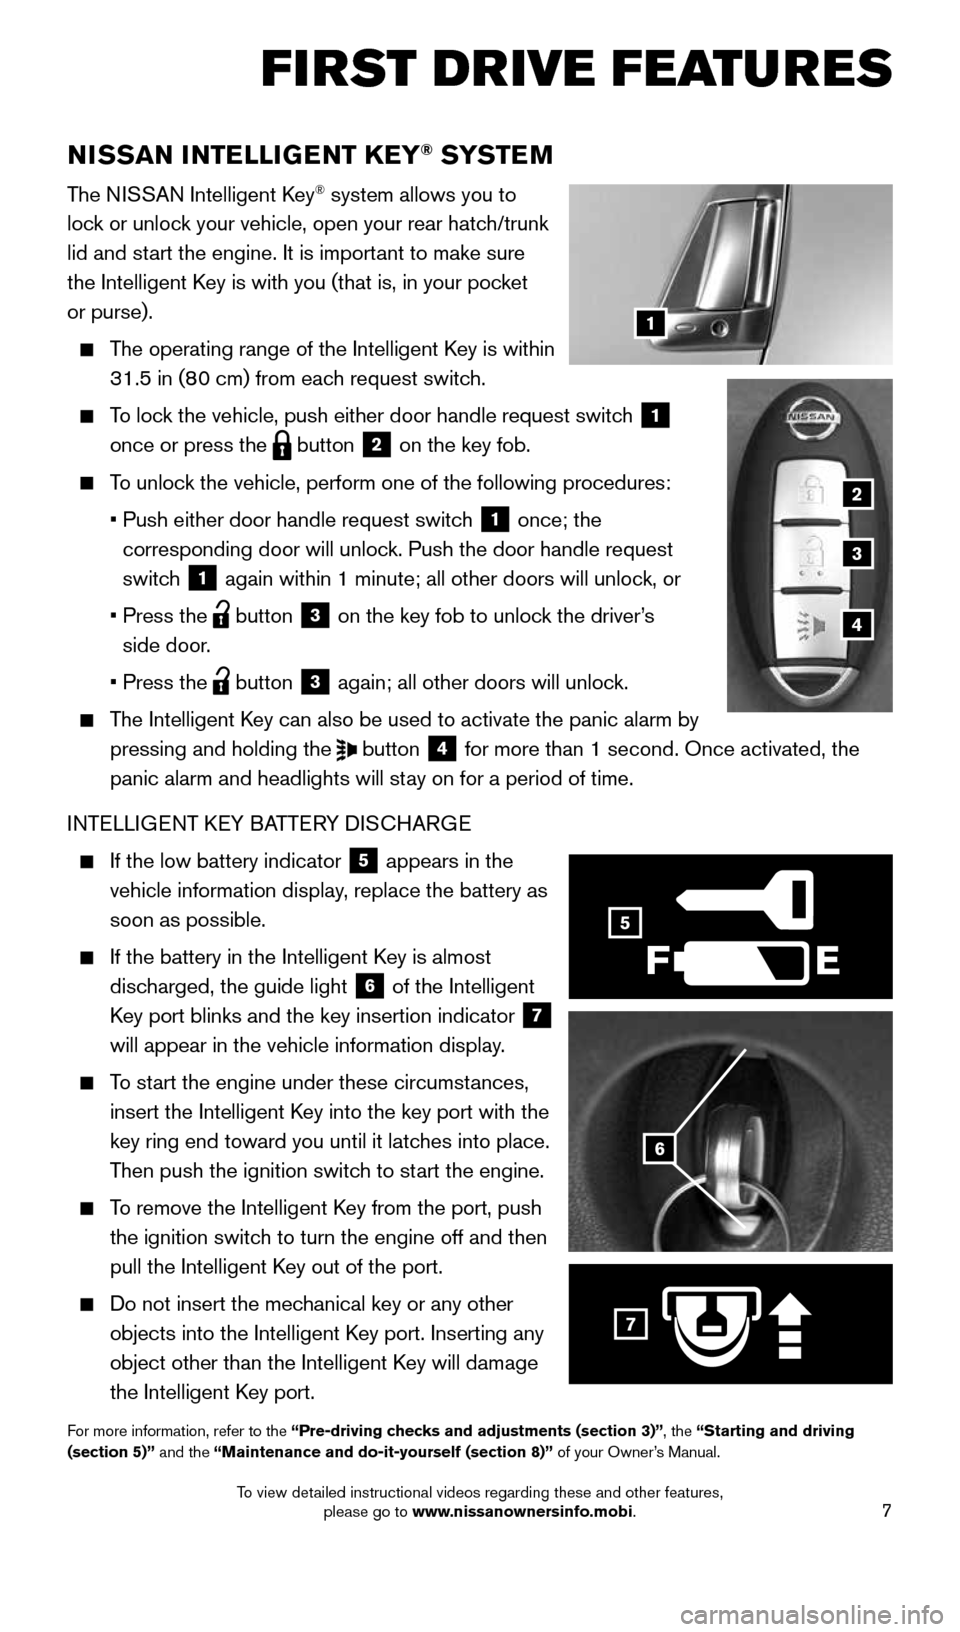
The NISSAN Intelligent Key® system allows you to
lock or unlock your vehicle, open your rear hatch/trunk
lid and start the engine. It is important to make sure
the Intelligent Key is with you (that is, in your pocket
or purse).
The operating range of the Intelligent Key is within
31.5 in (80 cm) from each request switch.
To lock the vehicle, push either door handle request switch
1
once or press the
button
2 on the key fob.
To unlock the vehicle, perform one of the following procedures:
• Push either door handle request switch
1 once; the
corresponding door will unlock. Push the door handle request
switch
1 again within 1 minute; all other doors will unlock, or
• Press the
button
3 on the key fob to unlock the driver’s
side door.
• Press the
button 3 again; all other doors will unlock.
The Intelligent Key can also be used to activate the panic alarm by
pressing and holding the
button
4 for more than 1 second. Once activated, the
panic alarm and headlights will stay on for a period of time.
INTELLIGENT KEY BATTERY DISCHARGE
If the low battery indicator
5 appears in the
vehicle information display, replace the battery as
soon as possible.
If the battery in the Intelligent Key is almost
discharged, the guide light
6 of the Intelligent
Key port blinks and the key insertion indicator 7
will appear in the vehicle information display.
To start the engine under these circumstances,
insert the Intelligent Key into the key port with the
key ring end toward you until it latches into place.
Then push the ignition switch to start the engine.
To remove the Intelligent Key from the port, push
the ignition switch to turn the engine off and then
pull the Intelligent Key out of the port.
Do not insert the mechanical key or any other
objects into the Intelligent Key port. Inserting any
object other than the Intelligent Key will damage
the Intelligent Key port.
For more information, refer to the “Pre-driving checks and adjustments (section 3)”, the “Starting and driving
(section 5)” and the “Maintenance and do-it-yourself (section 8)” of your Owner’s Manual.
6
F
5
7
2
3
4
1
1870658_16_370Z_QRG_012315.indd 71/23/15 12:08 PM
To view detailed instructional videos regarding these and other features, please go to www.nissanownersinfo.mobi.
Page 10 of 28
8
FI RST DR IVE FEATU R ES
REAR HATCH/TRUNK LID RELEASE
It is important to make sure the NISSAN Intelligent
Key® is with you (that is, in your pocket or purse).
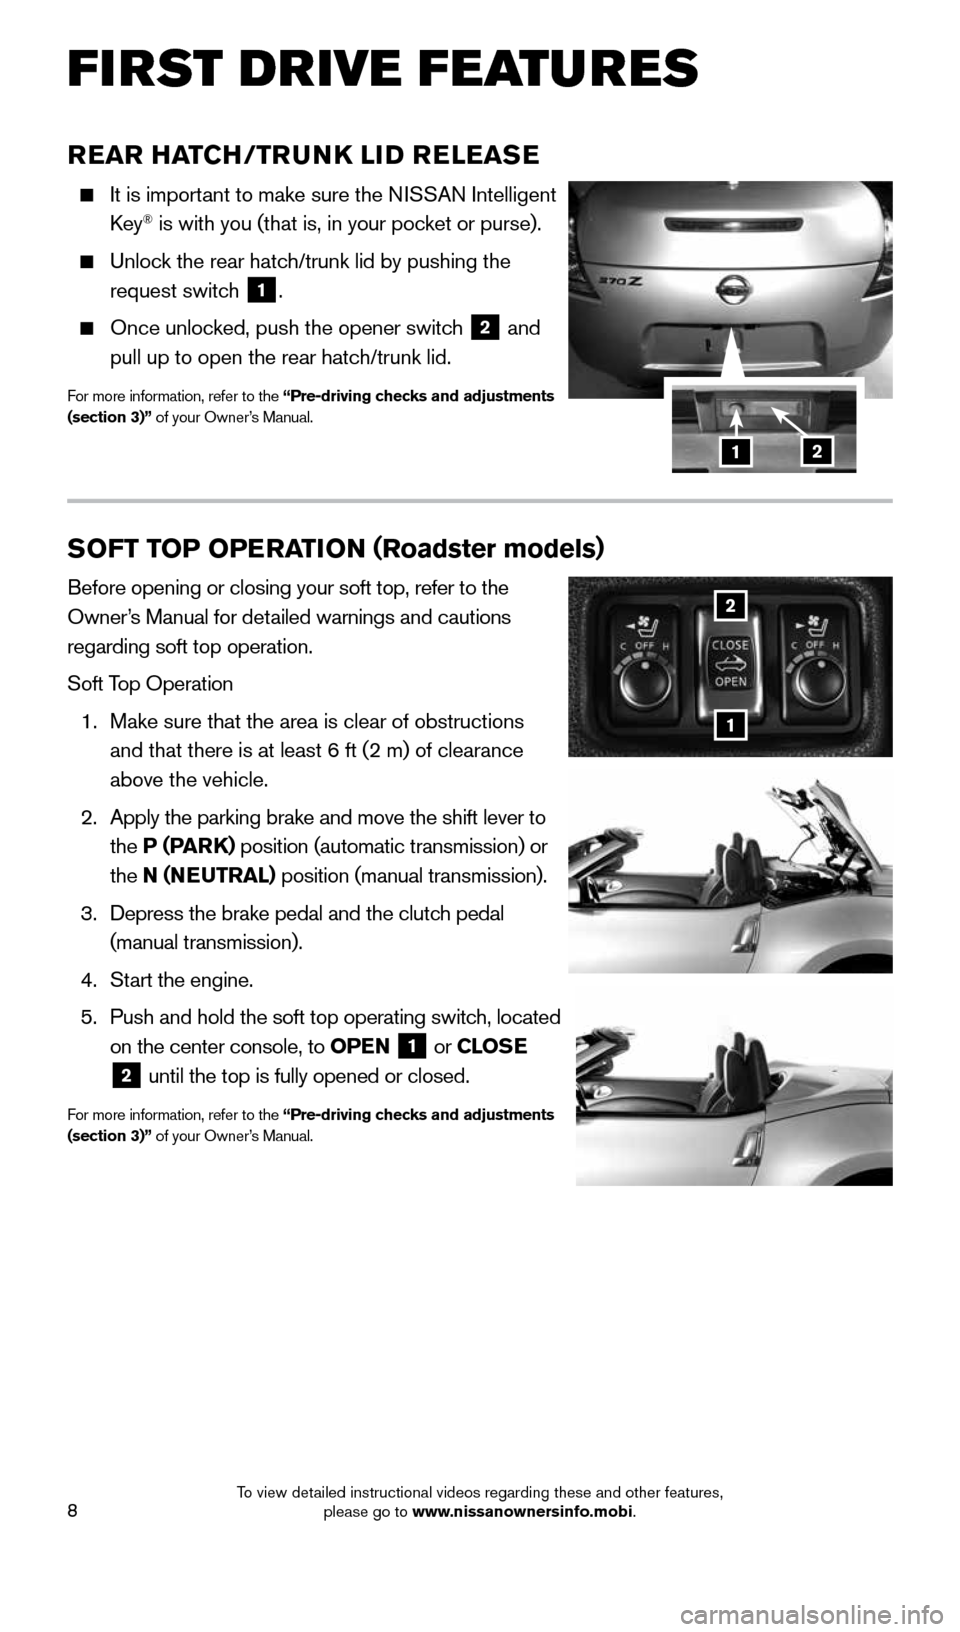
Unlock the rear hatch/trunk lid by pushing the
request switch
1.
Once unlocked, push the opener switch
2 and
pull up to open the rear hatch/trunk lid.
For more information, refer to the “Pre-driving checks and adjustments
(section 3)” of your Owner’s Manual.
12
SOFT TOP OPERATION ( Roadster models)
Before opening or closing your soft top, refer to the
Owner’s Manual for detailed warnings and cautions
regarding soft top operation.
Soft Top Operation
1. Make sure that the area is clear of obstructions
and that there is at least 6 ft (2 m) of clearance
above the vehicle.
2. Apply the parking brake and move the shift lever to
the P (PARK) position (automatic transmission) or
the N (NEUTRAL) position (manual transmission).
3. Depress the brake pedal and the clutch pedal
(manual transmission).
4. Start the engine.
5. Push and hold the soft top operating switch, located
on the center console, to OPEN
1 or
CLOSE
2 until the top is fully opened or closed.
For more information, refer to the “Pre-driving checks and adjustments
(section 3)” of your Owner’s Manual.
1
2
1870658_16_370Z_QRG_012315.indd 81/23/15 12:08 PM
To view detailed instructional videos regarding these and other features, please go to www.nissanownersinfo.mobi.
Page 12 of 28
10
FI RST DR IVE FEATU R ES
STARTING/STOPPING THE ENGINE
It is important to make sure the NISSAN Intelligent
Key® is with you (that is, in your pocket or purse).
AUTOMATIC TRANSMISSION (if so equipped)
Depress the brake pedal.
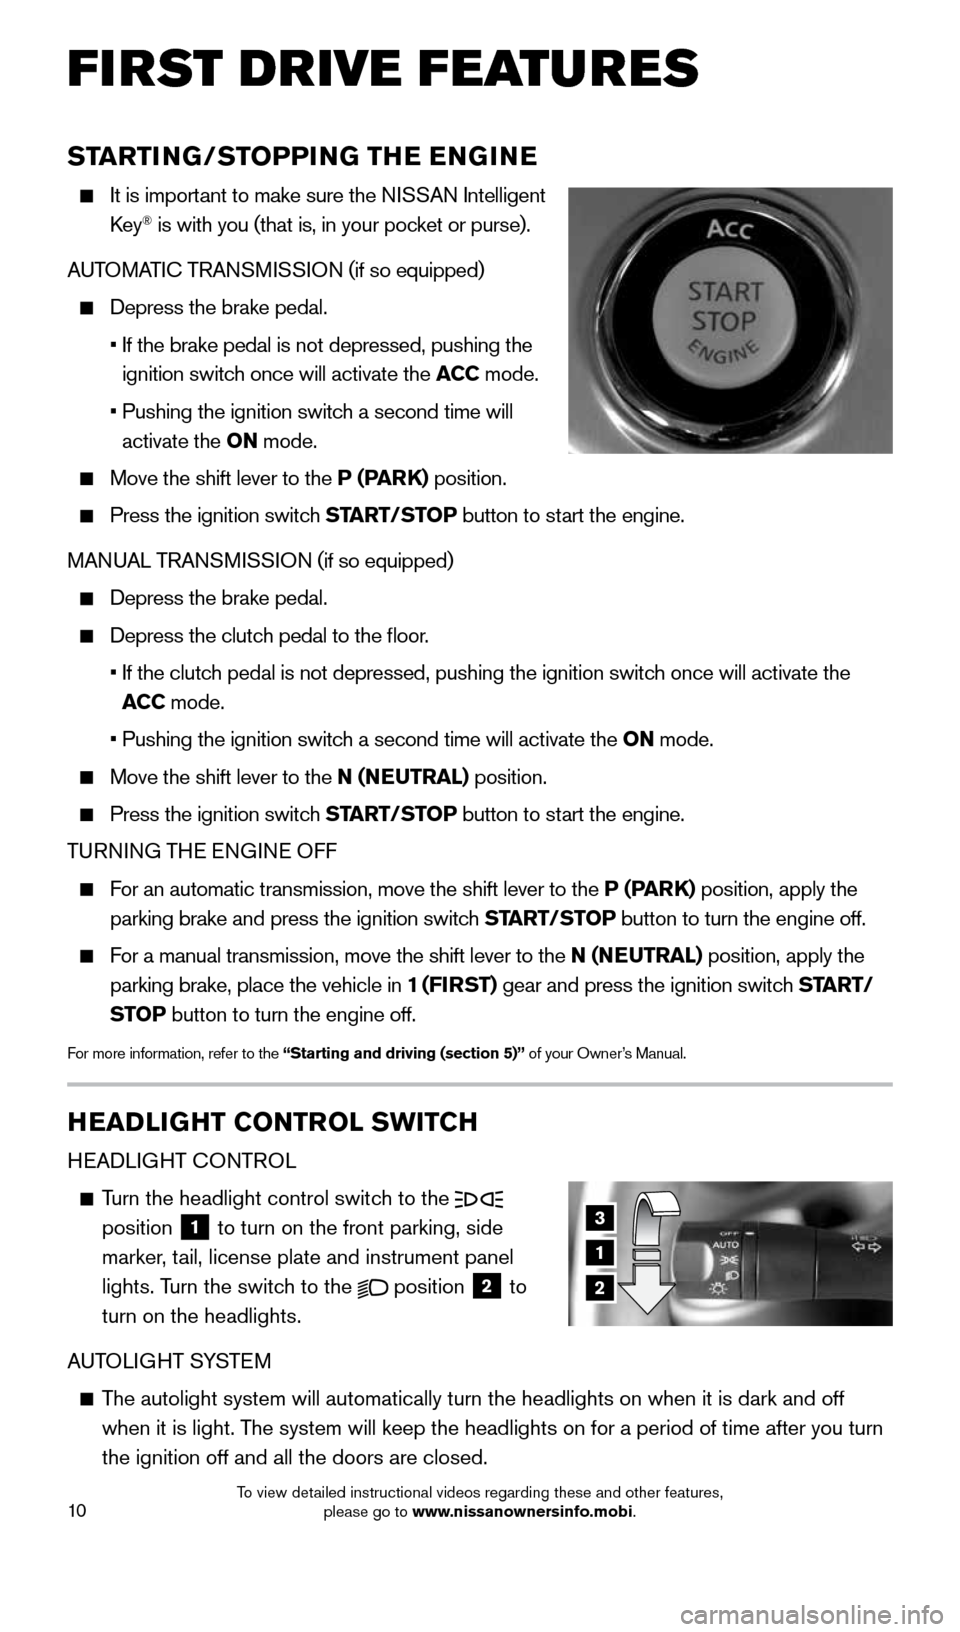
• If the brake pedal is not depressed, pushing the
ignition switch once will activate the ACC mode.
• Pushing the ignition switch a second time will
activate the ON mode.
Move the shift lever to the P (PARK) position.
Press the ignition switch START/STOP button to start the engine.
MANUAL TRANSMISSION (if so equipped)
Depress the brake pedal.
Depress the clutch pedal to the floor.
• If the clutch pedal is not depressed, pushing the ignition switch once will activate the
ACC mode.
• Pushing the ignition switch a second time will activate the ON mode.
Move the shift lever to the N (NEUTRAL) position.
Press the ignition switch START/STOP button to start the engine.
TURNING THE ENGINE OFF
For an automatic transmission, move the shift lever to the P (PARK) position, apply the
parking brake and press the ignition switch START/STOP button to turn the engine off.
For a manual transmission, move the shift lever to the N (NEUTRAL) position, apply the
parking brake, place the vehicle in 1 (FIRST) gear and press the ignition switch START/
STOP button to turn the engine off.
For more information, refer to the “Starting and driving (section 5)” of your Owner’s Manual.
3
1
2
HEADLIGHT CONTROL SWITCH
HEADLIGHT CONTROL
Turn the headlight control switch to the
position 1 to turn on the front parking, side
marker, tail, license plate and instrument panel
lights. Turn the switch to the
position
2 to
turn on the headlights.
AUTOLIGHT SYSTEM
The autolight system will automatically turn the headlights on when it is\
dark and off
when it is light. The system will keep the headlights on for a period of time after you tur\
n
the ignition off and all the doors are closed.
1870658_16_370Z_QRG_012315.indd 101/23/15 12:08 PM
To view detailed instructional videos regarding these and other features, please go to www.nissanownersinfo.mobi.
Page 19 of 28
17
FOR DEVICES OTHER THAN PHONES
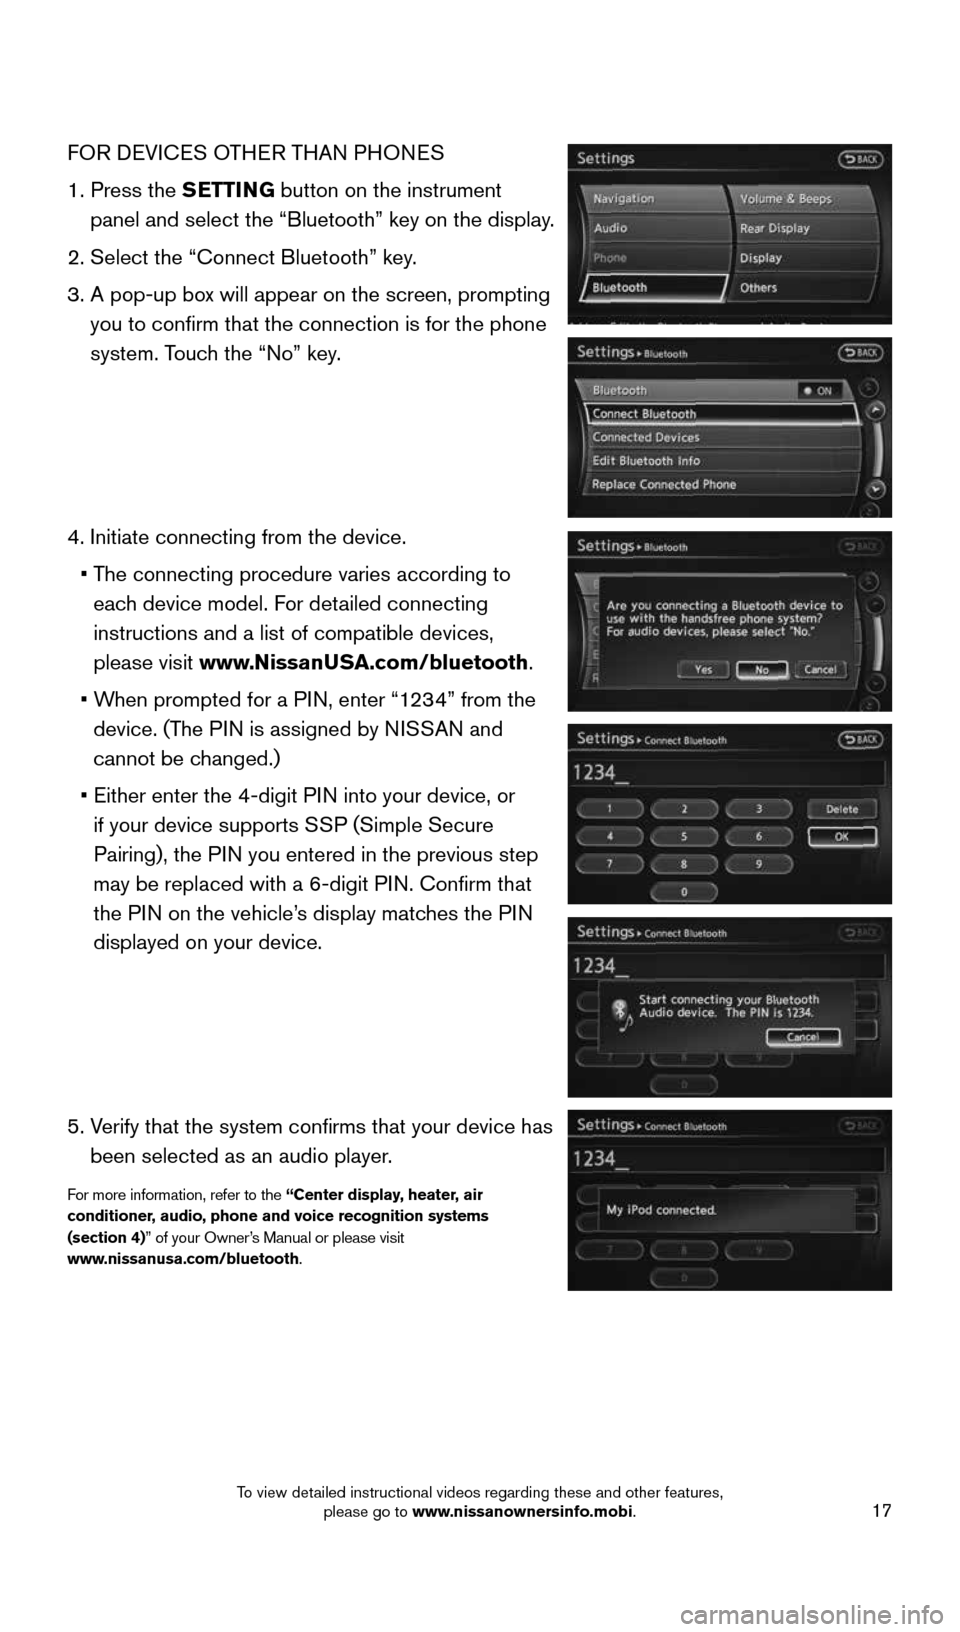
1. Press the SETTING button on the instrument
panel and select the “Bluetooth” key on the display.
2. Select the “Connect Bluetooth” key.
3. A pop-up box will appear on the screen, prompting
you to confirm that the connection is for the phone
system. Touch the “No” key.
4. Initiate connecting from the device.
• The connecting procedure varies according to
each device model. For detailed connecting
instructions and a list of compatible devices,
please visit www.NissanUSA.com/bluetooth.
• When prompted for a PIN, enter “1234” from the
device. (The PIN is assigned by NISSAN and
cannot be changed.)
• Either enter the 4-digit PIN into your device, or
if your device supports SSP (Simple Secure
Pairing), the PIN you entered in the previous step
may be replaced with a 6-digit PIN. Confirm that
the PIN on the vehicle’s display matches the PIN
displayed on your device.
5. Verify that the system confirms that your device has
been selected as an audio player.
For more information, refer to the “Center display, heater, air
conditioner, audio, phone and voice recognition systems
(section 4)” of your Owner’s Manual or please visit
www.nissanusa.com/bluetooth.
1870658_16_370Z_QRG_012315.indd 171/23/15 12:08 PM
To view detailed instructional videos regarding these and other features, please go to www.nissanownersinfo.mobi.