2016 MITSUBISHI OUTLANDER SPORT transmission
[x] Cancel search: transmissionPage 229 of 398

HomeLink® Wireless Control System (if so equipped)
Features and controls 5-167
5
4. Press the HomeLink
® button that was just
programmed and observe the indicatorlight. • If the indicator light continuously illumi- nates green, programming is completeand your device should operate when the HomeLink
® button is pressed and
released.• If the indicator light rapidly flashesgreen, firmly press, hold for 2 seconds and release the programmed HomeLink
®
button. Repeat the “press/hold/release” sequence a second time, and, depending on the brand of the garage door opener (or other rolling code equipped device),repeat this sequence a third time to com- plete the programming process. At this point if your device operates, program-ming is complete.
• If the device does not operate, continue with “Programming a new HomeLink
®”
steps 5 to 7 to complete the program- ming of a rolling code equipped device.
5. At the garage door opener receiver (motor-head unit) in the garage, locate the “Learn” or “Smart” button. This can usu-ally be found where the hanging antenna wire is attached to the motor-head unit (see the garage door opener manual toidentify the “Learn” button.)6. Firmly press and release the “Learn” or “Smart” button. (The name and color of the button may vary by manufacturer.)There are typically 30 seconds to initiate step 7. 7. Return to the vehicle and firmly press,hold for 2 seconds and release the pro- grammed HomeLink
® button. Repeat the
“press/hold/release” sequence a secondtime, and, depending on the brand of the garage door opener (or other rolling code equipped device), repeat this sequence athird time to complete the programming process. HomeLink
® should now activate your
rolling code equipped device.
N00584800034
Canadian radio-frequency laws require trans-mitter signals to “time-out” (or quit) after several seconds of transmission - which may not be long enough for HomeLink
® to pick
up the signal during programming. Similar tothis Canadian law, some U.S. gate operators are designed to “time-out” in the same man- ner.The indicator LED on the hand-held transmit- ter will go off when the device times out indi- cating that it has finished transmitting.If you live in Canada
or you are having diffi-
culties programming a gate operator or garage door opener by using the “Program-ming” procedures, replace “Programming a new HomeLink
®” step 3 with the following:
NOTE
Some devices may require you to replace this “Programming a new HomeLink
®” step 3
with procedures noted in the “Gate operator / Canadian programming” section. If the indi- cator light does not change to rapidly flash-ing green or continuously lit green after performing these steps, contact HomeLink
®
at www.homelink.com
NOTE
In the event that there are still programming difficulties or questions, additional Home- Link
® information and programming videos
can be found online at www.homelink.com, www.youtube.com/HomeLinkGentex, or by calling the HomeLink
® Hotline.
Gate operator/Canadian pro- gramming
BK0229600US.book
167 ページ 2015年10月1日 木曜日 午後2時29分
Page 248 of 398
Parking 6-6 Driving safety
6
On snowy roads, ice can form on the braking system, making the brakes less effective.While driving in such
conditions, pay close
attention to preceding and following vehicles and to the condition of
the road surface. From
time to time, lightly depress the brake pedal and check how effective the brakes are. It is important to take advantage of the engine braking by downshifting while driving on steep downhill roads in order to prevent the brakes from overheating.
N00629600304
When parking on a hill, set the parking brake,and turn the front wheels toward the curb on adownhill, or away from the curb on an uphill. If necessary, apply chocks to wheels.
Place the gearshift lever into the “R” (Reverse) position when parking on a down- hill slope, into the 1st position when parkingon an uphill slope. Be sure that the parking brake is firmly set when parked and that the selector lever is in the “P” (PARK) position. When parking on a hill, it is important to setthe parking brake before moving the selector lever to the “P” (PARK) position. This pre- vents loading the parking brake against thetransaxle. When this happens, it is difficult to move the selector lever out of the “P” (PARK) position. Never leave the engi
ne running while you
take a short sleep or rest. Also, never leave the engine running in a closed or poorly ven- tilated place.
Your front bumper can be damaged if you scrape it over curbs or parking stop blocks.Be careful when traveling up or down steep slopes where your bumper can scrape the road. More effort could be required to turn the steering wheel. Refer to “Electric power steering system (EPS)” on page 5-69.
When driving in cold weather When driving downhill Parking Parking on a hill
For vehicles equipped with man- ual transaxle For vehicles equipped with contin- uously variable transmission (CVT) Parking with the engine run- ning
WA R N I N G Leaving the engine running risks injury or death from accidentally moving the gear- shift lever (manual transaxle) or the selec- tor lever (CVT) or from the accumulation of toxic exhaust fumes in the passengercompartment.
Where you park
WA R N I N G Do not park your vehicle in areas where combustible materials such as dry grass or leaves can come in contact with a hotexhaust, since a fire could occur.
Do not keep the steering wheel fully turned for a long time
BK0229600US.bo
ok 6 ページ 2015年10月1日 木曜日 午後2時29分
Page 319 of 398
General information about your radio
Comfort controls 7-63
7
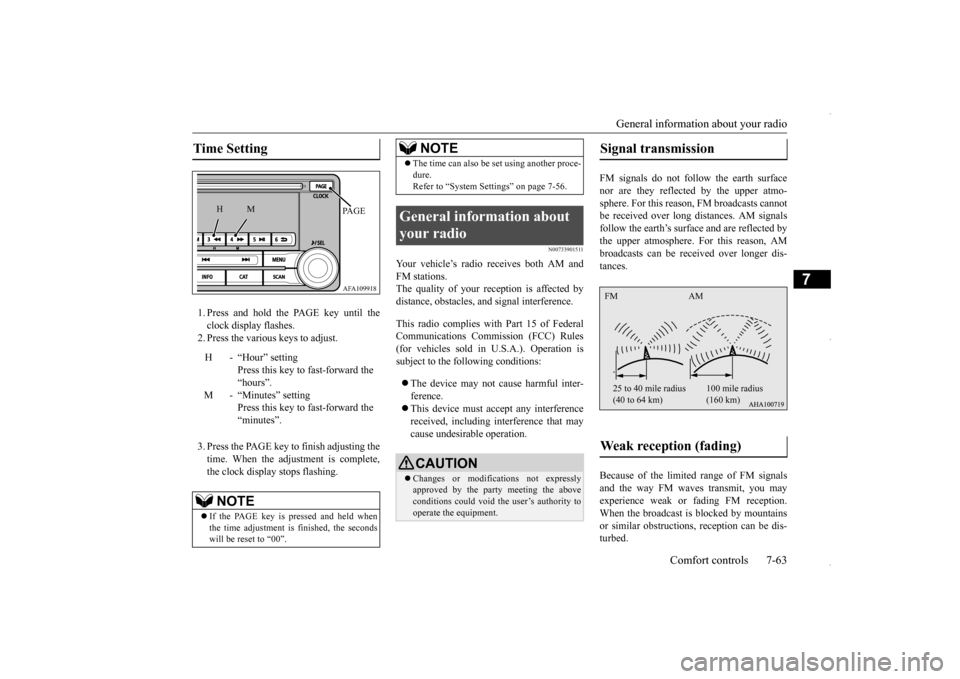
1. Press and hold the PAGE key until the clock display flashes.2. Press the various keys to adjust. 3. Press the PAGE key to finish adjusting the time. When the adjustment is complete, the clock display stops flashing.
N00733901511
Your vehicle’s radio receives both AM and FM stations. The quality of your reception is affected bydistance, obstacles, and signal interference. This radio complies with Part 15 of Federal Communications Commission (FCC) Rules (for vehicles sold in U.S.A.). Operation issubject to the following conditions: The device may not cause harmful inter- ference. This device must accept any interference received, including interference that may cause undesirable operation.
FM signals do not follow the earth surface nor are they reflected by the upper atmo-sphere. For this reason, FM broadcasts cannot be received over long distances. AM signals follow the earth’s surface and are reflected bythe upper atmosphere. For this reason, AM broadcasts can be received over longer dis- tances. Because of the limited range of FM signals and the way FM waves transmit, you may experience weak or fading FM reception.When the broadcast is blocked by mountains or similar obstructions, reception can be dis- turbed.
Time Setting
H - “Hour” setting
Press this key to fast-forward the“hours”.
M - “Minutes” setting
Press this key to fast-forward the “minutes”.
NOTE
If the PAGE key is pressed and held when the time adjustment is finished, the seconds will be reset to “00”.
AFA109918PA G E
M
H
The time can also be set using another proce- dure. Refer to “System Settings” on page 7-56.
General information about your radio
CAUTION Changes or modifications not expressly approved by the party meeting the above conditions could void the user’s authority to operate the equipment.NOTE
Signal transmission Weak reception (fading) FM AM 25 to 40 mile radius (40 to 64 km)
100 mile radius (160 km)
BK0229600US.bo
ok 63 ページ 2015年10月1日 木曜日 午後2時29分
Page 326 of 398
How to change a tire 8-6 For emergencies
8
N00836901832
Before changing a tire, first stop your vehicle in a safe, flat location. 1. Park the vehicle on level and stable ground. 2. Set the parking brake firmly.3. On vehicles equipped with manual trans- axle, stop the engine and move the gear- shift lever to the “R” (Reverse) position.On vehicles equipped with continuously variable transmission (CVT), move the selector lever to the “P” (PARK) position,and stop the engine. 4. Turn on the hazard flashers and set up a warning triangle, flashing signal light,etc., at an adequate distance from the vehicle, and have all your passengers leave the vehicle.
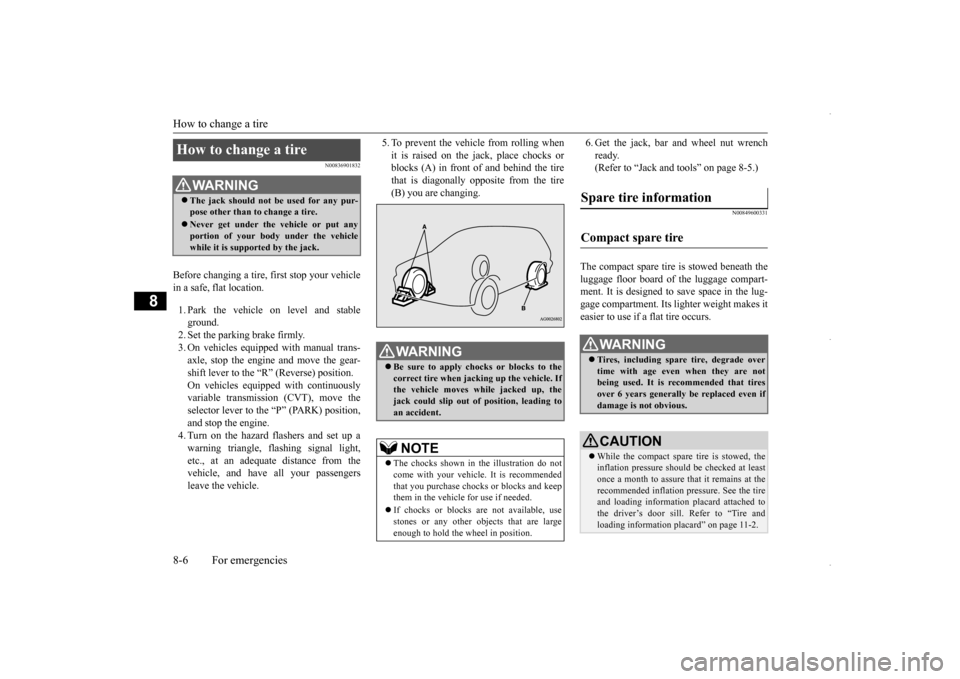
5. To prevent the vehicle from rolling when it is raised on the jack, place chocks or blocks (A) in front of and behind the tire that is diagonally opposite from the tire(B) you are changing.
6. Get the jack, bar and wheel nut wrench ready. (Refer to “Jack and tools” on page 8-5.)
N00849600331
The compact spare tire is stowed beneath the luggage floor board of the luggage compart- ment. It is designed to save space in the lug- gage compartment. Its lighter weight makes iteasier to use if a flat tire occurs.
How to change a tire
WA R N I N G The jack should not be used for any pur- pose other than to change a tire. Never get under the vehicle or put any portion of your body under the vehicle while it is supported by the jack.
WA R N I N G Be sure to apply chocks or blocks to the correct tire when jacking up the vehicle. Ifthe vehicle moves while jacked up, the jack could slip out of position, leading to an accident.NOTE
The chocks shown in the illustration do not come with your vehicle. It is recommended that you purchase chocks or blocks and keepthem in the vehicle for use if needed. If chocks or blocks are not available, use stones or any other objects that are large enough to hold the wheel in position.
Spare tire information Compact spare tire
WA R N I N G Tires, including spare tire, degrade over time with age even when they are not being used. It is recommended that tires over 6 years generally be replaced even ifdamage is not obvious.CAUTION While the compact spare tire is stowed, the inflation pressure should be checked at least once a month to assure that it remains at the recommended inflation pressure. See the tireand loading information placard attached to the driver’s door sill. Refer to “Tire and loading information placard” on page 11-2.
BK0229600US.bo
ok 6 ページ 2015年10月1日 木曜日 午後2時29分
Page 333 of 398
Towing
For emergencies 8-13
8
Set the gearshift lever to the “N” (Neutral) position. Secure the steering wheel in a straight-aheadposition with a rope or tie-down strap.
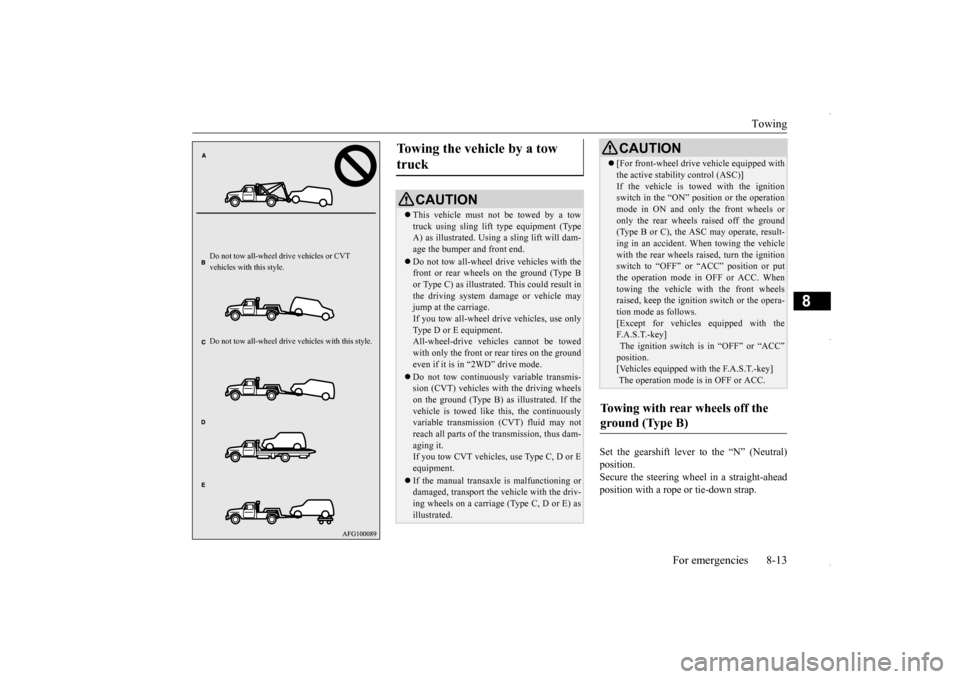
Do not tow all-wheel dr
ive vehicles or CVT
vehicles with this style. Do not tow all-whee
l drive vehicles with this style.
Towing the vehicle by a tow truck
CAUTION This vehicle must not be towed by a tow truck using sling lift type equipment (TypeA) as illustrated. Using a sling lift will dam- age the bumper and front end. Do not tow all-wheel dr
ive vehicles with the
front or rear wheels on the ground (Type B or Type C) as illustrated. This could result inthe driving system damage or vehicle may jump at the carriage. If you tow all-wheel drive vehicles, use onlyType D or E equipment. All-wheel-drive vehicles cannot be towed with only the front or rear tires on the groundeven if it is in “2WD” drive mode. Do not tow continuously variable transmis- sion (CVT) vehicles with the driving wheels on the ground (Type B) as illustrated. If the vehicle is towed like this, the continuouslyvariable transmission (CVT) fluid may not reach all parts of the transmission, thus dam- aging it.If you tow CVT vehicles, use Type C, D or E equipment. If the manual transaxle is malfunctioning or damaged, transport the vehicle with the driv-ing wheels on a carriage (Type C, D or E) as illustrated.
[For front-wheel drive vehicle equipped with the active stability control (ASC)] If the vehicle is towed with the ignition switch in the “ON” position or the operation mode in ON and only the front wheels oronly the rear wheels raised off the ground (Type B or C), the ASC may operate, result- ing in an accident. When towing the vehiclewith the rear wheels raised, turn the ignition switch to “OFF” or “ACC” position or put the operation mode in OFF or ACC. Whentowing the vehicle with the front wheels raised, keep the ignition switch or the opera- tion mode as follows.[Except for vehicles equipped with the F. A . S . T. - k e y ] The ignition switch is in “OFF” or “ACC”position. [Vehicles equipped with the F.A.S.T.-key] The operation mode is in OFF or ACC.
Towing with rear wheels off the ground (Type B)
CAUTION
BK0229600US.bo
ok 13 ページ 2015年10月1日 木曜日 午後2時29分
Page 337 of 398
9
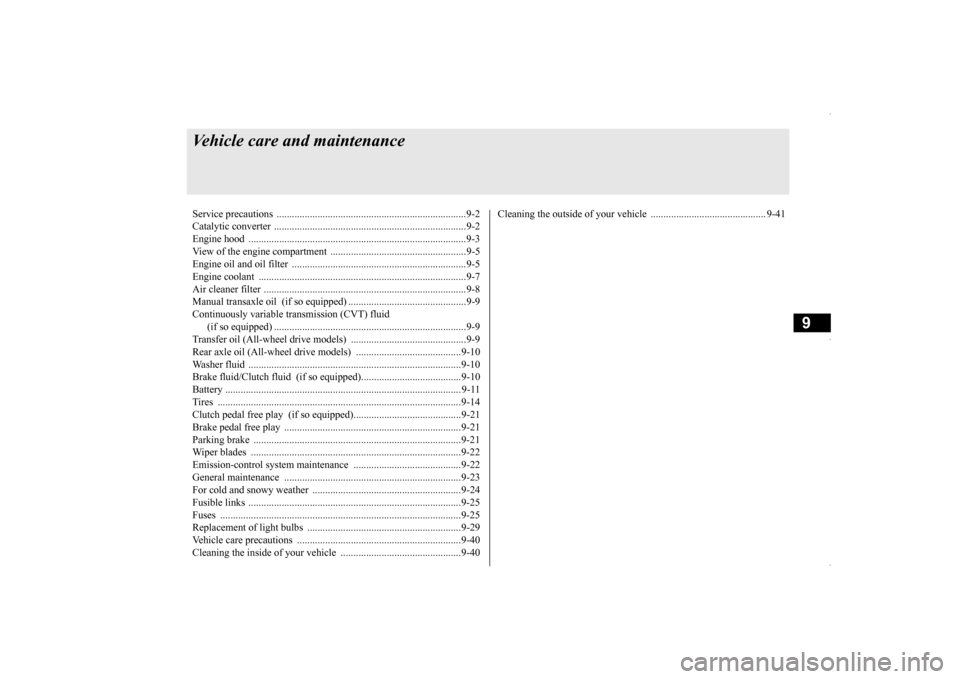
Vehicle care and maintenanceService precautions .........
.................................................................9-2
Catalytic converter
.................................................
..........................9-2
Engine hood ..............................
.......................................................9-3
View of the engine comp
artment .....................................................9-5
Engine oil and oil filt
er ................................
....................................9-5
Engine coolant ................
.................................................................9-7
Air cleaner filter ....
.................................................
..........................9-8
Manual transaxle oil (if so
equipped) ..............................................9-9
Continuously variable transmission (CVT) fluid (if so equipped)
.................................................
..........................9-9
Transfer oil (All-wheel dr
ive models) .............................................9-9
Rear axle oil (All-wheel dr
ive models) .........................................9-10
Washer fluid ....................
...............................................................9-10
Brake fluid/Clutch fluid (if so equipped).......................................9-10 Battery .......................................
..................................................... 9-11
Tires ..........................................
.....................................................9-14
Clutch pedal free play (if so equipped)..........................................9-21 Brake pedal free play
.............................................
........................9-21
Parking brake ..................
...............................................................9-21
Wiper blades ...................
...............................................................9-22
Emission-control system maintenance ..........................................9-22 General maintenance
.............................................
........................9-23
For cold and snowy weat
her ..........................................................9-24
Fusible links ....................
...............................................................9-25
Fuses .........................................
.....................................................9-25
Replacement of light bu
lbs ............................................................9-29
Vehicle care precautions
........................................
........................9-40
Cleaning the inside of your
vehicle ...............................................9-40
Cleaning the outside of your
vehicle ............................................. 9-41
BK0229600US.bo
ok 1 ページ 2015年10月1日 木曜日 午後2時29分
Page 345 of 398
Manual transaxle oil (if so equipped) Vehicle care and maintenance 9-9
9
5. Put the duct and upper cover back on in its original position. For details, refer to “Removing and installing the upper cover and duct” on page 9-11.
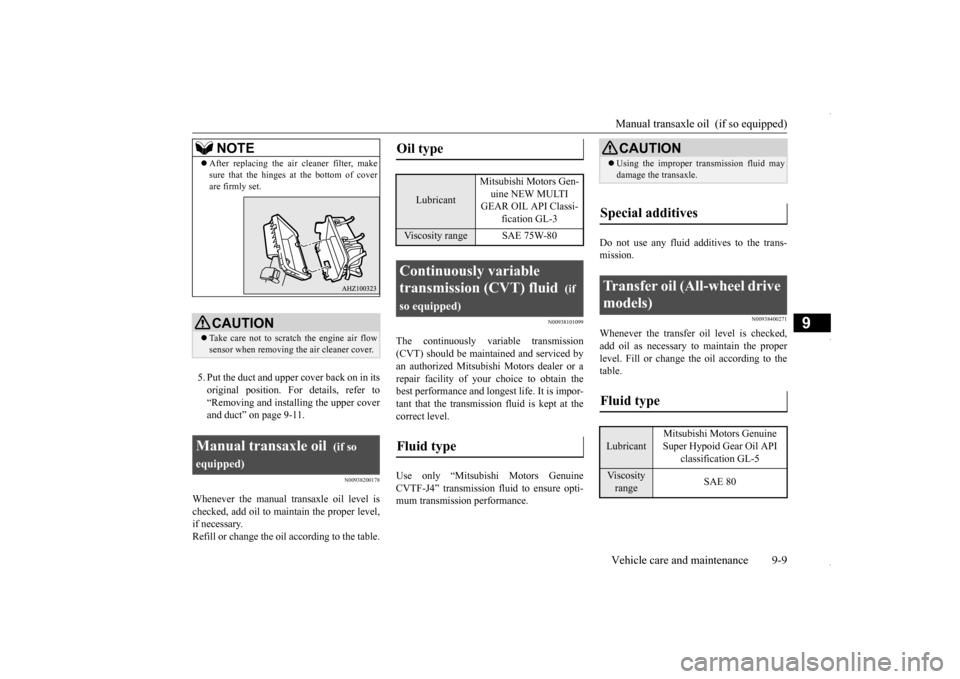
N00938200178
Whenever the manual transaxle oil level ischecked, add oil to maintain the proper level, if necessary. Refill or change the oil according to the table.
N00938101099
The continuously variable transmission(CVT) should be maintained and serviced by an authorized Mitsubishi Motors dealer or a repair facility of your choice to obtain thebest performance and longest life. It is impor- tant that the transmissi
on fluid is kept at the
correct level. Use only “Mitsubishi Motors Genuine CVTF-J4” transmission fluid to ensure opti-mum transmission performance.
Do not use any fluid additives to the trans- mission.
N00938400271
Whenever the transfer oil level is checked, add oil as necessary to maintain the proper level. Fill or change the oil according to the table.
After replacing the air cleaner filter, make sure that the hinges at the bottom of cover are firmly set.CAUTION Take care not to scratch the engine air flow sensor when removing the air cleaner cover.
Manual transaxle oil
(if so
equipped)
NOTE
Oil type
Lubricant
Mitsubishi Motors Gen- uine NEW MULTI GEAR OIL API Classi-
fication GL-3
Viscosity range SAE 75W-80Continuously variable transmission (CVT) fluid
(if
so equipped)Fluid type
CAUTION Using the improper transmission fluid may damage the transaxle.
Special additives
Transfer oil (All-wheel drive models) Fluid type Lubricant
Mitsubishi Motors Genuine Super Hypoid Gear Oil API
classification GL-5
Viscosity range
SAE 80
BK0229600US.bo
ok 9 ページ 2015年10月1日 木曜日 午後2時29分
Page 391 of 398
Tires and wheels
Specifications 11-5
11
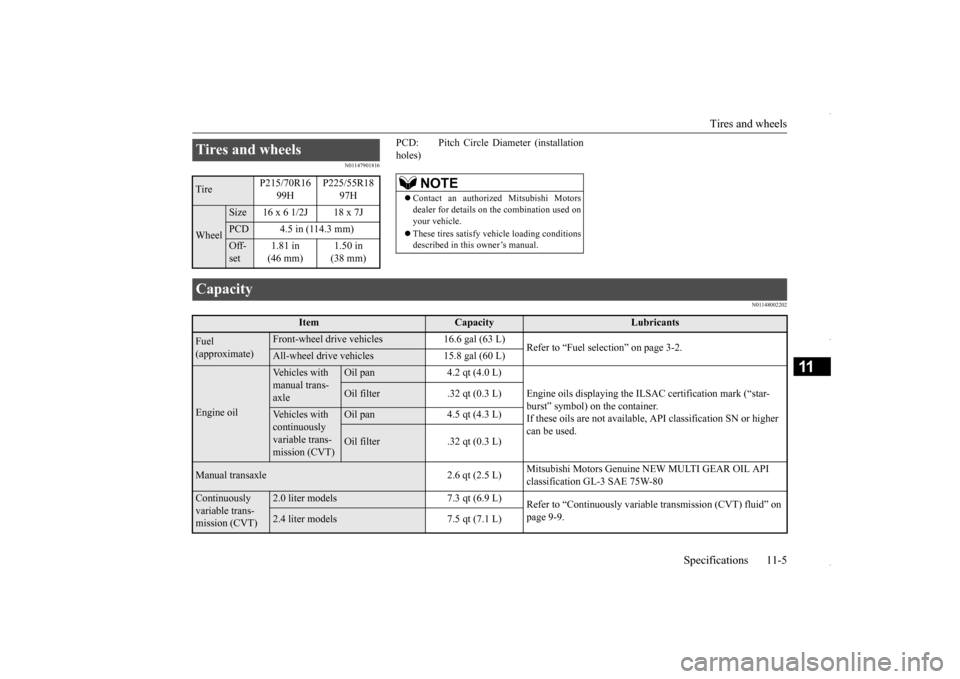
N01147901816
PCD: Pitch Circle Diameter (installation holes)
N01148002202
Tires and wheels Tire
P215/70R16
99H
P225/55R18
97H
Wheel
Size 16 x 6 1/2J 18 x 7JPCD 4.5 in (114.3 mm)Off- set
1.81 in (46 mm)
1.50 in (38 mm)
NOTE
Contact an authorized Mitsubishi Motors dealer for details on the combination used on your vehicle. These tires satisfy vehicle loading conditions described in this owner’s manual.
Capacity
Item
Capacity
Lubricants
Fuel (approximate)
Front-wheel drive vehicles 16.6 gal (63 L)All-wheel drive vehicles 15.8 gal (60 L)Vehicles with manual trans- axle
Oil pan 4.2 qt (4.0 L)
Engine oils displaying the IL
SAC certification mark (“star-
burst” symbol) on the container. If these oils are not available,
API classification SN or higher
can be used.
Oil filter .32 qt (0.3 L)
Vehicles with continuously variable trans- mission (CVT)
Oil pan 4.5 qt (4.3 L)Oil filter .32 qt (0.3 L)
Manual transaxle 2.6 qt (2.5 L)
Mitsubishi Motors Genuine NEW MULTI GEAR OIL API classification GL-3 SAE 75W-80
Continuously variable trans- mission (CVT)
2.0 liter models 7.3 qt (6.9 L)
Refer to “Continuously variable
transmission (CVT) fluid” on
page 9-9.
2.4 liter models 7.5 qt (7.1 L)
BK0229600US.bo
ok 5 ページ 2015年10月1日 木曜日 午後2時29分