2016 MITSUBISHI OUTLANDER SPORT flat tire
[x] Cancel search: flat tirePage 142 of 398
Tire pressure monitoring system 5-80 Features and controls
5
TPMS malfunctions may occur for a variety of reasons, including the installation of replacement or alternate tires or wheels on the vehicle that prevent the TPMS from function-ing properly. Always check the TPMS mal- function telltale after replacing one or more tires or wheels on your vehicle to ensure thatthe replacement or alternate tires and wheels allow the TPMS to continue to function prop- erly.
N00532801524
1. If the tire pressure monitoring systemwarning light illuminates, avoiding hardbraking, sharp steering maneuvers and high speeds. You should stop and adjust the tires to the proper inflation pressure assoon as possible. Adjust the spare tire at the same time. Refer to “Tires” on page 9-14.
2. If the tire pressure monitoring system warning light remains illuminated after you have been driving for about 20 min- utes after you adjust the tire inflation pres-sure, one or more of the tires may have a puncture. Inspect the tire and if it has a puncture, have it repaired by an autho-rized Mitsubishi Motors dealer as soon as possible.
The tire pressure monitoring system may not work normally in the following circum- stances: A wireless facility or device using the same frequency is near the vehicle. Snow or ice is stuck inside the fenders and/or on the wheels. The tire inflation pressure sensor’s battery is dead.
If the warning light/display illu- minates while driving
NOTE
In addition, the warning display is displayed on the information screen in the multi-infor- mation display. When inspecting or adjusting the tire pres- sure, do not apply excessive force to the valve stem to avoid breakage.
After inspecting or adjusting the tire pres- sure, always reinstall the valve cap on the valve stem. Without the valve cap, dirt or moisture could get into the valve, resulting in damage to thetire inflation pressure sensor. Do not use metal valve caps, which may cause a metal reaction, resulting in corrosion and damage of the tire inflation pressure sen- sors. Once adjustments have been made, the warn- ing light will go off after a few minutes ofdriving.WA R N I N G If the warning light/display illuminates while you are driving, avoid hard braking, sharp steering maneuvers and high speeds.Driving with an under-inflated tire adversely affects vehicle performance and can result in an accident.NOTE
CAUTION If a tire has a puncture, replace that tire with the spare tire. Driving on a punctured tire could lead to an accident. The warning light/display may not illuminate immediately in the event of a tire blowout or rapid leak.NOTE
To avoid the risk of damage to the tire infla- tion pressure sensors, have any punctured tire repaired by an authorized Mitsubishi Motors dealer. If the tire repair is not done byan authorized Mitsubishi Motors dealer, it is not covered by your warranty. Do not use an aerosol puncture-repair spray on any tire. Such a spray could damage the tire inflationpressure sensors. Have any puncture repaired by an authorized Mitsubishi Motors dealer.
BK0229600US.bo
ok 80 ページ 2015年10月1日 木曜日 午後2時29分
Page 143 of 398
Rear-view camera (if so equipped)
Features and controls 5-81
5
Wheels other than Mitsubishi genuine wheels are being used. Wheels that are not fitted with tire infla- tion pressure sensors are being used. Wheels whose ID codes are not memo- rized by the vehicle are used. Compact spare tire is fitted on a road wheel. A window tint that affects the radio wave signals is installed.
N00532901192
If new wheels with new tire inflation pressure sensors are installed, their ID codes must be programmed into the tire pressure monitoringsystem. Have the tire and wheel replacement performed by an authorized Mitsubishi Motors dealer to avoid the risk of damagingthe tire inflation pressure sensors. If the
wheel replacement is not done by an autho- rized Mitsubishi Motors dealer, it is not cov- ered by your warranty.
N00533001246
Your tire pressure monitoring system oper- ates on a radio frequency subject to Federal Communications Commission (FCC) Rules (For vehicles sold in U.S.A.) and IndustryCanada Rules (For vehicles sold in Canada). This device complies with part 15 of FCC Rules and Industry Canada licence-exemptRSS standard(s). Operation is subject to
the following two con-
ditions. This device may not cause harmful inter- ference. This device must accept any interference received, including interference that maycause undesired operation.
N00546201183
When the gearshift lever or the selector lever is in the “R” position with the ignition switch or the operation mode is in ON, the rear-viewimage will be displayed on the screen of the Mitsubishi Multi-Communication System or the DISPLAY AUDIO in the center panel.When the gearshift lever or the selector lever is shifted out of the “R” position, the rear- view image will go off.
NOTE
Tire inflation pressures vary with the ambi- ent temperature. If the
vehicle is subjected to
large variations in ambient temperature, the tire inflation pressures may be under-inflated (causing the warning light/display to comeon) when the ambient temperature is rela- tively low. If the warning light/display comes on, adjust the tire inflation pressure.
Whenever the tires and wheels are replaced with new ones
CAUTION The use of non-genuine wheels will prevent the proper fit of the tire inflation pressure sensors, resulting air leakage or damage of the sensors.
General information
CAUTION Changes or modifications not expressly approved by the manufacturer for compli- ance could void the user’s authority to oper- ate the equipment.
Rear-view camera (if so equipped)
WA R N I N G Never rely solely on the rear-view camera to clear the area behind your vehicle. Always check visually behind and all around your vehicle for persons, animals, obstructions or other vehicles. Failure todo so can result in vehicle damage, serious injury or death. The rear-view camera is an aid system for backing up, but it is not a substitute for your visual confirmation.
BK0229600US.bo
ok 81 ページ 2015年10月1日 木曜日 午後2時29分
Page 244 of 398
Driving precaution 6-2 Driving safety
6
N00629300053
Utility vehicles have higher ground clearance and a narrower track, which enables them toperform in a wide variety of off-road situa- tions. Because of the higher ground clear- ance, these vehicles have a higher center ofgravity, which makes them handle differently than ordinary vehicles when driving on pave- ment. They are not designed to maneuver orcorner at the same speed on pavement as con- ventional 2-wheel drive passenger cars any more than low-slung sports cars are designedto perform satisfactorily in off-road condi- tions. Always drive safely and steer the vehiclecarefully. Avoid operating the vehicle in a manner that might require sharp turns or abrupt maneuvers. As with other vehicles ofthis type, failure to operate this vehicle cor- rectly can result in loss of control or vehicle rollover.In a rollover crash, an unbelted person is sig- nificantly more likely to die than a person wearing a seat belt. Before starting the vehi-
cle, always make certain that you and all your passengers are properly wearing their seat belts (with children in the rear seat, in appro- priate restraints).
N00628800152
Fuel economy is dependent on many factors.Your personal driving habits can have a sig-nificant effect on your fuel use. Several rec-ommendations for achieving the greatest fuel economy are listed below. Whenever accelerating from a stop, always accelerate slowly and smoothly. When parked for even a short period, do not idle the engine. Shut it off. Plan your trips to avoid unnecessary stops. Keep your tires inflated to the recom- mended pressures. When you drive on highways or dry improved roads, set the drive mode-selec- tor “2WD” or “4WD AUTO” position (ifso equipped). For freeway driving, maintain a speed of approximately 50 mph (80 km/h) whentraffic, roadway and weather conditions safely permit. Keep your air filter clean and your vehicle lubricated according to the recommenda- tions in this manual.
Always keep your vehicle well main- tained. A poorly maintained engine wastes fuel and costs money. Never overload your vehicle.
N00628900049
Drunk driving is one of the most frequent causes of accidents.Your driving ability can be seriouslyimpaired even with blood alcohol levels far below the legal minimum. If you have been drinking, don’t drive. Ride with a designatednon-drinking driver, call a cab or a friend, or use public transportation. Drinking coffee or taking a cold shower will not make you sober.Similarly, prescription and nonprescription drugs affect your alertness, perception and reaction time. Consult with your doctor orpharmacist before driving while under the influence of any of these medications.
Driving precaution
WA R N I N G Utility vehicles have
a significantly higher
rollover rate than other types of vehicles. Avoid abrupt maneuvers and excessive speed. Always buckle up.
Fuel economy
Driving, alcohol and drugs
WA R N I N G NEVER DRINK AND DRIVE. Your perceptions are less accurate, your reflexes are slower and your judgment is impaired.
BK0229600US.bo
ok 2 ページ 2015年10月1日 木曜日 午後2時29分
Page 246 of 398
Vehicle preparation before driving 6-4 Driving safety
6
N00629000669
For a safer and more enjoyable trip, always check for the following: Before starting the vehicle, make certain that you and all passengers are seated and wearing their seat belts properly (with children in the rear seat, in appropriaterestraints), and that all the doors and lift- gate are locked. Move the driver’s seat as far backward as possible, while still keeping good visibil- ity, and good control of the steering wheel, brakes, accelerator, and controls.Check the instrument panel indicators and multi-information display for any possible problem. In the same way, the front passenger seat should also be moved as far back as possi- ble. Make sure that infants and small children are properly restrained in accordance with all laws and regulations.
Check these by selecting the defroster mode, and set the blower switch on high. Youshould be able to feel the air blowing against the windshield. Refer to “Defrosting or defogging (wind-shield, door windows)” on page 7-8, 7-13, 7-18, 7-23. Check all the tires for heavy tread wear or uneven wear patterns. Look for stones, nails, glass, or other objects stuck in the tread. Look for any tread cuts or sidewall cracks. Checkthe wheel nuts for tightness, and the tires (including spare tire) for proper pressure. Replace your tires before they are heavilyworn out. As your vehicle is equipped with a tire pres- sure monitoring system, there is a risk ofdamage to the tire inflation pressure sensors when the tire is replaced on the rim. Tire replacement should, therefore, be performedonly by an authorized Mitsubishi Motors dealer.
Have someone watch while you turn all the exterior lights on and off. Also check the turnsignal indicators and high-beam indicators on the instrument panel. Check the ground under the vehicle after parking overnight, for fuel, water, oil, or other leaks. Make sure all the fluid levels are correct. Also, if you can smell fuel, you needto find out why immediately and have it fixed.
N00629200094
Even this vehicle’s safety equipment, andyour safest driving, cannot guarantee that you can avoid an accident or injury. However, ifyou give extra attention to the following areas, you can better protect yourself and your passengers: Drive defensively. Be aware of traffic, road and weather conditions. Leave plenty of stopping distance between your vehicle and the vehicle ahead.
Vehicle preparation before driving Seat belts and seats
Defrosters Tires
Lights Fluid leaks Safe driving techniques
BK0229600US.bo
ok 4 ページ 2015年10月1日 木曜日 午後2時29分
Page 250 of 398
Loading information 6-8 Driving safety
6
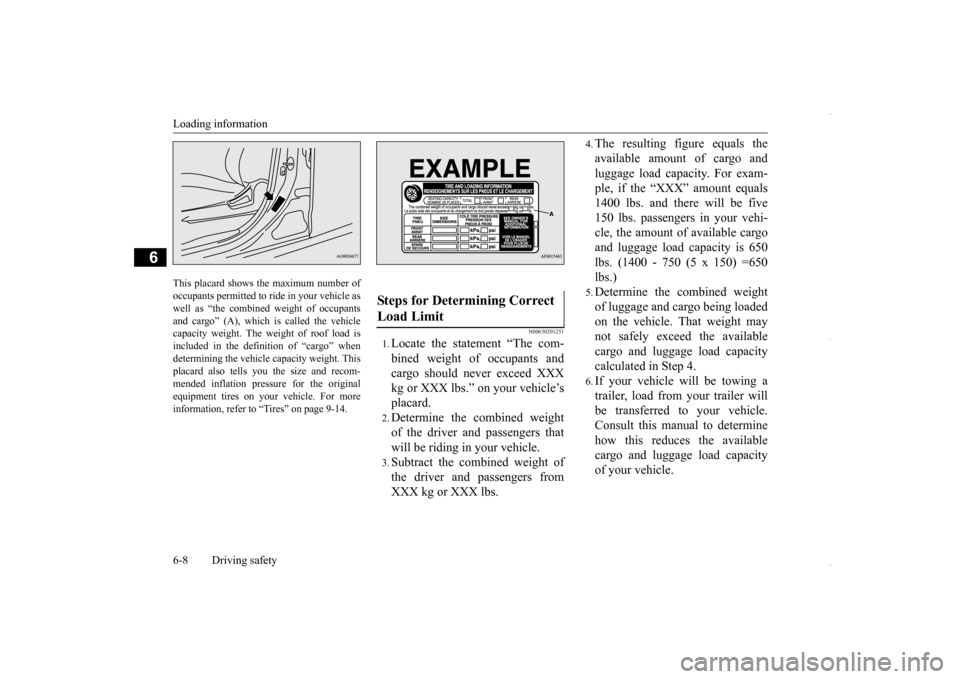
This placard shows the maximum number of occupants permitted to ride in your vehicle as well as “the combined weight of occupantsand cargo” (A), which is called the vehicle capacity weight. The weight of roof load is included in the definition of “cargo” whendetermining the vehicle capacity weight. This placard also tells you the size and recom- mended inflation pressure for the originalequipment tires on your vehicle. For moreinformation, refer to “Tires” on page 9-14.
N00630201251
1.Locate the statement “The com- bined weight of occupants and cargo should never exceed XXXkg or XXX lbs.” on your vehicle’s placard.2.Determine the combined weight of the driver and passengers that will be riding in your vehicle.3.Subtract the combined weight of the driver and passengers from XXX kg or XXX lbs.
4.The resulting figure equals theavailable amount of cargo and luggage load capacity. For exam- ple, if the “XXX” amount equals 1400 lbs. and there will be five150 lbs. passengers in your vehi- cle, the amount of available cargo and luggage load capacity is 650lbs. (1400 - 750 (5 x 150) =650 lbs.)5.Determine the combined weight of luggage and cargo being loaded on the vehicle. That weight may not safely exceed the availablecargo and luggage load capacity calculated in Step 4.6.If your vehicle will be towing a trailer, load from your trailer will be transferred to your vehicle. Consult this manual to determinehow this reduces the available cargo and luggage load capacity of your vehicle.
Steps for Determining Correct Load Limit
BK0229600US.bo
ok 8 ページ 2015年10月1日 木曜日 午後2時29分
Page 326 of 398
How to change a tire 8-6 For emergencies
8
N00836901832
Before changing a tire, first stop your vehicle in a safe, flat location. 1. Park the vehicle on level and stable ground. 2. Set the parking brake firmly.3. On vehicles equipped with manual trans- axle, stop the engine and move the gear- shift lever to the “R” (Reverse) position.On vehicles equipped with continuously variable transmission (CVT), move the selector lever to the “P” (PARK) position,and stop the engine. 4. Turn on the hazard flashers and set up a warning triangle, flashing signal light,etc., at an adequate distance from the vehicle, and have all your passengers leave the vehicle.
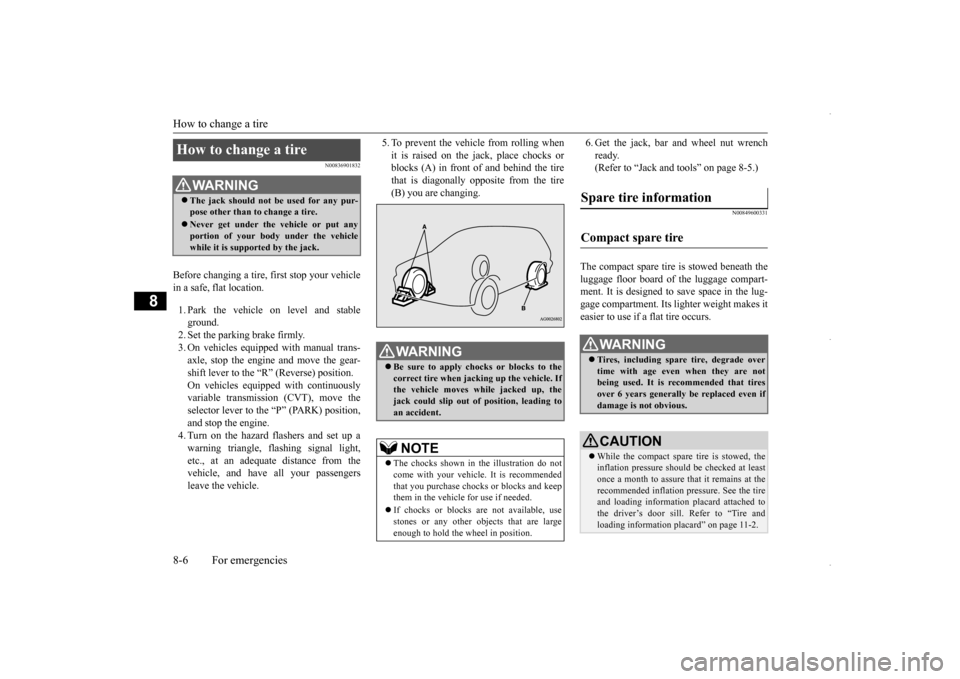
5. To prevent the vehicle from rolling when it is raised on the jack, place chocks or blocks (A) in front of and behind the tire that is diagonally opposite from the tire(B) you are changing.
6. Get the jack, bar and wheel nut wrench ready. (Refer to “Jack and tools” on page 8-5.)
N00849600331
The compact spare tire is stowed beneath the luggage floor board of the luggage compart- ment. It is designed to save space in the lug- gage compartment. Its lighter weight makes iteasier to use if a flat tire occurs.
How to change a tire
WA R N I N G The jack should not be used for any pur- pose other than to change a tire. Never get under the vehicle or put any portion of your body under the vehicle while it is supported by the jack.
WA R N I N G Be sure to apply chocks or blocks to the correct tire when jacking up the vehicle. Ifthe vehicle moves while jacked up, the jack could slip out of position, leading to an accident.NOTE
The chocks shown in the illustration do not come with your vehicle. It is recommended that you purchase chocks or blocks and keepthem in the vehicle for use if needed. If chocks or blocks are not available, use stones or any other objects that are large enough to hold the wheel in position.
Spare tire information Compact spare tire
WA R N I N G Tires, including spare tire, degrade over time with age even when they are not being used. It is recommended that tires over 6 years generally be replaced even ifdamage is not obvious.CAUTION While the compact spare tire is stowed, the inflation pressure should be checked at least once a month to assure that it remains at the recommended inflation pressure. See the tireand loading information placard attached to the driver’s door sill. Refer to “Tire and loading information placard” on page 11-2.
BK0229600US.bo
ok 6 ページ 2015年10月1日 木曜日 午後2時29分
Page 327 of 398
How to change a tire
For emergencies 8-7
8
N00849701355
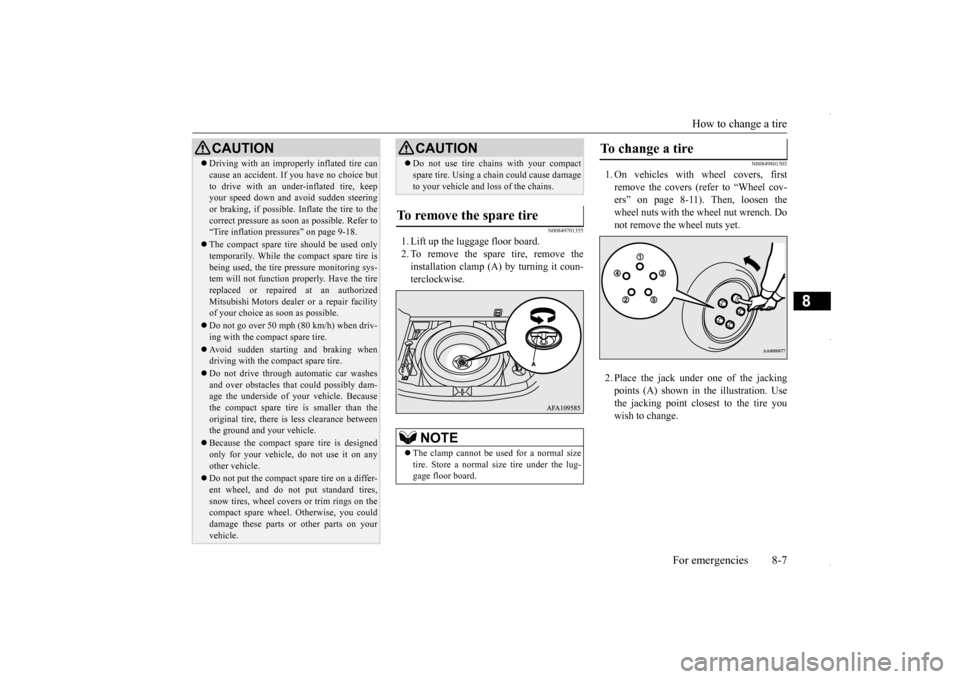
1. Lift up the luggage floor board. 2. To remove the spare tire, remove theinstallation clamp (A) by turning it coun-terclockwise.
N00849801503
1. On vehicles with wheel covers, firstremove the covers (refer to “Wheel cov-ers” on page 8-11). Then, loosen the wheel nuts with the wheel nut wrench. Do not remove the wheel nuts yet. 2. Place the jack under
one of the jacking
points (A) shown in the illustration. Use the jacking point closest to the tire youwish to change.
Driving with an improperly inflated tire can cause an accident. If you have no choice but to drive with an under-inflated tire, keep your speed down and avoid sudden steering or braking, if possible
. Inflate the tire to the
correct pressure as soon as possible. Refer to “Tire inflation pressures” on page 9-18. The compact spare tire should be used only temporarily. While the compact spare tire is being used, the tire pressure monitoring sys-tem will not function properly. Have the tire replaced or repaired at an authorized Mitsubishi Motors dealer or a repair facilityof your choice as soon as possible. Do not go over 50 mph (80 km/h) when driv- ing with the compact spare tire. Avoid sudden starting and braking when driving with the compact spare tire. Do not drive through automatic car washes and over obstacles that could possibly dam- age the underside of your vehicle. Because the compact spare tire is smaller than theoriginal tire, there is less clearance between the ground and your vehicle. Because the compact spare tire is designed only for your vehicle, do not use it on any other vehicle. Do not put the compact spare tire on a differ- ent wheel, and do not put standard tires, snow tires, wheel covers or trim rings on the compact spare wheel. Otherwise, you coulddamage these parts or other parts on your vehicle.CAUTION
Do not use tire chains with your compact spare tire. Using a chain could cause damage to your vehicle and loss of the chains.
To remove the spare tire
NOTE
The clamp cannot be us
ed for a normal size
tire. Store a normal size tire under the lug- gage floor board.CAUTION
To change a tire
BK0229600US.bo
ok 7 ページ 2015年10月1日 木曜日 午後2時29分
Page 328 of 398
How to change a tire 8-8 For emergencies
8
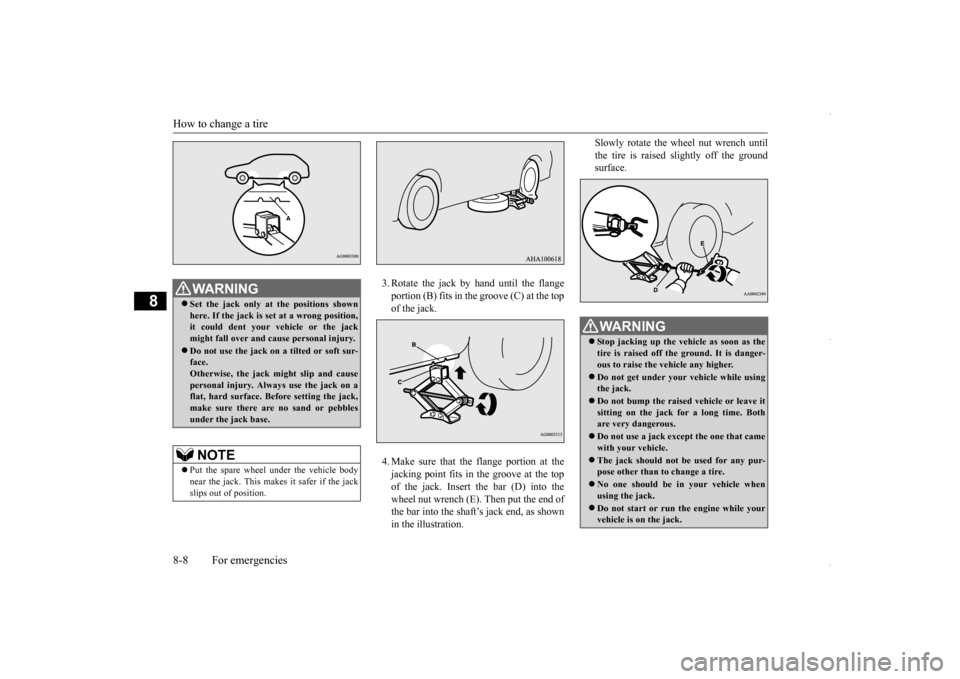
3. Rotate the jack by hand until the flange portion (B) fits in the groove (C) at the top of the jack. 4. Make sure that the flange portion at the jacking point fits in the groove at the topof the jack. Insert the bar (D) into thewheel nut wrench (E). Then put the end of the bar into the shaft’s jack end, as shown in the illustration.
Slowly rotate the wheel nut wrench until the tire is raised slightly off the ground surface.
WA R N I N G Set the jack only at the positions shown here. If the jack is set at a wrong position, it could dent your vehicle or the jackmight fall over and cause personal injury. Do not use the jack on a tilted or soft sur- face. Otherwise, the jack might slip and cause personal injury. Always use the jack on aflat, hard surface. Before setting the jack, make sure there are no sand or pebbles under the jack base.NOTE
Put the spare wheel under the vehicle body near the jack. This makes it safer if the jack slips out of position.
WA R N I N G Stop jacking up the vehicle as soon as the tire is raised off the ground. It is danger- ous to raise the vehicle any higher. Do not get under your vehicle while using the jack. Do not bump the raised vehicle or leave it sitting on the jack for a long time. Bothare very dangerous. Do not use a jack except the one that came with your vehicle. The jack should not be used for any pur- pose other than to change a tire. No one should be in your vehicle when using the jack. Do not start or run the engine while your vehicle is on the jack.
BK0229600US.bo
ok 8 ページ 2015年10月1日 木曜日 午後2時29分