2016 MERCEDES-BENZ SL ROADSTER sensor
[x] Cancel search: sensorPage 312 of 333

Important safety notes
The tyre pressure warning system does not warn
you of an incorrectly set tyre pressure. Observe
the notes on the recommended tyre pressure
(Y page 307).
The tyre pressure loss warning does not replace
the need to regularly check the tyre pressures.
An even loss of pressure on several tyres at the
same time cannot be detected by the tyre pres- sure loss warning system.
The tyre pressure monitor is not able to warn
you of a sudden loss of pressure, e.g. if the tyre
is penetrated by a foreign object. In the event of
a sudden loss of pressure, bring the vehicle to a halt by braking carefully. Avoid abrupt steering
manoeuvres.
The function of the tyre pressure loss warning
system is limited or delayed if:
R snow chains are fitted to your vehicle's tyres.
R road conditions are wintry.
R you are driving on sand or gravel.
R you adopt a very sporty driving style (corner-
ing at high speeds or driving with high rates of
acceleration).
R you drive with a heavy load.
Restarting the tyre pressure loss warn-
ing system Restart the tyre pressure loss warning system if
you have:
R changed the tyre pressure
R changed the wheels or tyres
R fitted new wheels or tyres
X Before restarting, make sure that the tyre
pressures are set properly on all four tyres for
the respective operating conditions. The rec-
ommended tyre pressures can be found in the
tyre pressure table on the fuel filler flap.
The tyre pressure loss warning system can
only give reliable warnings if you have set the correct tyre pressure. If an incorrect tyre
pressure is set, these incorrect values will be
monitored.
X Observe the notes in the section on tyre pres-
sures (Y page 307).
X Make sure that the key is in position 2in the
ignition lock (Y page 132).
X Press the =or; button on the steering
wheel to select the Serv.
Serv. menu. X
Press the 9or: button to select
Tyre pressure Tyre pressure.
X Press the abutton.
The Run Flat Indicator active Run Flat Indicator active
Restart with OK
Restart with OK message appears in the
multifunction display.
If you wish to confirm the restart:
X Press the abutton.
The Tyre
Tyre press.
press. now
nowOK?
OK?message appears
in the multifunction display.
X Press the 9or: button to select Yes
Yes .
X Press the abutton.
The Run Flat Indicator restarted
Run Flat Indicator restarted mes-
sage appears in the multifunction display.
After a teach-in period, the tyre pressure loss warning system will monitor the set tyre pres-
sures of all four tyres.
If you wish to cancel the restart: X Press the %button.
or X If the Tyre press. now OK?
Tyre press. now OK? message
appears, use the 9or: button to
select Cancel Cancel .
X Press the abutton.
The tyre pressure values stored at the last
restart will continue to be monitored. Tyre pressure monitor
General notes If a tyre pressure monitor system is fitted, the
vehicle's wheels have sensors fitted that moni-
tor the tyre pressures in all four tyres. The tyre
pressure monitor warns you if the pressure
drops in one or more of the tyres. The tyre pres- sure monitor only functions if the corresponding
sensors are fitted to all wheels.
Information on tyre pressures is shown in the
multifunction display. After a few minutes of
driving, the current tyre pressure of each tyre is
shown in the Service Servicemenu of the multifunction
display. Tyre pressure
309Wheels and tyres Z
Page 313 of 333

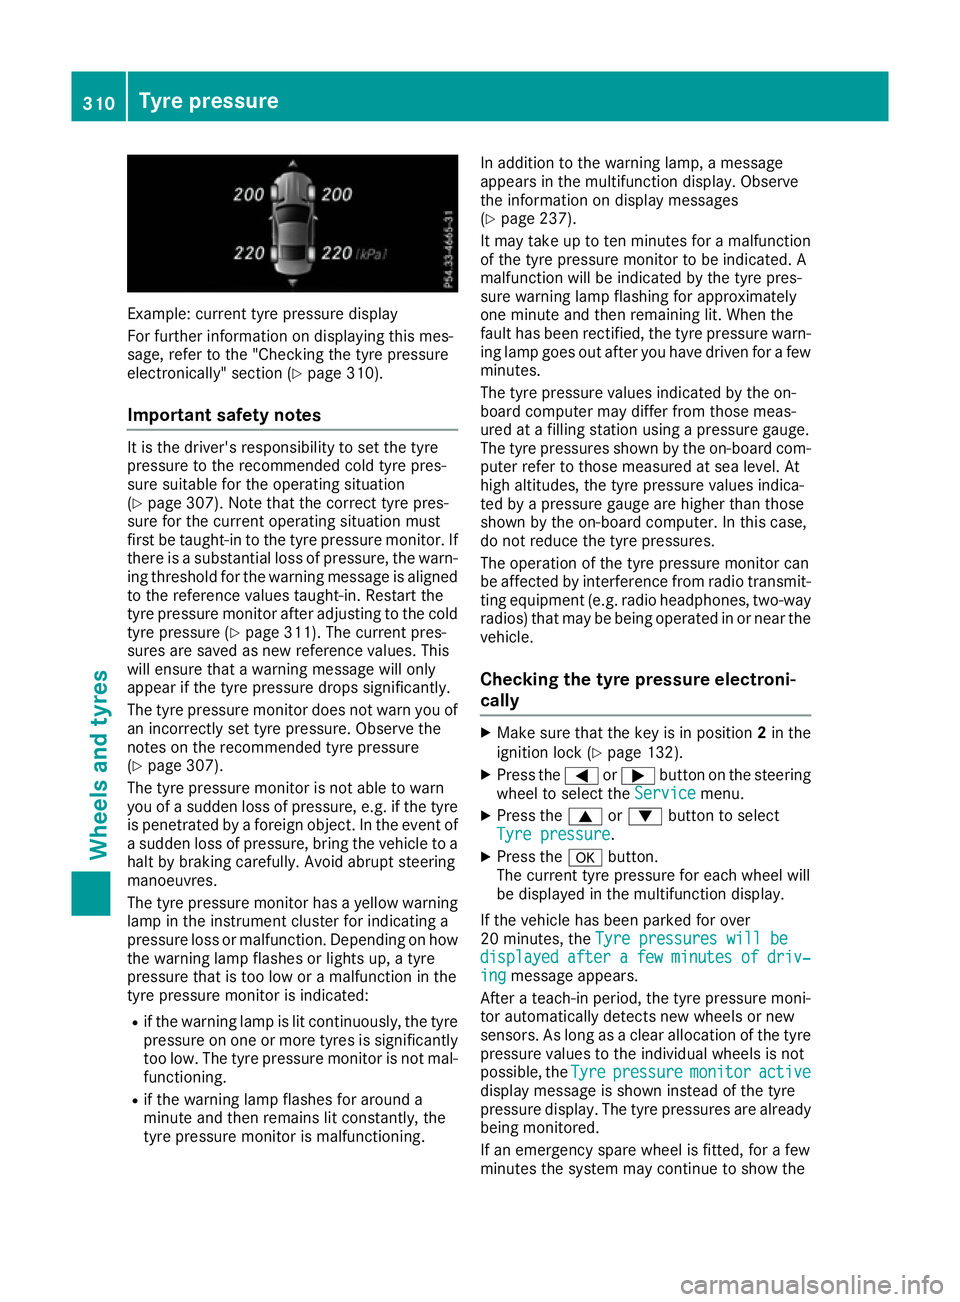
Example: current tyre pressure display
For further information on displaying this mes-
sage, refer to the "Checking the tyre pressure
electronically" section (Y page 310).
Important safety notes It is the driver's responsibility to set the tyre
pressure to the recommended cold tyre pres-
sure suitable for the operating situation
(Y page 307). Note that the correct tyre pres-
sure for the current operating situation must
first be taught-in to the tyre pressure monitor. If
there is a substantial loss of pressure, the warn- ing threshold for the warning message is aligned
to the reference values taught-in. Restart the
tyre pressure monitor after adjusting to the cold tyre pressure (Y page 311). The current pres-
sures are saved as new reference values. This
will ensure that a warning message will only
appear if the tyre pressure drops significantly.
The tyre pressure monitor does not warn you of
an incorrectly set tyre pressure. Observe the
notes on the recommended tyre pressure
(Y page 307).
The tyre pressure monitor is not able to warn
you of a sudden loss of pressure, e.g. if the tyre is penetrated by a foreign object. In the event of
a sudden loss of pressure, bring the vehicle to a halt by braking carefully. Avoid abrupt steering
manoeuvres.
The tyre pressure monitor has a yellow warning
lamp in the instrument cluster for indicating a
pressure loss or malfunction. Depending on how
the warning lamp flashes or lights up, a tyre
pressure that is too low or a malfunction in the
tyre pressure monitor is indicated:
R if the warning lamp is lit continuously, the tyre
pressure on one or more tyres is significantly
too low. The tyre pressure monitor is not mal- functioning.
R if the warning lamp flashes for around a
minute and then remains lit constantly, the
tyre pressure monitor is malfunctioning. In addition to the warning lamp, a message
appears in the multifunction display. Observe
the information on display messages
(Y page 237).
It may take up to ten minutes for a malfunction
of the tyre pressure monitor to be indicated. A
malfunction will be indicated by the tyre pres-
sure warning lamp flashing for approximately
one minute and then remaining lit. When the
fault has been rectified, the tyre pressure warn- ing lamp goes out after you have driven for a few
minutes.
The tyre pressure values indicated by the on-
board computer may differ from those meas-
ured at a filling station using a pressure gauge.
The tyre pressures shown by the on-board com- puter refer to those measured at sea level. At
high altitudes, the tyre pressure values indica-
ted by a pressure gauge are higher than those
shown by the on-board computer. In this case,
do not reduce the tyre pressures.
The operation of the tyre pressure monitor can
be affected by interference from radio transmit-
ting equipment (e.g. radio headphones, two-way radios) that may be being operated in or near the vehicle.
Checking the tyre pressure electroni-
cally X
Make sure that the key is in position 2in the
ignition lock (Y page 132).
X Press the =or; button on the steering
wheel to select the Service
Service menu.
X Press the 9or: button to select
Tyre pressure Tyre pressure.
X Press the abutton.
The current tyre pressure for each wheel will
be displayed in the multifunction display.
If the vehicle has been parked for over
20 minutes, the Tyre pressures will be Tyre pressures will be
displayed
displayed after
aftera
a few
few minutes
minutes of
ofdriv‐
driv‐
ing
ing message appears.
After a teach-in period, the tyre pressure moni-
tor automatically detects new wheels or new
sensors. As long as a clear allocation of the tyre pressure values to the individual wheels is not
possible, the Tyre Tyrepressure
pressure monitor
monitoractive
active
display message is shown instead of the tyre
pressure display. The tyre pressures are already being monitored.
If an emergency spare wheel is fitted, for a few
minutes the system may continue to show the 310
Tyre pressureWheels and tyres
Page 320 of 333

X
Stow the jack and the rest of the tyre-change
tool kit in the boot again.
X Mercedes-AMG vehicles and vehicles
with AMG equipment:
insert the cover into
the outer sill.
X Check the air pressure of the newly fitted
wheel and adjust accordingly.
Observe the recommended tyre pressure
(Y page 307).
Vehicles with a tyre pressure monitor: all fit-
ted wheels must be equipped with functioning
sensors.
If you are driving with the emergency spare
wheel fitted, the tyre pressure loss warning sys- tem or the tyre pressure monitor cannot func-
tion reliably. Only restart the tyre pressure loss
warning system or tyre pressure monitor when
the defective wheel has been replaced with a
new wheel.
Vehicles with a tyre pressure monitor: all fit-
ted wheels must be equipped with functioning
sensors. Wheel and tyre combinations
You can ask for information regarding permitted wheel-tyre combinations at a Mercedes-Benz
Service Centre.
! For safety reasons, Mercedes-Benz recom-
mends that you only use tyres and wheels
which have been approved by Mercedes-Benz specifically for your vehicle.
These are specially adapted to the control
systems, such as ABS or ESP ®
and are
marked as follows:
R MO = Mercedes-Benz Original
R MOE = Mercedes-Benz Original Extended
(tyres featuring run-flat characteristics)
R MO1 = Mercedes-Benz Original (only cer-
tain AMG tyres)
Mercedes-Benz Original Extended tyres may
only be used on wheels that have been spe-
cifically approved by Mercedes-Benz.
Only use tyres, wheels or accessories tested
and approved by Mercedes-Benz. Certain
characteristics, e.g. handling, vehicle noise
emissions or fuel consumption, may other-
wise be adversely affected. In addition, when driving with a load, tyre dimension variations
could cause the tyres to come into contact with the bodywork and axle components. This
could result in damage to the tyres or the
vehicle.
Mercedes-Benz accepts no liability for dam-
age resulting from the use of tyres, wheels or accessories other than those tested and
approved.
Further information about wheels, tyres and
approved combinations can be obtained from
any qualified specialist workshop.
! Retreaded tyres are neither tested nor rec-
ommended by Mercedes-Benz, since previ-
ous damage cannot always be detected on
retreaded tyres. As a result, Mercedes-Benz
cannot guarantee vehicle safety if retreaded
tyres are fitted. Do not fit used tyres if you
have no information about their previous
usage.
! Large wheels: the lower the section width
for a certain wheel size, the lower the ride
comfort is on poor road surfaces. Roll comfort and suspension comfort are reduced and therisk of damage to the wheels and tyres as a
result of driving over obstacles increases.
The recommended tyre pressures can be found
in the tyre pressure table on the fuel filler flap.
For further information on tyre pressure, see
(Y page 307). Check tyre pressures regularly
and only when the tyres are cold.
Notes on the vehicle equipment – always fit the
vehicle:
R with tyres of the same size across an axle
(left/right)
R with the same type of tyres at a given time
(summer tyres, winter tyres, MOExtended
tyres)
Exception: it is permissible to fit a different
type or make in the event of a flat tyre.
Observe the "MOExtended tyres (tyres with
run-flat characteristics)" section
(Y page 289).
Vehicles with MOExtended tyres are not equip-
ped with a TIREFIT kit at the factory. It is there-
fore recommended that you additionally equip
your vehicle with a TIREFIT kit if you fit tyres that do not feature run-flat characteristics, e.g. win-
ter tyres. A TIREFIT kit can be obtained from a
qualified specialist workshop. Wheel and tyre combinations
317Wheels and tyres Z
Page 323 of 333

Information on technical data
i The technical data was determined in
accordance with EU Directives. All data
applies to the vehicle's standard equipment.
The data may therefore differ for vehicles with
optional equipment. You can obtain further
information from a Mercedes-Benz Service
Centre. Vehicle electronics
Tampering with the engine electron-
ics
! Only have work carried out on the engine
electronics and its associated parts, such as
control units, sensors, actuating components
and connector leads, at a qualified specialist
workshop. Vehicle components may other-
wise wear more quickly and the vehicle's
operating permit may be invalidated. Retrofitting two-way radios and
mobile phones (RF transmitters)
G
WARNING
If RF transmitters are tampered with or not
properly retrofitted, the electromagnetic radi- ation they emit can interfere with the vehicle
electronics. This may jeopardise the opera-
tional safety of the vehicle. There is a risk of an
accident.
You should have all work on electrical and
electronic components carried out at a quali-
fied specialist workshop. G
WARNING
If you operate RF transmitters incorrectly in
the vehicle, the electromagnetic radiation
could interfere with the vehicle electronics,
e.g.:
R if the RF transmitter is not connected to an
exterior aerial
R the exterior aerial has been fitted incor-
rectly or is not a low-reflection type This could jeopardise the operating safety of
the vehicle. There is a risk of an accident.
Have the low-reflection exterior aerial fitted at a qualified specialist workshop. When oper-
ating RF transmitters in the vehicle, always
connect them to the low-reflection exterior
aerial.
! The operating permit may be invalidated if
the instructions for installation and use of RF
transmitters are not observed.
In particular, the following conditions must be complied with:
R only approved wavebands may be used.
R observe the maximum permissible output
in these wavebands.
R only approved aerial positions may be
used.
Excessive levels of electromagnetic radiation
may cause damage to your health and to the
health of others. The use of an exterior aerial
takes into consideration the scientific discus-
sion surrounding the possible health risk posed
by electromagnetic fields.
Observe the notes on operating mobile phones
(Y page 268).
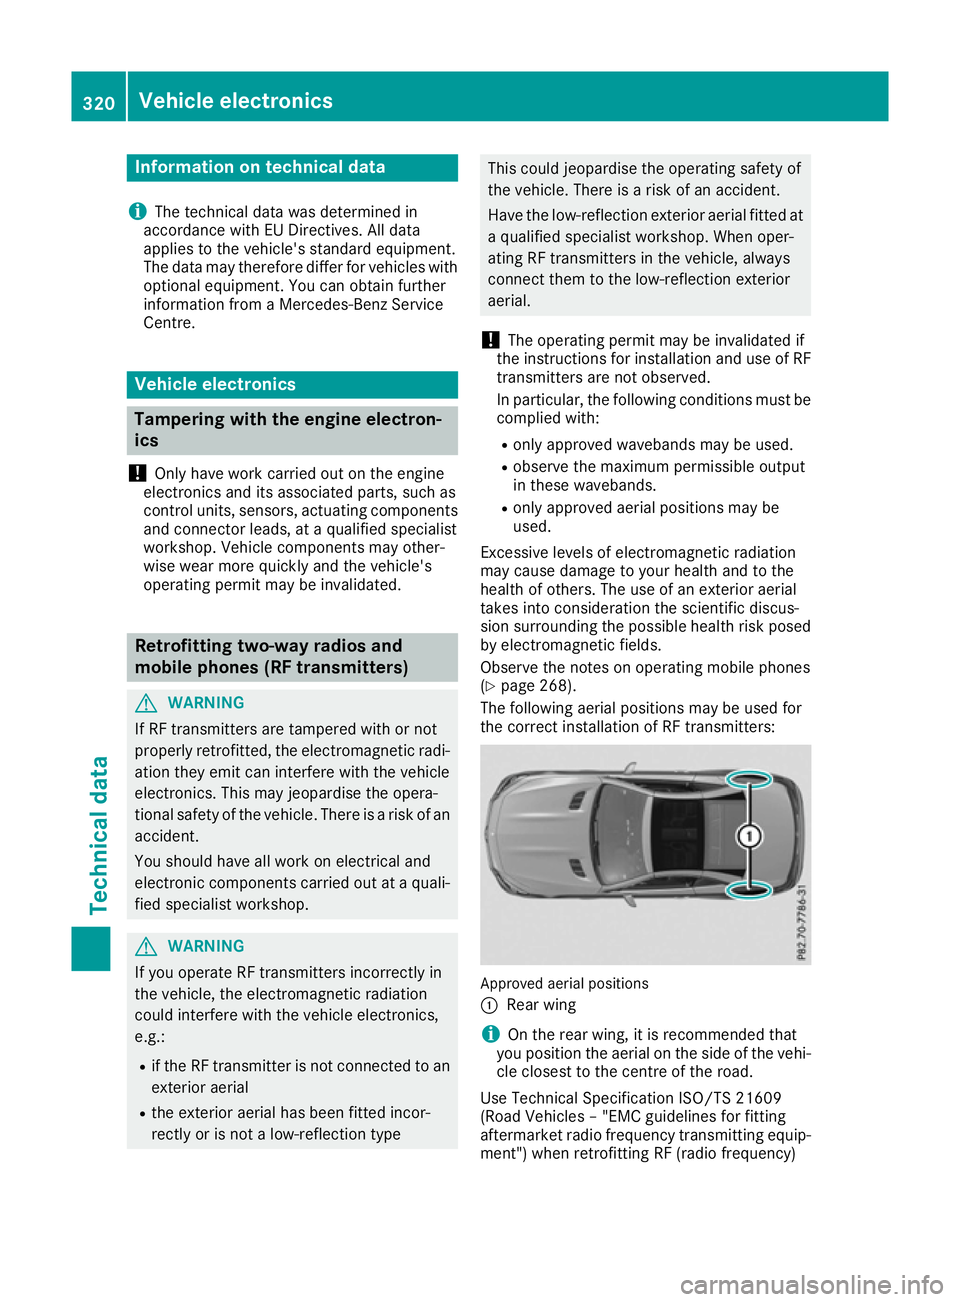
The following aerial positions may be used for
the correct installation of RF transmitters: Approved aerial positions
:
Rear wing
i On the rear wing, it is recommended that
you position the aerial on the side of the vehi-
cle closest to the centre of the road.
Use Technical Specification ISO/TS 21609
(Road Vehicles – "EMC guidelines for fitting
aftermarket radio frequency transmitting equip- ment") when retrofitting RF (radio frequency) 320
Vehicle electronicsTechnical data
Page 329 of 333

!
Only add coolant that has been premixed
with the desired antifreeze protection. You
could otherwise damage the engine.
Further information on coolants can be found in the Mercedes-Benz Specifications for Ser-
vice Products, MB Specifications for Service
Products 310.1, e.g. on the Internet at
http://bevo.mercedes-benz.com. Or contact
a qualified specialist workshop.
! Always use a suitable coolant mixture, even
in countries where high temperatures prevail.
Otherwise, the engine cooling system is not
sufficiently protected from corrosion and
overheating.
i Have the coolant regularly replaced at a
qualified specialist workshop and the replace- ment confirmed in the Service Booklet.
Comply with the important safety precautions
for service products when handling coolant
(Y page 322).
The coolant is a mixture of water and anti-
freeze/corrosion inhibitor. It is responsible for
the following:
R anti-corrosion protection
R antifreeze protection
R raising the boiling point
If antifreeze/corrosion inhibitor is present in the
correct concentration, the boiling point of the
coolant during operation will be approximately
130 †.
The antifreeze/corrosion inhibitor concentra-
tion in the engine cooling system should:
R be at least 50%. This will protect the engine
cooling system against freezing down to
approximately -37 †.
R not exceed 55% (antifreeze protection down
to -45 †). Heat will otherwise not be dissipa-
ted as effectively.
If the vehicle has lost coolant, top it up with
equal amounts of water and antifreeze/corro-
sion inhibitor.
Mercedes-Benz recommends an antifreeze/
corrosion inhibitor concentrate in accordance
with MB Specifications for Service Products
310.1.
i When the vehicle is first delivered, it is filled
with a coolant mixture that ensures adequate
antifreeze and corrosion protection. i
The coolant is checked at every mainte-
nance interval at a qualified specialist work-
shop. Windscreen washer system
Important safety notes G
WARNING
If windscreen washer concentrate comes into contact with hot components of the engine or
the exhaust system, it can ignite. There is a
risk of fire and injury.
Make sure the windscreen washer concen-
trate does not come into contact with the filler neck.
! Only use washer fluid that is suitable for
plastic lamp lenses, e.g. MB SummerFit or MB
WinterFit. Unsuitable washer fluid could dam-
age the plastic lenses of the headlamps.
! Only the washer fluids SummerFit and Win-
terFit can be mixed. Otherwise, the spraying
nozzles could become blocked.
Do not use distilled or de-ionised water. Other-
wise, the level sensor may give a false reading.
When handling washer fluid, observe the impor- tant safety notes on service products
(Y page 322).
At temperatures above freezing:
X Fill the washer fluid reservoir with a mixture of
water and washer fluid, e.g. MB SummerFit.
X Mix 1 part MB SummerFit to 100 parts water.
At temperatures below freezing:
X Fill the washer fluid reservoir with a mixture of
water and washer fluid, e.g. MB WinterFit.
For the correct mixing ratio refer to the infor- mation on the antifreeze reservoir.
i Add washer fluid concentrate, e.g. MB Sum-
merFit or MB WinterFit, to the washer fluid all
year round. 326
Service products and capacitiesTechnical data