2016 MERCEDES-BENZ SL ROADSTER sensor
[x] Cancel search: sensorPage 87 of 333

For all countries except the United Kingdom:
you can open a door from inside the vehicle evenif it has been locked.
United Kingdom only: you can only open a
door from inside the vehicle if the double-lock
function has been deactivated. You can deacti-
vate the double lock function by deactivating the
interior motion sensor (Y page 75).
When a locked door is opened from inside the
vehicle, the previous unlocking process will be
observed if the vehicle has been:
R locked with the locking button for the central
locking or
R locked automatically
The vehicle will be fully unlocked if it had previ-
ously been fully unlocked. Only the door which
has been opened from the inside is unlocked if
only the driver's door had been previously
unlocked. Automatic locking feature
X
To deactivate: press and hold button :for
about five seconds until a tone sounds.
X To activate: press and hold button ;for
about five seconds until a tone sounds.
If you press one of the two buttons and do not
hear a tone, the relevant setting has already
been selected.
The vehicle is locked automatically when the
ignition is switched on and the wheels are turn-
ing.
You could therefore be locked out if:
R the vehicle is being pushed
R the vehicle is being towed
R the vehicle is being tested on a dynamometer You can also activate and deactivate the auto-
matic locking function using the on-board com-
puter (Y page 211). Power closing
Power closing pulls the doors and boot lid into
their locks automatically even if they are only
partly closed. X Power closing feature (doors): push the
door past the first detent position into the
lock.
Power closing will pull the door fully closed.
X To power close the boot lid: lightly push the
boot lid closed.
The power closing function pulls the boot lid
closed. Unlocking/locking the driver's door
using the emergency key element
i In order to lock all of the vehicle's locks,
begin by pressing the button for locking the
vehicle from the inside while the driver's door
is open. Then proceed to unlock the driver's
door using the emergency key element. X
To unlock: turn the emergency key element
anti-clockwise as far as it will go to position
1.
X To lock: turn the emergency key element
clockwise as far as it will go to position 1.
Right-hand-drive vehicle: turn the emergency
key element in the opposite direction in both
cases.
If you use the emergency key element to unlock
and open the driver's door, the anti-theft alarm
system will be triggered. Switch off the alarm
(Y page 74). 84
DoorsOpening and closing
Page 90 of 333
If a key with KEYLESS-GO is detected in the
boot, the boot lid opens again after it is closed.
It does not lock. HANDS-FREE ACCESS
Important safety notes G
WARNING
The vehicle exhaust system can become very
hot. If you use HANDS-FREE ACCESS, you
could burn yourself by touching the exhaust
system. There is a risk of injury. Always
ensure that you only make a leg movement
within the detection range of sensors.
! If the key is within the rear detection range
of KEYLESS-GO, the following situations, for
example, could lead to the boot lid opening
unintentionally:
R using a car wash
R using a high-pressure cleaner
Make sure that the key is at least 3 m away
from the vehicle.
General notes With KEYLESS-GO and HANDS-FREE ACCESS,
you can open or close the boot lid or stop the
procedure without using your hands. This is use-
ful if you have your hands full. To do this, make
a kicking movement under the bumper with your
foot.
Observe the following points:
R Carry your KEYLESS-GO key about your per-
son. The KEYLESS-GO key must be in the rear detection range of the vehicle.
R When making the kicking movement, make
sure that you are standing firmly on the
ground and that there is sufficient clearance
to the rear of the vehicle. You could otherwise lose your balance, e.g. on ice. R
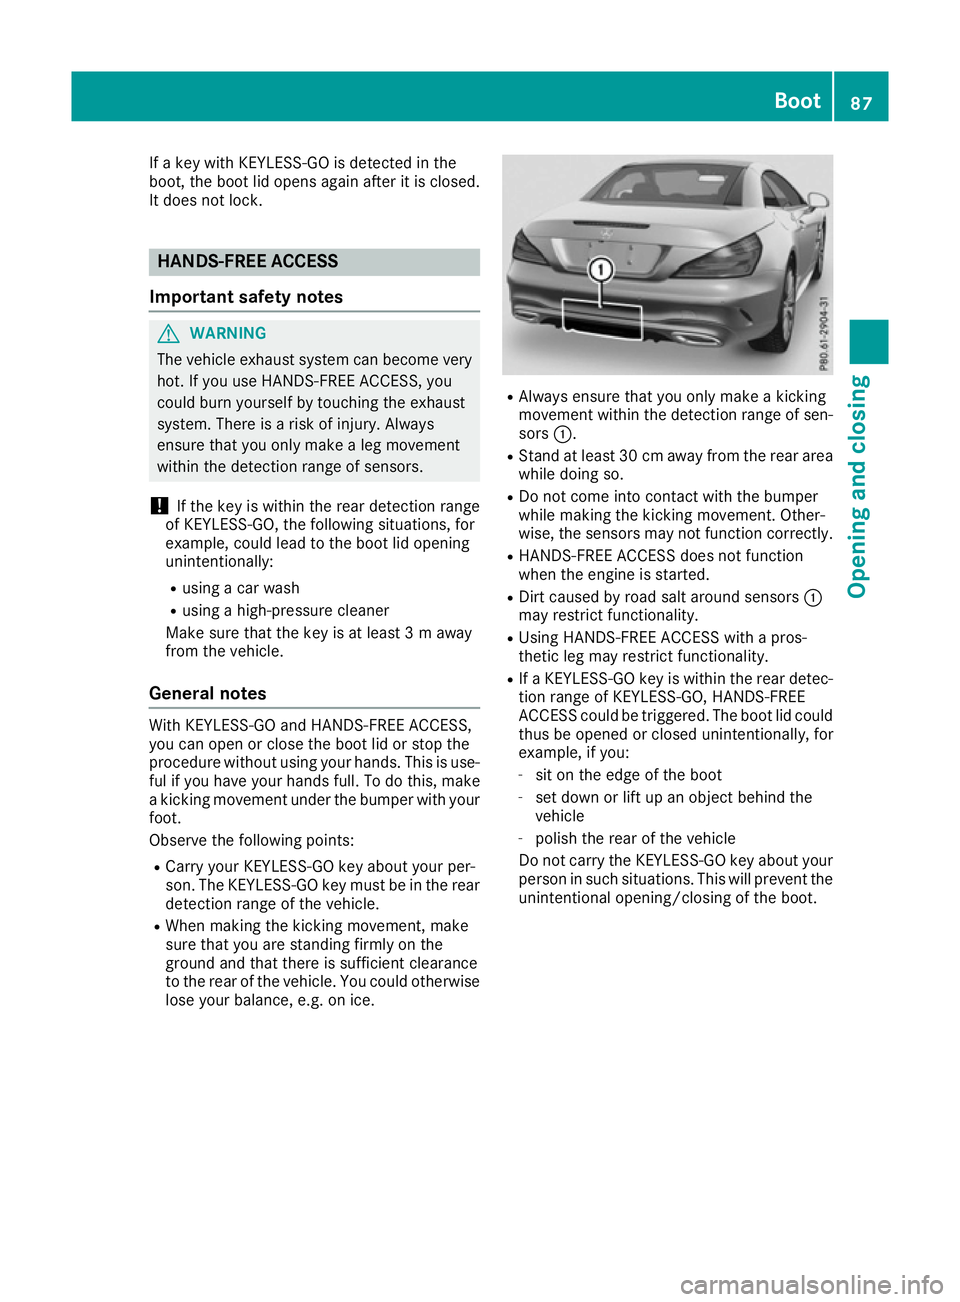
Always ensure that you only make a kicking
movement within the detection range of sen-
sors :.
R Stand at least 30 cm away from the rear area
while doing so.
R Do not come into contact with the bumper
while making the kicking movement. Other-
wise, the sensors may not function correctly.
R HANDS-FREE ACCESS does not function
when the engine is started.
R Dirt caused by road salt around sensors :
may restrict functionality.
R Using HANDS-FREE ACCESS with a pros-
thetic leg may restrict functionality.
R If a KEYLESS-GO key is within the rear detec-
tion range of KEYLESS-GO, HANDS-FREE
ACCESS could be triggered. The boot lid could thus be opened or closed unintentionally, for
example, if you:
- sit on the edge of the boot
- set down or lift up an object behind the
vehicle
- polish the rear of the vehicle
Do not carry the KEYLESS-GO key about your
person in such situations. This will prevent the
unintentional opening/closing of the boot. Boot
87Opening and closing Z
Page 91 of 333
Operation
X
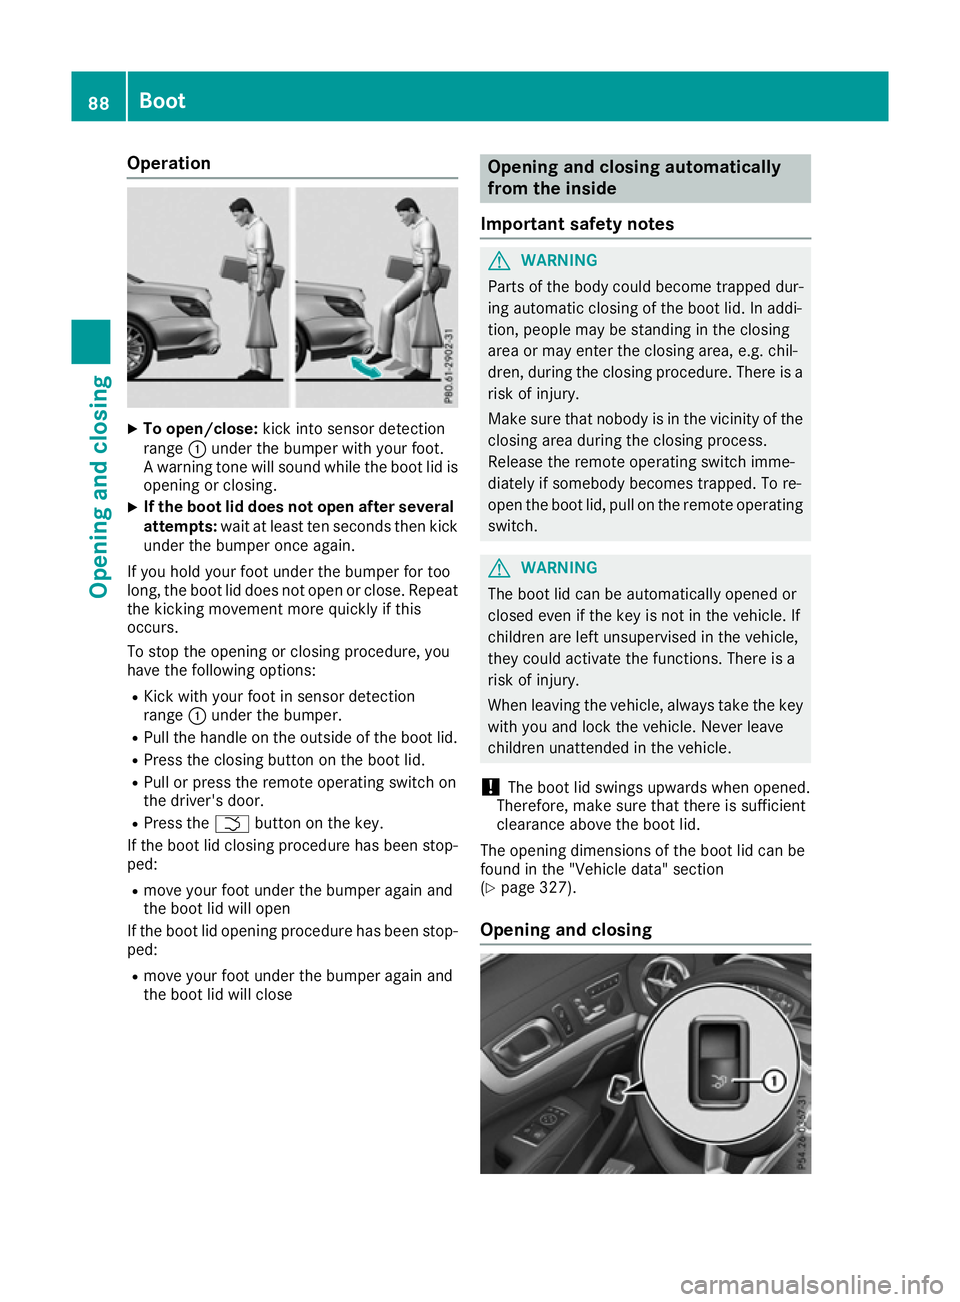
To open/close: kick into sensor detection
range :under the bumper with your foot.
A warning tone will sound while the boot lid is opening or closing.
X If the boot lid does not open after several
attempts: wait at least ten seconds then kick
under the bumper once again.
If you hold your foot under the bumper for too
long, the boot lid does not open or close. Repeat
the kicking movement more quickly if this
occurs.
To stop the opening or closing procedure, you
have the following options:
R Kick with your foot in sensor detection
range :under the bumper.
R Pull the handle on the outside of the boot lid.
R Press the closing button on the boot lid.
R Pull or press the remote operating switch on
the driver's door.
R Press the Fbutton on the key.
If the boot lid closing procedure has been stop- ped:
R move your foot under the bumper again and
the boot lid will open
If the boot lid opening procedure has been stop- ped:
R move your foot under the bumper again and
the boot lid will close Opening and closing automatically
from the inside
Important safety notes G
WARNING
Parts of the body could become trapped dur-
ing automatic closing of the boot lid. In addi-
tion, people may be standing in the closing
area or may enter the closing area, e.g. chil-
dren, during the closing procedure. There is a risk of injury.
Make sure that nobody is in the vicinity of theclosing area during the closing process.
Release the remote operating switch imme-
diately if somebody becomes trapped. To re-
open the boot lid, pull on the remote operating
switch. G
WARNING
The boot lid can be automatically opened or
closed even if the key is not in the vehicle. If
children are left unsupervised in the vehicle,
they could activate the functions. There is a
risk of injury.
When leaving the vehicle, always take the key with you and lock the vehicle. Never leave
children unattended in the vehicle.
! The boot lid swings upwards when opened.
Therefore, make sure that there is sufficient
clearance above the boot lid.
The opening dimensions of the boot lid can be
found in the "Vehicle data" section
(Y page 327).
Opening and closing 88
BootOpening and closing
Page 94 of 333
Opening/closing the rear side windows
X
To open: open the front side window on the
corresponding side (Y page 90).
X Press the corresponding switch again and
release.
The corresponding rear side window opens
fully.
X To stop the rear side windows: briefly pull
the corresponding switch up and release.
X To close: close the front side window on the
corresponding side (Y page 90).
X Pull the respective switch and hold it.
The corresponding rear side window will con-
tinue to close until you release the switch. Opening and closing all side windows
Using the switch on the centre console G
WARNING
When a side window is closed, body parts may become trapped in the closing range. There is a risk of injury.
Ensure that there are no body parts in the
closing range of the window when closing it. If
somebody becomes trapped, release the but- ton immediately or press the lower section of
the button to open the side window again.
Using the switch on the centre console, you can
close all side windows simultaneously.
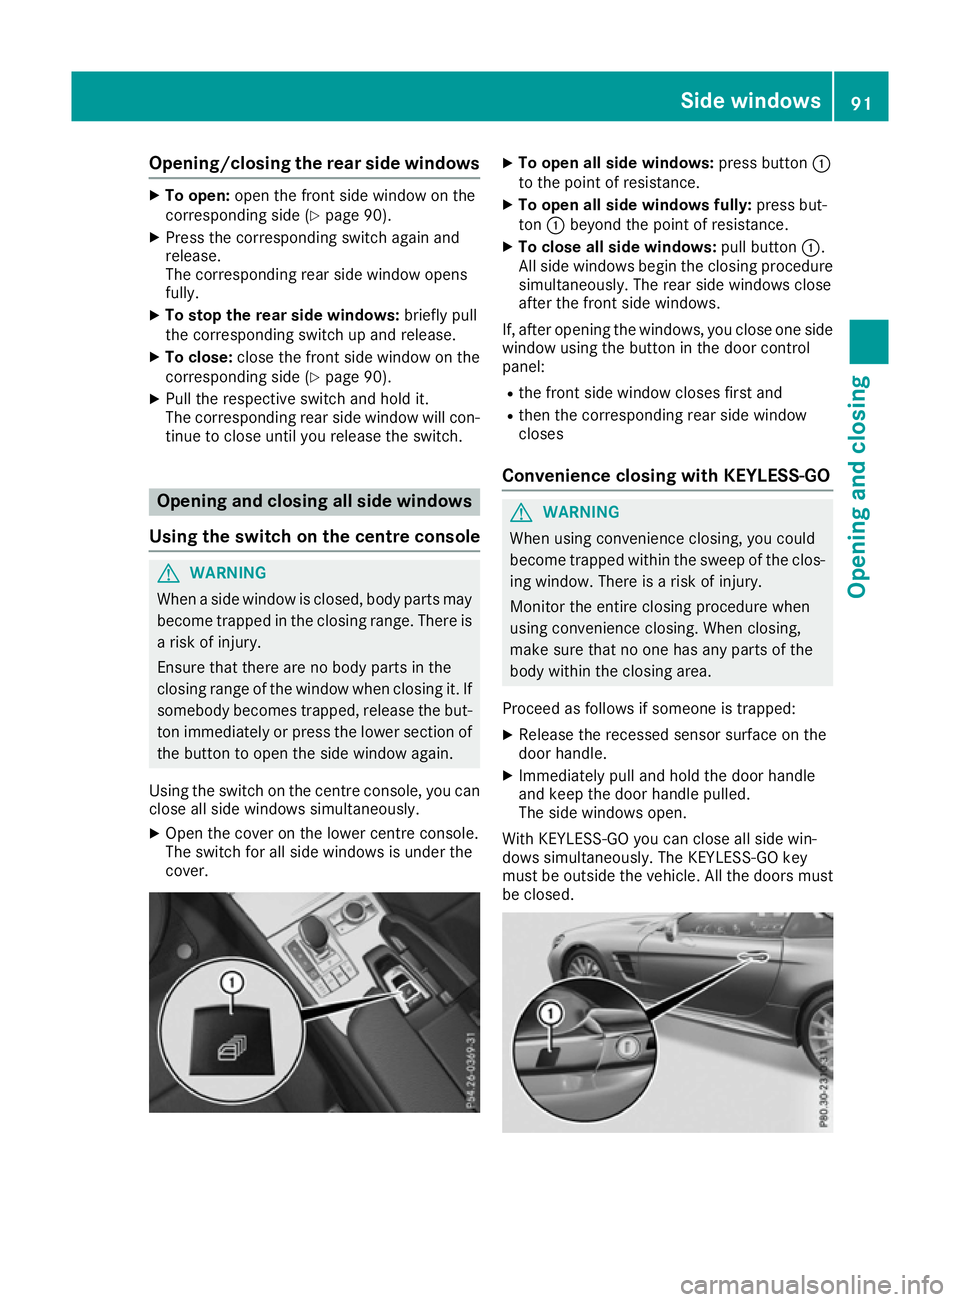
X Open the cover on the lower centre console.
The switch for all side windows is under the
cover. X
To open all side windows: press button:
to the point of resistance.
X To open all side windows fully: press but-
ton :beyond the point of resistance.
X To close all side windows: pull button:.
All side windows begin the closing procedure simultaneously. The rear side windows close
after the front side windows.
If, after opening the windows, you close one side
window using the button in the door control
panel:
R the front side window closes first and
R then the corresponding rear side window
closes
Convenience closing with KEYLESS-GO G
WARNING
When using convenience closing, you could
become trapped within the sweep of the clos- ing window. There is a risk of injury.
Monitor the entire closing procedure when
using convenience closing. When closing,
make sure that no one has any parts of the
body within the closing area.
Proceed as follows if someone is trapped:
X Release the recessed sensor surface on the
door handle.
X Immediately pull and hold the door handle
and keep the door handle pulled.
The side windows open.
With KEYLESS-GO you can close all side win-
dows simultaneously. The KEYLESS-GO key
must be outside the vehicle. All the doors must
be closed. Side windows
91Opening and closing Z
Page 95 of 333
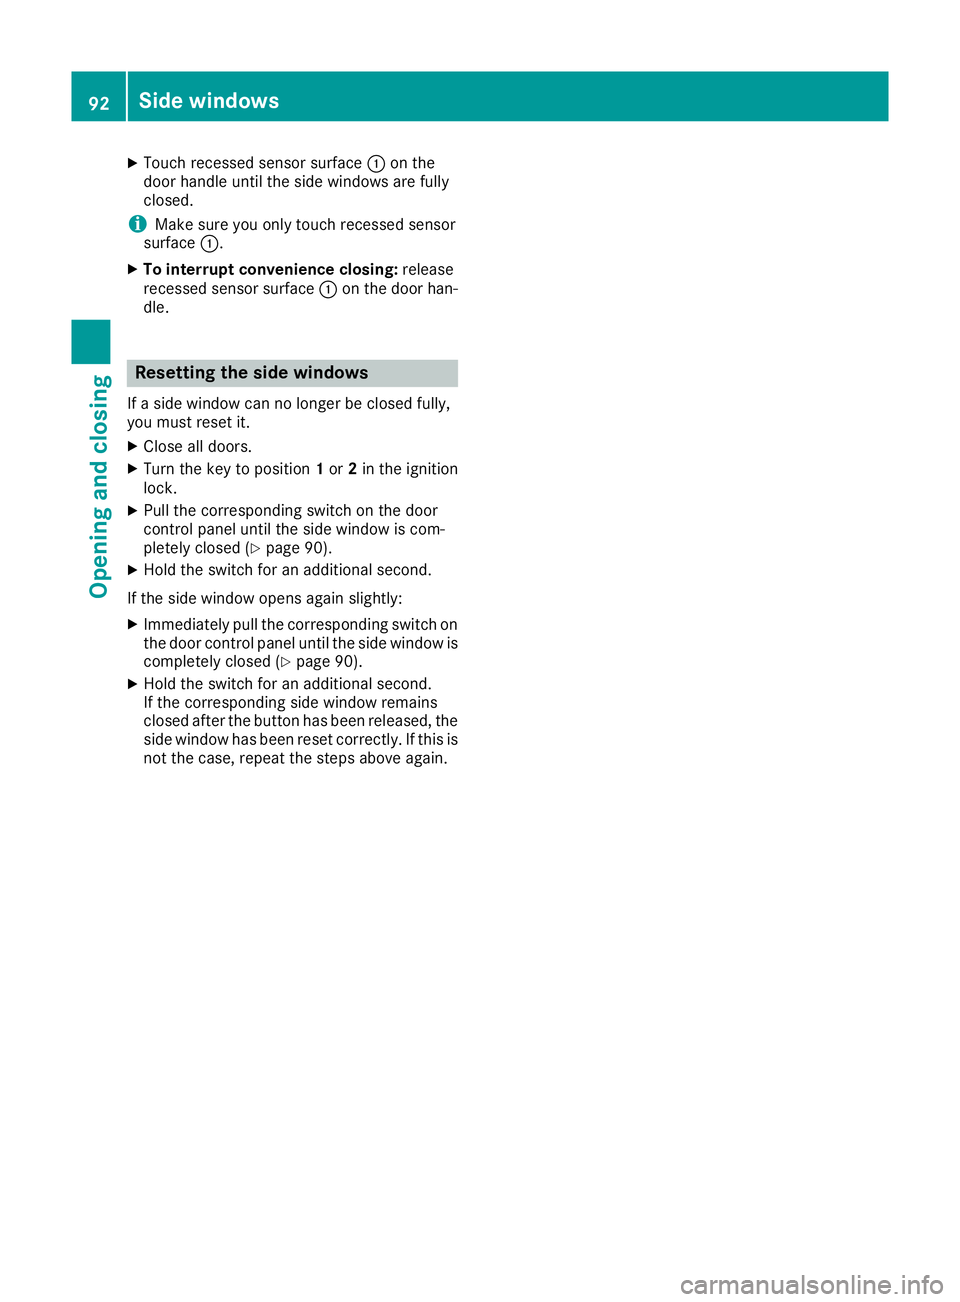
X
Touch recessed sensor surface :on the
door handle until the side windows are fully
closed.
i Make sure you only touch recessed sensor
surface :.
X To interrupt convenience closing: release
recessed sensor surface :on the door han-
dle. Resetting the side windows
If a side window can no longer be closed fully,
you must reset it.
X Close all doors.
X Turn the key to position 1or 2in the ignition
lock.
X Pull the corresponding switch on the door
control panel until the side window is com-
pletely closed (Y page 90).
X Hold the switch for an additional second.
If the side window opens again slightly: X Immediately pull the corresponding switch on
the door control panel until the side window is completely closed (Y page 90).
X Hold the switch for an additional second.
If the corresponding side window remains
closed after the button has been released, the side window has been reset correctly. If this is
not the case, repeat the steps above again. 92
Side windowsOpening and closing
Page 116 of 333
Exterior lighting
General notes
For reasons of safety, Mercedes-Benz recom-
mends that you drive with the lights switched on even during the daytime. In some countries,
operation of the headlamps varies due to legal
requirements and self-imposed obligations. Driving abroad
Symmetrical dipped-beam headlamps If your journey takes you to countries where
vehicles are driven on the opposite side of the
road to the country in which the vehicle is reg-
istered, your headlamps must be switched to
symmetrical dipped beam. This prevents
oncoming traffic from being dazzled. Symmetri-
cal lights do not illuminate as large an area of the edge of the carriageway.
Convert the headlamps as close to the border aspossible before driving in these countries
(Y page 210).
Asymmetrical dipped-beam headlamps Convert the headlamps back to asymmetrical
dipped beam as soon as possible after crossing
the border (Y page 210).
If the headlamps are converted to symmetrical
dipped beam, the "motorway mode" and "exten-
ded range foglamps" functions (Intelligent Light
System) are not available. Setting the exterior lighting
Setting options Exterior lighting can be set by:
R using the light switch
R using the combination switch (Y page 115)
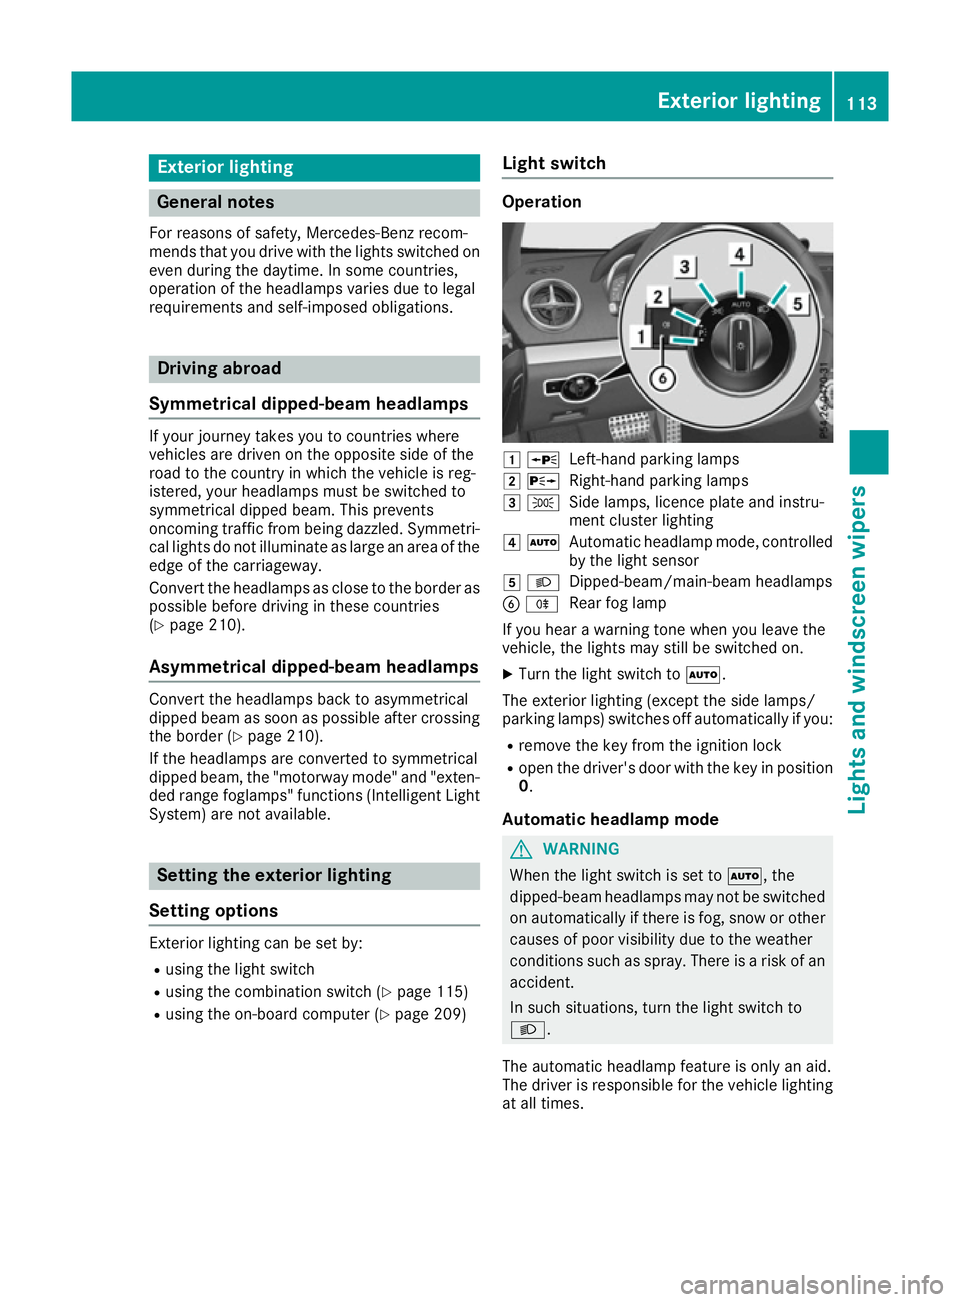
R using the on-board computer (Y page 209)Light switch Operation
1
W
Left-hand parking lamps
2 X
Right-hand parking lamps
3 T
Side lamps, licence plate and instru-
ment cluster lighting
4 Ã
Automatic headlamp mode, controlled
by the light sensor
5 L
Dipped-beam/main-beam headlamps
B R
Rear fog lamp
If you hear a warning tone when you leave the
vehicle, the lights may still be switched on.
X Turn the light switch to Ã.
The exterior lighting (except the side lamps/
parking lamps) switches off automatically if you: R remove the key from the ignition lock
R open the driver's door with the key in position
0.
Automatic headlamp mode G
WARNING
When the light switch is set to Ã, the
dipped-beam headlamps may not be switched on automatically if there is fog, snow or othercauses of poor visibility due to the weather
conditions such as spray. There is a risk of an
accident.
In such situations, turn the light switch to
L.
The automatic headlamp feature is only an aid.
The driver is responsible for the vehicle lighting at all times. Exterior lighting
113Lights and windscreen wipers Z
Page 117 of 333
Ã
is the preferred light switch position. The
light setting is automatically selected according to the brightness of the ambient light (excep-
tion: poor visibility due to weather conditions
such as fog, snow or spray):
R Key in position 1in the ignition lock: the side
lamps are switched on or off automatically
depending on the brightness of the ambient
light
R With the engine running: if you have switched
on the daytime driving lights function in the
on-board computer, the daytime driving lights
or the side lamps and dipped-beam head-
lamps are switched on or off automatically
depending on the brightness of the ambient
light
X To switch on automatic headlamp mode:
turn the light switch to
Ã.
The daytime driving lights improve the detecta-
bility of your vehicle during the day. Here, the
daytime driving lights function must be switched on via the on-board computer (Y page 209).
When the dipped-beam headlamps are switched
on, the green Lindicator lamp in the instru-
ment cluster lights up and the daytime driving
lights are switched off or dimmed.
Dipped-beam headlamps G
WARNING
When the light switch is set to Ã, the
dipped-beam headlamps may not be switched on automatically if there is fog, snow or othercauses of poor visibility due to the weather
conditions such as spray. There is a risk of an
accident.
In such situations, turn the light switch to
L.
When the ignition is switched on and the light
switch is in the Lposition, the side lamps
and dipped-beam headlamps are switched on
even if the light sensor does not sense dark
ambient light conditions. This is advantageous
when there is fog or rain.
X To switch on the dipped-beam headlamps:
turn the key in the ignition lock to position 2
or start the engine.
X Turn the light switch to L.
The green Lindicator lamp in the instru-
ment cluster lights up. Rear fog lamp
The rear foglamp improves the visibility of your
vehicle in heavy fog for the following traffic.
Please observe the country-specific laws on the
use of rear foglamps.
X To switch on the rear foglamp: turn the key
in the ignition lock to position 2or start the
engine.
X Turn the light switch to LorÃ.
X Press the Rbutton.
The yellow Rindicator lamp in the instru-
ment cluster lights up.
X To switch off the rear foglamp: press the
R button.
The yellow Rindicator lamp in the instru-
ment cluster goes out.
Side lamps
! If the battery has been discharged to a low
charge level, the side lamps or parking lamps
are automatically switched off to enable the
next engine start. Always leave your vehicle in
a safe position and adequately lit in accord-
ance with traffic regulations. Avoid using the
side lamps Tfor a period of several hours.
If possible, switch on the right Xor left
W parking lamp.
X To switch on: turn the light switch to T.
The green Tindicator lamp in the instru-
ment cluster lights up.
Parking lamps Switching on the parking lamps ensures that the
corresponding side of the vehicle is illuminated.
X To switch on the parking lamps: the key is
not in the ignition lock or it is in position 0.
X Turn the light switch to W(left-hand side of
the vehicle) or X(right-hand side of the
vehicle). 114
Exterior lightingLights and windscreen wipers
Page 119 of 333
Active light function
The active light function is a system that moves
the headlamps according to the steering move-
ments of the front wheels. In this way, relevant
areas remain illuminated while you are driving.
This allows you to recognise pedestrians,
cyclists and animals.
Active: when the lights are switched on.
Vehicles with Lane Keeping Assist: the active
light function evaluates the course of the lane in which you are driving and adjusts the light in
advance.
Cornering light function The cornering light function improves the illu-
mination of the road over a wide angle in the
direction you are turning, enabling better visi-
bility in tight bends, for example. The cornering
light function can only be activated when the
dipped-beam headlamps are switched on.
Active:
R if you are driving at speeds below 40 km/h
and switch on the turn signal or turn the steer-
ing wheel
R if you are driving at speeds between 40 km/h
and 70 km/h and turn the steering wheel
The cornering light function may remain lit for a short time, but is automatically switched off
after no more than three minutes.
Cornering light function with roundabout
function:
The cornering light function is activated on both
sides before entering a roundabout through an
evaluation of the current GPS position of the
vehicle. It remains active until after the vehicle
has left the roundabout. In this way, pedestrians crossing the road, for example, are illuminated
by your vehicle in good time.
Motorway mode Motorway mode increases the range of the
beam.
Active:
R
if you are driving at speeds above 110 km/h
and do not make any large steering move-
ments for at least 1,000 m
R if you are driving at speeds above 130 km/h
Not active: if you are driving at speeds below
80 km/h following activation. Extended range foglamps The extended range foglamps reduce the glare
experienced by the driver and improve the illu-
mination of the edge of the carriageway.
Active: if you are driving at speeds below
70 km/h and you switch on the rear foglamp.
Not active: if, following activation, you are driv-
ing at speeds above 100 km/h or if you switch
off the rear foglamp. Adaptive Highbeam Assist Plus
General notes With Adaptive Highbeam Assist Plus, you can
automatically switch between dipped-beam,
partial main-beam and main-beam headlamps.
Partial main-beam illumination is a form of illu-
mination whereby the main beam is directed
past other road users. Other road users are kept
out of the main-beam. This prevents glare. If
there is a vehicle in front, for example, the main- beam headlamps illuminate the areas to its right
and left, and the vehicle in front is illuminated by
the dipped-beam headlamps.
The system automatically adapts the dipped-
beam headlamp range depending on the dis-
tance to the other vehicle. Once the system no
longer detects any other vehicles, it switches on the main-beam headlamps again.
If the main-beam or partial main-beam head-
lamps are causing too much reflection from traf- fic signs, the lights are automatically dimmed
and glare for the driver caused by the reflectionsis thus avoided.
The system's optical sensor is located behind
the windscreen near the overhead control
panel.
Vehicles with drive program S+(Sport Plus): the
speed at which Adaptive Highbeam Assist Plus
switches between full beam and dipped beam is
increased when the drive program is switched
on. 116
Exterior lightingLights and windscreen wipers