2016 MERCEDES-BENZ SL ROADSTER parking brake
[x] Cancel search: parking brakePage 224 of 333

Display messages
Possible causes/consequences and
M
MSolutions The yellow
!warning lamp lights up. If you manually apply or
release the electric parking brake, the red !indicator lamp
flashes.
The electric parking brake is malfunctioning. It is not possible to apply
the electric parking brake manually.
X Shift the transmission to position P, as the electric parking brake is
not applied automatically.
X Consult a qualified specialist workshop. !
Parking brake inop‐ Parking brake inop‐
erative erative The yellow
!warning lamp lights up. The red !indicator lamp
flashes for about ten seconds after the electric parking brake has been applied or released. It then goes out or remains lit.
The electric parking brake is malfunctioning, e.g. because of over-
voltage or undervoltage.
X Rectify the cause of the overvoltage or undervoltage, e.g. by charg-
ing the battery or restarting the engine.
X Apply or release the electric parking brake.
If the electric parking brake still cannot be applied or released: X Switch off the ignition and turn it back on.
X Apply or release the electric parking brake.
If the electric parking brake still cannot be released: X Consult a qualified specialist workshop.
If it is still not possible to apply the electric parking brake:
X Consult a qualified specialist workshop. The yellow
!warning lamp lights up and the red !indicator
lamp flashes.
It is not possible to apply the electric parking brake manually.
X Shift the transmission to position P.
X Consult a qualified specialist workshop. J
Check brake fluid Check brake fluid
level level There is insufficient brake fluid in the brake fluid reservoir.
In addition, the red Jwarning lamp lights up in the instrument
cluster and a warning tone sounds.
G WARNING
Braking efficiency may be impaired.
There is a risk of an accident.
X Pull over and stop the vehicle safely as soon as possible, paying
attention to road and traffic conditions. Do not continue driving
under any circumstances.
X Safeguard the vehicle against rolling away (Y page 153).
X Consult a qualified specialist workshop.
X Do not top up the brake fluid. This does not correct the fault. Display
messages
221On-board computer and displays Z
Page 242 of 333
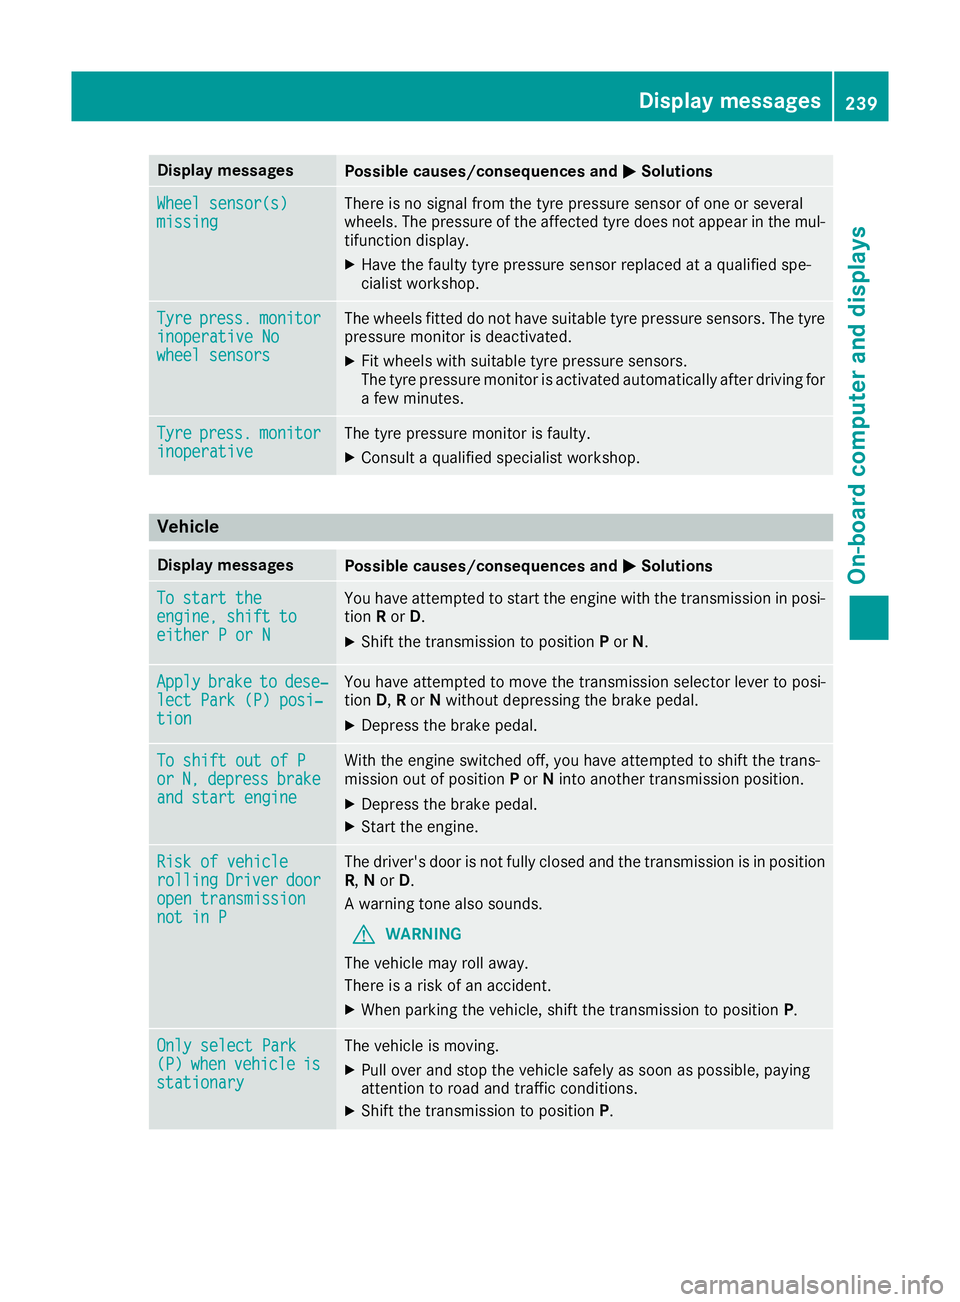
Display messages
Possible causes/consequences and
M
MSolutions Wheel sensor(s)
Wheel sensor(s)
missing missing There is no signal from the tyre pressure sensor of one or several
wheels. The pressure of the affected tyre does not appear in the mul-
tifunction display.
X Have the faulty tyre pressure sensor replaced at a qualified spe-
cialist workshop. Tyre Tyre
press.
press. monitor
monitor
inoperative No
inoperative No
wheel sensors wheel sensors The wheels fitted do not have suitable tyre pressure sensors. The tyre
pressure monitor is deactivated.
X Fit wheels with suitable tyre pressure sensors.
The tyre pressure monitor is activated automatically after driving for
a few minutes. Tyre Tyre
press.
press. monitor
monitor
inoperative
inoperative The tyre pressure monitor is faulty.
X Consult a qualified specialist workshop. Vehicle
Display messages
Possible causes/consequences and
M
MSolutions To start the
To start the
engine, shift to engine, shift to
either P or N either P or N You have attempted to start the engine with the transmission in posi-
tion Ror D.
X Shift the transmission to position Por N. Apply
Apply
brake
braketo
todese‐
dese‐
lect Park (P) posi‐
lect Park (P) posi‐
tion tion You have attempted to move the transmission selector lever to posi-
tion
D,Ror Nwithout depressing the brake pedal.
X Depress the brake pedal. To shift out of P To shift out of P
or or
N,
N,depress
depress brake
brake
and start engine
and start engine With the engine switched off, you have attempted to shift the trans-
mission out of position Por Ninto another transmission position.
X Depress the brake pedal.
X Start the engine. Risk of vehicle
Risk of vehicle
rolling rolling
Driver
Driverdoor
door
open transmission
open transmission
not in P not in P The driver's door is not fully closed and the transmission is in position
R, Nor D.
A warning tone also sounds.
G WARNING
The vehicle may roll away.
There is a risk of an accident.
X When parking the vehicle, shift the transmission to position P.Only select Park Only select Park
(P) (P)
when
when vehicle
vehicle is
is
stationary
stationary The vehicle is moving.
X
Pull over and stop the vehicle safely as soon as possible, paying
attention to road and traffic conditions.
X Shift the transmission to position P. Display
messages
239On-board computer and displays Z
Page 243 of 333
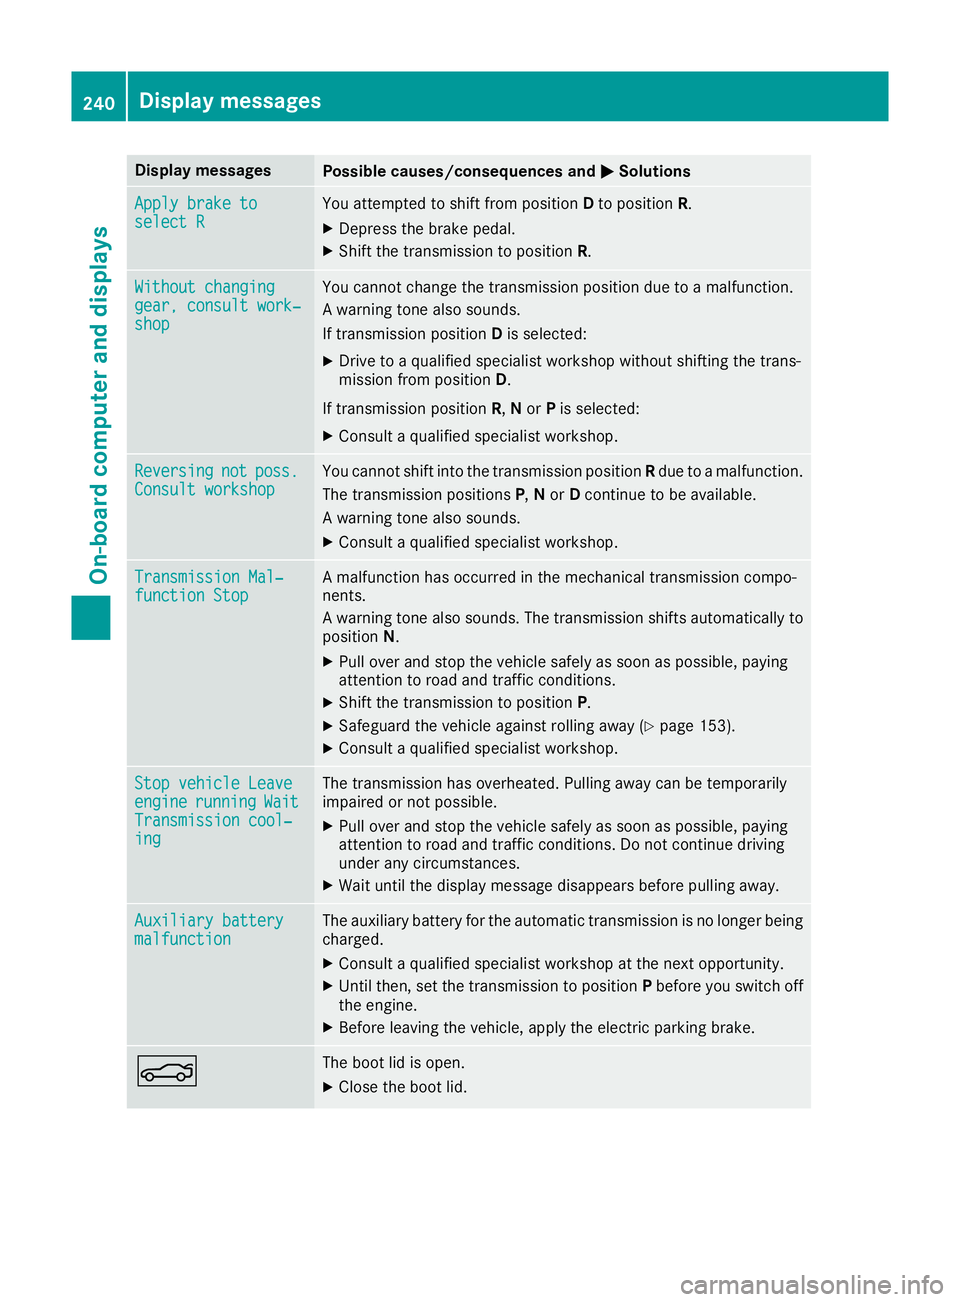
Display messages
Possible causes/consequences and
M
MSolutions Apply brake to
Apply brake to
select R select R You attempted to shift from position
Dto position R.
X Depress the brake pedal.
X Shift the transmission to position R.Without changing
Without changing
gear, consult work‐ gear, consult work‐
shop shop You cannot change the transmission position due to a malfunction.
A warning tone also sounds.
If transmission position
Dis selected:
X Drive to a qualified specialist workshop without shifting the trans-
mission from position D.
If transmission position R,Nor Pis selected:
X Consult a qualified specialist workshop. Reversing Reversing
not
not poss.
poss.
Consult workshop
Consult workshop You cannot shift into the transmission position
Rdue to a malfunction.
The transmission positions P,N or Dcontinue to be available.
A warning tone also sounds.
X Consult a qualified specialist workshop. Transmission Mal‐
Transmission Mal‐
function Stop function Stop A malfunction has occurred in the mechanical transmission compo-
nents.
A warning tone also sounds. The transmission shifts automatically to position N.
X Pull over and stop the vehicle safely as soon as possible, paying
attention to road and traffic conditions.
X Shift the transmission to position P.
X Safeguard the vehicle against rolling away (Y page 153).
X Consult a qualified specialist workshop. Stop vehicle Leave Stop vehicle Leave
engine engine
running
running Wait
Wait
Transmission cool‐
Transmission cool‐
ing ing The transmission has overheated. Pulling away can be temporarily
impaired or not possible.
X Pull over and stop the vehicle safely as soon as possible, paying
attention to road and traffic conditions. Do not continue driving
under any circumstances.
X Wait until the display message disappears before pulling away. Auxiliary battery Auxiliary battery
malfunction malfunction The auxiliary battery for the automatic transmission is no longer being
charged.
X Consult a qualified specialist workshop at the next opportunity.
X Until then, set the transmission to position Pbefore you switch off
the engine.
X Before leaving the vehicle, apply the electric parking brake. N The boot lid is open.
X Close the boot lid. 240
Display
messagesOn-board computer and displays
Page 251 of 333
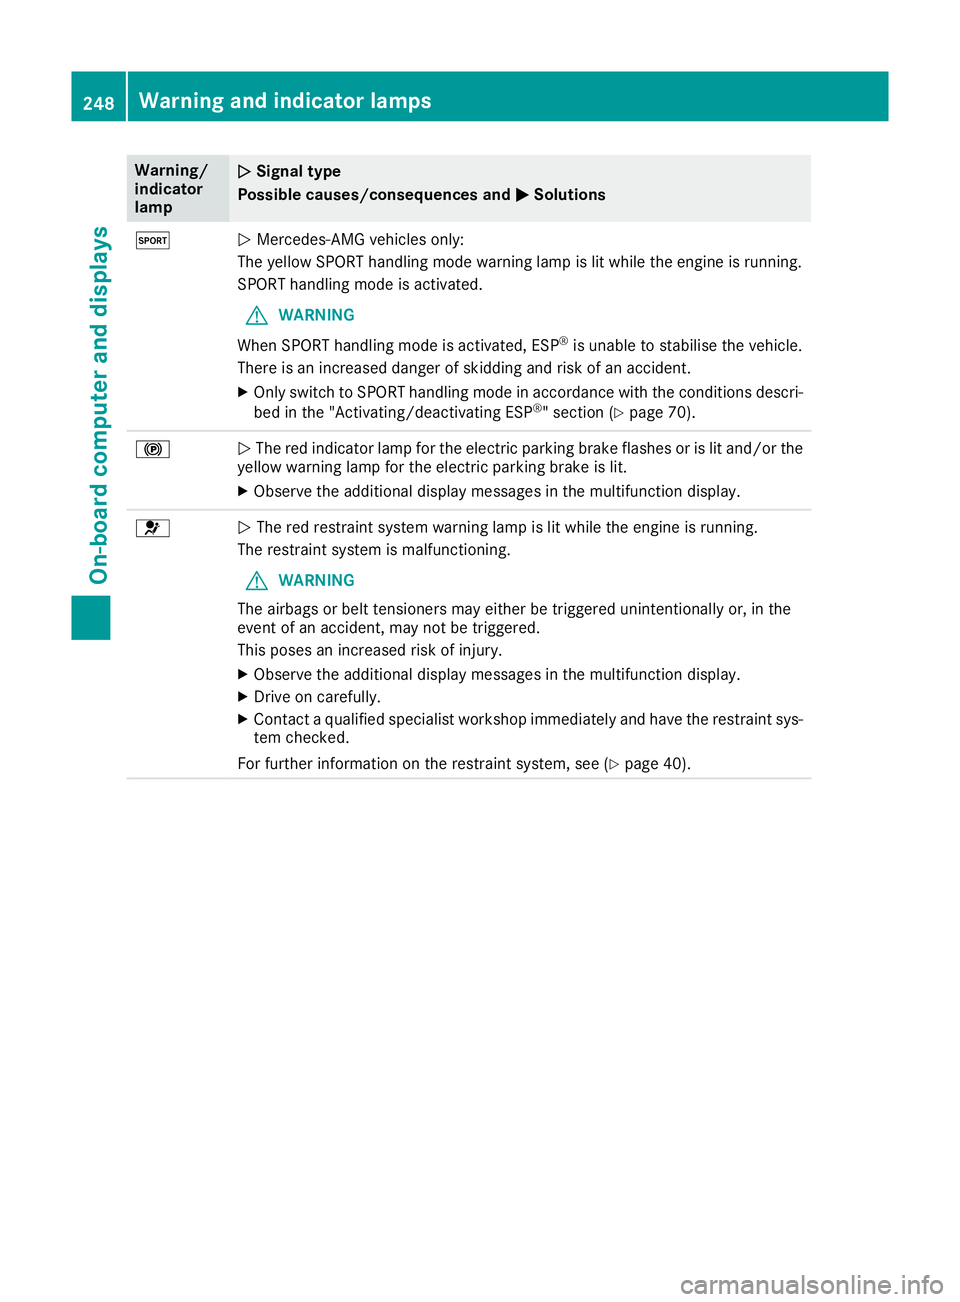
Warning/
indicator
lamp
N N
Signal type
Possible causes/consequences and M
M Solutions M
N
Mercedes-AMG vehicles only:
The yellow SPORT handling mode warning lamp is lit while the engine is running.
SPORT handling mode is activated.
G WARNING
When SPORT handling mode is activated, ESP ®
is unable to stabilise the vehicle.
There is an increased danger of skidding and risk of an accident.
X Only switch to SPORT handling mode in accordance with the conditions descri-
bed in the "Activating/deactivating ESP ®
" section (Y page 70). !
N
The red indicator lamp for the electric parking brake flashes or is lit and/or the
yellow warning lamp for the electric parking brake is lit.
X Observe the additional display messages in the multifunction display. 6
N
The red restraint system warning lamp is lit while the engine is running.
The restraint system is malfunctioning.
G WARNING
The airbags or belt tensioners may either be triggered unintentionally or, in the
event of an accident, may not be triggered.
This poses an increased risk of injury.
X Observe the additional display messages in the multifunction display.
X Drive on carefully.
X Contact a qualified specialist workshop immediately and have the restraint sys-
tem checked.
For further information on the restraint system, see (Y page 40).248
Warning and indicator lampsOn-board computer and displays
Page 300 of 333
Do not use a rapid charging device to start the vehicle. If your vehicle's battery is discharged, the
engine can be jump-started from another vehicle or from a second battery using jump leads.
Observe the following points:
R The battery is not accessible in all vehicles. If the other vehicle's battery is not accessible, jump-
start the vehicle using a second battery or a jump-starting device.
R You may only jump-start the vehicle when the engine and exhaust system are cold.
R Do not start the engine if the battery is frozen. Let the battery thaw first.
R Jump-starting may only be performed using batteries with a nominal voltage of 12 V.
R Only use jump leads that have a sufficient cross-section and insulated terminal clamps.
R If the battery is fully discharged, leave the battery that is being used to jump-start connected for
a few minutes before attempting to start. This charges the empty battery a little.
R Make sure that the two vehicles do not touch.
Make sure that:
R The jump leads are not damaged.
R Non-insulated parts of the terminal clamps do not come into contact with other metal parts while
the jump leads are connected to the battery.
R The jump leads cannot come into contact with parts which can move when the engine is running,
such as the V-belt pulley or the fan.
X Secure the vehicle by applying the electric parking brake.
X Shift the transmission to position P.
X Make sure that the ignition is switched off . All indicator lamps in the instrument cluster must be
off. When using the key, turn the key to position 0in the ignition lock and remove it (Y page 132).
X Switch off all electrical consumers, e.g. rear window heating, lighting etc.
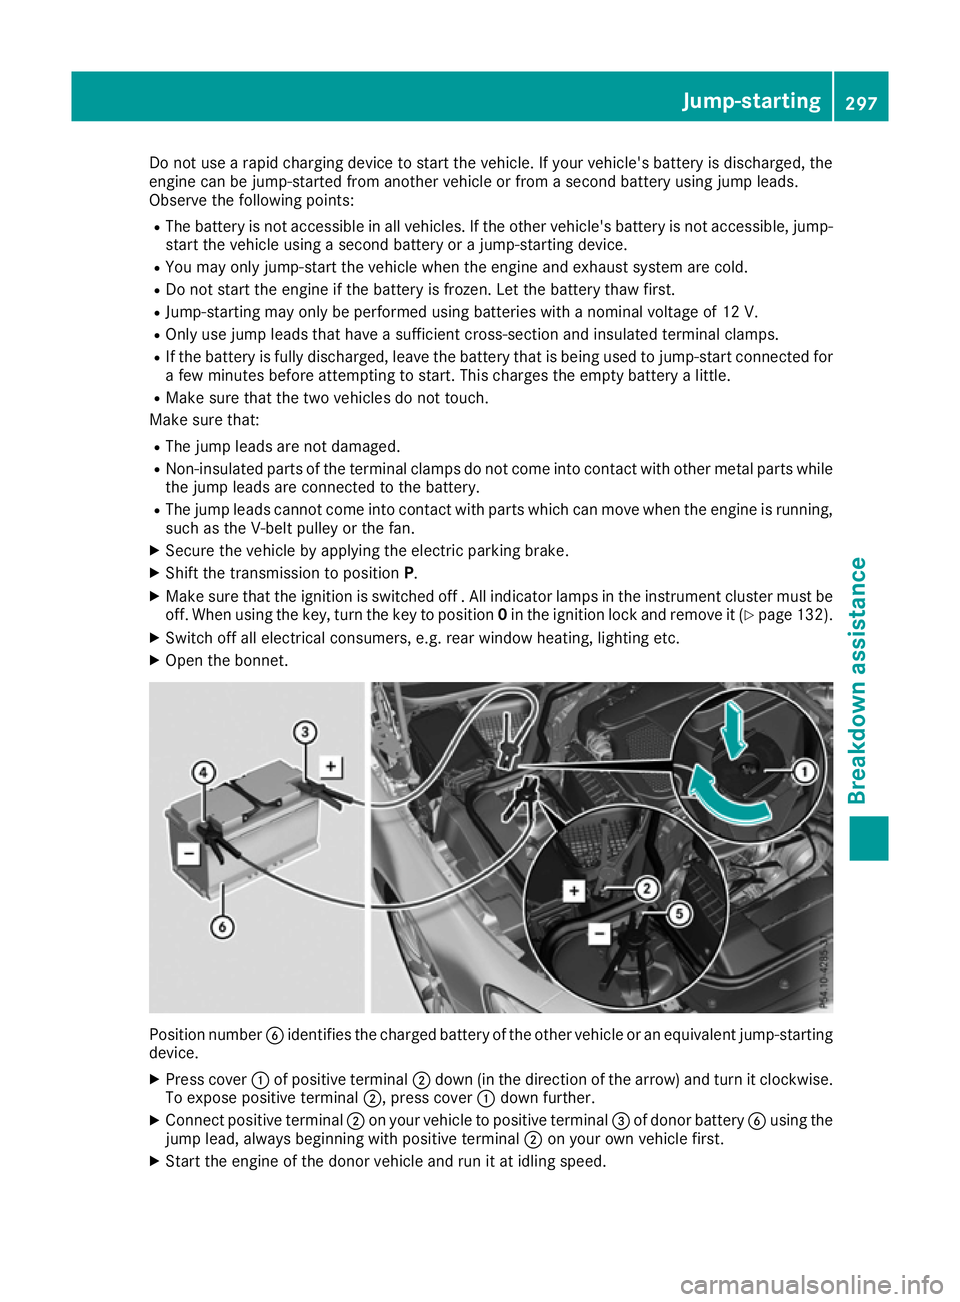
X Open the bonnet. Position number
Bidentifies the charged battery of the other vehicle or an equivalent jump-starting
device.
X Press cover :of positive terminal ;down (in the direction of the arrow) and turn it clockwise.
To expose positive terminal ;, press cover:down further.
X Connect positive terminal ;on your vehicle to positive terminal =of donor battery Busing the
jump lead, always beginning with positive terminal ;on your own vehicle first.
X Start the engine of the donor vehicle and run it at idling speed. Jump-starting
297Breakdown assistance Z
Page 301 of 333
X
Connect negative terminal ?of donor battery Bto earth point Aof your vehicle using the jump
lead, connecting the jump lead to donor battery Bfirst.
X Start the engine.
X Before disconnecting the jump leads, let the engines run for several minutes.
X First, remove the jump leads from earth point Aand negative terminal ?, then from positive
clamp ;and positive terminal =. Begin each time at the contacts on your own vehicle first.
X After the jump lead is removed, return cover :of positive terminal ;to the original position.
Positive terminal ;is covered up and thus insulated again.
X Have the battery checked at a qualified specialist workshop.
Jump-starting is not considered to be a normal operating condition.
i Jump-starting cables and further information regarding jump starting can be obtained at any
qualified specialist workshop. Towing away and tow-starting
Important safety notes
G
WARNING
When towing or tow-starting another vehicle
and its weight is greater than the permissible gross weight of your vehicle, the:
R towing eye may be torn off
R car/trailer combination may swerve or
even overturn
There is a risk of an accident.
When towing or tow-starting another vehicle,
its weight should not be greater than the per- missible gross weight of your vehicle.
Details on the permissible gross vehicle weight
of your vehicle can be found on the vehicle iden-
tification plate (Y page 321).
! When Active Brake Assist, Distance Pilot
DISTRONIC or the HOLD function are activa-
ted, the vehicle brakes automatically in cer-
tain situations.
To avoid damage to the vehicle, deactivate
these systems in the following or similar sit-
uations:
R when towing away
R in a car wash
! Only secure the tow rope or towing bar to
the towing eyes. The vehicle may otherwise
be damaged. !
Observe the following points when towing
with a tow rope:
R secure the tow rope on the same side on
both vehicles.
R make sure that the tow rope is not longer
than legally permitted. Mark the tow rope in
the middle, e.g. with a white cloth
(30 x 30 cm). This makes other road users
aware that a vehicle is being towed.
R only secure the tow rope to the towing eye.
R observe the brake lamps of the towing vehi-
cle while driving. Always maintain a dis-
tance so that the tow rope does not sag.
R do not use steel cables or chains to tow
your vehicle. You could otherwise damage
the vehicle.
! Do not use the towing eye for recovery, this
could damage the vehicle. If in doubt, recover the vehicle with a crane.
! When towing, pull away slowly and
smoothly. If the tractive power is too high, the
vehicles could be damaged.
! To tow vehicles with KEYLESS-GO, use the
key instead of the Start/Stop button. The
automatic transmission may otherwise
switch to position Pwhen you open the driv-
er's or front-passenger door which could
damage the transmission.
! Make sure that the electric parking brake is
released. If the electric parking brake is faulty,
visit a qualified specialist workshop.
! You may tow the vehicle for a maximum of
50km. A towing speed of 50 km/h must not
be exceeded. 298
Towing away and tow-startingBreakdown assistance
Page 303 of 333
Towing the vehicle with both axles on
the ground G
WARNING
If the steering wheel lock is engaged, the vehi- cle can no longer be steered. There is a risk of
an accident.
Always switch on the ignition when towing
with a tow rope or a towing bar.
The automatic transmission automatically shifts
to position Pwhen you open the driver's or front-
passenger door or when you remove the key
from the ignition lock.
In order to ensure that the automatic transmis-
sion stays in position Nwhen towing away the
vehicle, you must observe the following points:
X Switch on the hazard warning lamps
(Y page 115).
X Make sure that the vehicle is stationary and
that the key is in position 0in the ignition lock.
X Turn the key to position 2in the ignition lock.
On vehicles with KEYLESS-GO, use the key
instead of the Start/Stop button
(Y page 132).
X Depress the brake pedal and keep it
depressed.
X Shift the transmission to position N.
X Release the brake pedal.
X Release the electric parking brake.
X Leave the key in position 2in the ignition lock.
In order to signal a change of direction when
towing the vehicle with the hazard warning
lamps switched on, use the combination switch
as usual. In this case, only the turn signals for
the desired direction flash. When the combina-
tion switch is reset, the hazard warning lamps
start flashing again.
It is important that you observe the safety
instructions when towing away your vehicle
(Y page 298). Towing the vehicle away with the rear
axle raised
! The ignition must be switched off if you are
towing the vehicle with the rear axle raised.
Intervention by ESP ®
could otherwise dam-
age the brake system. !
Vehicles with automatic transmission must
not be towed with the rear axle raised. The
car/trailer combination may otherwise
swerve or even overturn. Transporting the vehicle
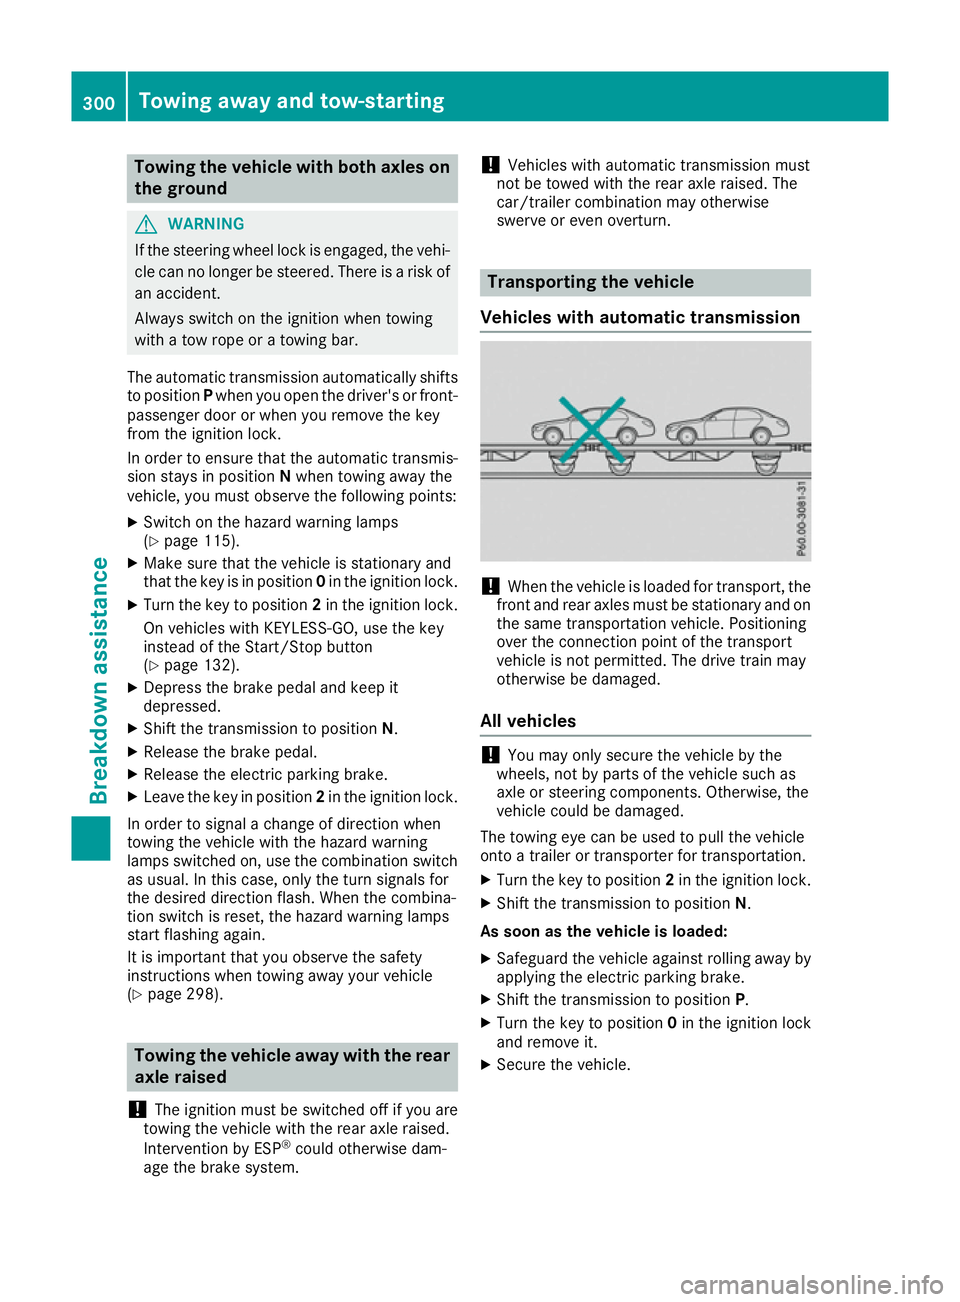
Vehicles with automatic transmission !
When the vehicle is loaded for transport, the
front and rear axles must be stationary and on the same transportation vehicle. Positioning
over the connection point of the transport
vehicle is not permitted. The drive train may
otherwise be damaged.
All vehicles !
You may only secure the vehicle by the
wheels, not by parts of the vehicle such as
axle or steering components. Otherwise, the
vehicle could be damaged.
The towing eye can be used to pull the vehicle
onto a trailer or transporter for transportation.
X Turn the key to position 2in the ignition lock.
X Shift the transmission to position N.
As soon as the vehicle is loaded:
X Safeguard the vehicle against rolling away by
applying the electric parking brake.
X Shift the transmission to position P.
X Turn the key to position 0in the ignition lock
and remove it.
X Secure the vehicle. 300
Towing away and tow-startingBreakdown assistance
Page 307 of 333
Important safety notes
G
WARNING
If wheels and tyres of the wrong size are used, the wheel brakes or suspension components
may be damaged. There is a risk of an acci-
dent.
Always replace wheels and tyres with those
that fulfil the specifications of the original
part.
When replacing wheels, make sure to fit the
correct:
R designation
R type
When replacing tyres, make sure to fit the
correct:
R designation
R manufacturer
R type G
WARNING
A flat tyre severely impairs the driving, steer-
ing and braking characteristics of the vehicle.
There is a risk of accident.
Tyres without run-flat characteristics:
R do not drive with a flat tyre.
R immediately replace the flat tyre with your
emergency spare wheel or spare wheel, or
consult a qualified specialist workshop.
Tyres with run-flat characteristics:
R pay attention to the information and warn-
ing notices on MOExtended tyres (tyres
with run-flat characteristics).
Accessories that are not approved for your vehi-
cle by Mercedes-Benz or are not being used cor- rectly can impair the operating safety.
Before purchasing and using non-approved
accessories, visit a qualified specialist work-
shop and enquire about:
R suitability
R legal stipulations
R factory recommendations Further information regarding wheels and tyres
can be found under "Wheel/tyre combinations"
(Y page 317).
You can ask for information regarding permitted
wheel-tyre combinations at a Mercedes-Benz
Service Centre.
Information on tyre pressures can be found:
R in the tyre pressure table in the fuel filler flap
(Y page 152)
R in the "Tyre pressure" section
Modification work on the brake system and
wheels is not permitted. The use of spacers or
brake dust shields is not permitted. This inva-
lidates the general operating permit for the vehi-
cle.
i Further information on wheels and tyres can
be obtained at any qualified specialist work-
shop. Operation
Information on driving
Check the tyre pressures when the vehicle is
heavily laden and adjust prior to a trip.
While driving, pay attention to vibrations, noises
and unusual handling characteristics, e.g. pull-
ing to one side. This may indicate that the
wheels or tyres are damaged. If you suspect that
a tyre is defective, reduce your speed immedi-
ately. Stop the vehicle as soon as possible to
check the wheels and tyres for damage. Hidden tyre damage could also be causing the unusual
handling characteristics. If you find no signs of
damage, have the tyres and wheels checked at a qualified specialist workshop.
When parking your vehicle, make sure not to
squash the tyre sidewalls. If you cannot avoid
driving over obstacles, e.g. kerbs, do so slowly
and at an obtuse angle only. You could other-
wise damage the wheel rims and tyres. Regular checking of wheels and tyres
G
WARNING
Damaged tyres can cause tyre inflation pres-
sure loss. As a result, you could lose control of your vehicle. There is a risk of accident. 304
OperationWheels and ty
res