2016 MERCEDES-BENZ SL ROADSTER ECO mode
[x] Cancel search: ECO modePage 183 of 333

mode if you prefer a more comfortable driving
style.
X Make sure that the engine is running or that it
has been switched off by the ECO start/stop function.
X If indicator lamp ;
; is lit: press button :.
Indicator lamp ;goes out. The comfortable
suspension setting is selected.
The AMG Ride Control COMFORT AMG Ride Control COMFORT message
appears in the multifunction display.
Activating the driving dynamics display in the COMAND display Using the driving dynamics display in the multi-
media system display, you can see the drive
program you selected as well as additional infor-
mation on the vehicle's operating status.
X Switch on COMAND Online. You can find fur-
ther information in the separate COMAND
Online operating instructions.
The following information on the vehicle's oper- ating status is displayed in the driving dynamics display:
R Drive program selected (Y page 140)
R Accelerator pedal position shown in %
R Brake pedal position shown in %
R Steering angle
R Vehicle level display (Y page 178)
R Activity of the ABC spring struts
R Level settings animation
R G-FORCE cross to display longitudinal and lat-
eral acceleration (only available in Sport,
Sport Plus andRACE drive programs)
R Overrun mode animation PARKTRONIC
Important safety notes PARKTRONIC is an electronic parking aid with
ultrasonic sensors. It monitors the area around
your vehicle using six sensors in the front
bumper and six sensors in the rear bumper.
PARKTRONIC indicates visually and audibly the
distance between your vehicle and an object.
PARKTRONIC is only an aid. It is not a substitute
for your attention to the immediate surround-
ings. The responsibility for safe manoeuvring
and parking remains with you. Make sure that there are no persons, animals or objects in
range while manoeuvring and parking.
! When parking, pay particular attention to
objects above or below the sensors, such as
flower pots or trailer drawbars. PARKTRONIC
does not detect such objects when they are in the immediate vicinity of the vehicle. You
could damage the vehicle or the objects.
The sensors may not detect snow and objects
which absorb ultrasonic sources.
Ultrasonic sources, such as an automatic car wash, a lorry's compressed-air brakes or a
pneumatic drill, could cause PARKTRONIC to
malfunction.
PARKTRONIC may not function correctly on
uneven terrain.
PARKTRONIC is activated automatically when
you:
R switch on the ignition
R shift the transmission to position D,Ror N
R release the electric parking brake
PARKTRONIC is deactivated at speeds above
18 km/h. It is reactivated at lower speeds.
Range of the sensors General notes
PARKTRONIC does not take into account obsta- cles located:
R below the detection range, e.g. persons, ani-
mals or objects
R above the detection range, e.g. overhanging
loads, tail sections or loading ramps of goods vehicles :
Example: sensors in the front bumper, left-
hand side
The sensors must be free of dirt, ice and slush.
Otherwise, they may not function correctly. 180
Driving systemsDriving and parking
Page 206 of 333
X
Press the =or; button on the steering
wheel to select the Trip
Trip menu.
X Press 9or: to select the display with
approximate range :and current fuel con-
sumption ;.
Approximate range :that can be covered is
calculated according to your current driving
style and the amount of fuel in the tank. If
there is only a small amount of fuel left in the
fuel tank, a vehicle being refuelled C
appears instead of approximate range :.
Recuperation display =shows you if energy
has been recuperated from the kinetic energy in overrun mode and saved in the battery.
Recuperation display =depends on the
engine installed and is therefore not available in all vehicles.
Digital speedometer X
Press the =or; button on the steering
wheel to select the Trip
Trip menu.
X Press the 9or: button to select the
digital speedometer.
A gearshift recommendation Zmay also
appear in the display.
Observe the information on gearshift recom-
mendation when shifting manually
(Y page 149).
Mercedes-AMG vehicles: a gearshift recom-
mendation is shown in the status bar of the
multifunction display and not in the digital
speedometer display.
Resetting values X
Press the =or; button on the steering
wheel to select the Trip
Trip menu.
X Press the 9or: button to select the
function that you wish to reset.
X Press ato confirm your selection.
X Press :to select Yes
Yes and press ato
confirm.
You can reset the values of the following func-
tions: R Trip meter
R "From start" trip computer
R "From reset" trip computer
R ECO display
If you reset the values in the "ECO display", the
values in the "From start" trip computer are also reset. If you reset the values in the "From start"
trip computer, the values in the "ECO display"
are also reset. Navigation menu
Displaying navigation instructions The multifunction display shows navigation
instructions in the
Navi Navimenu.
Observe the additional information on naviga-
tion in the separate operating instructions for
the multimedia system.
X Switch on the multimedia system (see sepa-
rate operating instructions).
X Press the =or; button on the steering
wheel to select the Navi
Navi menu.
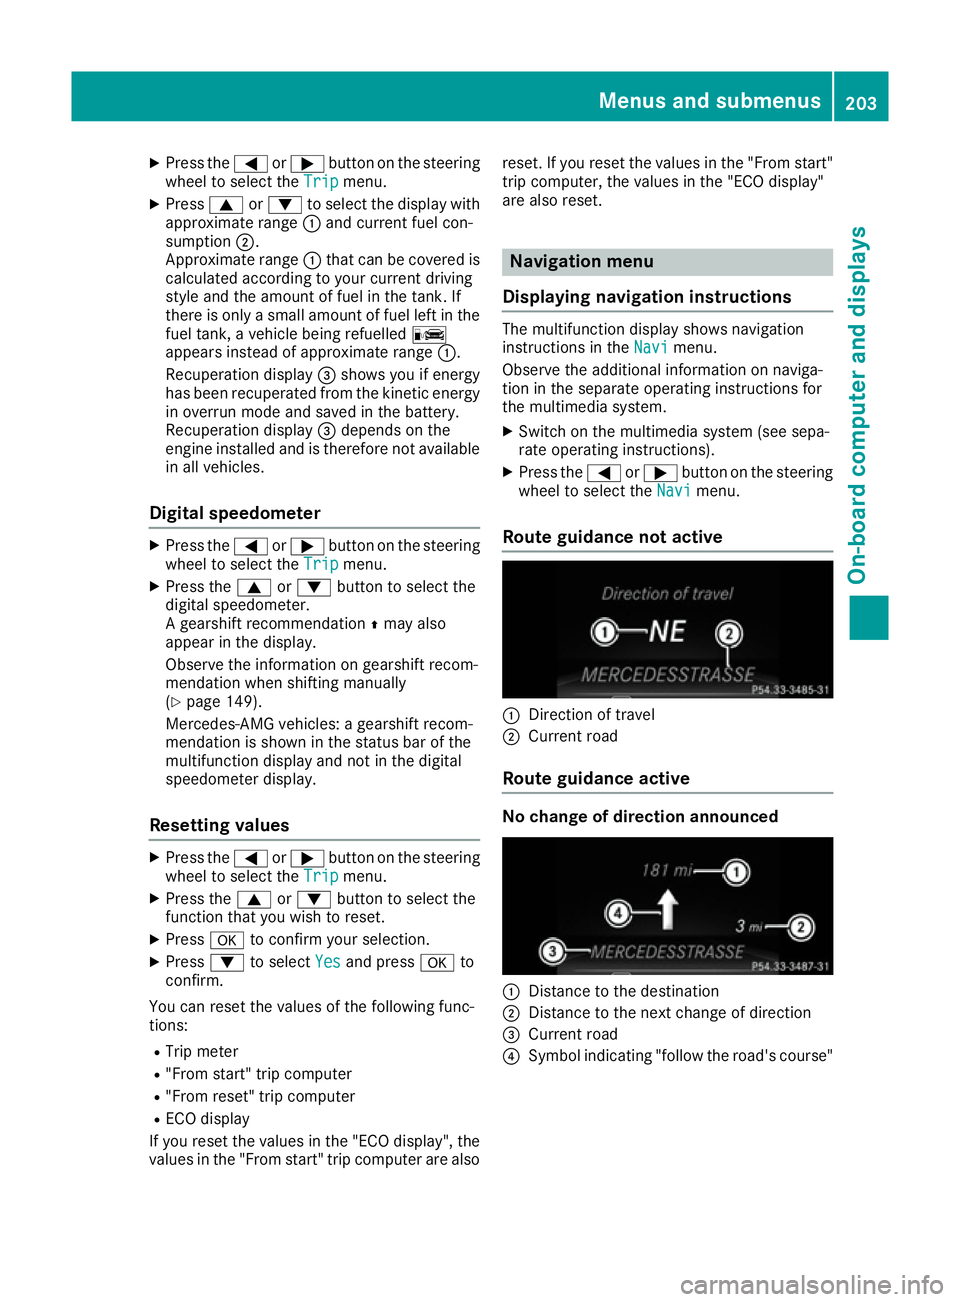
Route guidance not active :
Direction of travel
; Current road
Route guidance active No change of direction announced
:
Distance to the destination
; Distance to the next change of direction
= Current road
? Symbol indicating "follow the road's course" Menus and submenus
203On-board computer and displays Z
Page 212 of 333
Instrument cluster
Selecting the distance unit
The Display unit Speed-/odometer:
Display unit Speed-/odometer: func-
tion allows you to choose whether certain dis-
plays appear in kilometres or miles in the mul-
tifunction display.
X Press the =or; button on the steering
wheel to select the Settings Settingsmenu.
X Press the :or9 button to select the
Instrument cluster
Instrument cluster submenu.
X Press ato confirm.
X Press the :or9 button to select the
Display unit Speed-/odometer
Display unit Speed-/odometer function.
The current setting km
km ormiles
miles appears.
X Press the abutton to save the setting.
The selected unit of measurement for distance
applies to the: R digital speedometer in the Trip Tripmenu
R total distance recorder and trip meter
R trip computer
R current consumption and the range
R navigation instructions in the Navi
Navimenu
R cruise control
R speed limiter
R Distance Pilot DISTRONIC
R ASSYST PLUS service interval display
Selecting permanent display United Kingdom: this function is unavailable.
The Permanent display:
Permanent display: function allows you
to choose whether the multifunction display
always shows the outside temperature or the
speed.
The speed display is inverse to your speedome-
ter.
X Press the =or; button on the steering
wheel to select the Settings Settingsmenu.
X Press the :or9 button to select the
Instrument cluster
Instrument cluster submenu.
X Press ato confirm.
X Press the :or9 button to select the
Permanent display:
Permanent display: function.
The current setting, outside temperature
outside temperature
or Dig. speedo [mph]:
Dig. speedo [mph]: , appears.
X To change the setting: pressaagain. Lights Setting the daytime driving lights
The Daytime driving lights
Daytime driving lights function can
only be switched on with the engine switched
off.
X Press the =or; button on the steering
wheel to select the Settings Settingsmenu.
X Press the :or9 button to select the
Lights
Lights submenu.
X Press ato confirm.
X Press the :or9 button to select the
Daytime driving lights
Daytime driving lights function.
If the Daytime
Daytime driving
drivinglights
lightsfunction has
been switched on, the cone of light and the
W symbol in the multifunction display are
shown in orange.
X Press the abutton to save the setting.
Further information on daytime driving lights
(Y page 113).
Switching the Intelligent Light System
on/off
X Press the =or; button on the steering
wheel to select the Settings Settingsmenu.
X Press the :or9 button to select the
Lights
Lights submenu.
X Press ato confirm.
X Press the :or9 button to select the
Intell. Light System
Intell. Light System function.
If the Intell. Light System
Intell. Light System function has
been switched on, the multifunction display
shows the cone of light and the Lsymbol
in orange.
X Press the abutton to save the setting.
When you activate the Intell.
Intell. Light LightSystem
System ,
you activate the following functions:
R Motorway mode
R Active light function
R Cornering light function
R Extended range foglamps
If you set the dipped-beam headlamps for driv-
ing on the right/left, the multifunction display
shows the Intell. Light System: System
Intell. Light System: System
inoperative Inactive for left-side inoperative Inactive for left-side
traffic traffic orIntell.
Intell. Light
LightSystem:
System: System
System
inoperative Inactive for right-side
inoperative Inactive for right-side
traffic
traffic display message instead of the
Intell. Light Sys.
Intell. Light Sys. function in theLight
Light
submenu (Y page 210). This display message
will only appear if the setting for driving on the Menus and submenus
209On-board computer and displays Z
Page 213 of 333
left/right is set opposite to your vehicle's coun-
try version.
Further information on the Intelligent Light Sys-
tem (Y page 115).
Setting the dipped-beam headlamps for
driving on the left/right
You can use this function to switch between
symmetrical and asymmetrical dipped beam
(Y page 113).
X Press the =or; button on the steering
wheel to select the Settings
Settings menu.
X Press the :or9 button to select the
Lights
Lights submenu.
X Press ato confirm.
X Press the :or9 button to select the
Dipped beams Setting for:
Dipped beams Setting for: function.
The current setting Right-side traffic
Right-side traffic or
Left-side traffic Left-side traffic appears.
X Press the abutton to save the setting.
If you change the setting, conversion does not take place until the next time the vehicle is
stationary.
If you set the dipped-beam headlamps for driv-
ing on the right/left, then motorway mode and
the extended range foglamps are unavailable.
These are only deactivated if the setting for driv-
ing on the left/right is set opposite to your vehi-
cle's country version.
A qualified specialist workshop can set the
dipped-beam headlamps for driving on the left/ right.
Setting the brightness of the ambient
lighting
X Press the =or; button on the steering
wheel to select the Settings
Settings menu.
X Press the :or9 button to select the
Lights
Lights submenu.
X Press ato confirm.
X Press the :or9 button to select the
Amb. light +/- Amb. light +/- function.
The current setting appears.
X Press ato confirm.
X Press the :or9 button to adjust the
brightness to any level from Off
OfftoLevel 5
Level 5
(bright).
X Press the aor% button to save the
setting. Setting the ambient lighting colour
X Press the =or; button on the steering
wheel to select the Settings
Settings menu.
X Press the :or9 button to select the
Lights
Lights submenu.
X Press ato confirm.
X Press the :or9 button to select the
Amb. light col.
Amb. light col. function.
X Press ato confirm.
X Press the :or9 button to set the col-
our to SOLAR
SOLAR, SOLAR orange
SOLAR orange orSOLAR red
SOLAR red.
X Press the aor% button to save the
setting.
Activating/deactivating the surround
lighting and exterior lighting delayed
switch-off
X Press the =or; button on the steering
wheel to select the Settings Settingsmenu.
X Press the :or9 button to select the
Lights
Lights submenu.
X Press ato confirm.
X Press :or9 to select the Surround
Surround
lighting
lighting function.
If the Surround
Surround lighting
lightingfunction is activa-
ted, the multifunction display shows the light
cone and the area around the vehicle in
orange.
X Press the abutton to save the setting.
Deactivating delayed switch-off of the exterior
lighting temporarily: X Before leaving the vehicle, turn the key to
position 0in the ignition lock.
X Turn the key to position 2in the ignition lock.
The exterior lighting delayed switch-off is
deactivated.
Delayed switch-off of the exterior lighting is
reactivated the next time you start the engine.
If you have activated the Surround lighting Surround lighting
function and you turn the light switch to Ã,
the following functions are activated when it is
dark:
R surround lighting: the exterior lighting
remains lit for 40 seconds after unlocking
with the key. If you start the engine, the sur-
round lighting is switched off and automatic
headlamp mode is activated (Y page 113).
R exterior lighting delayed switch-off: the
exterior lighting remains lit for 60 seconds
after the engine is switched off. If you close all 210
Menus and submenusOn-board computer and displays
Page 257 of 333
Adjusting the volume
X
Turn the qcontrol knob.
The volume is adjusted:
R for the currently selected media source
R during traffic or navigation announcements
R in hands-free mode during a phone call
Switching the sound on/off X
Press the 8button on the control panel.
If the audio output is switched off, the status
line will show the 8symbol. If you switch
the media source or set the volume, the sound
is automatically switched on.
i Navigation messages will be heard even if
the sound is muted.
Functions The multimedia system has the following func-
tions:
R Radio mode
R Media mode with media search
R Sound systems
R Navigation system
COMAND Online: navigation via the hard drive
Audio 20: navigation via SD card
R Communication functions
R Vehicle functions with system settings
R Favourites functions
Controller The controller in the centre console lets you:
R select menu items on the display
R enter characters
R select a destination on the map
R save entries
The controller can be:
R turned 3
R slid left or right 1
R slid forwards or back 4
R slid diagonally 2
R pressed briefly or pressed and held 7Back button You can use the
%button to exit a menu or to
call up the basic display of the current operating mode.
X To exit the menu: briefly press the%
button.
The multimedia system changes to the next
higher menu level in the current operating
mode.
X To call up the basic display: press the%
button for longer than two seconds.
The multimedia system changes to the basic
display of the current operating mode. Favourites
Calling up and exiting favourites X
To call up: press theòbutton on the con-
troller.
X Select a favourite, e. g. Vehicle Vehicle.
The favourites are displayed.
X To exit: press the òbutton again.
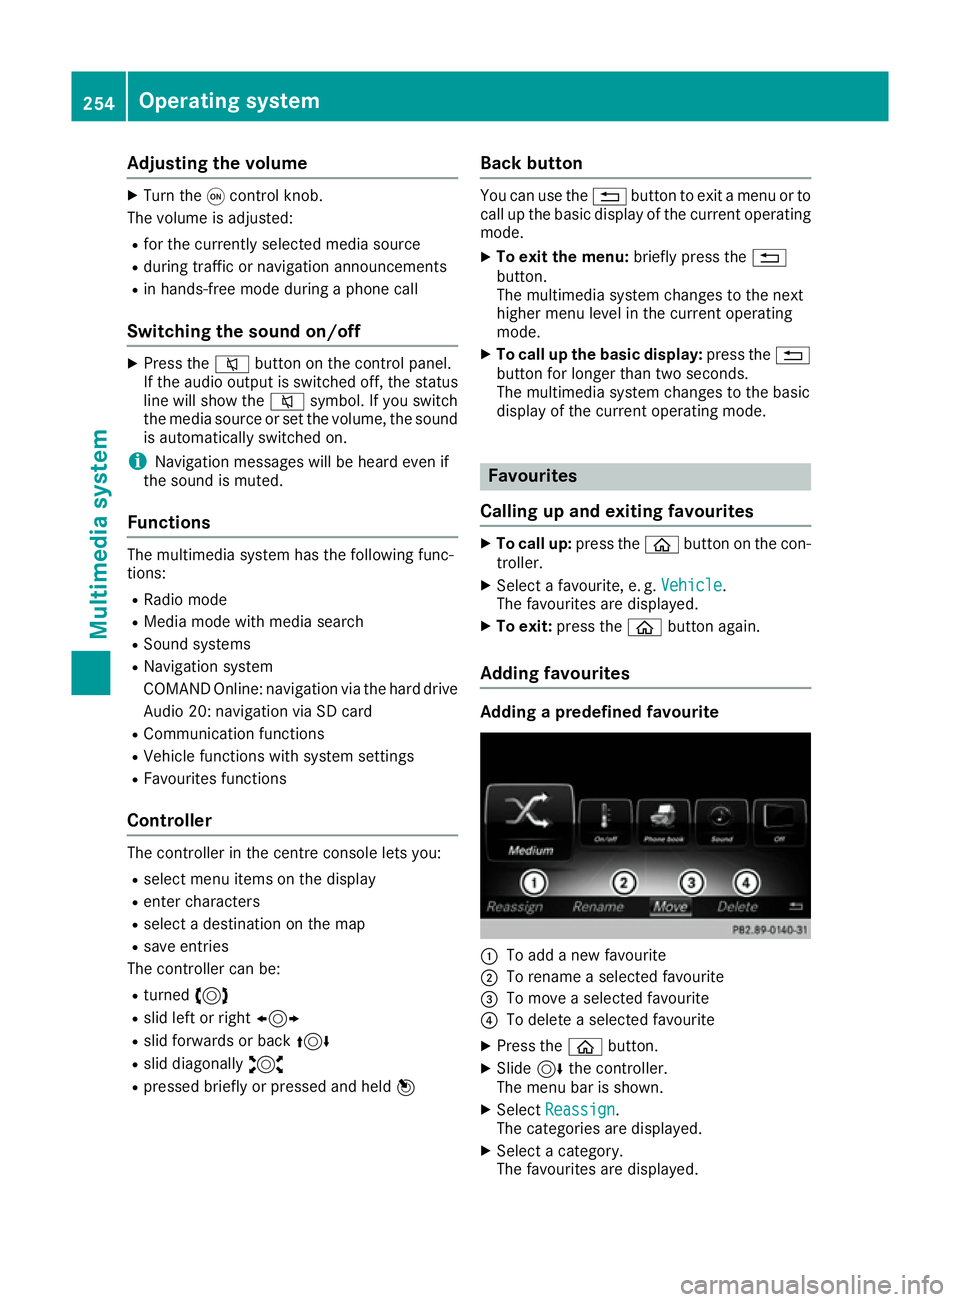
Adding favourites Adding a predefined favourite
:
To add a new favourite
; To rename a selected favourite
= To move a selected favourite
? To delete a selected favourite
X Press the òbutton.
X Slide 6the controller.
The menu bar is shown.
X Select Reassign
Reassign.
The categories are displayed.
X Select a category.
The favourites are displayed. 254
Operating systemMultimedia system
Page 258 of 333
X
Select a favourite.
X Add a favourite at the desired position.
If a favourite has already been added at this
position, it will be overwritten.
Adding your own favourite
X Select Vehicle VehicleQ Climate control Climate control.
X Press and hold the òbutton until the
favourites are displayed.
X Add a favourite at the desired position.
If a favourite has already been added at this
position, it will be overwritten. Navigation mode
Important safety notes G
WARNING
Operating the integrated information systems and communications equipment in the vehicle
while driving will distract you from traffic con-
ditions. You could then lose control of the
vehicle. There is a risk of an accident.
Only operate these devices if road traffic con-
ditions permit. If you are unsure about the
surrounding conditions, pull over to a safe
location and make entries only while the vehi-
cle is stationary.
You must observe the legal requirements for the country in which you are currently driving whenoperating the navigation system.
General notes Correct functioning of the navigation system
depends, amongst other things, on GPS recep-
tion. In certain situations, GPS reception may be
impaired, there may be interference or there
may be no reception at all, e.g. in tunnels or
multi-storey car parks.
Audio 20 is equipped with Garmin ®
MAP PILOT
(see the manufacturer's operating instructions).
The Garmin ®
MAP PILOT operating instructions
are stored on the SD memory card as a PDF file. The SD card box contains a quick guide.
The following descriptions apply to navigation
with COMAND Online. Further information can
be found in the Digital Owner's Manual. Selecting a route type and route options Multimedia system:
X Select Navi
Navi QNavigationNavigation.
The map displays the current vehicle position.
X Slide 6the controller.
X Select Options OptionsQ Route settings
Route settings .
Notes for route types:
R Eco route
Eco route
R Dynamic route
Dynamic route
Traffic reports on the route for the route guid-
ance are taken into account.
R Dynamic route only after request Dynamic route only after request
You can decide whether or not current traffic
reports should be taken into account for route
calculation.
R Calculate alternative routes
Calculate alternative routes
Different routes are being calculated. In order
to do so, instead of Start
Start, select the menu
item Continue Continue .
Notes for route options:
R Use toll roads
Use toll roads
The route calculation includes roads which
require you to pay a usage fee (toll).
R Use vignette roads
Use vignette roads (not available in all
countries)
The route calculation includes roads which
require you to pay a time-based fee (vignette). A vignette allows temporary use of the route
network, e. g. 10 days or 1 year.
Entering an address Multimedia system:
X Select Navi NaviQNavigationNavigation.
The map displays the current vehicle position.
X Slide 6the controller.
X Select Destination
DestinationQ Address entry
Address entry.
Enter an address, e.g. as follows:
R town or postcode, street, house number
R country, town or postcode
R town or postcode, centre
R street, town or postcode, junction
X Select Town
Town.
The town in which the vehicle is currently
located (current vehicle position) is at the top.
Below this, you will see locations for which
route guidance has already been carried out. Operating system
255Multimedia system Z
Page 272 of 333
cause you to lose control of the vehicle. There
is a risk of an accident.
Use this device only when the vehicle is sta-
tionary.
i You must observe the legal requirements for
the country in which you are currently driving
when operating mobile communications
equipment in the vehicle.
If it is permitted by law to operate communi-
cations equipment while the vehicle is in
motion, you may only do so if the traffic sit-
uation permits. You may otherwise be dis-
tracted from the traffic conditions, cause an
accident and injure yourself and others.
Excessive levels of electromagnetic radiation
may cause damage to your health and to the
health of others. The use of an exterior aerial
takes into consideration the scientific discus-
sion surrounding the possible health risk posed
by electromagnetic fields.
Mercedes-Benz recommends the use of an
approved exterior aerial. This ensures:
R optimal mobile phone reception quality in the
vehicle
R that mutual interference between the vehicle
electronics and mobile phones is minimised
An exterior aerial has the following advantages:
R it conducts the electromagnetic fields gener-
ated by a wireless device to the exterior
R the field strength in the vehicle interior is
lower than in a vehicle that does not have an
exterior aerial
Information on retrofitting two-way radios and
mobile phones (RF transmitters) (Y page 320).
General notes There are various mobile phone brackets that
may be fitted in your vehicle; in some cases,
these are country-specific.
You can connect a Bluetooth ®
-capable mobile
phone with COMAND Online through the Blue-
tooth ®
interface. This also applies if your vehicle
is equipped with convenience telephony. More information on suitable mobile phones,
mobile phone brackets and on connecting Blue-
tooth ®
-capable mobile phones with COMAND
Online can be obtained:
R at your Mercedes-Benz Service Centre
R on the Internet at https://www.mercedes-
benz.com/de/mercedes-me/
konnektivitaet/
i The functions and services available when
you use the phone depend on your mobile
phone model and service provider.
Using a mobile phone If the mobile phone is inserted in the mobile
phone bracket, the mobile phone will be
charged and connected with the exterior aerial.
X Open the telephone compartment
(Y page 262).
X Place the mobile phone bracket into the pre-
installed fitting; see the separate installation
instructions for the mobile phone fitting.
X Insert the mobile phone into the mobile phone
bracket; see the separate installation instruc-
tions for the mobile phone fitting.
Operating the mobile phone You can operate the telephone using the
6
and ~ buttons on the multifunction steering
wheel. You can operate other mobile phone
functions via the on-board computer
(Y page 205).
When you remove the key from the ignition lock,
the mobile phone is disconnected from the
hands-free system. Active calls will first be
transferred to the mobile phone directly. Garage door opener
General notes The HomeLink
®
garage door opener integrated
in the rear-view mirror allows you to operate up
to three different door and gate systems.
Once programmed, the integrated garage door
opener in the rear-view mirror will assume the
function of the garage door system's remote
control. Please also read the operating instruc-
tions for the garage door system. Features
269Stowing and features Z
Page 273 of 333
When programming a garage door opener, park
the vehicle outside the garage. Do not run the
engine while programming.
The garage door opener is only available for cer- tain countries. Observe the legal requirements
for each individual country.
The HomeLink ®
garage door opener is compat-
ible with most European garage and gate opener
drives. More information on HomeLink ®
and/or
compatible products is available:
R at a qualified specialist workshop
R via the HomeLink ®
Hotline
(0) 08000 466 354 65 or alternatively
+49 (0) 6838 907-277
R on the Internet at http://www.homelink.com
Important safety notes G
WARNING
When you operate or program the garage door with the integrated garage door opener, per-
sons in the range of movement of the garage
door can become trapped or struck by the
garage door. There is a risk of injury.
When using the integrated garage door
opener, always make sure that nobody is
within the range of movement of the garage
door. G
WARNING
Combustion engines emit poisonous exhaust
gases such as carbon monoxide. Inhaling
these exhaust gases leads to poisoning. There is a risk of fatal injury. Therefore never leave
the engine running in enclosed spaces with-
out sufficient ventilation.
Programming Programming buttons
Pay attention to the "Important safety notes"
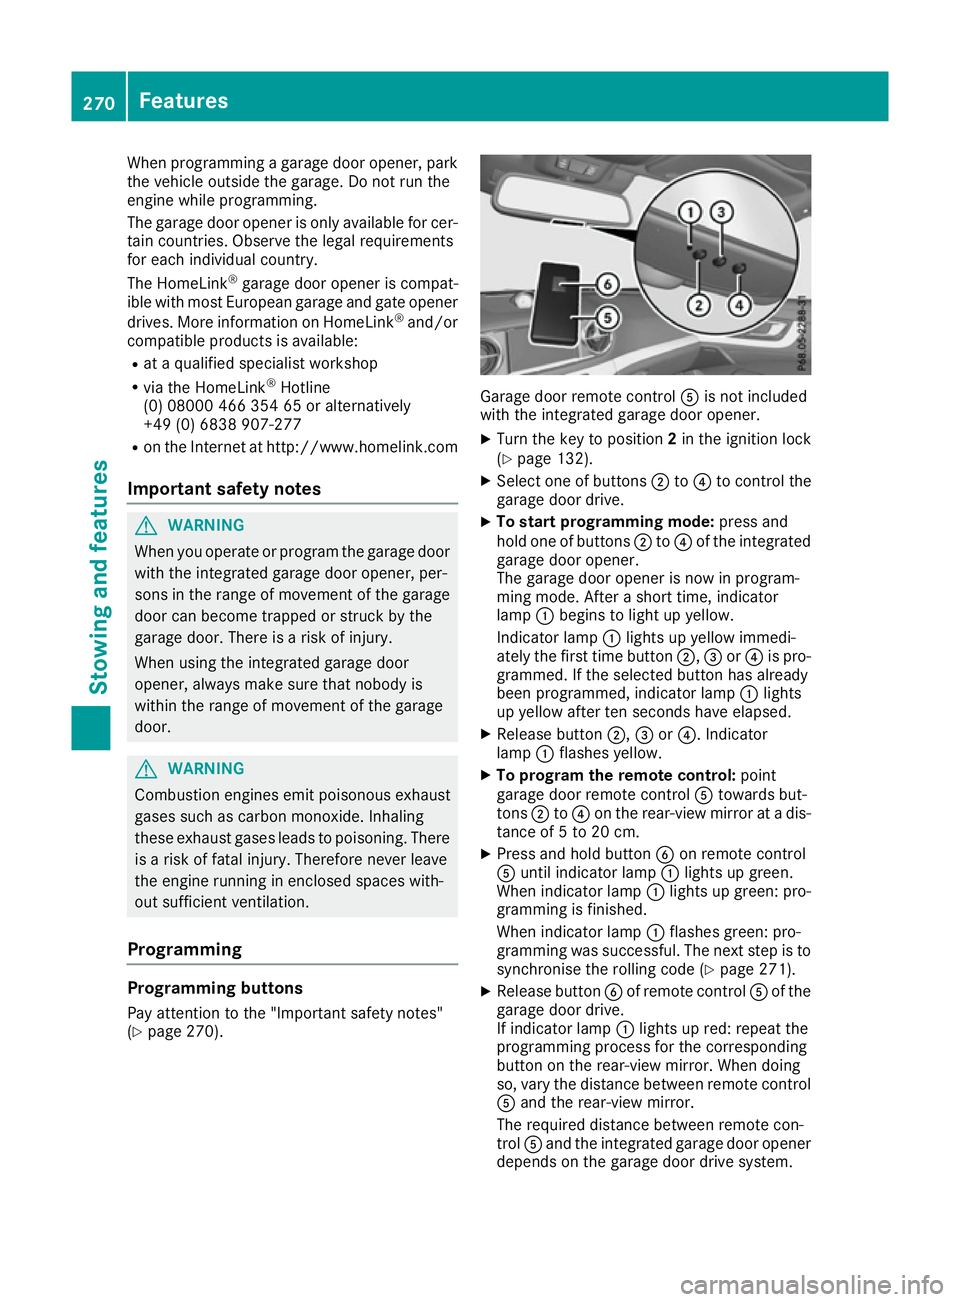
(Y page 270). Garage door remote control
Ais not included
with the integrated garage door opener.
X Turn the key to position 2in the ignition lock
(Y page 132).
X Select one of buttons ;to? to control the
garage door drive.
X To start programming mode: press and
hold one of buttons ;to? of the integrated
garage door opener.
The garage door opener is now in program-
ming mode. After a short time, indicator
lamp :begins to light up yellow.
Indicator lamp :lights up yellow immedi-
ately the first time button ;,=or? is pro-
grammed. If the selected button has already
been programmed, indicator lamp :lights
up yellow after ten seconds have elapsed.
X Release button ;,=or?. Indicator
lamp :flashes yellow.
X To program the remote control: point
garage door remote control Atowards but-
tons ;to? on the rear-view mirror at a dis-
tance of 5 to 20 cm.
X Press and hold button Bon remote control
A until indicator lamp :lights up green.
When indicator lamp :lights up green: pro-
gramming is finished.
When indicator lamp :flashes green: pro-
gramming was successful. The next step is to
synchronise the rolling code (Y page 271).
X Release button Bof remote control Aof the
garage door drive.
If indicator lamp :lights up red: repeat the
programming process for the corresponding
button on the rear-view mirror. When doing
so, vary the distance between remote control A and the rear-view mirror.
The required distance between remote con-
trol Aand the integrated garage door opener
depends on the garage door drive system. 270
FeaturesStowing and features