2016 MERCEDES-BENZ SL ROADSTER weight
[x] Cancel search: weightPage 64 of 333
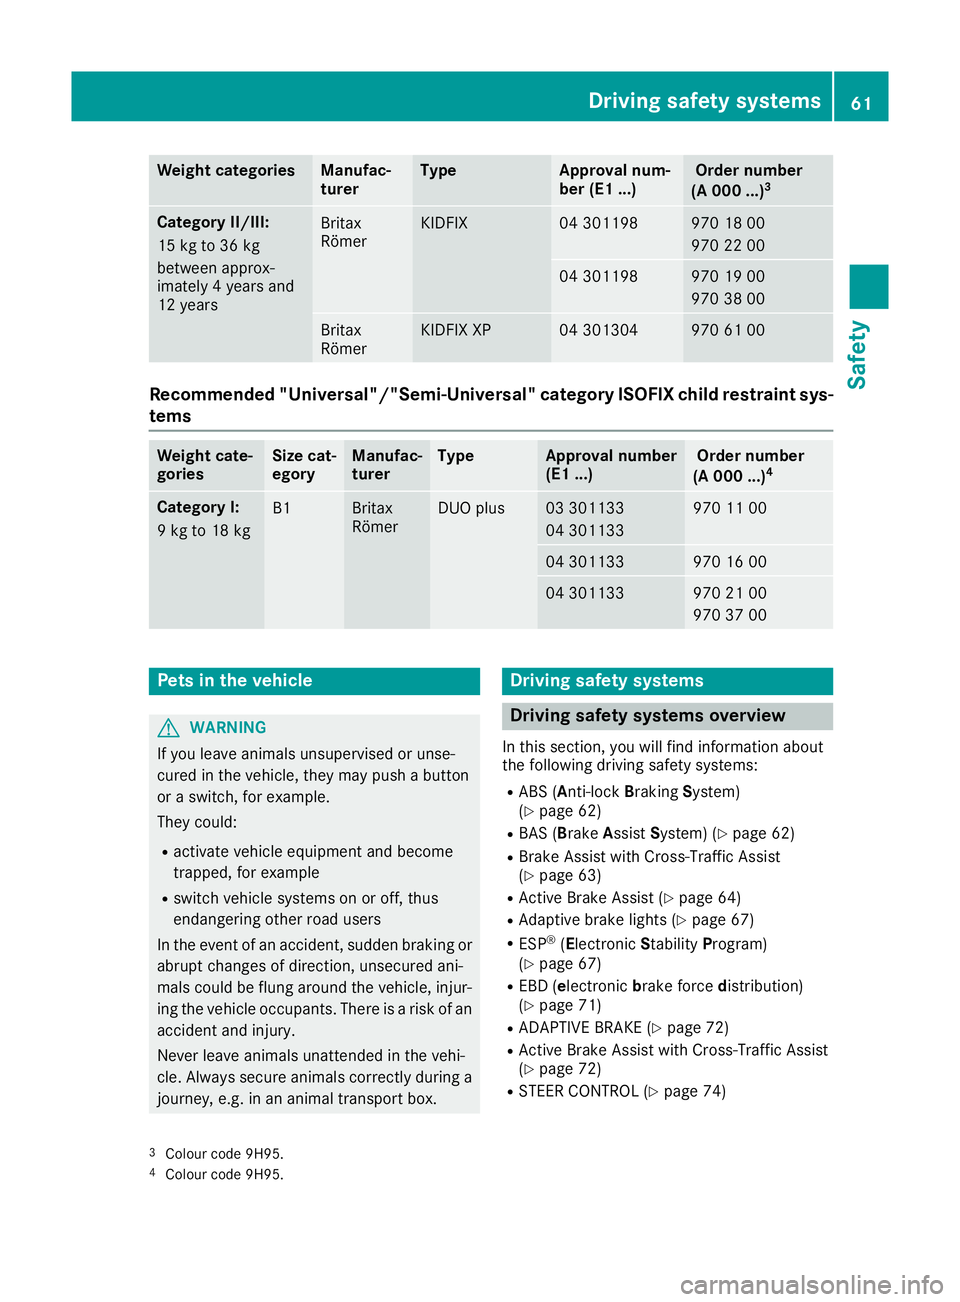
Weight categories Manufac-
turer Type Approval num-
ber (E1 ...) Order number
(A 000 ...) 3 Category II/III:
15 kg to 36 kg
between approx-
imately 4 years and
12 years
Britax
Römer KIDFIX 04 301198 970 18 00
970 22 00
04 301198 970 19 00
970 38 00
Britax
Römer KIDFIX XP 04 301304 970 61 00
Recommended "Universal"/"Semi-Universal" category ISOFIX child restraint sys-
tems Weight cate-
gories Size cat-
egory Manufac-
turer Type Approval number
(E1 ...) Order number
(A 000 ...) 4 Category I:
9 kg to 18 kg
B1 Britax
Römer DUO plus 03 301133
04 301133 970 11 00
04 301133 970 16 00
04 301133 970 21 00
970 37 00
Pets in the vehicle
G
WARNING
If you leave animals unsupervised or unse-
cured in the vehicle, they may push a button
or a switch, for example.
They could:
R activate vehicle equipment and become
trapped, for example
R switch vehicle systems on or off, thus
endangering other road users
In the event of an accident, sudden braking or
abrupt changes of direction, unsecured ani-
mals could be flung around the vehicle, injur-
ing the vehicle occupants. There is a risk of an accident and injury.
Never leave animals unattended in the vehi-
cle. Always secure animals correctly during a
journey, e.g. in an animal transport box. Driving safety systems
Driving safety systems overview
In this section, you will find information about
the following driving safety systems:
R ABS ( Anti-lock BrakingSystem)
(Y page 62)
R BAS ( Brake Assist System) (Y page 62)
R Brake Assist with Cross-Traffic Assist
(Y page 63)
R Active Brake Assist (Y page 64)
R Adaptive brake lights (Y page 67)
R ESP ®
(Electronic StabilityProgram)
(Y page 67)
R EBD ( electronic brake force distribution)
(Y page 71)
R ADAPTIVE BRAKE (Y page 72)
R Active Brake Assist with Cross-Traffic Assist
(Y page 72)
R STEER CONTROL (Y page 74)
3 Colour code 9H95.
4 Colour code 9H95. Driving safety systems
61Safety Z
Page 229 of 333
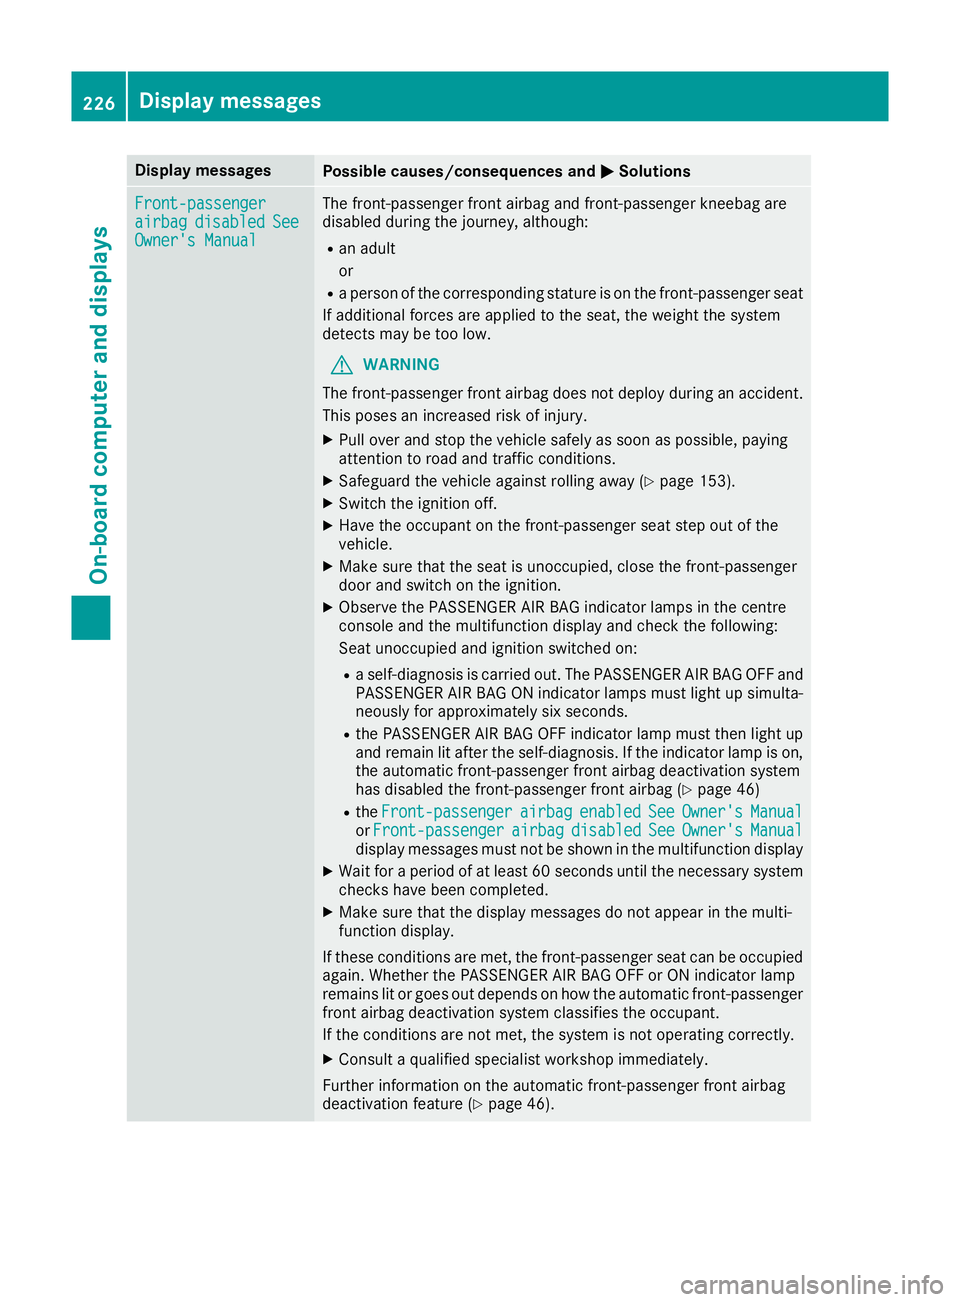
Display messages
Possible causes/consequences and
M
MSolutions Front-passenger
Front-passenger
airbag airbag
disabled
disabled See
See
Owner's Manual
Owner's Manual The front-passenger front airbag and front-passenger kneebag are
disabled during the journey, although:
R an adult
or
R a person of the corresponding stature is on the front-passenger seat
If additional forces are applied to the seat, the weight the system
detects may be too low.
G WARNING
The front-passenger front airbag does not deploy during an accident.
This poses an increased risk of injury.
X Pull over and stop the vehicle safely as soon as possible, paying
attention to road and traffic conditions.
X Safeguard the vehicle against rolling away (Y page 153).
X Switch the ignition off.
X Have the occupant on the front-passenger seat step out of the
vehicle.
X Make sure that the seat is unoccupied, close the front-passenger
door and switch on the ignition.
X Observe the PASSENGER AIR BAG indicator lamps in the centre
console and the multifunction display and check the following:
Seat unoccupied and ignition switched on:
R a self-diagnosis is carried out. The PASSENGER AIR BAG OFF and
PASSENGER AIR BAG ON indicator lamps must light up simulta-
neously for approximately six seconds.
R the PASSENGER AIR BAG OFF indicator lamp must then light up
and remain lit after the self-diagnosis. If the indicator lamp is on,
the automatic front-passenger front airbag deactivation system
has disabled the front-passenger front airbag (Y page 46)
R the Front-passenger
Front-passenger airbag airbagenabled
enabled See
SeeOwner's
Owner's Manual
Manual
or Front-passenger
Front-passenger airbag
airbagdisabled
disabled See
See Owner's
Owner's Manual
Manual
display messages must not be shown in the multifunction display
X Wait for a period of at least 60 seconds until the necessary system
checks have been completed.
X Make sure that the display messages do not appear in the multi-
function display.
If these conditions are met, the front-passenger seat can be occupied again. Whether the PASSENGER AIR BAG OFF or ON indicator lamp
remains lit or goes out depends on how the automatic front-passenger
front airbag deactivation system classifies the occupant.
If the conditions are not met, the system is not operating correctly.
X Consult a qualified specialist workshop immediately.
Further information on the automatic front-passenger front airbag
deactivation feature (Y page 46).226
Display
messagesOn-board computer and displays
Page 230 of 333
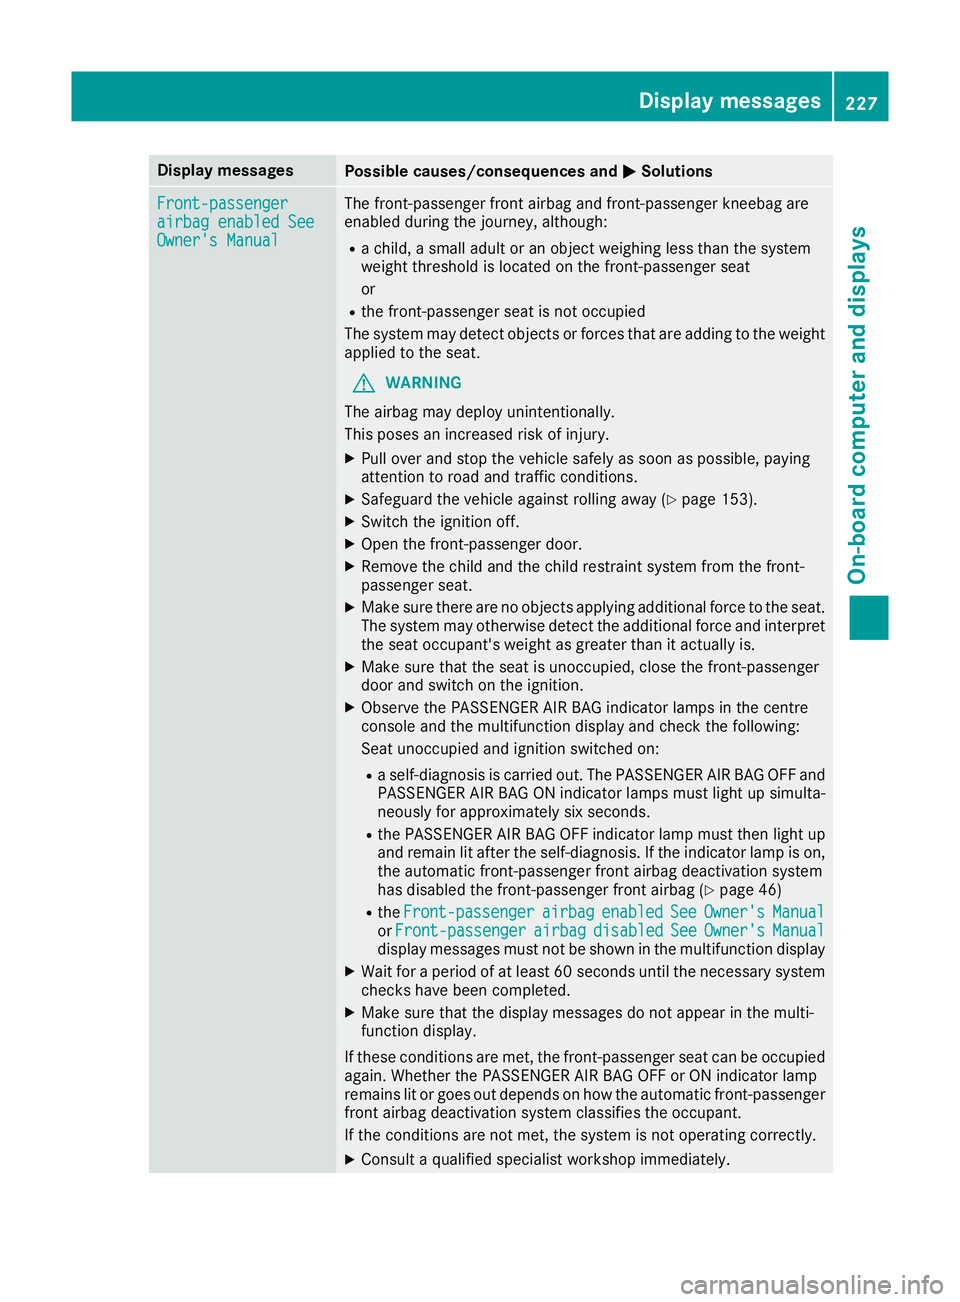
Display messages
Possible causes/consequences and
M
MSolutions Front-passenger
Front-passenger
airbag enabled See airbag enabled See
Owner's Manual Owner's Manual The front-passenger front airbag and front-passenger kneebag are
enabled during the journey, although:
R
a child, a small adult or an object weighing less than the system
weight threshold is located on the front-passenger seat
or
R the front-passenger seat is not occupied
The system may detect objects or forces that are adding to the weight
applied to the seat.
G WARNING
The airbag may deploy unintentionally.
This poses an increased risk of injury. X Pull over and stop the vehicle safely as soon as possible, paying
attention to road and traffic conditions.
X Safeguard the vehicle against rolling away (Y page 153).
X Switch the ignition off.
X Open the front-passenger door.
X Remove the child and the child restraint system from the front-
passenger seat.
X Make sure there are no objects applying additional force to the seat.
The system may otherwise detect the additional force and interpret the seat occupant's weight as greater than it actually is.
X Make sure that the seat is unoccupied, close the front-passenger
door and switch on the ignition.
X Observe the PASSENGER AIR BAG indicator lamps in the centre
console and the multifunction display and check the following:
Seat unoccupied and ignition switched on:
R a self-diagnosis is carried out. The PASSENGER AIR BAG OFF and
PASSENGER AIR BAG ON indicator lamps must light up simulta-
neously for approximately six seconds.
R the PASSENGER AIR BAG OFF indicator lamp must then light up
and remain lit after the self-diagnosis. If the indicator lamp is on, the automatic front-passenger front airbag deactivation system
has disabled the front-passenger front airbag (Y page 46)
R the Front-passenger
Front-passenger airbag airbagenabled
enabled See
SeeOwner's
Owner's Manual
Manual
or Front-passenger
Front-passenger airbag
airbagdisabled
disabled See
SeeOwner's
Owner's Manual
Manual
display messages must not be shown in the multifunction display
X Wait for a period of at least 60 seconds until the necessary system
checks have been completed.
X Make sure that the display messages do not appear in the multi-
function display.
If these conditions are met, the front-passenger seat can be occupied again. Whether the PASSENGER AIR BAG OFF or ON indicator lamp
remains lit or goes out depends on how the automatic front-passenger
front airbag deactivation system classifies the occupant.
If the conditions are not met, the system is not operating correctly.
X Consult a qualified specialist workshop immediately. Display
messages
227On-board computer and displays Z
Page 301 of 333
X
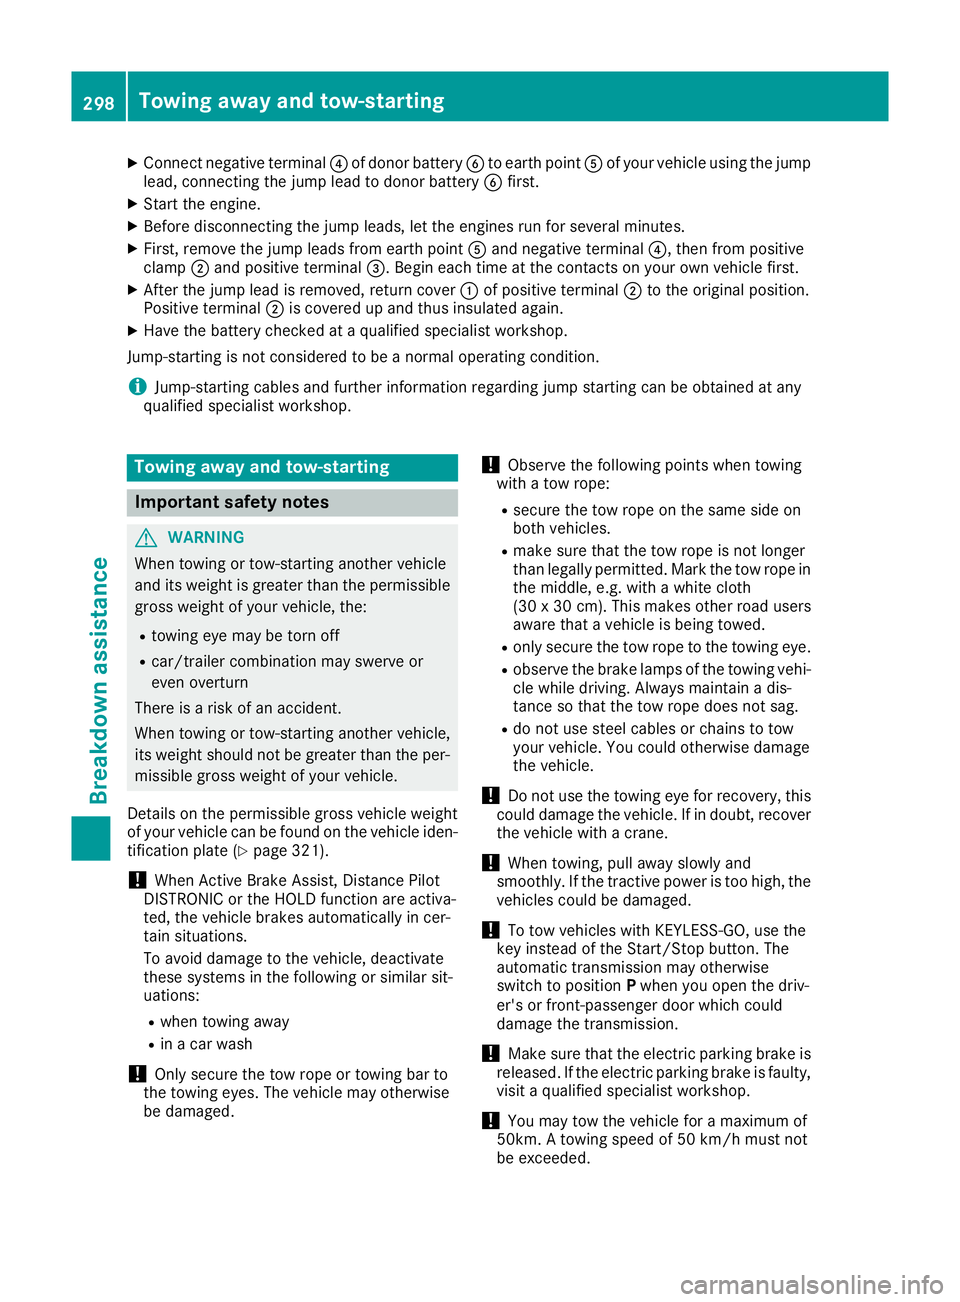
Connect negative terminal ?of donor battery Bto earth point Aof your vehicle using the jump
lead, connecting the jump lead to donor battery Bfirst.
X Start the engine.
X Before disconnecting the jump leads, let the engines run for several minutes.
X First, remove the jump leads from earth point Aand negative terminal ?, then from positive
clamp ;and positive terminal =. Begin each time at the contacts on your own vehicle first.
X After the jump lead is removed, return cover :of positive terminal ;to the original position.
Positive terminal ;is covered up and thus insulated again.
X Have the battery checked at a qualified specialist workshop.
Jump-starting is not considered to be a normal operating condition.
i Jump-starting cables and further information regarding jump starting can be obtained at any
qualified specialist workshop. Towing away and tow-starting
Important safety notes
G
WARNING
When towing or tow-starting another vehicle
and its weight is greater than the permissible gross weight of your vehicle, the:
R towing eye may be torn off
R car/trailer combination may swerve or
even overturn
There is a risk of an accident.
When towing or tow-starting another vehicle,
its weight should not be greater than the per- missible gross weight of your vehicle.
Details on the permissible gross vehicle weight
of your vehicle can be found on the vehicle iden-
tification plate (Y page 321).
! When Active Brake Assist, Distance Pilot
DISTRONIC or the HOLD function are activa-
ted, the vehicle brakes automatically in cer-
tain situations.
To avoid damage to the vehicle, deactivate
these systems in the following or similar sit-
uations:
R when towing away
R in a car wash
! Only secure the tow rope or towing bar to
the towing eyes. The vehicle may otherwise
be damaged. !
Observe the following points when towing
with a tow rope:
R secure the tow rope on the same side on
both vehicles.
R make sure that the tow rope is not longer
than legally permitted. Mark the tow rope in
the middle, e.g. with a white cloth
(30 x 30 cm). This makes other road users
aware that a vehicle is being towed.
R only secure the tow rope to the towing eye.
R observe the brake lamps of the towing vehi-
cle while driving. Always maintain a dis-
tance so that the tow rope does not sag.
R do not use steel cables or chains to tow
your vehicle. You could otherwise damage
the vehicle.
! Do not use the towing eye for recovery, this
could damage the vehicle. If in doubt, recover the vehicle with a crane.
! When towing, pull away slowly and
smoothly. If the tractive power is too high, the
vehicles could be damaged.
! To tow vehicles with KEYLESS-GO, use the
key instead of the Start/Stop button. The
automatic transmission may otherwise
switch to position Pwhen you open the driv-
er's or front-passenger door which could
damage the transmission.
! Make sure that the electric parking brake is
released. If the electric parking brake is faulty,
visit a qualified specialist workshop.
! You may tow the vehicle for a maximum of
50km. A towing speed of 50 km/h must not
be exceeded. 298
Towing away and tow-startingBreakdown assistance
Page 302 of 333
For towing distances over 50 km, the entire
vehicle must be lifted up and transported.
! If you tow or tow-start another vehicle, its
weight must not exceed the maximum per-
missible gross vehicle weight of your vehicle.
Observe the legal requirements for the relevant countries when towing.
It is better to have the vehicle transported than
to have it towed.
The automatic transmission must be in position
N when the vehicle is being towed away.
The battery must be connected and charged.
Otherwise, you:
R cannot turn the key to position 2in the igni-
tion lock.
R cannot shift the automatic transmission to
position N.
Deactivate the automatic locking feature before towing the vehicle (Y page 211). You could oth-
erwise be locked out when pushing or towing
the vehicle.
Deactivate tow-away protection before the vehi-
cle is towed away (Y page 75). Fitting/removing the towing eye
Fitting the towing eye G
WARNING
The exhaust tail pipe may be extremely hot.
There is a risk of burning when removing the
rear cover.
Do not touch the exhaust tail pipe. Use
extreme caution when removing the rear
cover. The mountings for the removable towing eyes
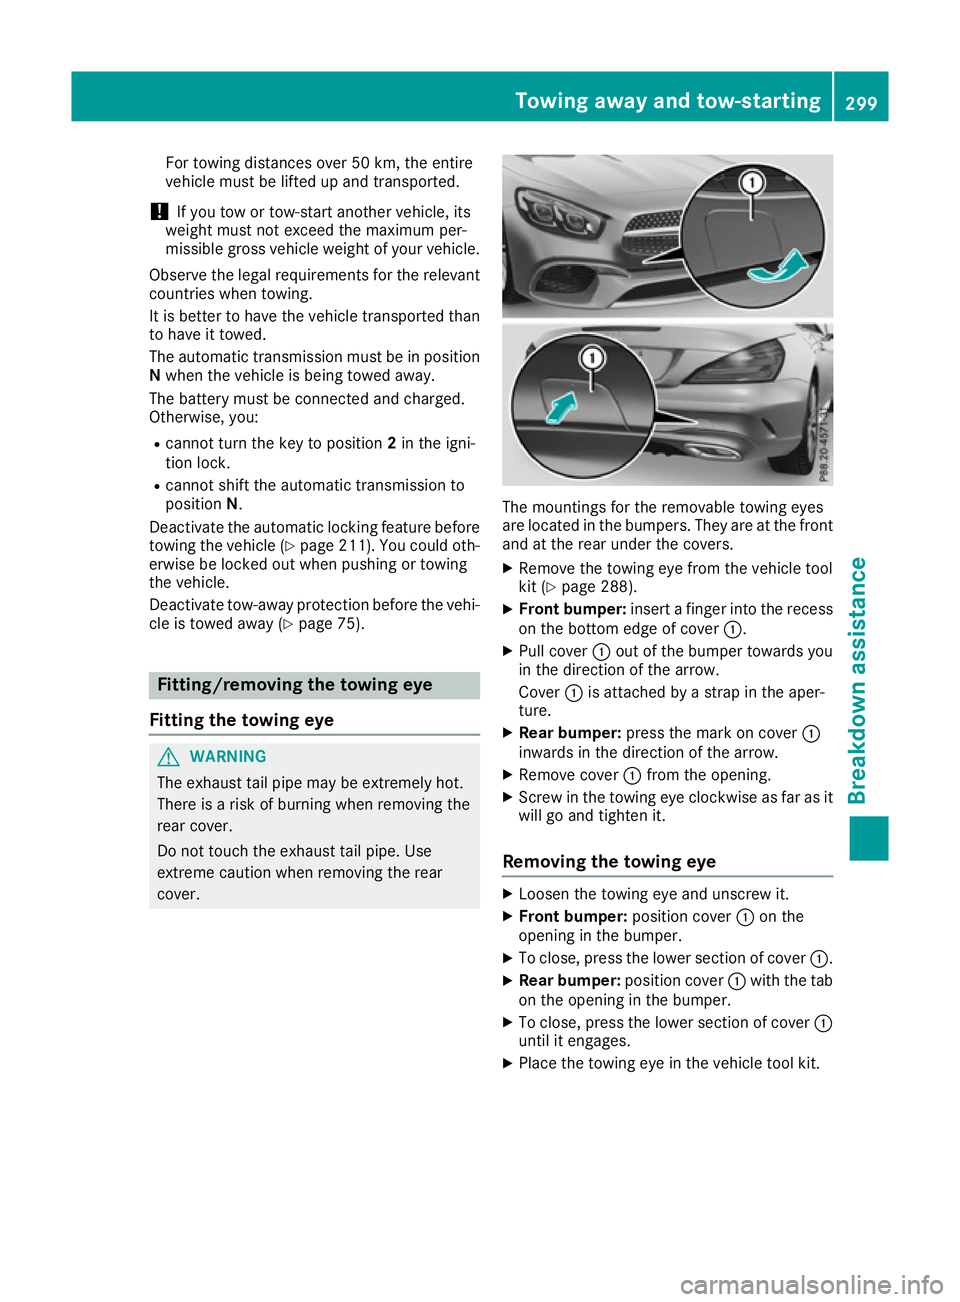
are located in the bumpers. They are at the front and at the rear under the covers.
X Remove the towing eye from the vehicle tool
kit (Y page 288).
X Front bumper: insert a finger into the recess
on the bottom edge of cover :.
X Pull cover :out of the bumper towards you
in the direction of the arrow.
Cover :is attached by a strap in the aper-
ture.
X Rear bumper: press the mark on cover :
inwards in the direction of the arrow.
X Remove cover :from the opening.
X Screw in the towing eye clockwise as far as it
will go and tighten it.
Removing the towing eye X
Loosen the towing eye and unscrew it.
X Front bumper: position cover:on the
opening in the bumper.
X To close, press the lower section of cover :.
X Rear bumper: position cover:with the tab
on the opening in the bumper.
X To close, press the lower section of cover :
until it engages.
X Place the towing eye in the vehicle tool kit. Towing away and tow-starting
299Breakdown assistance Z
Page 324 of 333
transmitters. Comply with the legal require-
ments for add-on parts.
If your vehicle has fittings for two-way radio
equipment, use the power supply or aerial con-
nections intended for use with the basic wiring. Be sure to observe the manufacturer's addi-
tional instructions when installing.
Deviations with respect to wavebands, maxi-
mum transmission outputs or aerial positions
must be approved by Mercedes-Benz.
The maximum transmission output (PEAK) at the
base of the aerial must not exceed the following values: Waveband Maximum
transmission output Short wave
3 - 54 MHz 100 W
4 m waveband
74 - 88 MHz 30 W
2 m waveband
144 - 174 MHz 50 W
Trunked radio/Tetra
380 - 460 MHz 10 W
70 cm waveband
400 - 460 MHz 35 W
Mobile communications
(2G/3G/4G) 10 W
The following can be used in the vehicle without
restrictions:
R RF transmitters with a maximum transmis-
sion output of up to 100 mW
R RF transmitters with transmitter frequencies
in the 380 - 410 MHz waveband and a maxi-
mum transmission output of up to 2 W
(trunked radio/Tetra)
R Mobile telephones (2G/3G/4G)
There are no restrictions when positioning the
aerial on the outside of the vehicle for the fol-
lowing wavebands:
R Trunked radio/Tetra
R 70 cm waveband
R 2G/3G/4G Identification plates
Vehicle identification plate with vehi-
cle identification number (VIN)
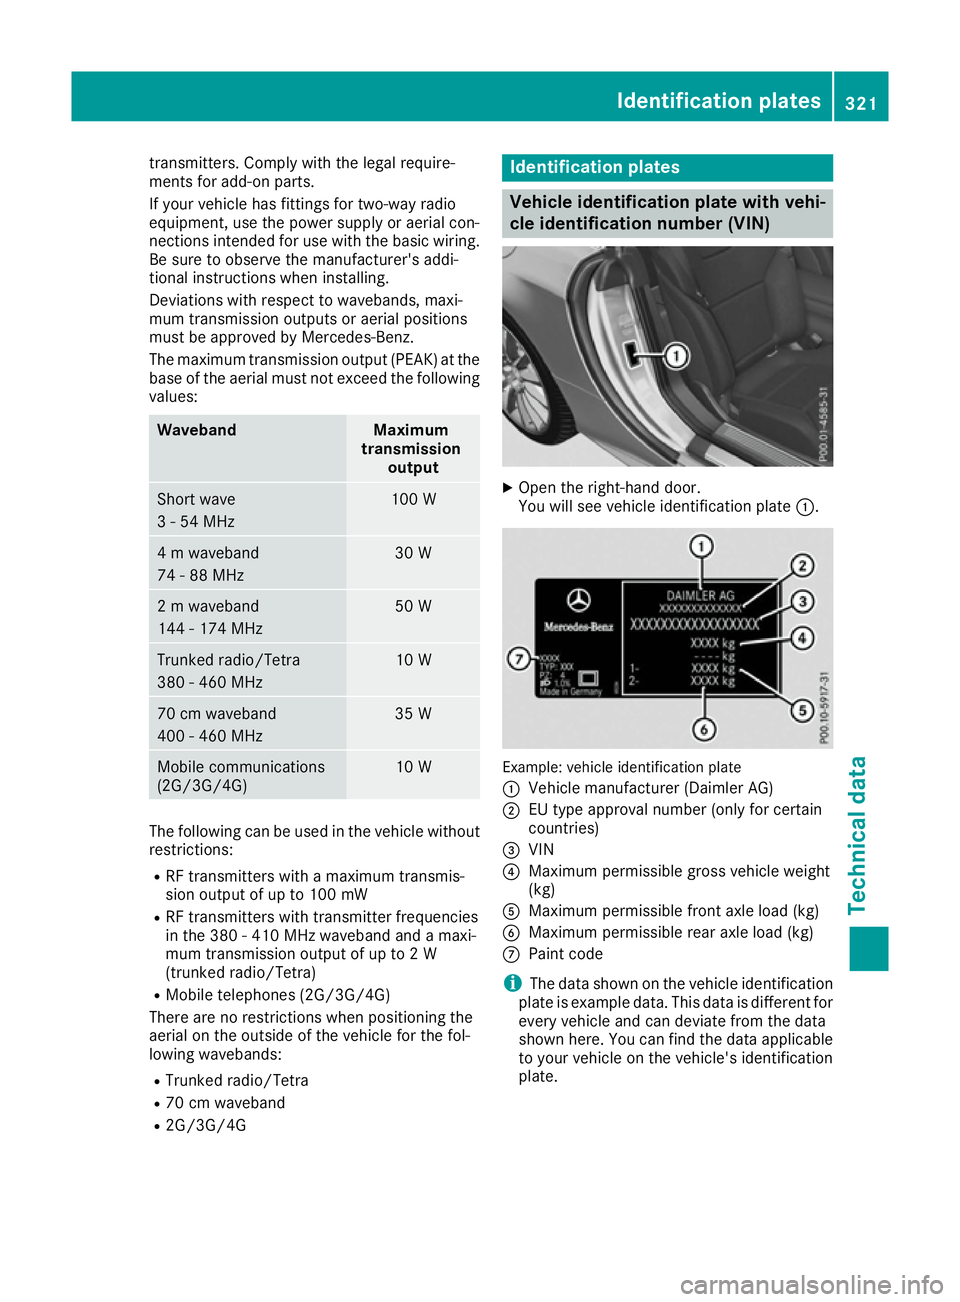
X
Open the right-hand door.
You will see vehicle identification plate :. Example: vehicle identification plate
:
Vehicle manufacturer (Daimler AG)
; EU type approval number (only for certain
countries)
= VIN
? Maximum permissible gross vehicle weight
(kg)
A Maximum permissible front axle load (kg)
B Maximum permissible rear axle load (kg)
C Paint code
i The data shown on the vehicle identification
plate is example data. This data is different for
every vehicle and can deviate from the data
shown here. You can find the data applicable to your vehicle on the vehicle's identification
plate. Identification plates
321Technical data Z
Page 330 of 333
Vehicle data
General notes
Please note that for the specified vehicle data: R the heights specified may vary as a result of
- tyres
- load
- condition of the suspension
- optional equipment
R optional equipment reduces the maximum
payload
R vehicle-specific weight information can be
found on the vehicle identification plate
(Y page 321).
R only for certain countries: you can find vehi-
cle-specific vehicle data in the COC docu-
ments (CERTIFICATE OF CONFORMITY).
These documents are delivered with your
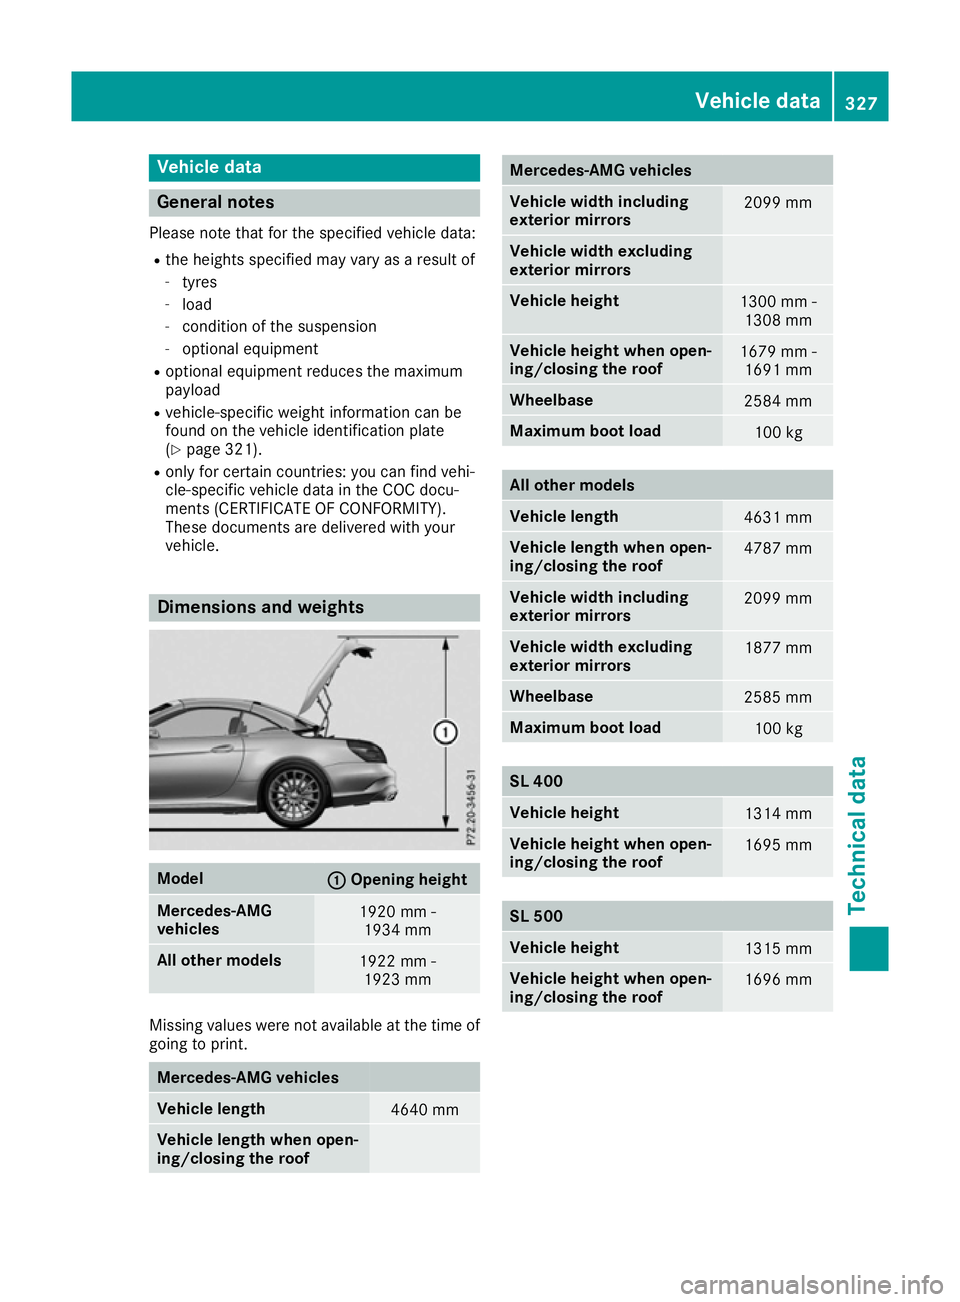
vehicle. Dimensions and weights
Model
: :
Opening height Mercedes-AMG
vehicles
1920 mm -
1934 mm All other models
1922 mm -
1923 mm Missing values were not available at the time of
going to print. Mercedes-AMG vehicles
Vehicle length
4640 mm
Vehicle length when open-
ing/closing the roof Mercedes-AMG vehicles
Vehicle width including
exterior mirrors
2099 mm
Vehicle width excluding
exterior mirrors
Vehicle height
1300 mm -
1308 mm Vehicle height when open-
ing/closing the roof
1679 mm -
1691 mm Wheelbase
2584 mm
Maximum boot load
100 kg
All other models
Vehicle length
4631 mm
Vehicle length when open-
ing/closing the roof
4787 mm
Vehicle width including
exterior mirrors
2099 mm
Vehicle width excluding
exterior mirrors
1877 mm
Wheelbase
2585 mm
Maximum boot load
100 kg
SL 400
Vehicle height
1314 mm
Vehicle height when open-
ing/closing the roof
1695 mm
SL 500
Vehicle height
1315 mm
Vehicle height when open-
ing/closing the roof
1696 mmVehicle data
327Technical data Z