2016 MERCEDES-BENZ SL-Class ECO mode
[x] Cancel search: ECO modePage 481 of 614

In the case of multi-language DVDs, for exam-
ple, you can change the DVD language in the
DVD menu.
XShow the menu (Ypage 477).
XSelectDVD-Videoin the menu by turning
cVd the COMAND controller and press W
to confirm.
XSelect DVD Functionsand press Wto
confirm.
XSelect Menuand press Wto confirm.
The DVD menu appears.
Selecting menu items in the DVD menu
XShow the DVD menu (Ypage 478).
XSelect a menu item by sliding ZVÆthe
COMAND controller and press Wto con-
firm.
or
XSelect a menu item by sliding XVYthe
COMAND controller and press Wto con-
firm.
The menu appears.
XTo reconfirm your selection: confirm
Select
by pressing W.
COMAND carries out the action.
Make a selection from the further options,
if necessary.
COMAND then switches back to the DVD
menu.
iMenu items which cannot be selected are
shown in gray.
iDepending on the DVD, the menu items:
Back (to movie)
, Play,Stop,K,
L orGo
Upmay either not function at all or may not function at certain points in the
DVD menu. To indicate this, the Ksymbol
appears in the display.
Moving up one level in the DVD menu
XShow the DVD menu (Ypage 478).
XSelect the corresponding menu item in the
DVD menu and press Wthe COMAND con-
troller to confirm.
or
XSelect any menu item in the DVD menu and press Wthe COMAND controller to con-
firm.
XSelect Go Upand press Wto confirm.
Back to the film
XPress the kback button repeatedly
until you see the movie.
or
XSelect the corresponding menu item from
the DVD menu.
XSelect the Back(tomovie)menu item in
the menu and press Wto confirm.
Setting the language and audio format
This function is not available on all DVDs. If it
is available, you can set the DVD menu lan-
guage, the audio language or the audio for-
mat. The number of settings is determined by
the DVD content. It is possible that the set-
tings may also be accessed in the DVD menu
(
Ypage 478).
XShow the DVD menu (Ypage 478).
XIn full-screen mode, press Wthe COMAND
controller to show the menu.
XSelect DVD-Videoin the menu by turning
cVd the COMAND controller and press W
to confirm.
XSelect DVD Functionsand press Wto
confirm.
Video479
COMAND
Z
Page 482 of 614

XSelectMenu LanguageorAudio Lan‐
guageand press Wto confirm.
In both cases, a menu appears after a few
seconds. The #dot in front of an entry indi-
cates the currently selected language.
XSelect a setting by turning cVdthe
COMAND controller and press Wto con-
firm.
Subtitles and camera angle
These functions are not available on all DVDs.
The number of subtitle languages and camera
angles available depends on the content of
the DVD. It may also be possible to access the
settings from the DVD menu.
XShow the DVD menu (Ypage 478).
XSelect DVD-Videoin the menu by turning
cVd the COMAND controller and press W
to confirm.
XSelect DVD Functionsand press Wto
confirm.
XSelect SubtitlesorCamera Angleand
press Wto confirm.
In both cases, a menu appears. The #dot in
front of an entry indicates the current set-
ting.
XSelect a setting by turning cVdthe
COMAND controller and press Wto con-
firm.
Interactive content
DVDs can contain interactive content (e.g. a
video game). In a video game, for example,
you may be able to influence events by select-
ing and triggering actions. The type and num-
ber of actions depend on the DVD.
XSelect an action by sliding ZVÆorXVY the
COMAND controller and press Wto exe-
cute it.
A menu appears and the first entry, Select
,
is highlighted.
XPress Wthe COMAND controller.
Video AUX mode
Connecting external video sources
External video sources may have different
volumes, which can mean that system mes-
sages such as traffic announcements and
navigation system announcements are much
louder. If necessary, deactivate the system
messages or adjust their volume manually.
If your vehicle is equipped with Media Inter-
face, you can connect an external video
source (AUX video) (
Ypage 467).
The 1/8 inch audio/video jacks are in the
center console stowage compartment.
iIn vehicles with a rear view camera, the
AUX video jack cannot be used for external
video sources.
Switching to AUX video mode
AUX video mode
XPress the hfunction button repeatedly
until Media Interface mode is selected.
or
XSelect Videoin the main function bar by
turning cVdthe COMAND controller and
press Wto confirm.
If AUX video mode was the last mode selec-
ted, it will now be active.
If another video source is switched on, you can now switch to AUX video mode in the
video menu.
480Video
COMAND
Page 490 of 614

XRemove discharged batteriesA from th e
tray.
XInser tth ene wbatteries. Observ eth epolar -
it y marking son th ebatterie sand battery
compartmen twhen doin gso.
Left-han dbattery: th epositive pole (+)
mus tfac eupwards.
Right-hand battery: th epositive pole (+)
mus tfac edownwards.
XTo close th ebatter ycompartment :
inser tbattery compartmen tcover =start -
in g wit hretainin glugs ?into th ebattery
compartmen tand allow catch tab ;to
engage in place.
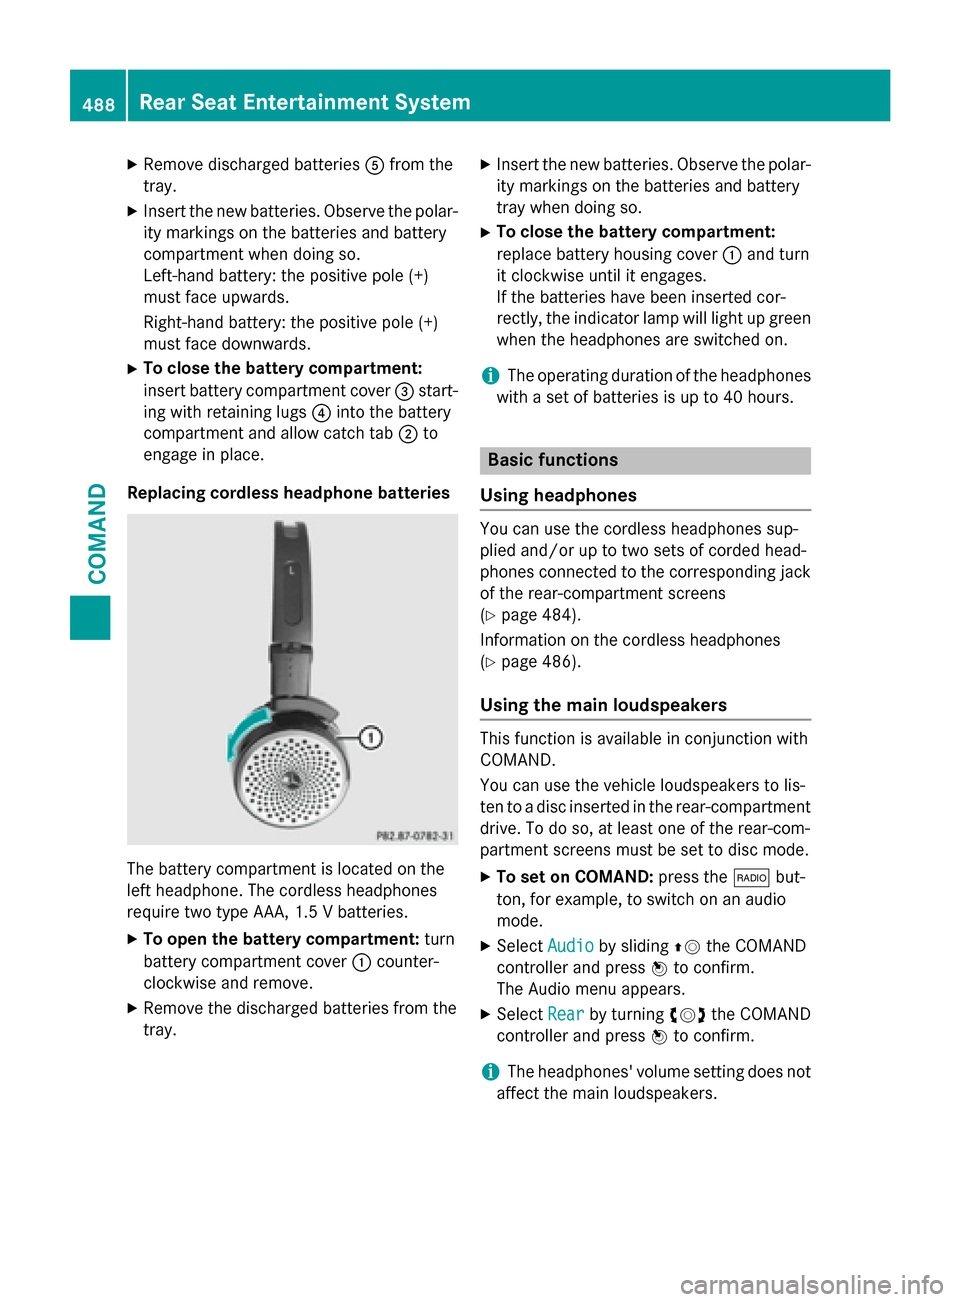
Replacing cordless headphon ebatteries
The battery compartmen tis locate don th e
lef theadphone .The cordless headphone s
require tw otyp eAAA, 1. 5 Vbatteries.
XTo ope nth ebatter ycompartment :tur n
battery compartmen tcover :counter-
clockwise and remove .
XRemove thedischarged batterie sfrom th e
tray.
XInser tth ene wbatteries. Observ eth epolar -
it y marking son th ebatterie sand battery
tray when doin gso.
XTo close th ebatter ycompartment :
replace battery housin gcover :and tur n
it clockwise until it engages.
If th ebatterie shav ebeen inserte dcor-
rectly, th eindicato rlamp will ligh tup green
when th eheadphone sare switched on .
iThe operating duration of th eheadphone s
wit h a set of batterie sis up to 40 hours.
Basic functions
Usin gheadphones
You can use th ecordless headphone ssup-
plied and/o rup to tw oset sof corde dhead -
phone sconnecte dto th ecorrespondin gjac k
of th erear-compartmen tscreens
(
Ypage 484).
Information on th ecordless headphone s
(
Ypage 486).
Usin gth emain loudspeaker s
This function is available in conjunction wit h
COMAND .
You can use th evehicl eloudspeakers to lis-
te nto adisc inserte din th erear-compartmen t
drive. To do so, at least on eof th erear-com-
partmen tscreens mus tbe set to disc mode.
XTo set on COMAND: press the$ but-
ton, for example, to switch on an audio
mode.
XSelec tAudioby slidin gZV theCOMAND
controller and press Wto confirm .
The Audio men uappears.
XSelec tRea rby turning cVdtheCOMAND
controller and press Wto confirm .
iThe headphones' volume setting does no t
affec tth emain loudspeakers .
488Rear Seat Entertainment System
COMAND
Page 491 of 614

Selecting sound settings
You can select the sound settings in the CD/
MP3, video DVD and AUX modes.
XSwitch on an operating mode (e.g. audio
CD mode) (
Ypage 491).
XSelectTrebleorBassusing
the :=; buttons on the remote
control and press the 9button to confirm.
An adjustment scale appears.
XSelect a setting using the 9:but-
tons and press the 9button to confirm.
Multiple users
Simultaneous use of the rear-compart-
ment disc drive
The two rear-compartment screens can be
operated almost entirely independently from
one another. However, there can be a conflict
in some menus if the two screens are used
simultaneously.
If the rear-compartment disc drive is being
used for both screens simultaneously, select-
ing certain menus or settings on one of the
screens also affects the other screen.
The following functions affect both screens:
Rchanging playback options
Rselecting a track (from a track list or folder)
Rusing the play, pause and stop functions
Rfast forwarding/rewinding or scrolling
Rcalling up the DVD menu and navigating
within it
Rsetting the language, subtitles and camera
angle
Rcalling up interactive DVD content
The following functions affect only one
screen:
Raudio and video functions as well as picture
settings
Rswitching between full screen and the
menu Switching between operating modes
When you exit an operating mode (e.g. audio
CD mode), the current setting is saved. If you
call up this operating mode again later, there
are two possibilities:
Rthe operating mode has been changed on
the other screen.
Rthe operating mode has not been changed.
In the first case, the operating mode appears as it is on the other screen.
In the second case, the setting appears on the
screen as it was when you last exited the
operating mode.
Picture settings
Overview
You can select picture settings in video DVD
and AUX mode (
Ypage 500).
Adjusting the brightness, contrast and
color
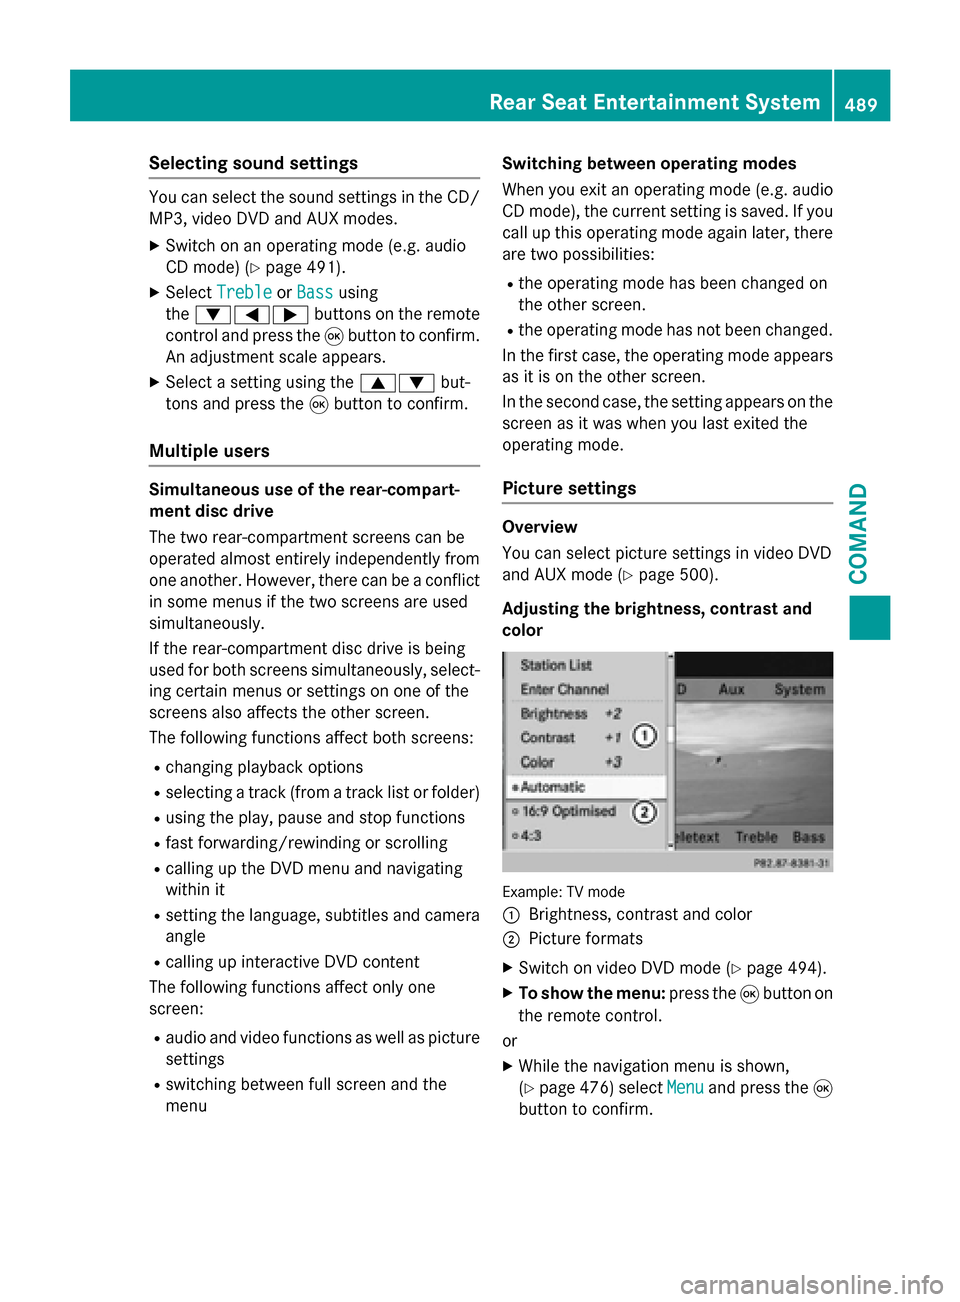
Example: TV mode
:
Brightness, contrast and color
;Picture formats
XSwitch on video DVD mode (Ypage 494).
XTo show the menu: press the9button on
the remote control.
or
XWhile the navigation menu is shown,
(
Ypage 476) select Menuand press the9
button to confirm.
Rear Seat Entertainment System489
COMAND
Z
Page 492 of 614

XSelectDVD-Videousing
the :=; buttons and press the
9 button to confirm.
XSelect Brightness,Contrastor Color
using the 9: buttons and press the
9 button to confirm.
An adjustment scale appears.
XSelect a setting using the 9:but-
tons and press the 9button to confirm.
Changing the picture format
XTo show the menu: press the9button on
the remote control.
or
XWhile the navigation menu is shown,
(
Ypage 476) select Menuand press the9
button to confirm.
XSelect DVD-Videousing
the :=; buttons and press the
9 button to confirm.
The dot in front of one of the menu items
16:9
Optimized, 4:3or Widescreenindi-
cates the format currently selected.
XSelect a format using the 9:but-
tons and press the 9button to confirm.
System settings
Note
You can adjust almost all system settings
individually for each screen without affecting
the other screen. You make these settings
using the remote control (
Ypage 484).
Selecting the display language
XSelect Systemusing the 9=;
buttons on the remote control and press 9
to confirm.
You see the system menu on the selected
rear screen.
XSelect Settingsusing the :button
and press 9to confirm.
XSelect Languageusing the 9: but-
tons and press the 9button to confirm.
The list of languages appears. A #dot
indicates the current setting.
XSelect a language using the 9:but-
tons and press the 9button to confirm.
The Rear Seat Entertainment System acti-
vates the selected language.
Switching the display design
XSelect Settingsusing the :button
and press 9to confirm.
XSelect Day Mode,Night Modeor Auto‐
maticusing the 9: buttons and
press the 9button to confirm.
The dot indicates the current setting.
DesignExplanation
Day ModeThe display is set per-
manently to day
design.
Night ModeThe display is set per-
manently to night
design.
AutomaticThe display design
changes depending on
the vehicle instrument
cluster illumination.
Setting the brightness
XSelect Settingsusing the :button
and press 9to confirm.
XSelect Brightnessusing the 9:
buttons and press the 9button to confirm.
A scale appears.
XAdjust the brightness using the 9:
buttons and press the 9button to confirm.
The brightness bar moves up or down. The
picture becomes lighter or darker in
accordance with the scale.
490Rear Seat Entertainment System
COMAND
Page 494 of 614

Selecting a track
Selecting by skipping to a track
XTo skip forwards or backwards to a
track:press the =or; button on
the remote control.
or
XPress the EorF button.
The skip forward function skips to the next
track.
If the elapsed track time has passed 8 sec-
onds, the function skips back to the begin-
ning of the track. If the elapsed time is
shorter, it will skip to the start of the pre-
vious track.
If the Random Tracks
orRandom Folder
playback option has been selected, the
track order is random.
Selecting by track list
In audio CD mode, the track list contains all
tracks on the disc currently playing. In audio
DVD mode, the track list contains all tracks in the currently active group.
In MP3 mode, the track list shows all tracks in
the currently active folder as well as the folder
structure, allowing you to select any track on
the MP3 CD.
XSelect Track List(audio CD/DVD mode)
or Folder
(MP3 mode) using
the :=; buttons on the remote
control, and confirm by pressing the 9
button.
or
XPress the 9button when the display/
selection window is active.
The track list appears. The #dot indicates
the current track.
XSelect a track using the 9:buttons
and press the 9button to confirm. Making a selection by entering the track
number directly
XPress the
hbutton on the remote con-
trol.
The track entry display appears.
Example: track 2
XPress number button 2.
Example: track 12
XPress the corresponding number keys in
rapid succession.
XWait for approximately three seconds after
making the entry.
You will hear the track which has been
entered. The corresponding basic menu
then reappears.
iIt is not possible to enter numbers that
exceed the number of tracks on the CD or in
the currently active folder.
Fast forwarding/rewinding
XWith the display/selection window active,
press the =or; button on the
remote control repeatedly until you reach
the desired position.
or
XPress and hold the EorF button
until the desired position is reached.
Selecting a folder
This function is only available in MP3 mode.
XSelect Folderin MP3 mode using
the :=; buttons on the remote
control and press the 9button to confirm.
or
XPress the 9button when the display/
selection window is active.
The folder content appears.
492Rear Seat Entertainment System
COMAND
Page 497 of 614

If it was not, switch on video DVD mode as
described in the following instruction.
XSelectDiscin the menu using the
9=; buttons on the remote
control and confirm by pressing the 9
button.
If the video DVD fulfills the playback crite-
ria, the film either starts automatically or
the menu stored on the DVD appears. If the
DVD menu appears, you must start the film
manually.
XSelect the corresponding menu item in the
DVD menu.
Showing/hiding the control menu
Control menu displayed
:
Type of data medium
;Current title
=Current scene
?Track time
AShows the menu
XTo show: press the9or: button on
the remote control.
XTo hide: press the 9or: button.
or
XWait about eight seconds.
Showing/hiding the menu
Example: menu shown
:
Video DVD options
;Pause function
=Stop function
?Media selection
ASound settings
XTo show: press the9button on the
remote control.
or
XSelect Menuwhile the control menu is
shown and press the 9button to confirm.
XTo hide: press the 9button, select
Full Screen
and press the 9button to
confirm.
Fast forwarding/rewinding
XPress and hold the EorF button on
the remote control until the desired posi-
tion has been reached.
You see the control menu.
Pause function
XTo show the menu: press the9button on
the remote control.
or
XSelect Menuwhile the control menu is
shown and press the 9button to confirm.
XTo pause playback: selectËand press
the 9button to confirm.
The Ë display changes to Ì.
Rear Seat Entertainment System495
COMAND
Z
Page 498 of 614

XTo continue playback:selectÌand
press the 9button to confirm.
The menu is hidden.
Stop function
XTo show the menu: press the9button on
the remote control.
or
XSelect Menuwhile the control menu is
shown and press the 9button to confirm.
XTo interrupt playback: selectÉand
press the 9button to confirm.
The Ë display changes to Ì. The
video image is hidden.
XTo continue playback: selectÌand
press the 9button to confirm.
Playback continues from the point where it
was interrupted. The menu is hidden.
XTo stop playback: while playback is inter-
rupted, select Éagain and press the 9
button to confirm.
Playback stops and returns to the begin-
ning of the DVD. Ìis highlighted.
XTo restart playback: selectÌand
press the 9button to confirm.
Playback starts from the beginning of the
DVD.
Selecting a scene/chapter
General notes
Observe the information on DVD video mode
(
Ypage 478).
Skipping forwards/backwards
XPress the =or; button on the
remote control.
or
XPress the EorF button.
The navigation menu (
Ypage 476 )appears
for approximately eight seconds. Selecting a scene/chapter directly
These examples illustrate how to select
scene/chapter 5.
XOption 1:
while the film is playing, press
the h button on the remote control.
XPress the corresponding number key, such
as5.
XOption 2: while the film is playing, press
the 9button on the remote control and
show the menu.
XSelect DVD-Vand press the 9button to
confirm.
XSelect DVD Functionsand press the 9
button to confirm.
XSelect SceneSelectionand press the 9
button to confirm.
XSelect 5using the 9or: button and
press the 9button to confirm.
In both cases, playback will begin from the
fifth scene/chapter after a brief pause.
Selecting a film/track
Option 1:
XPress the 9button on the remote control
and show the menu.
XSelect DVD-Videoand press the 9button
on the remote control to confirm.
XSelect DVD Functionsand press the 9
button to confirm.
XSelect TitleSelectionand press the 9
button to confirm.
496Rear Seat Entertainment System
COMAND