2016 MERCEDES-BENZ S-COUPE ESP
[x] Cancel search: ESPPage 374 of 410
will be displayed in the multifunction dis-
play.
XPress the:button.
The Use Current Pressures as New
Reference Valuesmessage appears in
the multifunction display.
If you wish to confirm the restart:
XPress the abutton.
The Tire Press. Monitor Restarted
message appears in the multifunction dis-
play.
After driving for a few minutes, the system
checks whether the current tire pressures
are within the specified range. The new tire
pressures are then accepted as reference
values and monitored.
If you wish to cancel the restart:
XPress the %button.
The tire pressure values stored at the last
restart will continue to be monitored.
Radio type approval for the tire pres-
sure monitor
CountryRadio type approval number
USAFCC ID: MRXMW2433A
FCC ID: MRXGG4
FCC ID: MRXMC34MA4
CanadaIC: 2546A-MW2433A
IC: 2546A-GG4
IC: 2546A-MC34MA4
Loading the vehicle
Instruction labels for tires and loads
GWARNING
Overloaded tires can overheat, causing a
blowout. Overloaded tires can also impair the steering and driving characteristics and lead
to brake failure. There is a risk of accident.
Observe the load rating of the tires. The load
rating must be at least half of the GAWR of
your vehicle. Never overload the tires by
exceeding the maximum load.
Two instruction labels on your vehicle show
the maximum possible load.
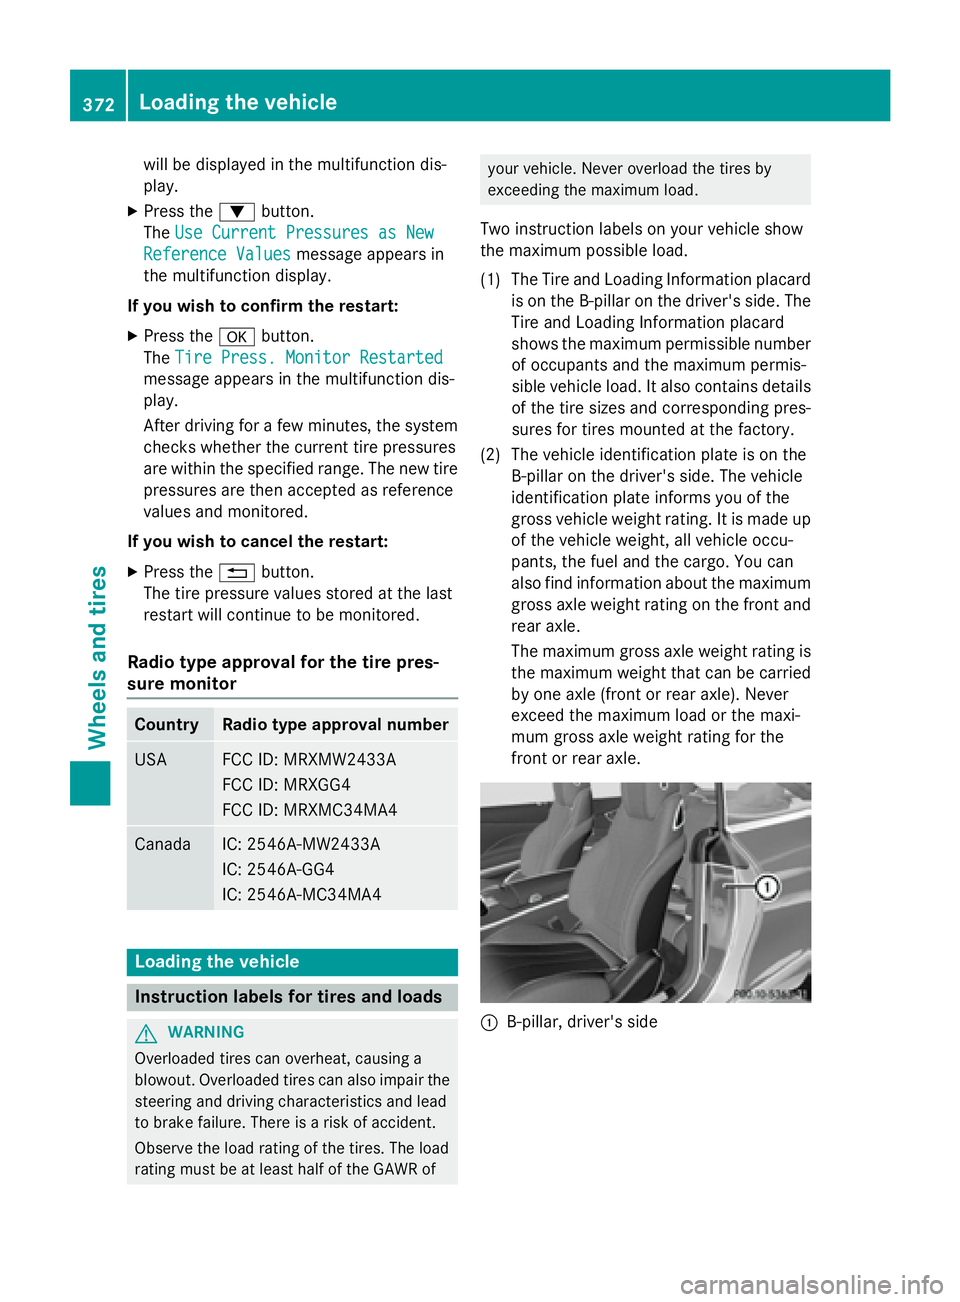
(1) The Tire and Loading Information placard is on the B-pillar on the driver's side. The
Tire and Loading Information placard
shows the maximum permissible numberof occupants and the maximum permis-
sible vehicle load. It also contains details
of the tire sizes and corresponding pres-
sures for tires mounted at the factory.
(2) The vehicle identification plate is on the B-pillar on the driver's side. The vehicle
identification plate informs you of the
gross vehicle weight rating. It is made up
of the vehicle weight, all vehicle occu-
pants, the fuel and the cargo. You can
also find information about the maximum
gross axle weight rating on the front and
rear axle.
The maximum gross axle weight rating is
the maximum weight that can be carried
by one axle (front or rear axle). Never
exceed the maximum load or the maxi-
mum gross axle weight rating for the
front or rear axle.
:B-pillar, driver's side
372Loading the vehicle
Wheels and tires
Page 378 of 410
All about wheels and tires
UniformTire Quality Grading Stand-
ards
Overview ofTire Quality Grading Stand-
ards
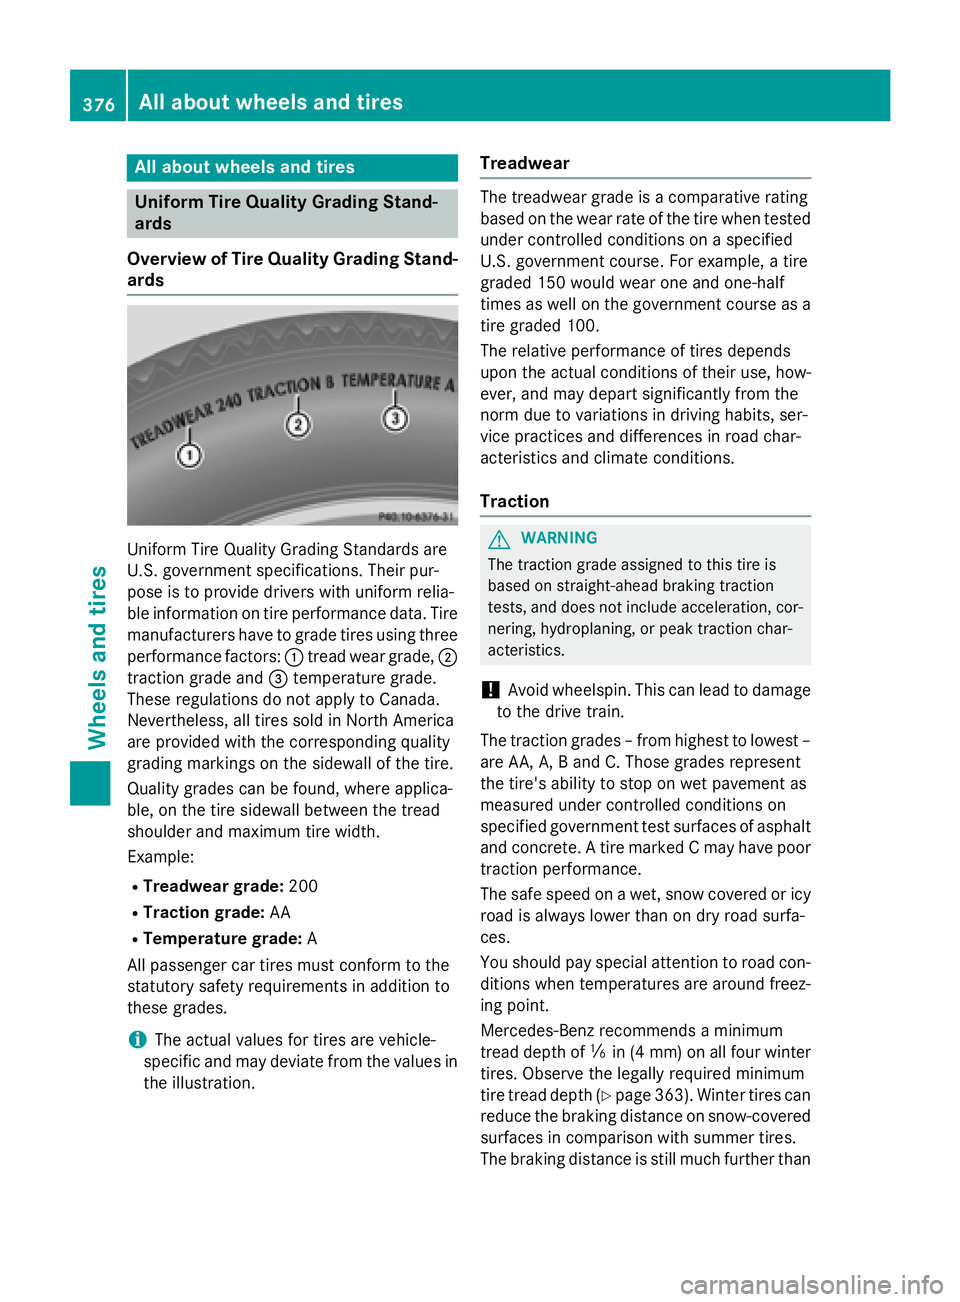
Uniform Tir eQuality Grading Standards are
U.S. governmen tspecifications. Their pur-
pos eis to provide drivers wit hunifor mrelia-
ble information on tire performance data. Tir e
manufacturers hav eto grad etires usin gthree
performance factors :: tread wear grade, ;
traction grad eand =temperature grade.
These regulation sdo no tapply to Canada.
Nevertheless, all tires sold in North America
are provide dwit hth ecorresponding qualit y
grading marking son th esidewall of th etire.
Quality grades can be found, wher eapplica-
ble, on th etire sidewall between th etread
shoulder and maximum tire width.
Example:
RTreadwear grade: 200
RTraction grade: AA
RTemperaturegrade: A
Al lpassenger car tires mus tconform to th e
statutory safet yrequirements in addition to
these grades.
iThe actual value sfor tires are vehicle-
specific and may deviat efrom th evalue sin
th eillustration .
Treadwear
The treadwea rgrad eis acomparative rating
base don th ewear rat eof th etire when te sted
under controlled condition son aspecifie d
U.S. governmen tcourse. Fo rexample, atire
graded 15 0would wear on eand one-half
times as well on th egovernmen tcours eas a
tire graded 100.
The relative performance of tires depend s
upon th eactual condition sof their use, how-
ever, and may depar tsignificantly from th e
norm due to variation sin driving habit s, ser-
vic epractice sand difference sin road char-
acteri stics and climat econditions.
Traction
GWARNIN G
The traction grad eassigned to this tire is
base don straight-ahead braking traction
tests, and does no tinclude acceleration ,cor-
nering, hydroplaning ,or peak traction char-
acteristics .
!Avoid wheelspin .This can lead to damag e
to th edriv etrain .
The traction grades –from highest to lowes t –
are AA ,A, Band C. Those grades represen t
th etire' sabilit yto stop on wet pavemen tas
measured under controlled condition son
specifie dgovernmen tte st surfaces of asphalt
and concrete. Atire marke d Cmay hav epoor
traction performance .
The saf espee don awet ,snow covered or icy
road is always lower than on dry road surfa-
ces.
You should pay special attention to road con-
dition swhen temperatures are aroun dfreez -
ing point.
Mercedes-Benz recommends aminimum
tread dept hof ã in (4 mm )on all four winte r
tires . Observ eth elegall yrequire dminimum
tire tread dept h (
Ypage 363). Winte rtires can
reduce th ebraking distanc eon snow-covered
surfaces in comparison wit h summer tires.
The braking distanc eis still muc hfurther than
376All about wheels and tires
Wheels and tires
Page 379 of 410
on surfaces that are not icy or covered with
snow. Take appropriate care when driving.
Further information on winter tires (M+S
tires) (
Ypage 364).
Temperature
GWARNING
The temperature grade for this tire is estab-
lished for a tire that is properly inflated and
not overloaded. Excessive speed, underinfla-
tion, or excessive loading, either separately or
in combination, can cause excessive heat
build-up and possible tire failure.
The temperature grades are A (the highest), B,
and C. They represent the tire's resistance to
the generation of heat and its ability to dissi-
pate heat when tested under controlled con-
ditions on a specified indoor laboratory test
wheel. Sustained high temperature can cause
the material of the tire to degenerate and
reduce tire life, and excessive temperature
can lead to sudden tire failure. The grade C
corresponds to a level of performance which
all passenger car tires must meet under the
Federal Motor Vehicle Safety Standard No.
109. Grades B and A represent higher levels
of performance on the laboratory test wheel
than the minimum required by law.
Tire labeling
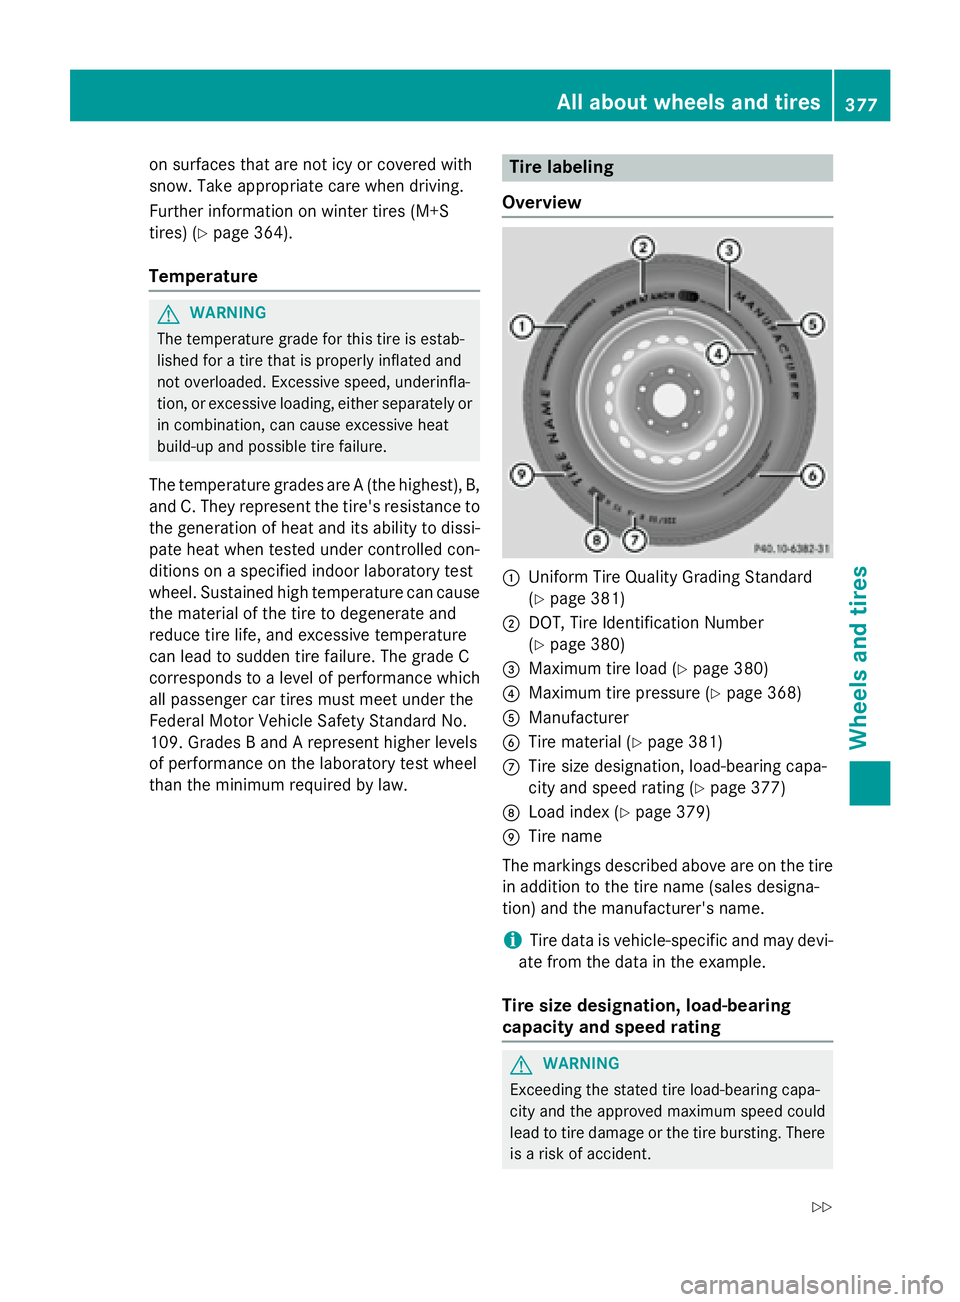
Overview
:Uniform Tire Quality Grading Standard
(
Ypage 381)
;DOT, Tire Identification Number
(
Ypage 380)
=Maximum tire load (Ypage 380)
?Maximum tire pressure (Ypage 368)
AManufacturer
BTire material (Ypage 381)
CTire size designation, load-bearing capa-
city and speed rating (
Ypage 377)
DLoad index (Ypage 379)
ETire name
The markings described above are on the tire
in addition to the tire name (sales designa-
tion) and the manufacturer's name.
iTire data is vehicle-specific and may devi-
ate from the data in the example.
Tire size designation, load-bearing
capacity and speed rating
GWARNING
Exceeding the stated tire load-bearing capa-
city and the approved maximum speed could
lead to tire damage or the tire bursting. There is a risk of accident.
All about wheels and tires377
Wheels and tires
Z
Page 381 of 410
IndexSpeed rating
Wup to 168 mph (270 km/h)
Yup to 186 mph (300 km/h)
ZR...Yup to 186 mph (300 km/h)
ZR...(..Y)over 186 mph(300km/ h)
ZRover 149 mph (240km/ h)
ROptionally, tires with a maximum speed of
over 149 mph (240 km/h) may have "ZR" in
the size description, depending on the
manufacturer (e.g. 245/40 ZR18).
The service specification is made up of
load-bearing index Aand speed rating B.
RIf the size description of your tire includes
"ZR" and there are no service specifica-
tions, ask the tire manufacturer in order to
find out the maximum speed.
If a service specification is available, the
maximum speed is limited according to the
speed rating in the service specification.
Example: 245/40 ZR18 97 Y.In this exam-
ple, "97 Y" is the service specification. The
letter "Y" represents the speed rating. The
maximum speed of the tire is limited to
186 mph (300 km/h).
RThe size description for all tires with maxi-
mum speeds of over 186 mph (300 km/h)
must include "ZR", andthe service specifi-
cation must be given in parentheses. Exam-
ple: 275/40 ZR 18 (99 Y). Speed rating
"(Y)" indicates that the maximum speed of
the tire is over 186 mph (300 km/h). Ask
the tire manufacturer about the maximum
speed.
All-weather tires and winter tires
IndexSpeed rating
Q M+S1up to 100 mph (160 km/h)
T M+S1up to 118 mph (190 km/h)
IndexSpeed rating
H M+S1up to 130 mph (210 km/h)
V M+S1up to 149 mph (240 km/h)
iNot all tires with the M+S marking provide
the driving characteristics of winter tires. In
addition to the M+S marking, winter tires
also have the isnowflake symbol on
the tire wall. Tires with this marking fulfill
the requirements of the Rubber Manufac-
turers Association (RMA) and the Rubber
Association of Canada (RAC) regarding the
tire traction on snow. They have been espe-
cially developed for driving on snow.
An electronic speed limiter prevents your
vehicle from exceeding a speed of 130 mph
(210 km/h).
The speed rating of tires mounted at the fac-
tory may be higher than the maximum speed
that the electronic speed limiter permits.
Make sure that your tires have the required
speed rating, e.g. when buying new tires. The
required speed rating for your vehicle can be
found in the "Tires" section (
Ypage 388).
Further information about reading tire data
can be obtained from any qualified specialist workshop.
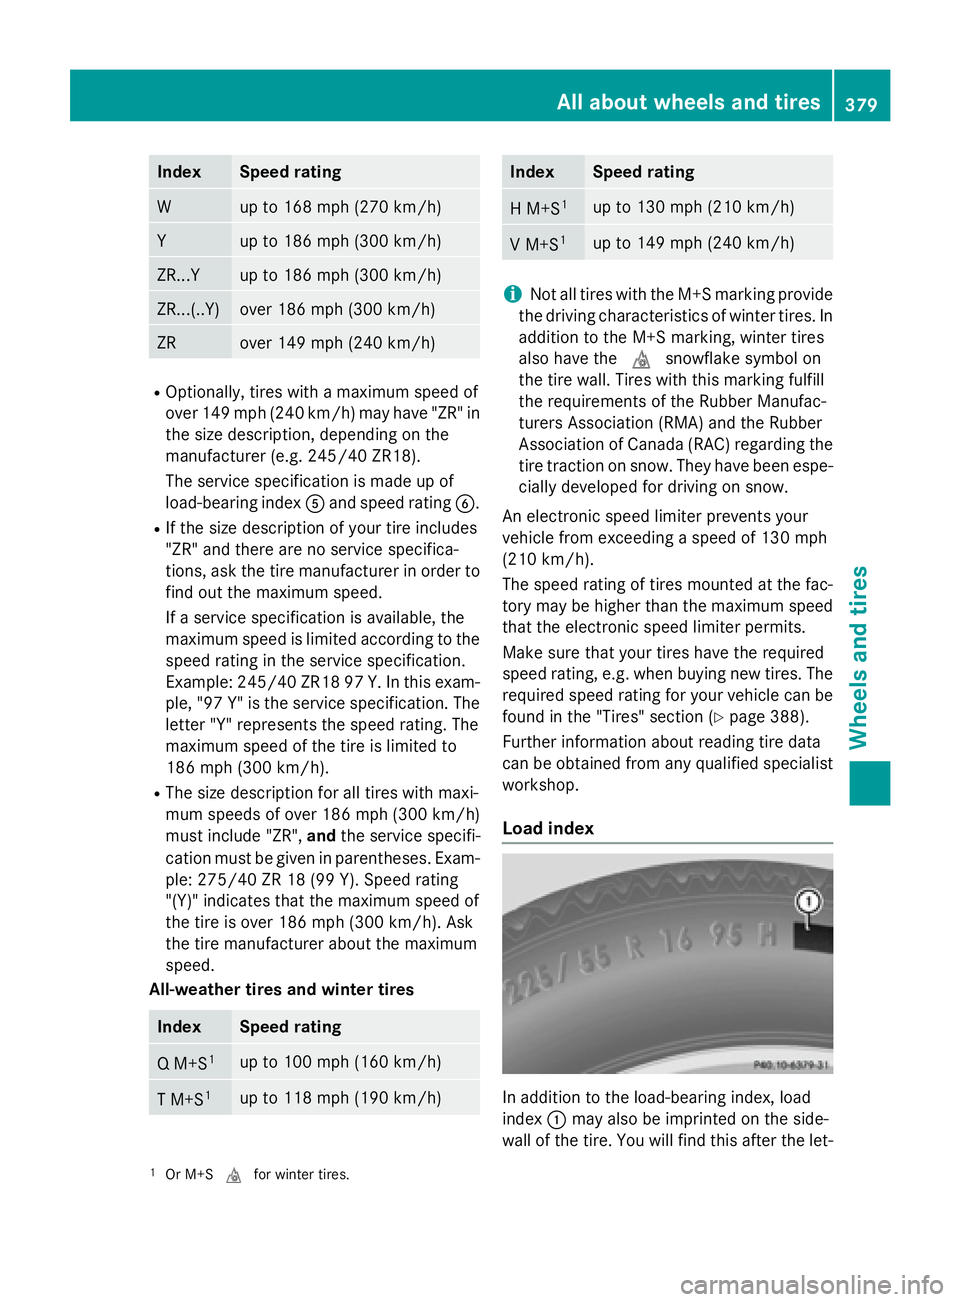
Load index
In addition to the load-bearing index, load
index :may also be imprinted on the side-
wall of the tire. You will find this after the let-
1Or M+S ifor winter tires.
All about wheels and tires379
Wheels and tires
Z
Page 386 of 410
Direction of rotation
Tires with aspecifie ddirection of rotation
hav eadditional benefits, e.g. if there is aris k
of hydroplaning .These advantages can only
be gained if th etires are installed correspond-
in g to th edirection of rotation .
An arrow on th esidewall of th etire indicates
it s correc tdirection of rotation .
Storing wheels
Storewheels that are no tbein gused in acool,
dry and preferably dar kplace. Protec tth e
tires from oil, grease ,gasolin eand diesel.
Mounting awheel
Preparing th evehicle
XStop th evehicle on solid, non-slipper yand
level ground.
XApply th eelectric parking brake manually.
XBrin gth efron twheels into th estraight -
ahead position .
XShift thetransmissio nto position P.
XMakesur ethat "normal" level is selecte d
fo rAIRMATIC (
Ypage 197).
XSwitchof fth eengine.
XOpe nth edriver's door.
The on-boar delectronic sno whav estatus
0. Thi sis th esam eas th eSmartKey havin g
been removed.
XRemov eStart/Sto pbutto nfrom ignition
loc k (
Ypage 151).
or ,if th eSmartKey is inserte din th eignition
lock:
XRemov eth eSmartKey from th eignition
lock.
XMak esur ethat th eengin ecanno tbe star-
te dvia your smartphone (
Ypage 154).
XIf included in thevehicle equipment,
remov eth etire-chang etool ki tfrom th e
vehicle.
XSafeguar dth evehicle against rollin gaway.
Securing th evehicle to preven tit from
rollin gawa y
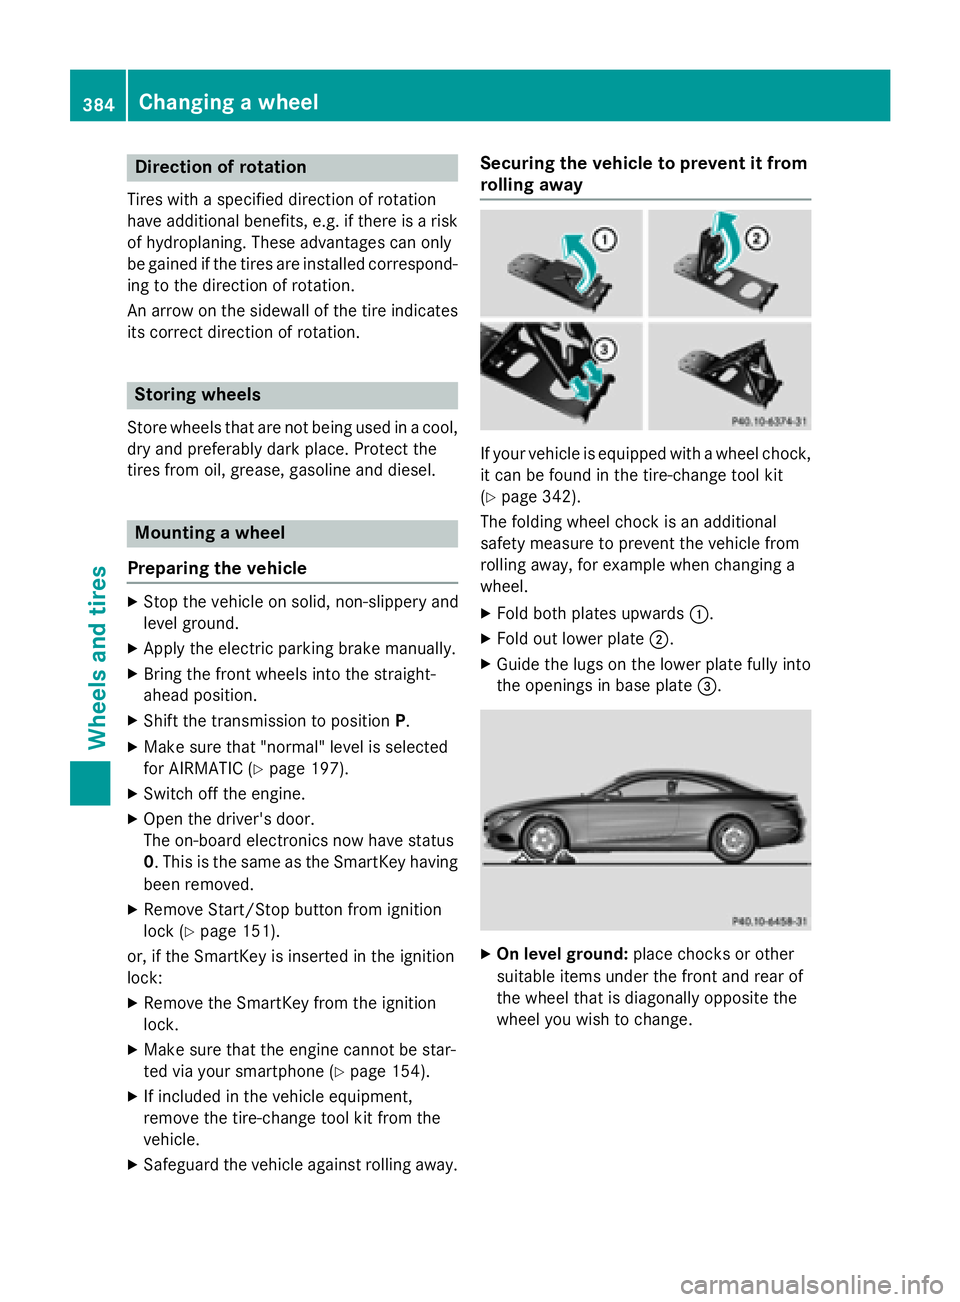
If your vehicle is equipped wit h awhee lchock,
it can be found in th etire-chang etool ki t
(
Ypage 342).
The foldin gwhee lchoc kis an additional
safet ymeasur eto preven tth evehicle from
rollin gaway, fo rexample when changin g a
wheel.
XFold bot hplates upwards :.
XFold out lowerplat e;.
XGuide th elugs on th elowe rplat efull yinto
th eopening sin base plat e=.
XOn leve lground: placechocks or other
suitable items under th efron tand rea rof
th ewhee lthat is diagonally opposite th e
whee lyou wish to change.
384Changing a wheel
Wheels and tires
Page 390 of 410
approved for Mercedes-Benz vehicles and the
respective wheel.
!Mercedes-AMG vehicles:during
removal and repositioning of the wheel, the
wheel rim can strike the ceramic-brake disc
and damage it. Therefore, you should pro-
ceed carefully and get a second person
assist to you. Alternatively, you can use a
second alignment bolt.
!To prevent damage to the paintwork, hold
the wheel securely against the wheel hub
while screwing in the first wheel bolt.
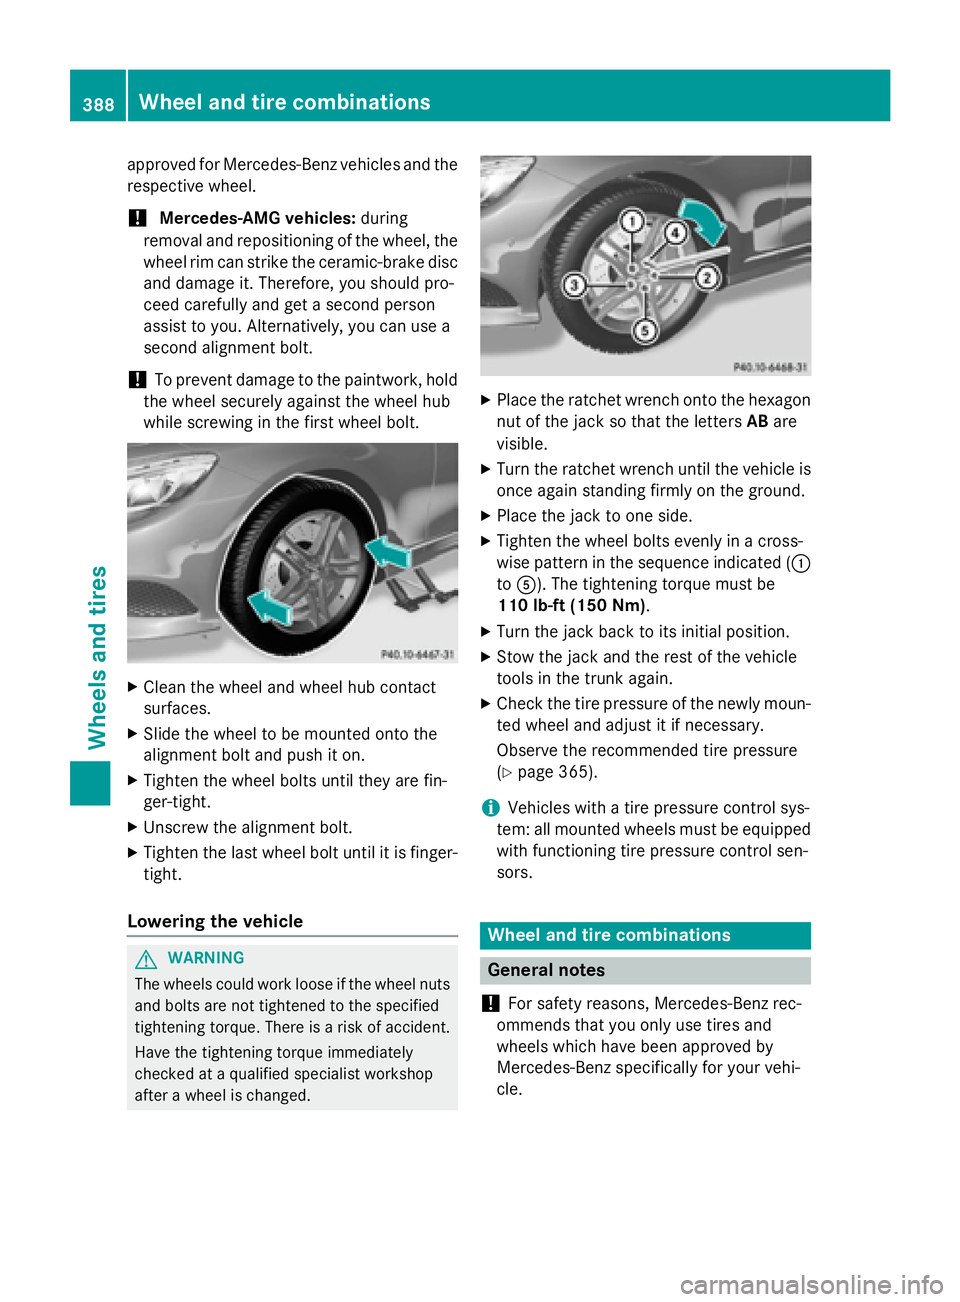
XClean the wheel and wheel hub contact
surfaces.
XSlide the wheel to be mounted onto the
alignment bolt and push it on.
XTighten the wheel bolts until they are fin-
ger-tight.
XUnscrew the alignment bolt.
XTighten the last wheel bolt until it is finger-
tight.
Lowering the vehicle
GWAR NING
The wheels could work loose ifthe wheel nuts
and bolts are not tightened to the specifie d
tightening torque. There isa risk of acc ident.
Have the tightening torque immediately
checked at a qualified specialist workshop
after a wheel ischanged.
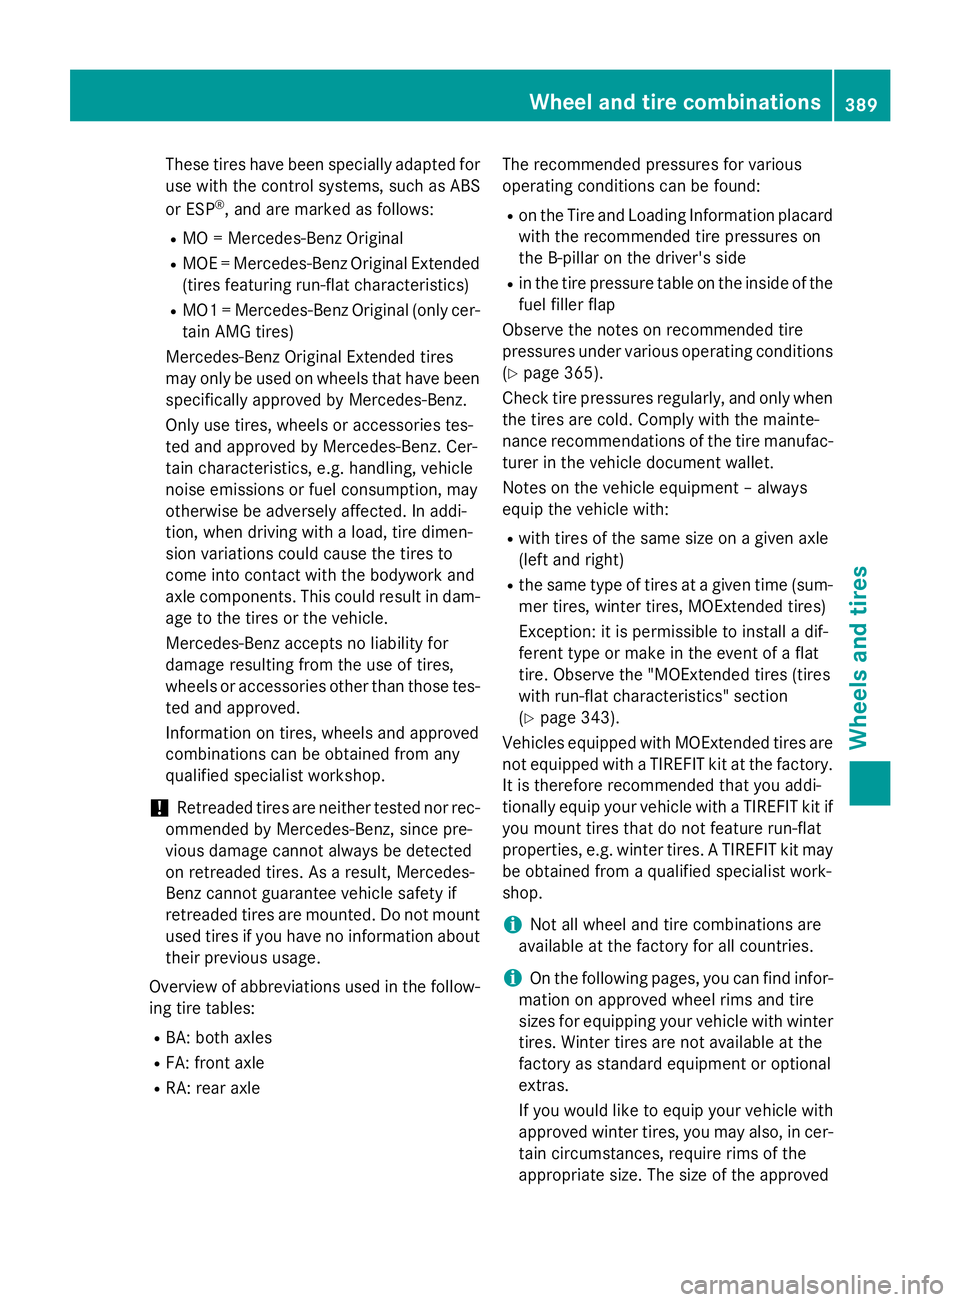
XPlace the ratchet wrench onto the hexagon
nut of the jack so that the letters ABare
visible.
XTurn the ratchet wrench until the vehicle is
once again standing firmly on the ground.
XPlace the jack to one side.
XTighten the wheel bolts evenly in a cross-
wise pattern in the sequence indicated ( :
to A). The tightening torque must be
110 lb-f t(150 Nm) .
XTurn the jack back to its initial position.
XStow the jack and the rest of the vehicle
tools in the trunk again.
XCheck the tire pressure of the newly moun-
ted wheel and adjust it if necessary.
Observe the recommended tire pressure
(
Ypage 365).
iVehicles with a tire pressure control sys-
tem: all mounted wheels must be equipped
with functioning tire pressure control sen-
sors.
Wheel and tire combinations
General notes
!
For safety reasons, Mercedes-Benz rec-
ommends that you only use tires and
wheels which have been approved by
Mercedes-Benz specifically for your vehi-
cle.
388Wheel and tire combinations
Wheels and tires
Page 391 of 410
These tires have been specially adapted for
use with the control systems, such as ABS
or ESP
®, and are marked as follows:
RMO = Mercedes-Benz Original
RMOE = Mercedes-Benz Original Extended
(tires featuring run-flat characteristics)
RMO1 = Mercedes-Benz Original (only cer-
tain AMG tires)
Mercedes-Benz Original Extended tires
may only be used on wheels that have been
specifically approved by Mercedes-Benz.
Only use tires, wheels or accessories tes-
ted and approved by Mercedes-Benz. Cer-
tain characteristics, e.g. handling, vehicle
noise emissions or fuel consumption, may
otherwise be adversely affected. In addi-
tion, when driving with a load, tire dimen-
sion variations could cause the tires to
come into contact with the bodywork and
axle components. This could result in dam-
age to the tires or the vehicle.
Mercedes-Benz accepts no liability for
damage resulting from the use of tires,
wheels or accessories other than those tes-
ted and approved.
Information on tires, wheels and approved
combinations can be obtained from any
qualified specialist workshop.
!Retreaded tires are neither tested nor rec-
ommended by Mercedes-Benz, since pre-
vious damage cannot always be detected
on retreaded tires. As a result, Mercedes-
Benz cannot guarantee vehicle safety if
retreaded tires are mounted. Do not mount
used tires if you have no information about
their previous usage.
Overview of abbreviations used in the follow-
ing tire tables:
RBA: both axles
RFA: front axle
RRA: rear axle The recommended pressures for various
operating conditions can be found:
Ron the Tire and Loading Information placard
with the recommended tire pressures on
the B-pillar on the driver's side
Rin the tire pressure table on the inside of the
fuel filler flap
Observe the notes on recommended tire
pressures under various operating conditions
(
Ypage 365).
Check tire pressures regularly, and only when
the tires are cold. Comply with the mainte-
nance recommendations of the tire manufac-
turer in the vehicle document wallet.
Notes on the vehicle equipment – always
equip the vehicle with:
Rwith tires of the same size on a given axle
(left and right)
Rthe same type of tires at a given time (sum-
mer tires, winter tires, MOExtended tires)
Exception: it is permissible to install a dif-
ferent type or make in the event of a flat
tire. Observe the "MOExtended tires (tires
with run-flat characteristics" section
(
Ypage 343).
Vehicles equipped with MOExtended tires are
not equipped with a TIREFIT kit at the factory.
It is therefore recommended that you addi-
tionally equip your vehicle with a TIREFIT kit if
you mount tires that do not feature run-flat
properties, e.g. winter tires. A TIREFIT kit may
be obtained from a qualified specialist work-
shop.
iNot all wheel and tire combinations are
available at the factory for all countries.
iOn the following pages, you can find infor-
mation on approved wheel rims and tire
sizes for equipping your vehicle with winter
tires. Winter tires are not available at the
factory as standard equipment or optional
extras.
If you would like to equip your vehicle with
approved winter tires, you may also, in cer- tain circumstances, require rims of the
appropriate size. The size of the approved
Wheel and tire combinations389
Wheels and tires
Z
Page 400 of 410

Useful information
i
This Operator's Manual describes all
models and all standard and optional equip-
ment of your vehicle available at the time of
publication of the Operator's Manual.
Country-specific differences are possible.
Please note that your vehicle may not be
equipped with all features described. This
also applies to safety-related systems and
functions.
iRead the information on qualified special-
ist workshops (
Ypage 26).
Information regarding technical data
i
The data stated here specifically refers to
a vehicle with standard equipment. Consult an authorized Mercedes-Benz Center for
the data for all vehicle variants and trim
levels.
Vehicle electronics
Tampering with the engine electron-
ics
!
Only have work carried out on the engine
electronics and its associated parts, such
as control units, sensors, actuating com-
ponents and connector leads, at a qualified
specialist workshop. Vehicle components
may otherwise wear more quickly and the
vehicle's operating permit may be invalida-
ted.
!Engine management measures under-
taken to increase performance can lead to
increased wear and tear or damage to the
drive system.
Retrofitting two-way radios and
mobile phones (RF transmitters)
Approved antenna positions
:
Front roof area
;Rear roof area
=Rear fender
?Trunk lid
iOn vehicles with panorama roof with
power tilt/sliding panel, installing an
antenna to the front or rear roof area is not
permitted.
On the rear fenders, it is recommended to
position the antenna on the side of the
vehicle closest to the center of the road.
Use the Technical Specification ISO/TS
21609 when retrofitting RF transmitters
(Road Vehicles - EMC guidelines for installa-
tion of aftermarket radio frequency transmit-
ting equipment). Observe the legal require-
ments for retrofittings.
If your vehicle has installations for two-way
radio equipment, use the power supply or
antenna connections intended for use with
the basic wiring. Be sure to observe the man-
ufacturer's additional instructions when
installing.
Deviations with respect to wavebands, maxi-
mum transmission outputs or antenna posi-
tions must be approved by Mercedes-Benz.
398Vehicle electronics
Technical data