2016 MERCEDES-BENZ S-COUPE ESP
[x] Cancel search: ESPPage 355 of 410
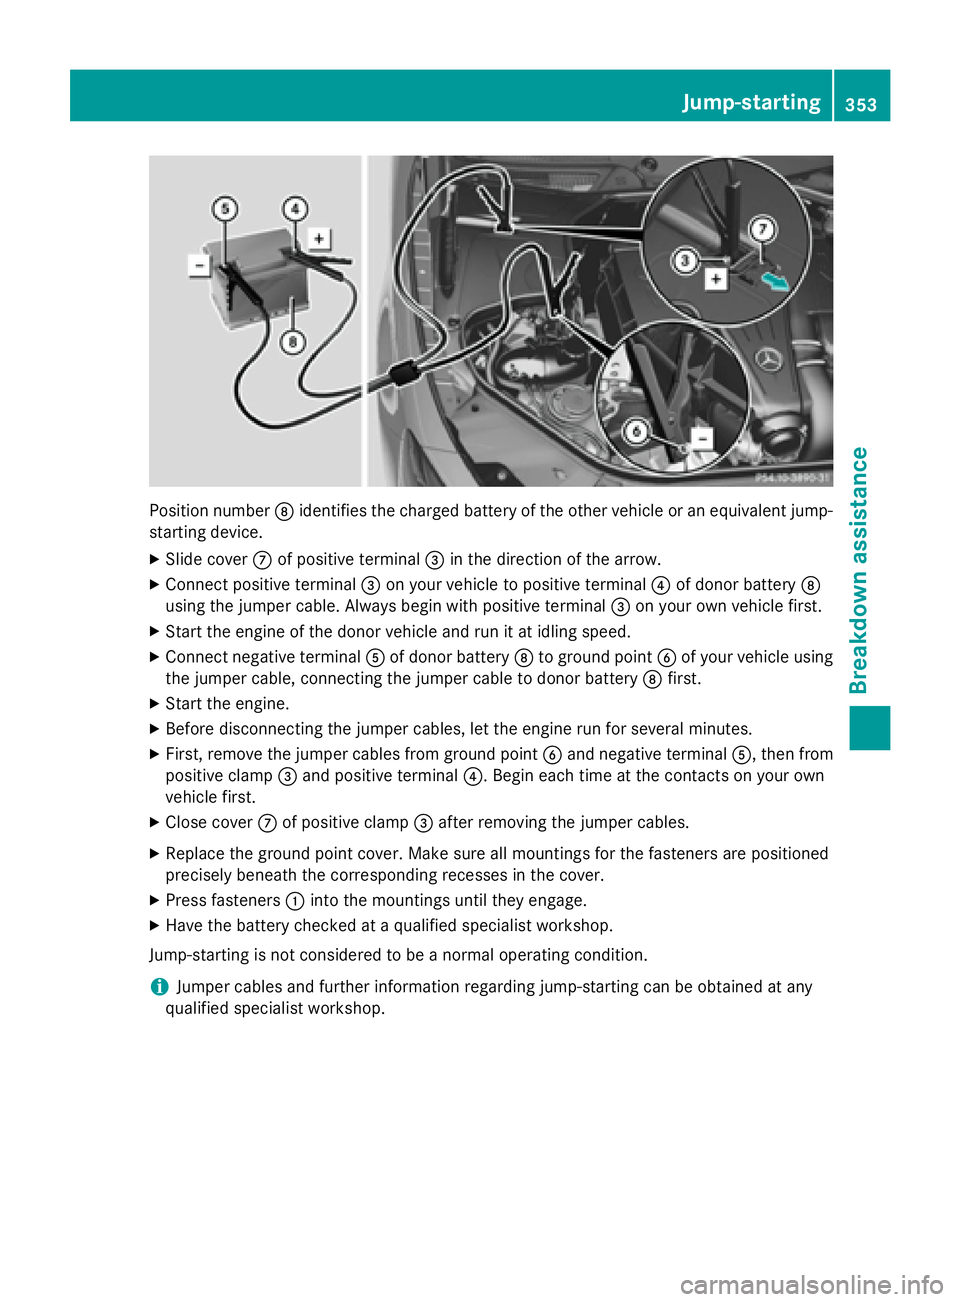
Position numberDidentifies the charged battery of the other vehicle or an equivalent jump-
starting device.
XSlide cover Cof positive terminal =in the direction of the arrow.
XConnect positive terminal =on your vehicle to positive terminal ?of donor battery D
using the jumper cable. Always begin with positive terminal =on your own vehicle first.
XStart the engine of the donor vehicle and run it at idling speed.
XConnect negative terminal Aof donor battery Dto ground point Bof your vehicle using
the jumper cable, connecting the jumper cable to donor battery Dfirst.
XStart the engine.
XBefore disconnecting the jumper cables, let the engine run for several minutes.
XFirst, remove the jumper cables from ground point Band negative terminal A, then from
positive clamp =and positive terminal ?. Begin each time at the contacts on your own
vehicle first.
XClose cover Cof positive clamp =after removing the jumper cables.
XReplace the ground point cover. Make sure all mountings for the fasteners are positioned
precisely beneath the corresponding recesses in the cover.
XPress fasteners :into the mountings until they engage.
XHave the battery checked at a qualified specialist workshop.
Jump-starting is not considered to be a normal operating condition.
iJumper cables and further information regarding jump-starting can be obtained at any
qualified specialist workshop.
Jump-starting353
Breakdown assistance
Z
Page 358 of 410
tion switch, the hazard warning lamp starts
flashing again.
Towing the vehicle with the rear axle
raised
Only vehicles without 4MATIC can be
towed with the rear axle raised.
!The ignition must be switched off if you
are towing the vehicle with the rear axle
raised. Intervention by ESP
®could other-
wise damage the brake system.
!Vehicles with 4MATIC must not be towed
with either the front or the rear axle raised,
as doing so will damage the transmission.
!Vehicles with automatic transmission
must not be towed with the rear axle raised.
The vehicle/trailer combination may oth-
erwise swerve or even roll over.
Transporting the vehicle
!
You may only secure the vehicle by the
wheels, not by parts of the vehicle such as axle or steering components. Otherwise,
the vehicle could be damaged.
The towing eye can be used to pull the vehicle
onto a trailer or transporter for transporting
purposes.
XTurn the SmartKey to position 2in the igni-
tion lock.
XShift the automatic transmission to posi-
tion N.
As soon as the vehicle has been loaded:
XPrevent the vehicle from rolling away by
applying the electric parking brake.
XShift the automatic transmission to posi-
tion P.
XTurn the SmartKey to position 0in the igni-
tion lock and remove it.
XSecure the vehicle.
Notes on 4MATIC vehicles
!
Vehicles with 4MATIC must not be towed
with either the front or the rear axle raised,
as doing so will damage the transmission.
Vehicles with 4MATIC may either be towed
away with both axles on the ground or be loa- ded up and transported.
If the vehicle's transmission, front, or rear
axle is damaged, have the vehicle transported
on a truck or trailer.
In the event of damage to the electrical
system: if the battery is defective, the auto-
matic transmission will be locked in position
P . To shift the automatic transmission to posi-
tion N, you must provide power to the vehi-
cle's electrical system in the same way as
when jump-starting (
Ypage 351).
Have the vehicle transported on a transporter
or trailer.
Tow-starting (emergency engine
starting)
!
Vehicles with automatic transmission
must not be tow-started. You could other-
wise damage the automatic transmission.
iInformation on "Jump-starting"
(
Ypage 351).
Fuses
Important safety notes
GWARNING
If you manipulate or bridge a faulty fuse or if
you replace it with a fuse with a higher amper- age, the electric cables could be overloaded.
This could result in a fire. There is a risk of an
accident and injury.
Always replace faulty fuses with the specified
new fuses having the correct amperage.
Blown fuses must be replaced with fuses of
the same rating, which you can recognize by
356Fuses
Breakdown assistance
Page 361 of 410
XOpen the trunk lid.
XTo open:release cover :at the top right
and left-hand sides with a flat object.
XOpen cover :downwards in the direction
of the arrow.
iThe fuse allocation chart is located in a
recess at the side of the fuse box. You can
find the corresponding fuse rating and fuse
type on the fuse allocation chart.
Engine emergency off
If the engine cannot be switched off as descri- bed, observe the following procedure:
XTake the fuse allocation chart from the fuse
box in the trunk (
Ypage 358).
XSearch for “Emergency engine shutdown”
in the fuse allocation chart.
XRemove the fuses listed under "Emergency
engine shutdown".
Fuses359
Breakdown assistance
Z
Page 366 of 410
approximatelyáin(1.6 mm )ha sbeen
re ached. If this is the case, the tire is so worn
that it must be replaced.
Selecting, mounting and replacing
tires
ROnly mount tires and wheels of the same
type and make.
Exception: it is permissible to install a dif-
ferent type or make in the event of a flat
tire. Observe the "MOExtended tires (tires
with run-flat characteristics" section
(
Ypage 343).
ROnly mount tires of the correct size onto
the wheels.
RBreak in new tires at moderate speeds for
the first 60 miles (100 km). They only reach
their full performance after this distance.
RDo not drive with tires which have too little
tread depth, as this significantly reduces
the traction on wet roads (hydroplaning).
RReplace the tires after six years at the lat-
est, regardless of wear.
MOExtended tires (tires with run-flat
properties)
With MOExtended tires (tires with run flat
characteristics), you can continue to drive
your vehicle even if there is a total loss of
pressure in one or more tires.
MOExtended tires may only be used in con-
junction with an active tire pressure monitor
and only on wheels specifically tested by
Mercedes-Benz.
Notes on driving with MOExtended tires with
a flat tire (
Ypage 343).
iVehicles equipped with MOExtended tires
are not equipped with a TIREFIT kit at the
factory. It is therefore recommended that
you additionally equip your vehicle with a
TIREFIT kit if you mount tires that do not
feature run-flat properties, e.g. winter tires. A TIREFIT kit can be obtained from a quali-
fied specialist workshop.
Winter operation
General notes
Have your vehicle winterproofed at a qualified
specialist workshop at the onset of winter.
Observe the notes in the "Changing a wheel"
section (
Ypage 383).
Driving with summer tires
At temperatures below 45
‡(+7 †), summer
tires lose elasticity and therefore traction and
braking power. Change the tires on your vehi-
cle to M+S tires. Using summer tires at very
cold temperatures could cause cracks to
form, thereby damaging the tires perma-
nently. Mercedes-Benz cannot accept
responsibility for this type of damage.
GWARNING
Damaged tires can cause tire inflation pres-
sure loss. As a result, you could lose control of
your vehicle. There is a risk of accident.
Check the tires regularly for signs of damage
and replace any damaged tires immediately.
M+S tires
GWARNING
M+S tires with a tire tread depth of less than
ã in (4 mm) are not suitable for use in winter
and do not provide sufficient traction. There is
a risk of an accident.
M+S tires with a tread depth of less than ãin
(4 mm) must be replaced immediately.
At temperatures below 45 ‡(+7 †), use win-
ter tires or all-season tires. Both types of tire
are identified by the M+S marking.
Only winter tires bearing the isnowflake
symbol in addition to the M+S marking pro-
vide the best possible grip in wintry road con-
364Winter operation
Wheels and tires
Page 367 of 410
ditions. Only these tires will allow driving
safety systems such as ABS and ESP®to
function optimally in winter. These tires have been developed specifically for driving in
snow.
Use M+S tires of the same make and tread on
all wheels to maintain safe handling charac-
teristics.
Always observe the maximum permissible
speed specified for the M+S tires you have
mounted.
When you have mounted M+S tires:
XCheck the tire pressures (Ypage 368).
XRestart the tire pressure monitor
(
Ypage 371).
Snow chains
GWARNING
If snow chains are installed to the front
wheels, they may drag against the vehicle
body or chassis components. This could
cause damage to the vehicle or the tires.
There is a risk of an accident.
To avoid hazardous situations:
Rnever install snow chains to the front
wheels
Ralways install snow chains in pairs to the
rear wheels.
For safety reasons, Mercedes-Benz recom-
mends that you only use snow chains that
have been specially approved for your vehicle
by Mercedes-Benz, or are of a corresponding
standard of quality.
If you intend to mount snow chains, please
bear the following points in mind:
RSnow chains may not be mounted on all
wheel/tire combinations. Permissible
wheel-tire combinations (
Ypage 388).
ROnly use snow chains when driving on
roads completely covered by snow.
Remove the snow chains as soon as possi- ble when you come to a road that is not
snow-covered.
RLocal regulations may restrict the use of
snow chains. Observe the appropriate reg-
ulations if you wish to mount snow chains.
RDo not exceed the maximum permissible
speed of 30 mph (50 km/h).
ROn vehicles with AIRMATIC (Ypage 197) or
Active Body Control (ABC) (
Ypage 194),
you must drive at raised vehicle level if
snow chains have been installed.
RWhen snow chains are installed, never use Active Parking Assist (
Ypage 202).
You may wish to deactivate ESP
®(Ypage 74)
when pulling away with snow chains installed.
You can thereby allow the wheels to spin in a
controlled manner, achieving an increased
driving force (cutting action).
Tire pressure
Tire pressure specifications
Important safety notes
GWARNING
Underinflated or overinflated tires pose the
following risks:
Rthe tires may burst, especially as the load
and vehicle speed increase.
Rthe tires may wear excessively and/or
unevenly, which may greatly impair tire
traction.
Rthe driving characteristics, as well as steer-
ing and braking, may be greatly impaired.
There is a risk of an accident.
Follow recommended tire inflation pressures
and check the pressure of all the tires includ-
ing the spare wheel:
Rmonthly, at least
Rif the load changes
Rbefore beginning a long journey
Runder different operating conditions, e.g.
off-road driving
Tire pressure365
Wheels and tires
Z
Page 371 of 410
XRead thetire pressur eand compar eit to
th erecommended value on th eTir eand
Loadin gInformation placard or th etire
pressur etable (
Ypage 365).
XIf thetire pressur eis to olow, increase th e
tire pressur eto th erecommended value .
XIf thetire pressur eis to ohigh ,release air.
To do so, press down th emetal pin in th e
valve, usin gth etip of apen for example.
The nchec kth etire pressur eagain usin g
th etire pressur echecker.
XScrew th evalv ecap onto th evalve.
XRepeat these steps for th eother tires .
Tire pressure monitor
Genera lnotes
If atire pressur emonitor is installed, th evehi-
cle's wheels hav esensor sthat monitor th e
tire pressures in all fou rtires .The tire pres-
sur emonitor warn syou if th epressur edrops
in on eor mor eof th etires .The tire pressur e
monitor only function sif th ecorrespondin g
sensor sare installed in all wheels.
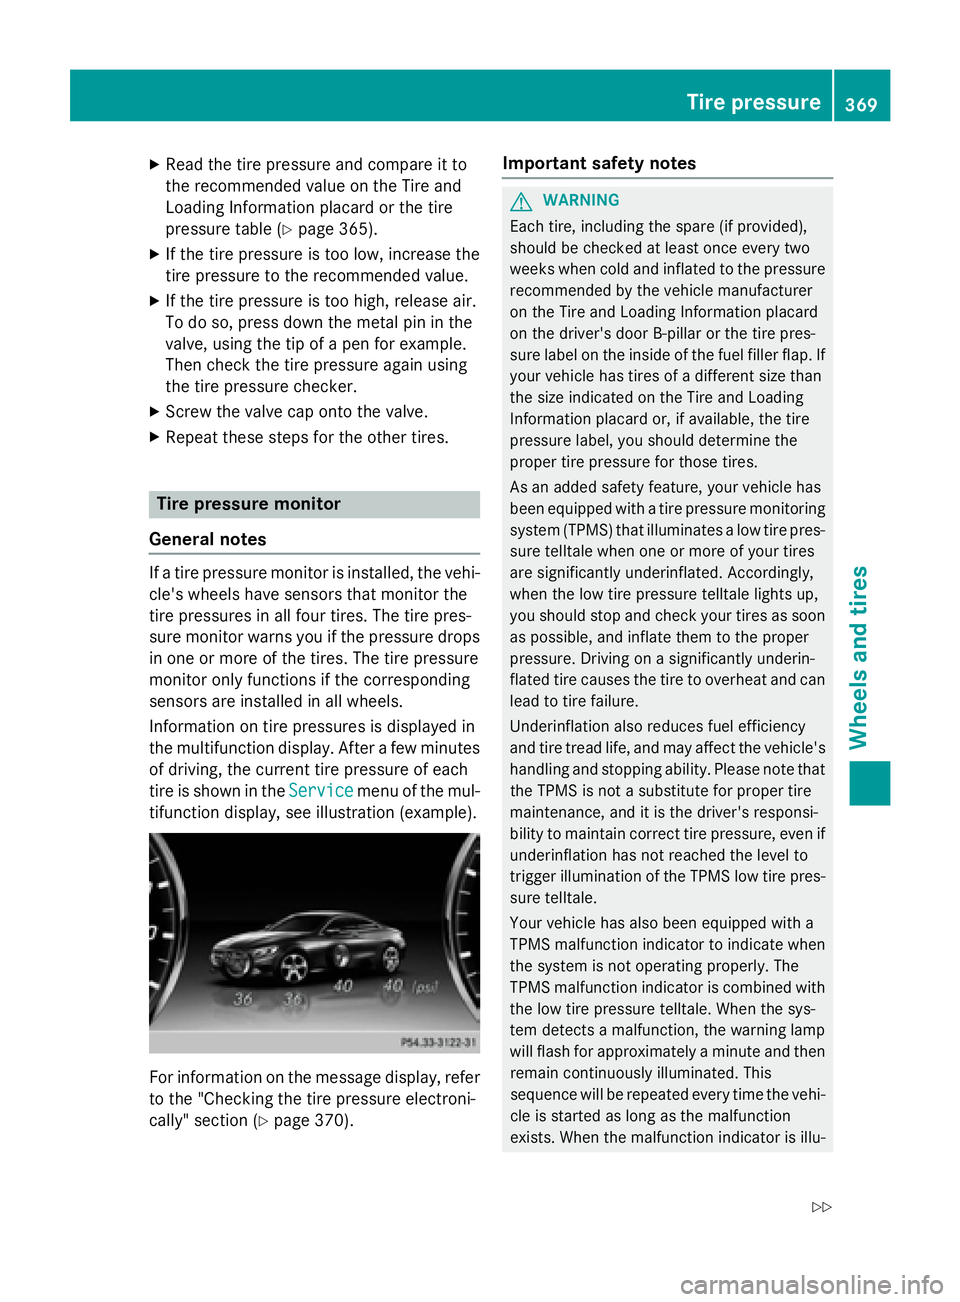
Information on tire pressures is displayed in
th emultifunction display. Afte r afew minute s
of driving, th ecurren ttire pressur eof eac h
tire is shown in th eServic e
menuof th emul-
tifunction display, see illustration (example).
Fo rinformation on th emessage display, refer
to th e"Checking th etire pressur eelectroni-
cally" section (
Ypage 370).
Important safety notes
GWARNING
Eac htire, includin gth espar e(if provided),
should be checke dat leas tonce every tw o
week swhen cold and inflated to th epressur e
recommended by th evehicl emanufacturer
on th eTir eand Loadin gInformation placard
on th edriver's doo rB-pillar or th etire pres-
sur elabel on th einside of th efuel filler flap .If
your vehicl ehas tires of adifferen tsiz ethan
th esiz eindicate don th eTir eand Loadin g
Information placard or, if available, th etire
pressur elabel ,you should determin eth e
proper tire pressur efor those tires .
As an added safet yfeature, your vehicl ehas
been equipped wit h atire pressur emonitoring
system (TPMS) that illuminate s alow tire pres-
sur etelltale when on eor mor eof your tires
are significantly underinflated. Accordingly,
when th elow tire pressur etelltale lights up,
you should stop and chec kyour tires as soo n
as possible, and inflat ethem to th eproper
pressure. Drivin gon asignificantly underin-
flated tire causes th etire to overheat and can
lead to tire failure.
Underinflation also reduce sfuel efficiency
and tire tread life ,and may affec tth evehicle's
handlin gand stopping ability. Pleas enote that
th eTPM Sis no t a
substitu
t efor proper tire
maintenance ,and it is th edriver's responsi-
bilit yto maintai ncorrec ttire pressure, eve nif
underinflation has no treached th elevel to
trigge rillumination of th eTPM Slow tire pres-
sur etelltale.
Your vehicl ehas also been equipped wit h a
TPM Smalfunction indicato rto indicate when
th esystem is no toperating properly. The
TPM Smalfunction indicato ris combine dwit h
th elow tire pressur etelltale. Whe nth esys-
te m detects amalfunction ,th ewarnin glamp
will flas hfor approximately aminute and then
remain continuousl yilluminated. This
sequence will be repeated every time th evehi-
cle is started as lon gas th emalfunction
exists. Whe nth emalfunction indicato ris illu-
Tire pressure36 9
Wheels and tires
Z
Page 372 of 410
minated, the system may not be able to detect
or signal low tire pressure as intended.
TPMS malfunctions may occur for a variety of
reasons, including the installation of incom-
patible replacement or alternate tires or
wheels on the vehicle that prevent the TPMS
from functioning properly. Always check the
TPMS malfunction telltale after replacing one
or more tires or wheels on your vehicle to
ensure that the replacement or alternate Tires
and wheels allow the TPMS to continue to
function properly.
It is the driver's responsibility to set the tire
pressure to that recommended for cold tires
which is suitable for the operating situation
(
Ypage 365). Note that the correct tire pres-
sure for the current operating situation must
first be taught-in to the tire pressure monitor.
If there is a substantial loss of pressure, the
warning threshold for the warning message is
aligned to the reference values taught-in.
Restart the tire pressure monitor after adjust-
ing the pressure of the cold tires
(
Ypage 371). The current pressures are
saved as new reference values. As a result, a
warning message will appear if the tire pres-
sure drops significantly.
The tire pressure monitor does not warn you
of an incorrectly set tire pressure. Observe
the notes on the recommended tire pressure
(
Ypage 365).
The tire pressure monitor is not able to warn
you of a sudden loss of pressure, e.g. if the
tire is penetrated by a foreign object. In the
event of a sudden loss of pressure, bring the
vehicle to a halt by braking carefully. Avoid
abrupt steering maneuvers.
The tire pressure monitor has a yellow warn-
ing lamp in the instrument cluster for indicat-
ing pressure loss or a malfunction. Whether
the warning lamp flashes or lights up indi-
cates whether a tire pressure is too low or the
tire pressure monitor is ma
lfunctioning:
Rif the warning lamp is lit continuously, the
tire pressure on one or more tires is signif- icantly too low. The tire pressure monitor is
not malfunctioning.
Rif the warning lamp flashes for around a
minute and then remains lit constantly, the
tire pressure monitor is malfunctioning.
In addition to the warning lamp, a message
appears in the multifunction display. Observe
the information on display messages
(
Ypage 279).
It may take up to ten minutes for a malfunc-
tion of the tire pressure monitor to be indica-
ted. A malfunction will be indicated by the tire
pressure warning lamp flashing for approx-
imately one minute and then remaining lit.
When the malfunction has been rectified, the
tire pressure warning lamp goes out after a
few minutes of driving.
The tire pressure values indicated by the on-
board computer may differ from those meas-
ured at a gas station with a pressure gage.
The tire pressures shown by the on-board
computer refer to those measured at sea
level. At high altitudes, the tire pressure val-
ues indicated by a pressure gage are higher
than those shown by the on-board computer.
In this case, do not reduce the tire pressures.
The operation of the tire pressure monitor can be affected by interference from radio trans-
mitting equipment (e.g. radio headphones,
two-way radios) that may be being operated
in or near the vehicle.
Checking the tire pressure electroni-
cally
XMake sure that the SmartKey is in position
2 in the ignition lock (
Ypage 151).
XUse ò on the steering wheel to call up
the list of menus.
XPress 9or: on the steering wheel
to select the Service
menu.
XPress theabutton.
370Tire pressure
Wheels and tires
Page 373 of 410
XPress9or: to select Tire Pres‐
sure.
XPress the abutton.
The current tire pressure of each tire is
shown in the multifunction display.
If the vehicle was parked for longer than
20 minutes, the Tire pressure will be
displayed after driving a few
minutesmessage appears.
After a teach-in process, the tire pressure
monitor automatically detects new wheels or
new sensors. As long as a clear allocation of
the tire pressure value to the individual
wheels is not possible, the Tire Pressure
Monitor Activemessage is shown instead
of the tire pressure display. The tire pressures are already being monitored.
Tire pressure monitor warning mes-
sages
If the tire pressure monitor detects a pressureloss in one or more tires, a warning message
is shown in the multifunction display and the
yellow tire pressure monitor warning lamp
comes on.
RIf the Please Correct Tire Pressure
message appears in the multifunction dis-
play, the tire pressure in at least one tire is
too low and must be corrected at the next
opportunity.
RIf theCheckTiresmessage appears in the
multifunction display, the tire pressure in
one or more tires has dropped significantly
and the tires must be checked.
RIf the Warning Tire Malfunctionmes-
sage appears in the multifunction display,
the tire pressure in one or more tires has
dropped suddenly and the tires must be
checked.
Observe the instructions and safety notes in
the display messages in the "Tires" section
(
Ypage 279).
If the wheel positions on the vehicle are rota-
ted, the tire pressures may be displayed for
the wrong positions for a short time. This is rectified after a few minutes of driving, and
the tire pressures are displayed for the cor-
rect positions.
Restarting the tire pressure monitor
When you restart the tire pressure monitor, all
existing warning messages are deleted and
the warning lamps go out. The monitor uses
the currently set tire pressures as the refer-
ence values for monitoring. In most cases, the
tire pressure monitor will automatically
detect the new reference values after you
have changed the tire pressure. However, you
can also define reference values manually as
described here. The tire pressure monitor
then monitors the new tire pressure values.
XSet the tire pressure to the value recom-
mended for the corresponding driving sit-
uation on the Tire and Loading Information
placard on the driver's side
B-pillar (
Ypage 365).
Additional tire pressure values for different
loads can also be found on the tire pressure
table on the inside of the fuel filler flap
(
Ypage 365).
XMake sure that the tire pressure is correct
on all four wheels.
XMake sure that the SmartKey is in position
2 in the ignition lock.
XUse ò on the steering wheel to call up
the list of menus.
XPress 9or: on the steering wheel
to select the Service
menu.
XPress theabutton.
XPress 9or: to select Tire Pres‐
sure.
XPress the abutton.
The current tire pressure for each wheel or
the Tire
pressurewillbedisplayed
afterdrivingafewminutesmessage
Tire pressure371
Wheels and tires
Z