2016 MERCEDES-BENZ S-Class SEDAN button
[x] Cancel search: buttonPage 129 of 438
XAdjust the seat accordingly (Ypage 106).
XOn the driver's side, adjust the steering wheel
(Ypage 120) and the exterior mirrors
(Ypage 123).
XPress memory button Mand one of the stor-
age position buttons 1,2 or 3within three
seconds.
The settings are stored in the selected preset
position. A tone sounds when the settings
have been completed.
Calling up a stored setting
XPress and hold the relevant storage position
button 1,2 or 3until the:
RSeat
RSteering wheel
RExterior mirrors
are in the stored position.
iIf you release the storage position button,
the seat, steering wheel and mirror setting
functions stop immediately. The multicontour
seat setting or the 4-way lumbar support is
still carried out.
Memory function in the rear compart-
ment
Important safety notes
GWARNING
When the memory function adjusts the seat or steering wheel, you and other vehicle occu-
pants – particularly children – could become
trapped. There is a risk of injury.
While the memory function is making adjust-
ments, make sure that no one has any body
parts in the sweep of the seat or steering
wheel. If somebody becomes trapped, imme-
diately release the memory function position
button. The adjustment process is stopped.
GWARNING
Children could become trapped if they acti-
vate the memory function, particularly when
unattended. There is a risk of injury.
When leaving the vehicle, always take the
SmartKey with you and lock the vehicle. Never
leave children unsupervised in the vehicle.
General notes
The settings for the rear seat and the front-
passenger seat can be stored using the rear-
compartment memory function.
RIf the indicator lamp in the vbutton is not
lit, store the rear seat settings.
RIf the indicator lamp in the vbutton lights
up, store the front-passenger seat and rear
seat settings. Both the front-passenger and
rear seat are taken into account with this set-
ting. Depending on the equipment in the vehi-
cle, two or three memory positions can be
stored for the front-passenger and rear seats.
Storing settings
General notes
With the memory function in the rear, you can
store up to three different settings, e.g. for three
different people.
The following settings are stored as a single
memory preset:
Rposition of the seat, backrest and head
restraint
Rmulticontour seat: the seat cushions of the
backrest as well as the contour of the back-
rest in the lumbar and shoulder regions
Rseat heating: distribution of the heated sec-
tions of the seat cushion and backrest if the
indicator lamp in the vbutton is not lit
The following settings are stored to a memory
position, if the indicator lamp in the vbutton
lights up:
Rposition of the footrest for the front-
passenger seat, if available
Rposition of the screen, if available
Memory function in the rear compartment127
Seats, steering wheel and mirrors
Z
Page 130 of 438
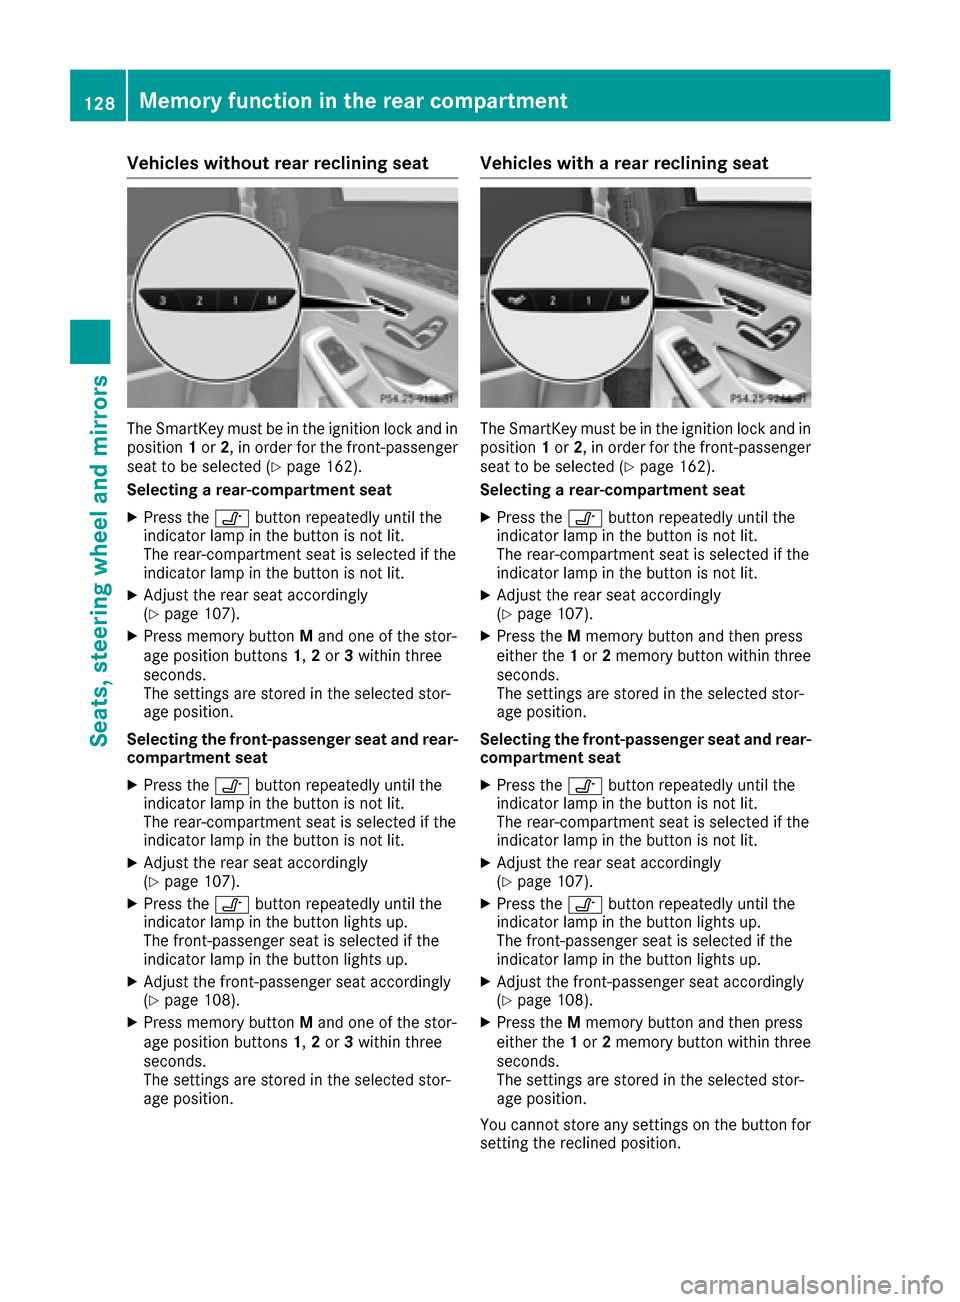
Vehicles without rear reclining seat
The SmartKey must be in the ignition lock and in
position1or 2, in order for the front-passenger
seat to be selected (
Ypage 162).
Selecting a rear-compartment seat
XPress the vbutton repeatedly until the
indicator lamp in the button is not lit.
The rear-compartment seat is selected if the
indicator lamp in the button is not lit.
XAdjust the rear seat accordingly
(Ypage 107).
XPress memory button Mand one of the stor-
age position buttons 1,2 or 3within three
seconds.
The settings are stored in the selected stor-
age position.
Selecting the front-passenger seat and rear-
compartment seat
XPress the vbutton repeatedly until the
indicator lamp in the button is not lit.
The rear-compartment seat is selected if the
indicator lamp in the button is not lit.
XAdjust the rear seat accordingly
(Ypage 107).
XPress the vbutton repeatedly until the
indicator lamp in the button lights up.
The front-passenger seat is selected if the
indicator lamp in the button lights up.
XAdjust the front-passenger seat accordingly
(Ypage 108).
XPress memory button Mand one of the stor-
age position buttons 1,2 or 3within three
seconds.
The settings are stored in the selected stor-
age position.
Vehicles with a rear reclining seat
The SmartKey must be in the ignition lock and in
position 1or 2, in order for the front-passenger
seat to be selected (
Ypage 162).
Selecting a rear-compartment seat
XPress the vbutton repeatedly until the
indicator lamp in the button is not lit.
The rear-compartment seat is selected if the
indicator lamp in the button is not lit.
XAdjust the rear seat accordingly
(Ypage 107).
XPress the Mmemory button and then press
either the 1or 2memory button within three
seconds.
The settings are stored in the selected stor-
age position.
Selecting the front-passenger seat and rear-
compartment seat
XPress the vbutton repeatedly until the
indicator lamp in the button is not lit.
The rear-compartment seat is selected if the
indicator lamp in the button is not lit.
XAdjust the rear seat accordingly
(Ypage 107).
XPress the vbutton repeatedly until the
indicator lamp in the button lights up.
The front-passenger seat is selected if the
indicator lamp in the button lights up.
XAdjust the front-passenger seat accordingly
(Ypage 108).
XPress the Mmemory button and then press
either the 1or 2memory button within three
seconds.
The settings are stored in the selected stor-
age position.
You cannot store any settings on the button for
se
tting the reclined position.
128Memory function in the rear compartment
Seats, steering wheel and mirrors
Page 131 of 438
Calling up a stored setting
General notes
The memory positions in the area for the chauf-
feur mode can only be set when the conditions
for the chauffeur mode are fulfilled
(
Ypage 111).
Vehicles without rear reclining seat
The SmartKey must be in the ignition lock and in
position 1or 2, in order for the front-passenger
seat to be selected (
Ypage 162).
XTo call up the stored rear seat setting:
press the vbutton repeatedly until the
indicator lamp in the button is not lit.
XTo call up the stored front-passenger seat
and rear seat settings: press thevbut-
ton repeatedly until the indicator lamp in the
button lights up.
XPress and hold the relevant storage position
button 1,2or 3until the rear seat or the front-
passenger seat are in the stored position.
iSeat adjustment is interrupted as soon as
you release the storage position button. The
adjustment of the multicontour seat is still
carried out.
Vehicles with a rear reclining seat
The SmartKey must be in the ignition lock and in
position 1or 2, in order for the front-passenger
seat to be selected (
Ypage 162).
XTo call up the stored rear seat setting:
press the vbutton repeatedly until the
indicator lamp in the button is not lit.
XTo call up the stored front-passenger seat
and rear seat settings: press thevbut-
ton repeatedly until the indicator lamp in the
button lights up.
XPress and hold the relevant storage position
button 1or 2until the rear seat or the front-
passenger seat is in the stored position.
iSeat adjustment is interrupted as soon as
you release the storage position button. The
adjustment of the multicontour seat is still
carried out.
Memory function in the rear compartment129
Seats, steering wheel and mirrors
Z
Page 134 of 438

High-beam headlamps
XTo activate manually:turn the SmartKey in
the ignition lock to position 2or start the
engine.
XVehicles without Adaptive Highbeam Assist
Plus: turn the light switch to position Lor
Ã.
XVehicles with Adaptive Highbeam Assist Plus:
turn the light switch to the Lposition.
XPress the combination switch beyond the
pressure point in the direction of arrow :.
In the Ãposition, the high-beam head-
lamps are only switched on when it is dark and
the engine is running.
The blue Kindicator lamp in the instru-
ment cluster lights up when the high-beam
headlamps are switched on.
XTo switch off: move the combination switch
back to its normal position.
The blue Kindicator lamp in the instru-
ment cluster goes out.
Vehicles with Adaptive Highbeam Assist
Plus: if Adaptive Highbeam Assist Plus is acti-
vated, it automatically controls activation and
deactivation of the high-beam headlamps
(
Ypage 133).
High-beam flasher
XTo switch on: turn the SmartKey in the igni-
tion lock to position 1or 2, or start the engine.
XPull the combination switch in the direction of
arrow =.
Hazard warning lamps
XTo switch on the hazard warning lamps:
press button :.
All turn signals flash. If you now switch on a
turn signal using the combination switch, only
the turn signal lamp on the corresponding
side of the vehicle will flash.
XTo switch off the hazard warning lamps:
press button :.
The hazard warning lamps automatically switch
on if:
Ran air bag is deployed or
Rthe vehicle decelerates rapidly from a speed
of above 45 mph (70 km/h) and comes to a
standstill
The hazard warning lamps switch off automati-
cally if the vehicle reaches a speed of above
6 mph (10 km/h) again after a full brake appli-
cation.
The hazard warning lamps still operate if the
ignition is switched off.
Cornering light function
The cornering light function improves the illu-
mination of the road over a wide angle in the
direction you are turning, enabling better visi-
bility in tight bends, for example. It can only be
activated when the low-beam headlamps are
switched on.
Active:
Rif you are driving at speeds below 25 mph
(40 km/h) and switch on the turn signal or
turn the steering wheel
Rif you are driving at speeds between 25 mph
(40 km/h) and 45 mph (70 km/h) and turn
the steering wheel
The cornering lamp may remain lit for a short
time, but is automatically switched off after no
more than three minutes.
132Exterior lighting
Lights and windshield wipers
Page 136 of 438
=High-beam flasher
?Turn signal, left
XTo switch on:turn the light switch to Ã.
XPress the combination switch beyond the
pressure point in the direction of arrow :.
The _ indicator lamp in the multifunction
display lights up if it is dark and the light sen-
sor activates the low-beam headlamps.
At speeds above approx. 16 mph
(25 km/h): the headlamp range is set auto-
matically depending on the distance between
the vehicle and other road users.
At speeds above approx. 19 mph
(30 km/h):
RIf no other road users are detected, the
high-beam headlamps are automatically
switched on.
RIf other road users are detected, the partial
high-beam headlamps are automatically
switched on.
The K indicator lamp in the instrument
cluster also lights up.
At speeds below approx. 16 mph
(25 km/h) or when there is sufficient
street lighting:
RThe partial high-beam headlamps are
switched off automatically.
RThe high-beam headlamps are switched off
automatically.
The K indicator lamp in the instrument
cluster goes out. The _indicator lamp in
the multifunction display remains lit.
XTo switch off: move the combination switch
back to its normal position or move the light
switch to another position.
The _ indicator lamp in the multifunction
display goes out.
Headlamps fogged up on the inside
Certain climatic and physical conditions may
cause moisture to form in the headlamp. This
moisture does not affect the functionality of the
headlamp.
Interior lighting
Overview of interior lighting
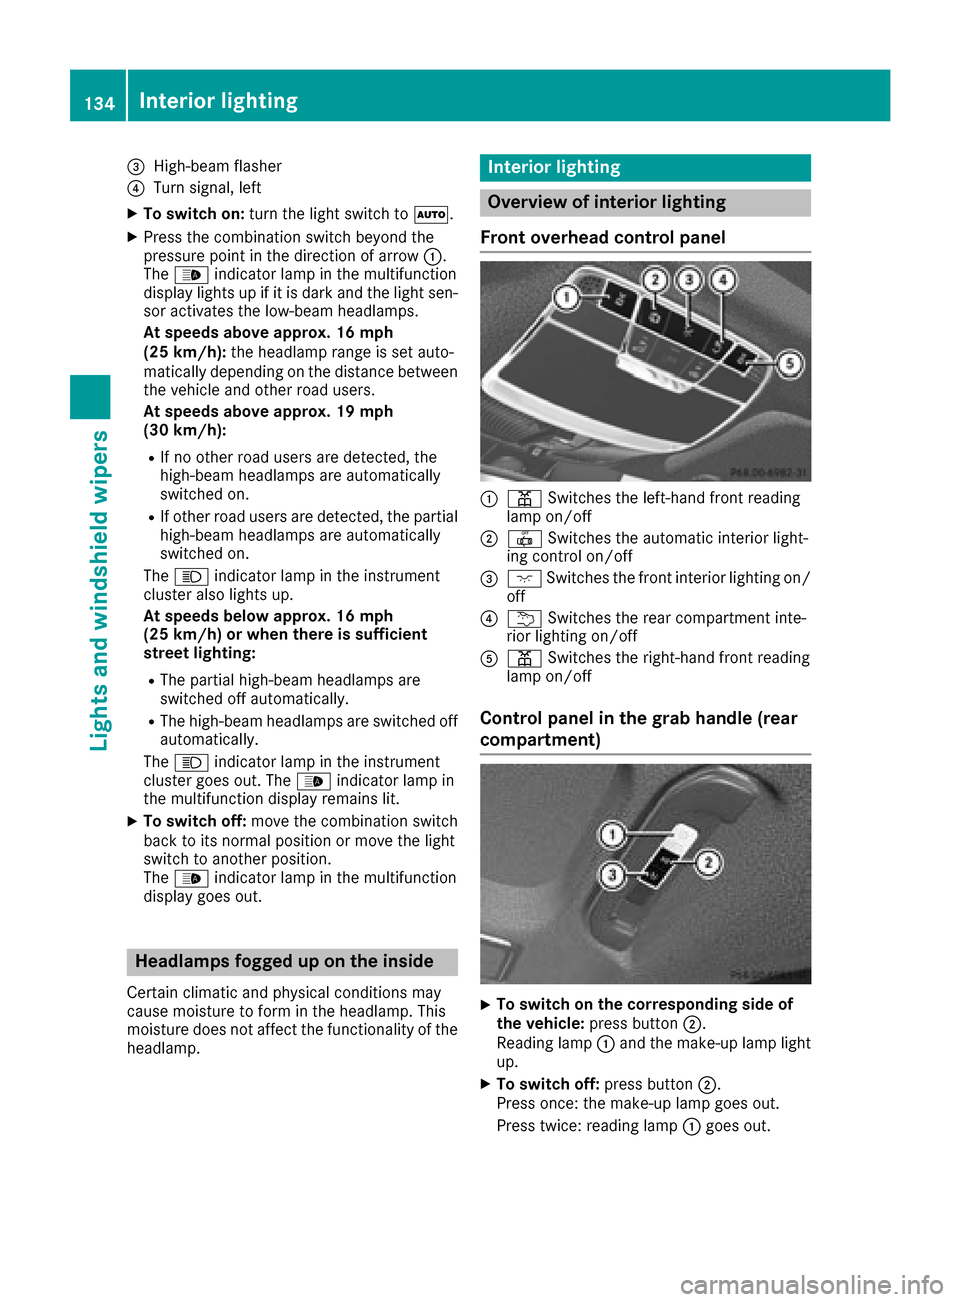
Front overhead control panel
:p Switches the left-hand front reading
lamp on/off
;| Switches the automatic interior light-
ing control on/off
=c Switches the front interior lighting on/
off
?u Switches the rear compartment inte-
rior lighting on/off
Ap Switches the right-hand front reading
lamp on/off
Control panel in the grab handle (rear
compartment)
XTo switch on the corresponding side of
the vehicle: press button ;.
Reading lamp :and the make-up lamp light
up.
XTo switch off: press button;.
Press once: the make-up lamp goes out.
Press twice: reading lamp :goes out.
134Interior lighting
Lights and windshield wipers
Page 137 of 438

XTo switch on both sides of the vehicle:
press button=.
Reading lamp :and the make-up lamp light
up.
XTo switch off: press button=.
Reading lamp :and the make-up lamp go
out.
Interior lighting control
General notes
In order to prevent the vehicle's battery from
discharging, the interior lighting functions are
automatically deactivated after some time
except when the SmartKey is in position 2in the
ignition lock.
The color, brightness, zone and display lighting
for the ambient lighting are set using the multi-
media system (see the separate operating
instructions).
The interior lighting control can be operated
using the front overhead control panel.
Automatic interior lighting control
XTo switch on or off: press the|button.
When the automatic interior lighting control is
activated, the button is flush with the over-
head control panel.
The interior lighting automatically switches on if
you:
Runlock the vehicle
Ropen a door
Rremove the SmartKey from the ignition lock
The interior light is activated for a short while
when the SmartKey is removed from the ignition
lock. This delayed switch-off can be adjusted via the multimedia system (see the separate oper-
ating instructions).
Manual interior lighting control
XTo switch the front interior lighting on/
off: press the cbutton.
XTo switch the rear compartment interior
lighting on/off: press theubutton.
XTo switch the reading lamp on/off: press
the p button.
Crash-responsive emergency lighting
The interior lighting is activated automatically if
the vehicle is involved in an accident.
XTo switch off the crash-responsive emer-
gency lighting: press the hazard warning
lamp button.
or
XLock and then unlock the vehicle using the
SmartKey.
Replacing bulbs
The front and rear light clusters of your vehicle
are equipped with LED light bulbs. Do not
replace the bulbs yourself. Contact a qualified
specialist workshop which has the necessary
specialist knowledge and tools to carry out the
work required.
Lamps are an important aspect of vehicle safety.
You must therefore make sure that these func-
tion correctly at all times. Have the headlamp
setting checked regularly.
Windshield wipers
Switching the windshield wipers
on/off
!
Do not operate the windshield wipers when
the windshield is dry, as this could damage
the wiper blades. Moreover, dust that has col-
lected on the windshield can scratch the glass
if wiping takes place when the windshield is
dry.
If it is necessary to switch on the windshield
wipers in dry weather conditions, always use
washer fluid when operating the windshield
wipers.
!If the windshield wipers leave smears on the
windshield after the vehicle has been washed
in an automatic car wash, wax or other resi-
dues may be the reason for this. Clean the
windshield using washer fluid after washing
the vehicle in an automatic car wash.
!Vehicles with a rain sensor: if the windshield
becomes dirty in dry weather conditions, the
windshield wipers may be activated inadver-
tently. This could then damage the windshield wiper blades or scratch the windshield.
Windshield wipers135
Lights and windshield wiper s
Z
Page 138 of 438

For this reason, you should always switch off
the windshield wipers in dry weather.
1$Windshield wiper off
2ÄIntermittent wipe, low (rain sensor set
to low sensitivity)
3Å Intermittent wipe, high (rain sensor
set to high sensitivity)
4° Continuous wipe, slow
5¯Continuous wipe, fast
BíSingle wipe/î to wipe the wind-
shield using washer fluid
XSwitch on the power supply with the Start/
Stop button or the SmartKey (Ypage 162).
XTurn the combination switch to the corre-
sponding position.
In the ÄorÅ position, the appropriate
wiping frequency is set automatically according
to the intensity of the rain. In the Åposition,
the rain sensor is more sensitive than in
the Ä position, causing the windshield wip-
ers to wipe more frequently.
Vehicles with MAGIC VISION CONTROL: the
washer fluid is fed through the wiper blades and
when wiping with washer fluid îthe washer
fluid is emitted directly from the blades.
Vehicles with MAGIC VISION CONTROL: if you
push and hold the combination switch beyond
the point of resistance in the direction of arrow
B, the manual wash program is activated. If you briefly push and hold the combination switch
beyond the point of resistance in the direction of
arrow B, the automatic wash program is acti-
vated.
If the wiper blades are worn, the windshield will
no longer be wiped properly. This could prevent
you from observing the traffic conditions.
Replacing the wiper blades
Important safety notes
GWARNING
If the windshield wipers begin to move while
you are changing the wiper blades, you could be trapped by the wiper arm. There is a risk of
injury.
Always switch off the windshield wipers and
ignition before changing the wiper blades.
!To avoid damaging the wiper blades, make
sure that you touch only the wiper arm of the
wiper.
!Never open the hood if a windshield wiper
arm has been folded away from the wind-
shield.
Hold the windshield wiper arm firmly when
you change the wiper blade. If you release the
windshield wiper arm without a wiper blade
and it falls onto the windshield, the windshield
may be damaged by the force of the impact.
Mercedes-Benz recommends that you have
the wiper blades changed at a qualified spe-
cialist workshop.
!Always position the windshield wiper arms
vertically before folding them away from the
windshield. By doing so, you will avoid dam-
age to the hood.
Replacing the wiper blades (standard
windshield wipers)
Moving the wiper arms to a vertical posi-
tion
On vehicles without KEYLESS-GO:
XTurn the SmartKey to position 0in the ignition
lock (Ypage 162).
XSet the windshield wiper to the °position.
XTurn the SmartKey to position 1in the ignition
lock (Ypage 162).
XAs soon as the wiper arms are vertical to the
hood, turn the SmartKey to position 0in the
ignition lock (
Ypage 162).
XRemove the SmartKey.
XFold the wiper arms away from the windshield
until you feel them snap into place.
136Windshield wipers
Lights and windshield wipers
Page 139 of 438
On vehicles with KEYLESS-GO:
XSwitch off the engine.
XRemove your foot from the brake pedal.
XSet the windshield wipers to position°.
XPress the Start/Stop button repeatedly until
the windshield wiper starts.
XWhen the wiper arms have reached the verti-
cal position, press the Start/Stop button
repeatedly until the windshield wipers stop.
XFold the wiper arms away from the windshield
until you feel them snap into place.
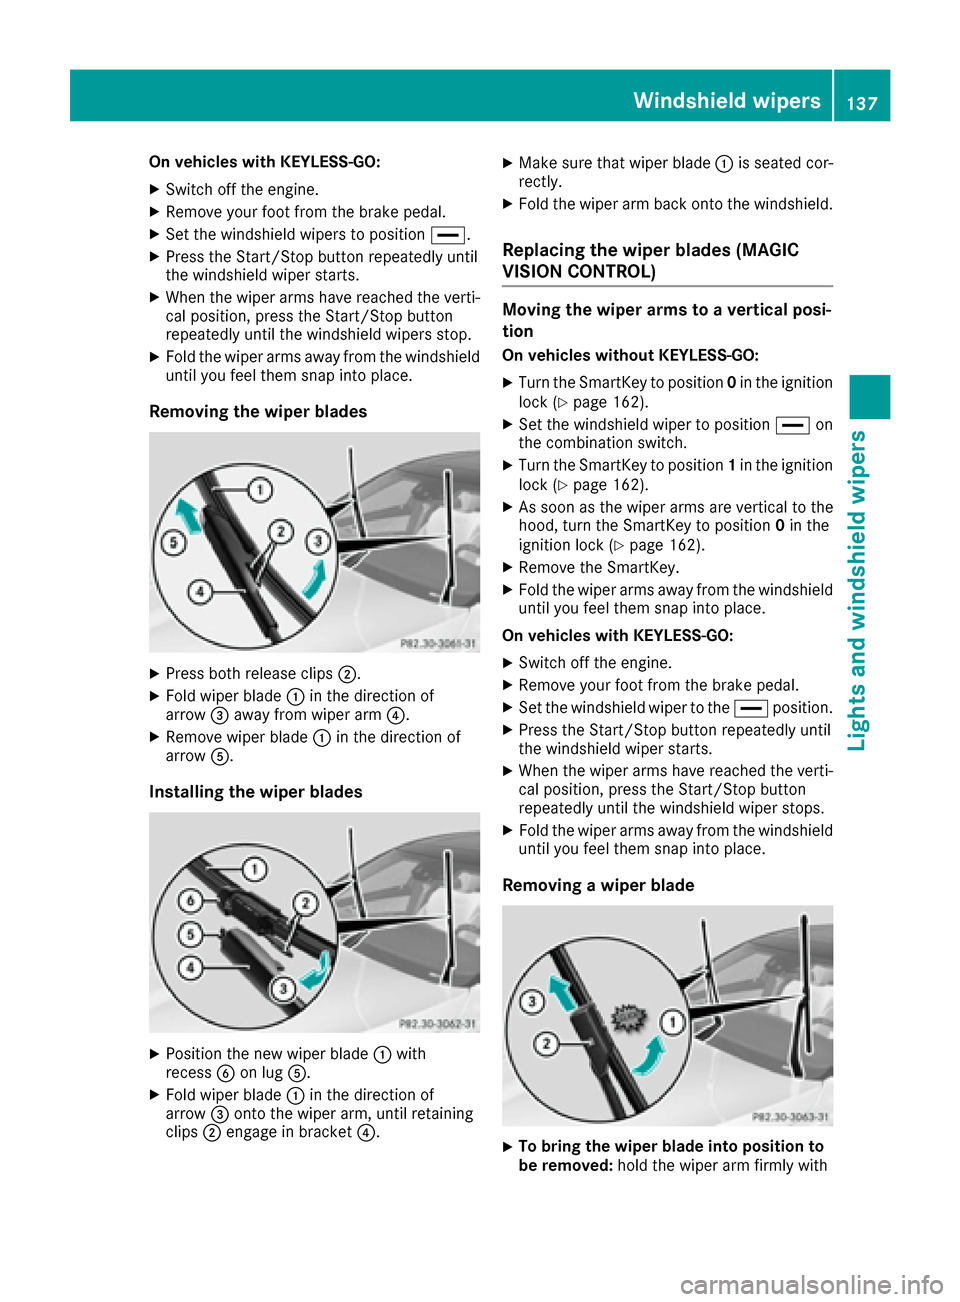
Removing the wiper blades
XPress both release clips ;.
XFold wiper blade:in the direction of
arrow =away from wiper arm ?.
XRemove wiper blade:in the direction of
arrow A.
Installing the wiper blades
XPosition the new wiper blade :with
recess Bon lug A.
XFold wiper blade :in the direction of
arrow =onto the wiper arm, until retaining
clips ;engage in bracket ?.
XMake sure that wiper blade :is seated cor-
rectly.
XFold the wiper arm back onto the windshield.
Replacing the wiper blades (MAGIC
VISION CONTROL)
Moving the wiper arms to a vertical posi-
tion
On vehicles without KEYLESS-GO:
XTurn the SmartKey to position 0in the ignition
lock (Ypage 162).
XSet the windshield wiper to position °on
the combination switch.
XTurn the SmartKey to position 1in the ignition
lock (Ypage 162).
XAs soon as the wiper arms are vertical to the
hood, turn the SmartKey to position 0in the
ignition lock (
Ypage 162).
XRemove the SmartKey.
XFold the wiper arms away from the windshield
until you feel them snap into place.
On vehicles with KEYLESS-GO:
XSwitch off the engine.
XRemove your foot from the brake pedal.
XSet the windshield wiper to the °position.
XPress the Start/Stop button repeatedly until
the windshield wiper starts.
XWhen the wiper arms have reached the verti-
cal position, press the Start/Stop button
repeatedly until the windshield wiper stops.
XFold the wiper arms away from the windshield
until you feel them snap into place.
Removing a wiper blade
XTo bring the wiper blade into position to
be removed: hold the wiper arm firmly with
Windshield wipers137
Lights and windshield wipers
Z