2016 MERCEDES-BENZ S-Class SEDAN departure time
[x] Cancel search: departure timePage 8 of 438

Removing...................................... .185
Storing ...........................................1 83
Warming up ................................... 182
Charging the high-voltage battery
(important safety notes) ................... 180
Chauffeur mode
Display message ............................ 310
Fully reclined position .................... 114
General notes ................................ 111
Installing the head restraint ........... 113
Moving front-passenger seat into
the chauffeur position .................... 112
Moving the front-passenger seat
into the normal position ................. 113
Removing the head restraint .......... 113
Child
Restraint system .............................. 62
Child seat
Forward-facing restraint system ...... 66
LATCH-type (ISOFIX) child seat
anchors ............................................ 63
On the front-passenger seat ............ 65
Rearward-facing restraint system .... 66
Top Tether ....................................... 64
Child-proof locks
Important safety notes .................... 66
Rear doors ....................................... 67
Children
Special seat belt retractor ............... 62
Cigarette lighter ................................ 335
Cleaning
Mirror turn signal ........................... 362
Climate control
Automatic climate control ............. 141
Controlling automatically ............... 147
Cooling with air dehumidification .. 146
Defrosting the windows ................. 151
Defrosting the windshield .............. 151
ECO start/stop function ................ 145
General notes ................................ 140
Immediate pre-entry climate con-
trol ................................................. 158
Indicator lamp ................................ 147
Ionization ....................................... 155
Notes on using the automatic cli-
mate control .................................. 145
Overview of systems ...................... 140
Perfume atomizer .......................... 153 Pre-entry climate control at
departure time ............................... 157
Pre-entry climate control via
key ... 155
P
roblem with the rear window
defroster ........................................ 152
Problems with cooling with air
dehumidification ............................ 147
Rear control panel ......................... 141
Refrigerant ..................................... 432
Refrigerant filling capacity ............. 432
Setting the air distribution ............. 149
Setting the air vents ...................... 158
Setting the airflow ......................... 150
Setting the climate mode ............... 148
Setting the temperature ................ 148
Switching air-recirculation mode
on/off ............................................ 152
Switching on/off ........................... 145
Switching residual heat on/off ...... 152
Switching the rear window
defroster on/off ............................ 151
Switching the synchronization
function on and off ........................ 150
Climate control system
Climate control .............................. 145
Cockpit
Overview .......................................... 32
COLLISION PREVENTION ASSIST
PLUS
Activating/deactivating ................. 270
Display message ............................ 284
Operation/notes .............................. 71
COMAND display
Cleaning ......................................... 364
Combination switch .......................... 131
Consumption statistics (on-board
computer) .......................................... 262
Convenience closing feature .............. 96
Convenience opening feature ............ 95
Coolant (engine)
Checking the level ......................... 356
Display message ............................ 294
Displaying the temperature (on-
board computer) ............................ 269
Filling capacity ............................... 431
Important safety notes .................. 431
Temperature gauge ........................ 257
Warning lamp ................................. 320
6Index
Page 18 of 438

Starting .......................................... 249
When the vehicle is stationary ....... 251
Power locks ......................................... 87
Power washers .................................. 360
Power windows
see Side windows
Pre-entry climate control (via
SmartKey)
Problems (malfunctions) ................ 157
Pre-entry climate control at depar-
ture time
General notes ................................ 157
Pre-entry climate control at time of
departure
Setting departure time ................... 158
Pre-entry climate control via key
General notes ................................ 155
PRE-SAFE
®(anticipatory occupant
protection)
Display message ............................ 284
Operation ......................................... 59
PRE-SAFE
®Brake
Activating/deactivating ................. 271
Display message ............................ 284
Function/notes ................................ 75
Important safety notes .................... 76
Warning lamp ................................. 322
PRE-SAFE
®PLUS (anticipatory
occupant protection PLUS)
Display message ............................ 284
Operation ......................................... 60
Program selector button .................. 173
Protection against theft
ATA (Anti-Theft Alarm system) ......... 78
Immobilizer ...................................... 78
Protection of the environment
General notes .................................. 24
Pulling away
Automatic transmission ................. 165
General notes ................................ 165
Hill start assist ............................... 165
Q
QR codeMercedes-Benz Guide App ................. 1
Rescue card ..................................... 29
Qualified specialist workshop ........... 28
R
Radio
Selecting a station ......................... 265
Radio-wave reception/transmis-
sion in the vehicle
Declaration of conformity ................ 28
Rain closing feature
Panorama sliding sunroof ................ 99
RBS (Recuperative Brake System)
Warning lamp ................................. 315
Reading lamp ..................................... 134
Rear compartment
Activating/deactivating climate
control ........................................... 145
Setting the air distribution ............. 149
Setting the air vents ...................... 160
Setting the airflow ......................... 150
Setting the temperature ................ 148
Stowage compartment .................. 327
Rear lamps
see Lights
Rear seats
Adjusting ....................................... 107
Adjusting a rear reclining seat ....... 107
Overview .......................................... 41
Setting the reclined position .......... 107
Rear view camera
Cleaning instructions ..................... 363
Displays in the COMAND display ... 221
Function/notes ............................. 220
Rear window blind ............................ 334
Rear window defroster
Problem (malfunction) ................... 152
Switching on/off ........................... 151
Rear-view mirror
Anti-glare (manual) ........................ 123
Dipping (automatic) ....................... 124
Recuperative Brake System
Driving safety systems ..................... 44
Important safety notes .................... 44
Refrigerant (air-conditioning sys-
tem)
Important safety notes .................. 432
Refueling
Fuel gauge ....................................... 33
Important safety notes .................. 177
16Index
Page 20 of 438

Cleaning the cover .........................365
Correct driver's seat position ........1 04
Display message ............................ 310
EASY-ENTRY/EXIT system ............. 122
Important safety notes .................. 105
Multicontour seat .......................... 117
Seat heating .................................. 118
Seat heating problem .................... 119
Seat ventilation .............................. 119
Seat ventilation problem ................ 120
Storing settings (memory func-
tion) ............................................... 126
Switching seat heating on/off ....... 118
Switching seat ventilation on/off .. 119
Section
Wheels and tires ............................ 384
Securing a load
see Securing cargo
Securing cargo .................................. 329
Selector lever
Cleaning ......................................... 365
see Automatic transmission
Sensors (cleaning instructions) ....... 362
Service menu (on-board com-
puter) ..................................................2 69
Service message
see ASSYST PLUS
Service products
Brake fluid ..................................... 430
Coolant (engine) ............................ 431
Engine oil ....................................... 429
Fuel ................................................ 428
Important safety notes .................. 427
Refrigerant (air-conditioning sys-
tem) ............................................... 432
Washer fluid ................................... 431
Setting the charge current (on-
board computer) ............................... 272
Setting the departure time (on-
board computer) ............................... 272
Settings
Factory (on-board computer) ......... 275
On-board computer ....................... 269
SETUP (on-board computer) ............. 276
Side impact air bag .............................5 2
Side marker lamp (display mes-
sage) ................................................... 292 Side windows
Cleaning ........................... .............. 362
Convenience closing feature ............ 96
Convenience opening feature ..........9 5
Importa
nt safety information ........... 94
Opening/closing .............................. 95
Problem (malfunction) .....................9 7
Resettin g........................................ .96
Reversin gfeature ............................ .94
Sliding sunroof
see Panorama roof with power
tilt/sliding panel
SmartKey
Changing the battery ....................... 82
Changing the programming .............8 1
Checking the battery ...................... .82
Convenience closing feature ............ 96
Convenience opening feature .......... 95
Display message ............................ 312
Door central locking/unlocking ...... .79
Important safety notes .................... 79
KEYLESS-GO start function .............. 81
Loss .................................................8 4
Mechanical key ................................ 81
Overview .......................................... 79
Positions (ignition lock) ................. 162
Problem (malfunction) ..................... 84
Starting the engine ........................ 164
Smartphone
Starting the engine ........................ 164
Snow chains ...................................... 386
Sockets
Center console .............................. 336
General notes ................................ 336
Rear compartment .........................3 37
Trunk ............................................. 337
Special seat be
lt retractor
.................. 62
Specialist workshop ............................ 28
Speed, controlling
see Cruise control
Speedometer
Activating/deactivating the addi-
tional speedometer ........................ 274
Digital ............................................ 263
In the Instrument cluster ................. 33
Selecting the display unit ...............2 74
Standing lamps
Display message ............................ 292
18Index
Page 159 of 438
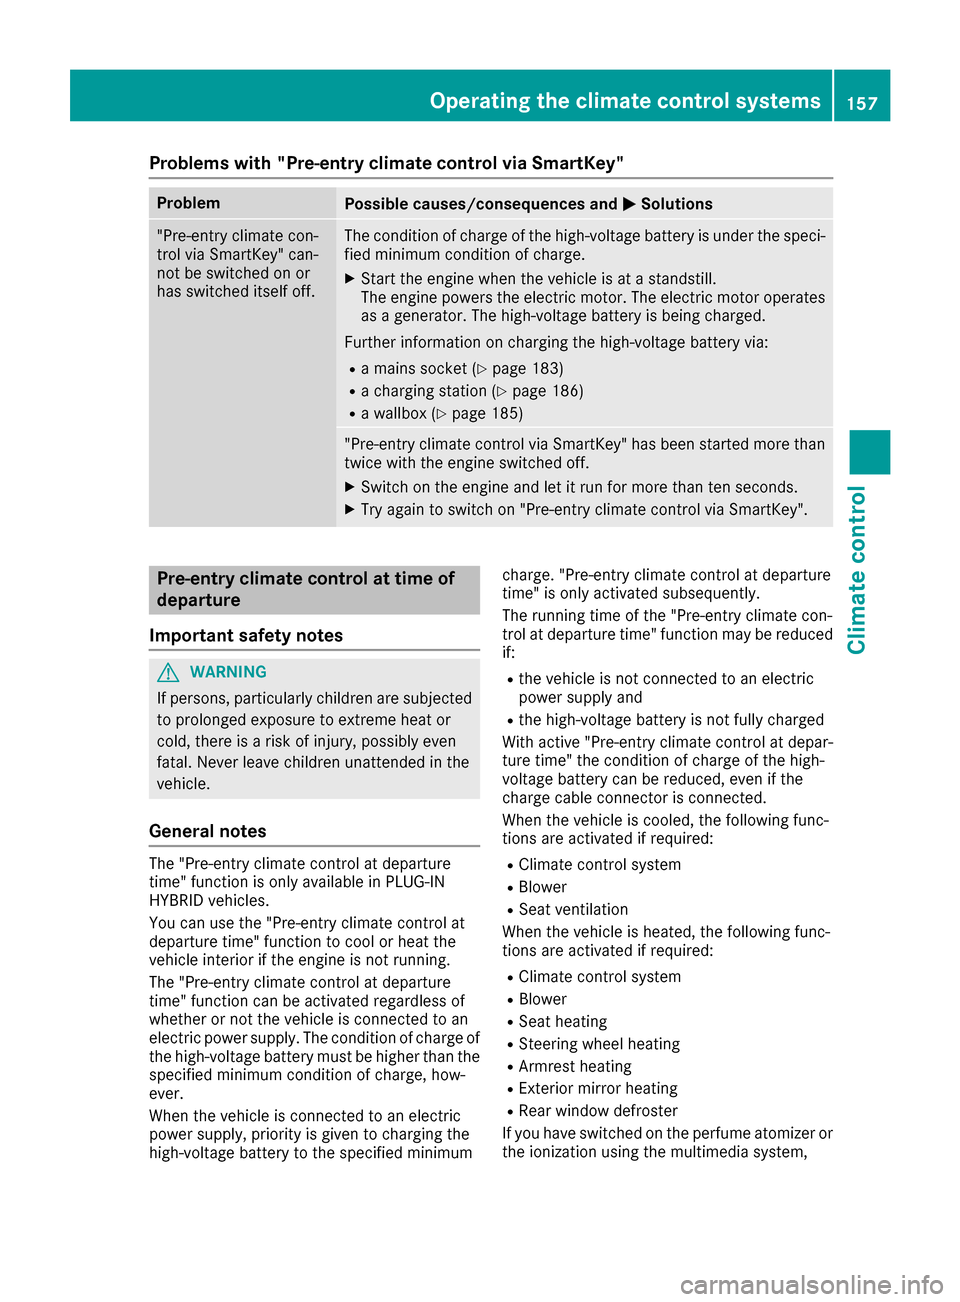
Problems with "Pre-entry climate control via SmartKey"
ProblemPossible causes/consequences andMSolutions
"Pre-entry climate con-
trol via SmartKey" can-
not be switched on or
has switched itself off.The condition of charge of the high-voltage battery is under the speci-
fied minimum condition of charge.
XStart the engine when the vehicle is at a standstill.
The engine powers the electric motor. The electric motor operates
as a generator. The high-voltage battery is being charged.
Further information on charging the high-voltage battery via:
Ra mains socket (Ypage 183)
Ra charging station (Ypage 186)
Ra wallbox (Ypage 185)
"Pre-entry climate control via SmartKey" has been started more than
twice with the engine switched off.
XSwitch on the engine and let it run for more than ten seconds.
XTry again to switch on "Pre-entry climate control via SmartKey".
Pre-entry climate control at time of
departure
Important safety notes
GWARNING
If persons, particularly children are subjected to prolonged exposure to extreme heat or
cold, there is a risk of injury, possibly even
fatal. Never leave children unattended in the
vehicle.
General notes
The "Pre-entry climate control at departure
time" function is only available in PLUG-IN
HYBRID vehicles.
You can use the "Pre-entry climate control at
departure time" function to cool or heat the
vehicle interior if the engine is not running.
The "Pre-entry climate control at departure
time" function can be activated regardless of
whether or not the vehicle is connected to an
electric power supply. The condition of charge of
the high-voltage battery must be higher than the
specified minimum condition of charge, how-
ever.
When the vehicle is connected to an electric
power supply, priority is given to charging the
high-voltage battery to the specified minimum charge. "Pre-entry climate control at departure
time" is only activated subsequently.
The running time of the "Pre-entry climate con-
trol at departure time" function may be reduced
if:
Rthe vehicle is not connected to an electric
power supply and
Rthe high-voltage battery is not fully charged
With active "Pre-entry climate control at depar-
ture time" the condition of charge of the high-
voltage battery can be reduced, even if the
charge cable connector is connected.
When the vehicle is cooled, the following func-
tions are activated if required:
RClimate control system
RBlower
RSeat ventilation
When the vehicle is heated, the following func-
tions are activated if required:
RClimate control system
RBlower
RSeat heating
RSteering wheel heating
RArmrest heating
RExterior mirror heating
RRear window defroster
If you have switched on the perfume atomizer or the ionization using the multimedia system,
Operating the climate control systems157
Climate control
Z
Page 160 of 438
these will be activated together with the "Pre-
entry climate control at departure time".
Activating the perfume atomizer or ionization
(see separate operating instructions).
Setting the departure time
You can set the departure time using the on-
board computer or via the My Mercedes Electric
– Vehicle Homepage. The activation of the "Pre-
entry climate control at departure time" func-
tion can be linked to this departure time. Your
vehicle will then be cooled or heated until the
desired temperature is reached in time for the
set departure time. "Pre-entry climate control at departure time" will be activated a maximum of
55 minutes before departure. If the departure is
delayed, the vehicle will be heated or cooled for
another five minutes.
XTo set the departure time: set the departure
time using the on-board computer
(
Ypage 272). Set the departure time via the
My Mercedes Electric – Vehicle Homepage
(
Ypage 189).
XTo activate or deactivate "Pre-entry cli-
mate control at departure time": activate
or deactivate "Pre-entry climate control at
departure time" via the multimedia system
(see the separate operating instructions).
Activate or deactivate "Pre-entry climate con-
trol at departure time" via the My Mercedes
Electric – Vehicle Homepage (
Ypage 189).
When activating the "Pre-entry climate control
at departure time" function: you can sele ct
w
hether only the driver's area or the whole vehi-
cle interior should be heated or cooled.
The "Pre-entry climate control at departure
time" function switches off automatically when
the vehicle is started. The following functions
remain active:
RSeat heating
RSeat ventilation
RArmrest heating
RSteering wheel heating
RPerfume atomizer
RIonization
Switching off "Pre-entry climate control at
departure time": the activated "Pre-entry cli-
mate control at departure time" can be switched
off using the rocker switch (
Ypage 158).
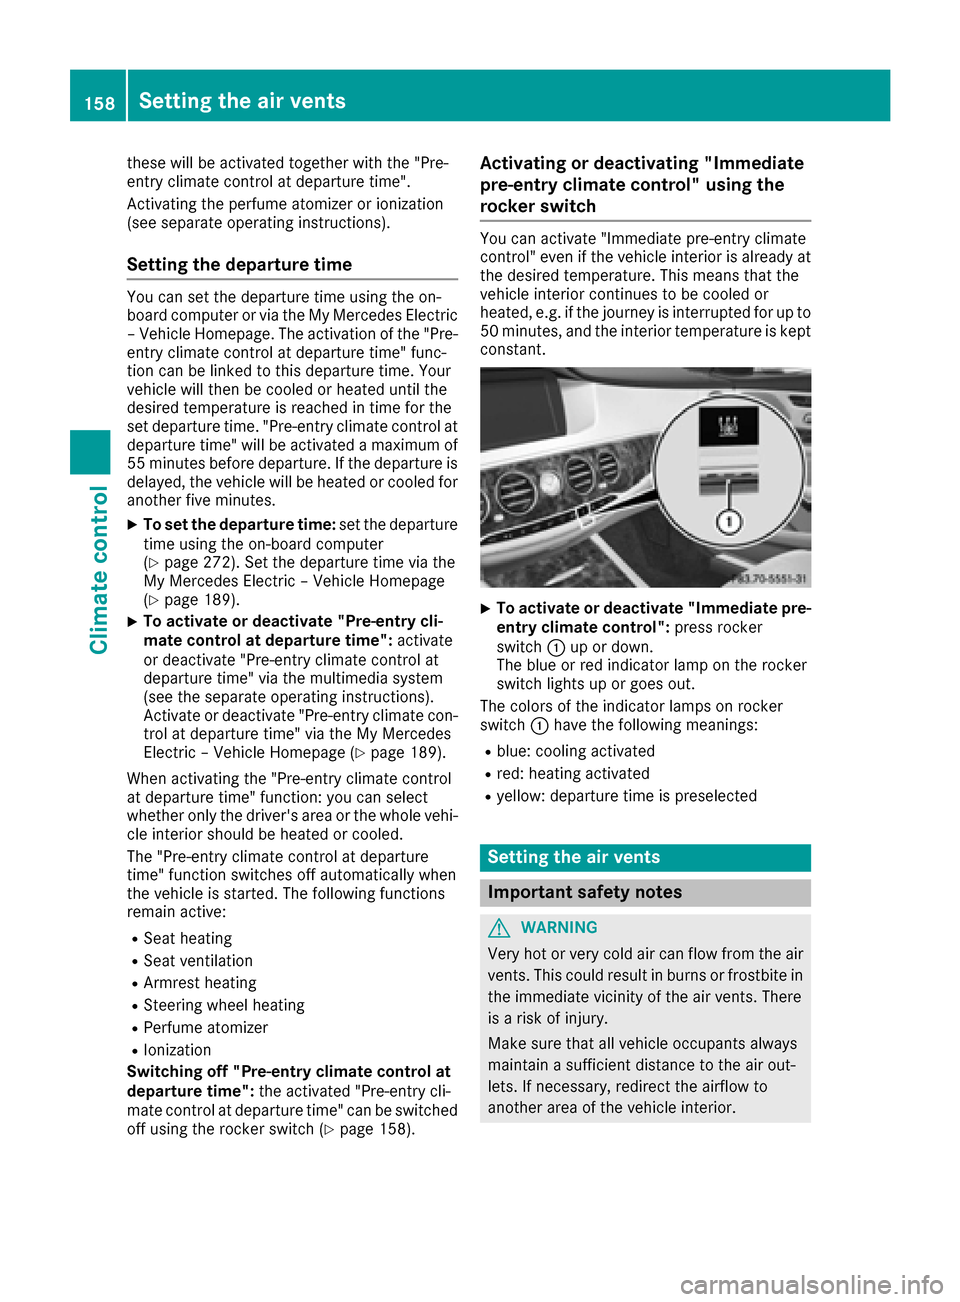
Activating or deactivating "Immediate
pre-entry climate control" using the
rocker switch
You can activate "Immediate pre-entry climate
control" even if the vehicle interior is already at
the desired temperature. This means that the
vehicle interior continues to be cooled or
heated, e.g. if the journey is interrupted for up to 50 minutes, and the interior temperature is kept
constant.
XTo activate or deactivate "Immediate pre-
entry climate control": press rocker
switch :up or down.
The blue or red indicator lamp on the rocker
switch lights up or goes out.
The colors of the indicator lamps on rocker
switch :have the following meanings:
Rblue: cooling activated
Rred: heating activated
Ryellow: departure time is preselected
Setting the air vents
Important safety notes
GWARNING
Very hot or very cold air can flow from the air
vents. This could result in burns or frostbite in
the immediate vicinity of the air vents. There
is a risk of injury.
Make sure that all vehicle occupants always
maintain a sufficient distance to the air out-
lets. If necessary, redirect the airflow to
another area of the vehicle interior.
158Setting the air vents
Climate control
Page 187 of 438
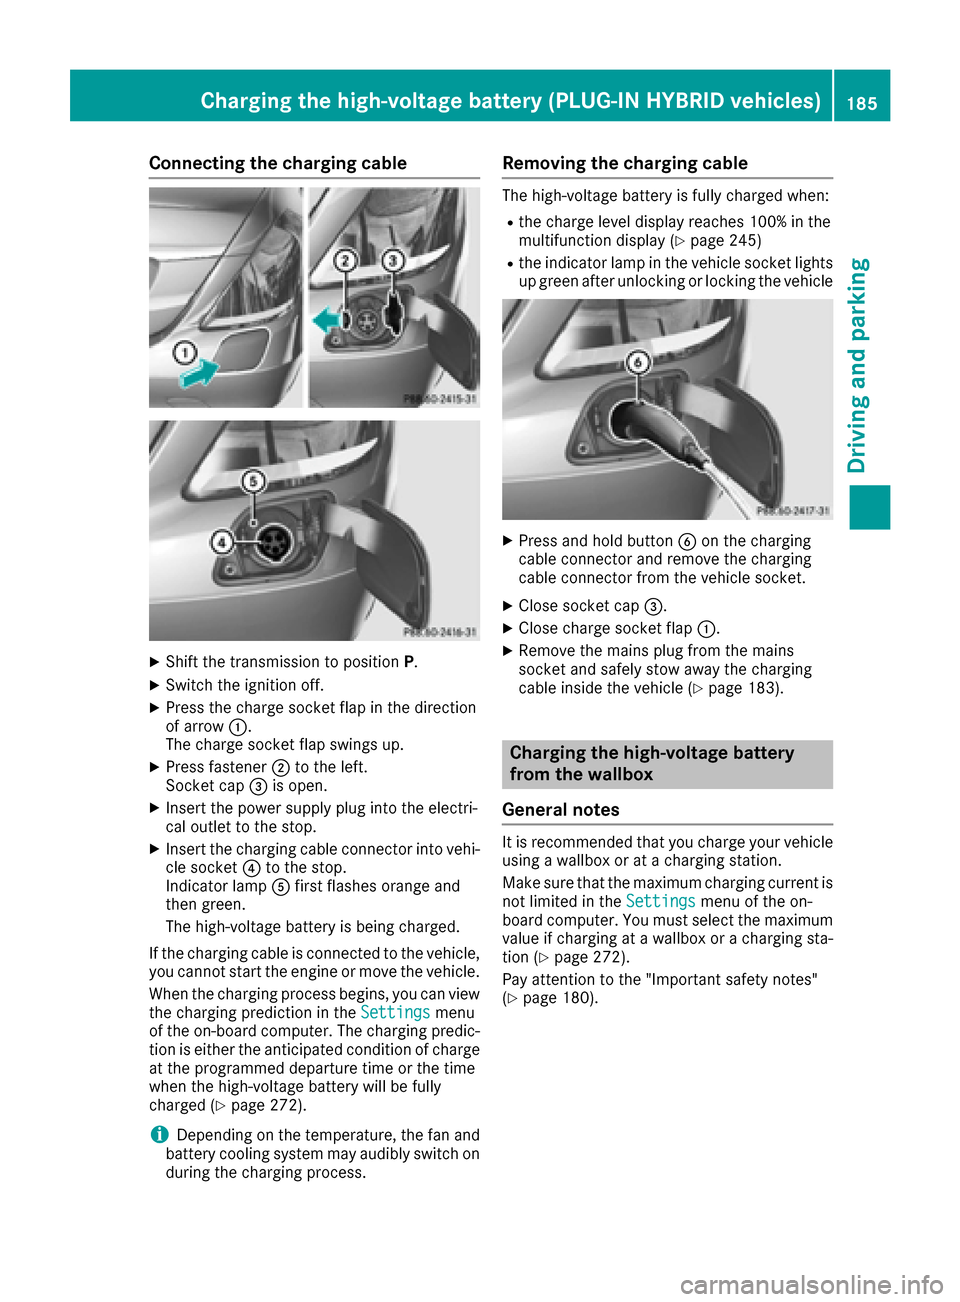
Connecting the charging cable
XShift the transmission to positionP.
XSwitch the ignition off.
XPress the charge socket flap in the direction
of arrow:.
The charge socket flap swings up.
XPress fastener ;to the left.
Socket cap =is open.
XInsert the power supply plug into the electri-
cal outlet to the stop.
XInsert the charging cable connector into vehi-
cle socket ?to the stop.
Indicator lamp Afirst flashes orange and
then green.
The high-voltage battery is being charged.
If the charging cable is connected to the vehicle,
you cannot start the engine or move the vehicle.
When the charging process begins, you can view
the charging prediction in the Settings
menu
of the on-board computer. The charging predic-
tion is either the anticipated condition of charge
at the programmed departure time or the time
when the high-voltage battery will be fully
charged (
Ypage 272).
iDepending on the temperature, the fan and
battery cooling system may audibly switch on
during the charging process.
Removing the charging cable
The high-voltage battery is fully charged when:
Rthe charge level display reaches 100% in the
multifunction display (Ypage 245)
Rthe indicator lamp in the vehicle socket lights up green after unlocking or locking the vehicle
XPress and hold button Bon the charging
cable connector and remove the charging
cable connector from the vehicle socket.
XClose socket cap =.
XClose charge socket flap :.
XRemove the mains plug from the mains
socket and safely stow away the charging
cable inside the vehicle (
Ypage 183).
Charging the high-voltage battery
from the wallbox
General notes
It is recommended that you charge your vehicle
using a wallbox or at a charging station.
Make sure that the maximum charging current is
not limited in the Settings
menu of the on-
board computer. You must select the maximum
value if charging at a wallbox or a charging sta-
tion (
Ypage 272).
Pay attention to the "Important safety notes"
(
Ypage 180).
Charging the high-voltage battery (PLUG-IN HYBRID vehicles)185
Driving and parking
Z
Page 188 of 438
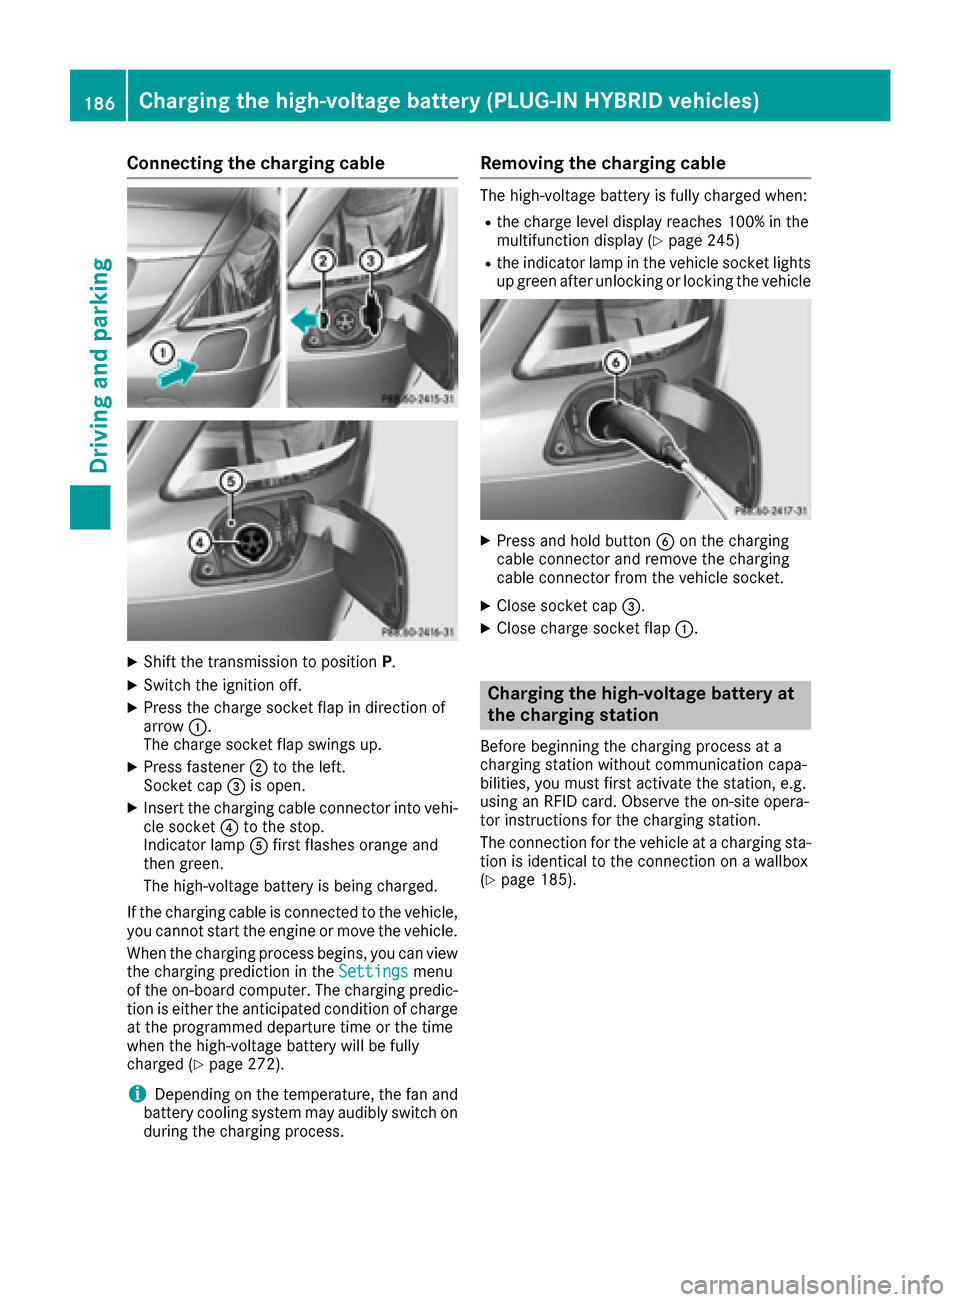
Connecting the charging cable
XShift the transmission to positionP.
XSwitch the ignition off.
XPress the charge socket flap in direction of
arrow:.
The charge socket flap swings up.
XPress fastener ;to the left.
Socket cap =is open.
XInsert the charging cable connector into vehi-
cle socket ?to the stop.
Indicator lamp Afirst flashes orange and
then green.
The high-voltage battery is being charged.
If the charging cable is connected to the vehicle,
you cannot start the engine or move the vehicle.
When the charging process begins, you can view
the charging prediction in the Settings
menu
of the on-board computer. The charging predic-
tion is either the anticipated condition of charge
at the programmed departure time or the time
when the high-voltage battery will be fully
charged (
Ypage 272).
iDepending on the temperature, the fan and
battery cooling system may audibly switch on
during the charging process.
Removing the charging cable
The high-voltage battery is fully charged when:
Rthe charge level display reaches 100% in the
multifunction display (Ypage 245)
Rthe indicator lamp in the vehicle socket lights up green after unlocking or locking the vehicle
XPress and hold button Bon the charging
cable connector and remove the charging
cable connector from the vehicle socket.
XClose socket cap =.
XClose charge socket flap :.
Charging the high-voltage battery at
the charging station
Before beginning the charging process at a
charging station without communication capa-
bilities, you must first activate the station, e.g.
using an RFID card. Observe the on-site opera-
tor instructions for the charging station.
The connection for the vehicle at a charging sta-
tion is identical to the connection on a wallbox
(
Ypage 185).
186Charging the high-voltage battery (PLUG-IN HYBRID vehicles)
Driving and parking
Page 191 of 438
iPrevent unauthorized persons from
accessing this data.
Every person who has access to the informa-
tion stated can use the functions on the "My
Mercedes Electric - Vehicle Homepage".
iInformation when selling a vehicle or
buying a used vehicle:
RIf you sell your vehicle, you are obliged to
delete the vehicle from your personal area
on the "My Mercedes Electric - Vehicle
Homepage".
RIf you have bought a used vehicle, it is pos-
sible that the previous owner still has
access to the "My Mercedes Electric - Vehi-
cle Homepage".
Calling up functions
The "My Mercedes Electric - Vehicle Homepage"
allows you access to information about your
vehicle and its functions using remote query and
remote configuration.
The following functions can be accessed:
Rrequest the current condition of charge of the
high-voltage battery
Rprogram the departure time (Ypage 272)
Rset or activate the "Pre-entry climate control
at departure time" function (see the separate
COMAND operating instructions)
Information on additional functions and operat- ing instructions can be found on the "My
Mercedes Electric - Vehicle Homepage".
Connecting the vehicle to the Internet
iThis function is not available in all countries
and requires activated access to the mbrace
emergency call system.
The "My Mercedes Electric - Vehicle Homepage"
can be used if the vehicle has a connection to
the Internet via a mobile phone network. The
necessary data is transmitted by radio. The vehi-
cle automatically recognizes whether a connec- tion to the Internet is possible or not. No presets
are necessary.
iRestrictions in reception are possible if the
vehicle is in an underground car park, for
example. Restrictions may also occur in areas with poor mobile network coverage.
Parking
Important safety notes
GWARNING
Flammable material such as leaves, grass or
twigs may ignite if they come into contact with
hot parts of the exhaust system or exhaust
gas flow. There is a risk of fire.
Park the vehicle so that no flammable mate-
rials come into contact with parts of the vehi-
cle which are hot. Take particular care not to
park on dry grassland or harvested grain
fields.
GWARNING
If you leave children unsupervised in the vehi-
cle, they could set it in motion by, for example:
Rrelease the parking brake.
Rshift the automatic transmission out of the
parking position P.
Rstart the engine.
In addition, they may operate vehicle equip-
ment and become trapped. There is a risk of
an accident and injury.
When leaving the vehicle, always take the
SmartKey with you and lock the vehicle. Never
leave children unsupervised in the vehicle.
!Always secure the vehicle correctly against
rolling away. Otherwise, the vehicle or its driv-
etrain could be damaged.
To ensure that the vehicle is secured against
rolling away unintentionally:
Rthe electric parking brake must be applied.
Rthe transmission must be in position Pand the
SmartKey must be removed from the ignition
lock.
Rthe front wheels must be turned towards the
curb on steep uphill or downhill gradients.
Rthe empty vehicle must be secured at the
front axle with a wheel chock or similar, for
example, on uphill or downhill gradients.
Ra laden vehicle must also be secured at the
rear axle with a wheel chock or similar, for
example, on uphill or downhill gradients.
Parking189
Driving and parking
Z