2016 MERCEDES-BENZ S-Class SEDAN interior
[x] Cancel search: interiorPage 169 of 438
then not necessary to continue applying the
brakes during the automatic stop phase. When
you depress the accelerator pedal, the engine
starts automatically and the braking effect of
the HOLD function is deactivated.
All vehicles (except Mercedes-AMG vehi-
cles):automatic engine switch-off can take
place a maximum of four times in a row (initial
stop, then three subsequent stops).
Mercedes-AMG vehicles: the number of con-
secutive automatic engine switch-offs is unlimi-
ted.
Automatic engine start
The engine starts automatically if:
Ryou switch off the ECO start/stop function by pressing the ECO button
Ryou switch to drive program Sor M
Rin transmission position Dor Nthe brake
pedal is released and the HOLD function is not
active
Ryou depress the accelerator pedal
Ryou engage reverse gear R
Ryou move the transmission out of position P
Ryou unfasten your seat belt or open the driv-
er's door
Rthe vehicle starts to roll
Rthe brake system requires this
Rthe temperature in the vehicle interior devi-
ates from the set range
Rthe system detects moisture on the wind-
shield when the air-conditioning system is
switched on
Rthe battery's condition of charge is too low
Shifting the transmission to position Pdoes not
start the engine.
Deactivating or activating the ECO
start/stop function
All vehicles (except Mercedes-AMG vehi-
cles)
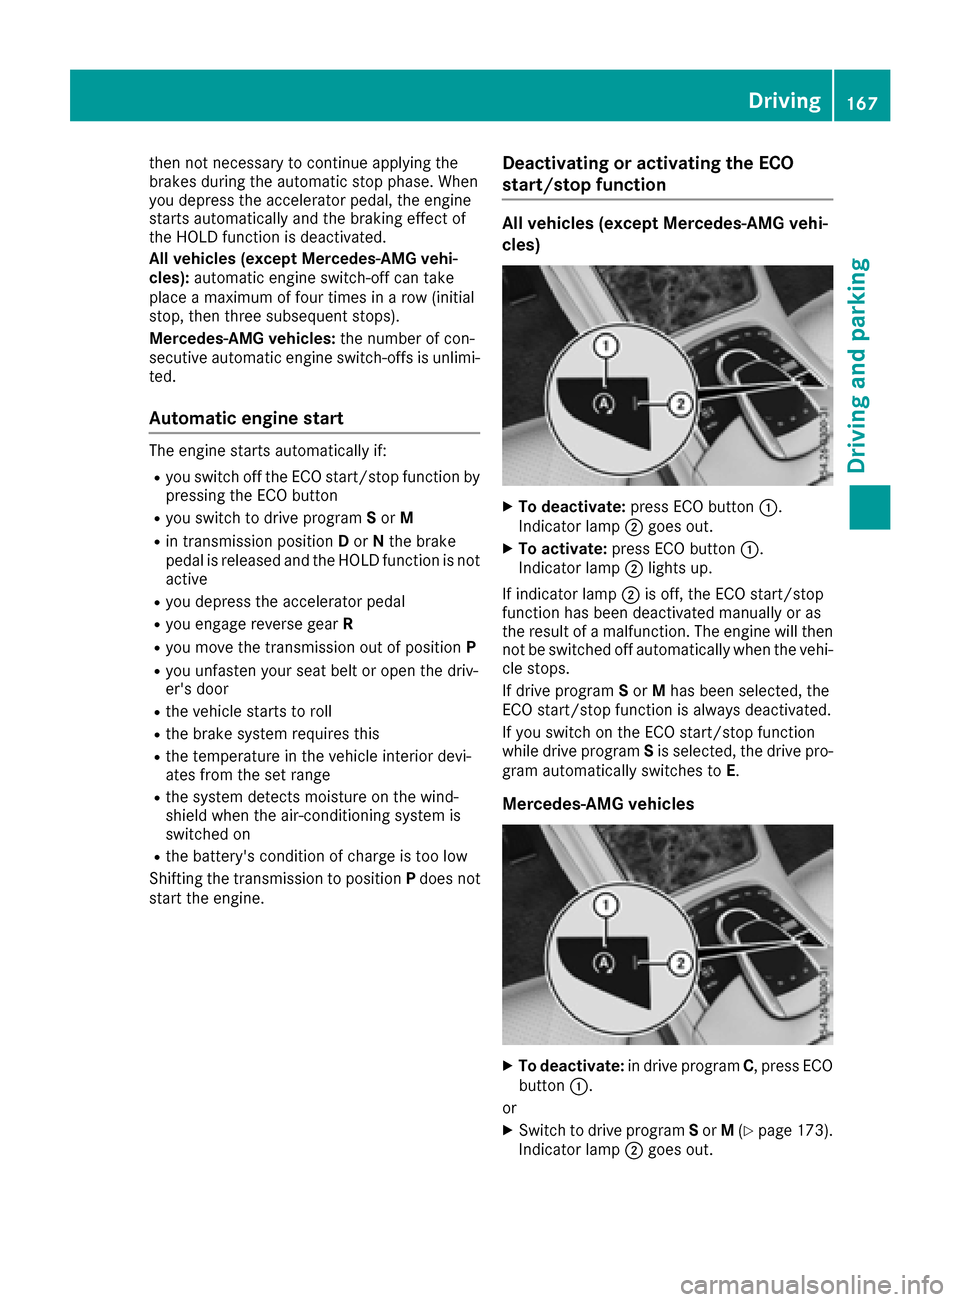
XTo deactivate: press ECO button :.
Indicator lamp ;goes out.
XTo activate: press ECO button :.
Indicator lamp ;lights up.
If indicator lamp ;is off, the ECO start/stop
function has been deactivated manually or as
the result of a malfunction. The engine will then
not be switched off automatically when the vehi- cle stops.
If drive program Sor Mhas been selected, the
ECO start/stop function is always deactivated.
If you switch on the ECO start/stop function
while drive program Sis selected, the drive pro-
gram automatically switches to E.
Mercedes-AMG vehicles
XTo deactivate: in drive program C, press ECO
button :.
or
XSwitch to drive program Sor M(Ypage 173).
Indicator lamp ;goes out.
Driving167
Driving an d parking
Z
Page 198 of 438
sponds to an equivalent quality standard. Brake
fluid which has not been approved for
Mercedes-Benz vehicles or which is not of an
equivalent quality could affect your vehicle's
operating safety.
AMG high-performance and ceramic
brakes
The high-performance brake system is only
available on Mercedes-AMG vehicles.
The AMG brake systems are designed for heavy
loads. This may lead to noise when braking. Thiswill depend on:
RSpeed
RBraking force
REnvironmental conditions, such as tempera-
ture and humidity
The wear of individual components of the brake
system, such as the brake pads/linings or brake
discs, depends on the individual driving style
and operating conditions.
For this reason, it is impossible to state a mile-
age that will be valid under all circumstances. An
aggressive driving style will lead to high wear.
You can obtain more information on this from a
qualified specialist workshop.
New and replaced brake pads and discs only
reach their optimum braking effect after several
hundred kilometers of driving. Compensate for
this by applying greater force to the brake pedal.
Keep this in mind, and adapt your driving and
braking accordingly during this break-in period. Excessive heavy braking results in correspond-
ingly high brake wear. Observe the brake wear
warning lamp in the instrument cluster and note
any brake status messages in the multifunction
display. Especially for high performance driving,
it is important to maintain and have the brake
system checked regularly.
Driving on wet roads
Hydroplaning
If water has accumulated to a certain depth on
the road surface, there is a danger of hydro-
planing occurring, even if:
Ryou drive at low speeds
Rthe tires have adequate tread depth For this reason, in the event of heavy rain or in
conditions in which hydroplaning may occur,
you must drive in the following manner:
Rlower your speed
Ravoid ruts
Ravoid sudden steering movements
Rbrake carefully
Driving on flooded roads
!Do not drive through flooded areas. Check
the depth of any water before driving through
it. Drive slowly through standing water. Oth-
erwise, water may enter the vehicle interior or
the engine compartment. This can damage
the electronic components in the engine or
the automatic transmission. Water can also
be drawn in by the engine's air suction nozzles
and this can cause engine damage.
Winter driving
GWARNING
If you shift down on a slippery road surface in an attempt to increase the engine's braking
effect, the drive wheels could lose their grip.
There is an increased danger of skidding and
accidents.
Do not shift down for additional engine brak-
ing on a slippery road surface.
GDANGER
If the exhaust pipe is blocked or adequate
ventilation is not possible, poisonous gases
such as carbon monoxide (CO) may enter the vehicle. This is the case, e.g. if the vehicle
becomes trapped in snow. There is a risk of
fatal injury.
If you leave the engine or the auxiliary heating
running, make sure the exhaust pipe and area
around the vehicle are clear of snow. To
ensure an adequate supply of fresh air, open a
window on the side of the vehicle that is not
facing into the wind.
Have your vehicle winter-proofed at a qualified
specialist workshop at the onset of winter.
196Driving tips
Driving and parking
Page 258 of 438

Useful information
i
This Operator's Manual describes all models
and all standard and optional equipment of
your vehicle available at the time of publica-
tion of the Operator's Manual. Country-spe-
cific differences are possible. Please note
that your vehicle may not be equipped with all
features described. This also applies to
safety-related systems and functions.
iRead the information on qualified specialist
workshops (Ypage 28).
Important safety notes
GWARNING
If you operate information systems and com-
munication equipment integrated in the vehi-
cle while driving, you will be distracted from
traffic conditions. You could also lose control
of the vehicle. There is a risk of an accident.
Only operate the equipment when the traffic
situation permits. If you are not sure that this
is possible, park the vehicle paying attention
to traffic conditions and operate the equip-
ment when the vehicle is stationary.
You must observe the legal requirements for the
country in which you are currently driving when
operating the on-board computer.
PLUG-IN HYBRID vehicles only:
GWARNING
If the instrument cluster has failed or mal-
functioned, you may not recognize function
restrictions in systems relevant to safety. The
operating safety of your vehicle may be
impaired. There is a risk of an accident.
Pull over as soon as it is safe to do so and
consult a qualified specialist workshop.
All vehicles, except PLUG-IN HYBRID vehi-
cles:
GWARNING
If the instrument cluster has failed or mal-
functioned, you may not recognize function
restrictions in systems relevant to safety. The
operating safety of your vehicle may be
impaired. There is a risk of an accident.
Drive on carefully. Have the vehicle checked
at a qualified specialist workshop immedi-
ately.
If the operating safety of your vehicle is
impaired, pull over as soon as it is safe to do so.
Contact a qualified specialist workshop.
The on-board computer only shows messages or
warnings from certain systems in the multifunc-
tion display. You should therefore make sure
your vehicle is operating safely at all times.
For an overview, see the instrument panel illus- tration (
Ypage 33).
Displays and operation
Instrument cluster lighting
The light sensor in the instrument cluster auto-
matically controls the brightness of the multi-
function display. In daylight, the displays in the
instrument cluster are illuminated. A dimming
function is not possible in daylight.
The lighting in the instrument cluster, in the dis-plays and the controls in the vehicle interior can
be adjusted using the brightness control knob.
The brightness control is located between the
instrument cluster and the multimedia system
display (
Ypage 35).
XTurn the brightness control knob clockwise or
counter-clockwise.
If you turn the light switch (
Ypage 130) to the
T, ÃorL position, the brightness
will depend upon the brightness of the ambi-
ent light.
Tachometer
!
Do not drive in the overrevving range, as this
could damage the engine.
The red band in the tachometer indicates the
engine's overrevving range.
The fuel supply is interrupted to protect the
engine when the red band is reached.
PLUG-IN HYBRID vehicles: if you select the oper-
ating mode E-MODE, the display in the instru-
ment cluster changes from tachometer to power
meter (
Ypage 242).
256Displays and operation
On-board computer and displays
Page 274 of 438
XUse: or9 to select the DriveAssistsubmenu.
XPressato confirm your selection.
XPress the :or9 button to select
Lane Keeping Assist.
XPress ato confirm.
The current selection, StandardorAdap‐tive, appears.
XTo change the setting: pressaagain.
For further information about Active Lane Keep-
ing Assist, see (
Ypage 237).
HYBRID submenu (PLUG-IN HYBRID
vehicles)
Setting the maximum charge current
Using the Max.ChargeCurrentfunction, you
can limit the charge current value at which the
high-voltage battery should be charged.
Before starting the charging process at a power
socket, check the maximum permissible charge current for the relevant power socket or the
building.
Only set the maximum permissible charge cur-
rent using the function if:
Rit is not possible to set the charge current on
the charging cable
Rthe precise maximum permitted charge cur-
rent can only be set via the on-board com-
puter
Before charging the high-voltage battery at a
wallbox or charging station, ensure that the
charging current is not limited by the function. If
charging at a wallbox or a charging station,
select the maximum value.
Further information on charging the high-volt-
age battery and setting the charge current
(PLUG-IN HYBRID vehicles) (
Ypage 181).
XPress òon the steering wheel to open the
menu list.
XPress :or9 on the steering wheel to
select the Settingsmenu.
XConfirm by pressing aon the steering
wheel.
XPress :or9 to select the Hybridsubmenu.
XPressato confirm.
XPress :or9 to select the Max.Charge Currentfunction.
You will see the selected setting.
XPress the abutton to save the setting.
Before charging the high-voltage battery, check
the maximum permissible charge current for the
relevant power socket.
Further information on charging the high-volt-
age battery (PLUG-IN HYBRID vehicles)
(
Ypage 181).
Setting the departure time
You can climatize the vehicle interior prior to
your departure with the "Set departure time"
function. Further information on pre-entry cli-
mate control (
Ypage 157).
If you recharge the high-voltage battery, the
function also displays the charging prediction.
XPress the òbutton on the steering wheel
to open the menu list.
XPress :or9 on the steering wheel to
select the Settingsmenu.
XConfirm by pressing aon the steering
wheel.
XPress :or9 to select the Hybridsubmenu.
XPressato confirm.
XPress :or9 to select the DepartureTimefunction.
You will see the selected setting.
XPress the abutton to save the setting.
XTo set no departure time: press:or
9 to select No Pre-selection
.
XPressato confirm.
If you recharge the high-voltage battery, the
multifunction display also shows the time
when the high-voltage battery will be fully
charged.
or
XTo set a departure time: press:or9
A
, Bor Cto select the desired preset.
XPress the abutton to confirm the selec-
tion.
XPress :or9 to set the hours.
XPress ato confirm.
XPress :or9 to set the minutes.
XPress ato confirm.
If you recharge the high-voltage battery, the
multifunction display shows the expected
272Menus and submenus
On-board computer and displays
Page 297 of 438
Display messagesPossible causes/consequences andMSolutions
#
See Operator'sMan ‐ual
The battery is no tbein gcharged.
A warning tone also sounds.
Possibl ecauses are:
Radefective alternato r
Rdefective powerelectronics (PLUG-IN HYBRID vehicles)
Ra torn poly-V-belt
Ramalfunction in th eelectronics
!Do no tcontinu edriving. The engin ecould otherwise overheat.
XPull ove rand stop th evehicl esafely and switch off th eengine, pay-
ing attention to roa dand traffic conditions.
XSecur eth evehicl eagainst rollin gaway (Ypage 189).
XConsult aqualified specialist workshop .
#
StopVehicl eSeeOperator' sManual
The battery is no longer bein gcharged and th ebattery charg elevel is
to olow.
A warning tone also sounds.
XPull ove rand stop th evehicl esafely and switch off th eengine, pay-
ing attention to roa dand traffic conditions.
XSecur eth evehicl eagainst rollin gaway (Ypage 189).
XObserv eth einstruction sin th e# See Operator' sManualdisplay message .
XConsultaqualified specialist workshop .
#
StopVehicl eLeaveEngine Runnin g
The battery charg elevel is to olow.
XPull ove rand stop th evehicl esafely as soo nas possible, payin g
attention to roa dand traffic conditions. Do no tcontinu edrivin g
under any circumstances.
XLeav eth eengin erunning.
XWait until th edisplay message disappear sbefore pullin gaway.
#
Start Engine SeeOperator' sManual
The engin eis switched off and th ebattery charg elevel is to olow.
XSwitc hoff electrical consumer sthat you do no tneed, suc has th e
rear window defroste rand interior lighting .
XLeaveth eengin erunnin gfor afew minute sor drive alon gdistance.
The battery is bein gcharged.
Display messages29 5
On-board computer and displays
Z
Page 327 of 438
Useful information
i
This Operator's Manual describes all models
and all standard and optional equipment of
your vehicle available at the time of publica-
tion of the Operator's Manual. Country-spe-
cific differences are possible. Please note
that your vehicle may not be equipped with all
features described. This also applies to
safety-related systems and functions.
iRead the information on qualified specialist
workshops (Ypage 28).
Stowage areas
Loading guidelines
GWARNING
Combustion engines emit poisonous exhaust
gases such as carbon monoxide. Exhaust
gases can enter the vehicle interior if the
trunk lid is open when the engine is running,
especially if the vehicle is in motion. There is a
risk of poisoning.
Always switch off the engine before opening
the trunk lid. Never drive with the trunk lid
open.
GWARNING
If objects, luggage or loads are not secured or
not secured sufficiently, they could slip, tip
over or be flung around and thereby hit vehicle
occupants. There is a risk of injury, particu-
larly in the event of sudden braking or a sud-
den change in direction.
Always store objects so that they cannot be
flung around. Secure objects, luggage or
loads against slipping or tipping before the
journey.
GWARNING
The exhaust tail pipe and tail pipe trim can
become very hot. If you come into contact
with these parts of the vehicle, you could burn
yourself. There is a risk of injury.
Always be particularly careful around the
exhaust tail pipe and the tail pipe trim. Allow
these components to cool down before touch-
ing them.
The handling characteristics of a laden vehicle
are dependent on the distribution of the load
within the vehicle. For this reason, you should
observe the following notes when transporting a
load:
RNever exceed the maximum permissible
gross vehicle weight or the gross axle weight
rating of the vehicle (including occupants).
The values are specified on the vehicle iden-
tification plate on the B-pillar of the driver's
door.
RThe trunk is the preferred place to carry
objects.
RPosition heavy loads as far forwards as pos-
sible and as low down in the trunk as possible.
RThe load must not protrude above the upper
edge of the seat backrests.
RAlways place the load behind unoccupied
seats if possible.
RSecure the load with sufficiently strong and
wear-resistant tie-downs. Pad sharp edges for
protection.
Stowage spaces
Important safety notes
GWARNING
If objects in the passenger compartment are
stowed incorrectly, they can slide or be
thrown around and hit vehicle occupants. In
addition, cupholders, open stowage spaces
and mobile phone brackets cannot always
retain all objects they contain. There is a risk of injury, particularly in the event of sudden
braking or a sudden change in direction.
RAlways stow objects so that they cannot be
thrown around in such situations.
RAlways make sure that objects do not pro-
trude from stowage spaces, parcel nets or
stowage nets.
Stowage areas325
Stowage and features
Z
Page 332 of 438

XCliphook =into groove ?.
XTo close:uncliphook =from groove ?.
XFasten hook =to the bracket on the under-
side of the trunk floor.
XFold the trunk floor down.
Roof carrier
Important safety notes
GWAR NING
When you load the roof, the center of gravity
of the veh iclerises and the driving character-
istics change. Ifyou exceed the maximum roof
load, the driving characteristics, as wellas
steering and braking, will begreatly impaired.
There isa risk of an acc ident.
Never exceed the maximum roof load and
adjust your driving style.
You willfind information on the maximum roof
load inthe "Technical data" section
(
Ypage 433).
!Mercedes-Benz recommends that you only
use roof carriers that have been tested and
approved for Mercedes-Benz veh icles. This
helps to avoid damage to the veh icle.
Position the load on the roof carrier insuch a
way that the veh icle willnot sustain damage
even when it is inmotion.
Ensure that, dependin g on the vehicle's
equipm ent, you can raise the panorama roof
wit h power tilt/ sliding panel fully and open
the trunk lidfully when the roof carrier is
installed.
!To avoid damaging or scratching the covers,
do not use metallic or hard objects to open
them.
An incorrectly secured roof carrier or roof load
may become detached from the vehicle. You
must therefore ensure that you observe the roof carrier manufacturer's installation instructions.
Vehicles with a panorama roofwith power
tilt/sliding panel: the pan
orama roof with
power tilt/sliding panel cannot be opened if a
roof carrier isinstalled. The panorama roof with
power tilt/sliding panel can still be raised to
allow ventilation of the vehicle interior.
If the panorama roof with power tilt/sliding
panel makes contact with a roof carrier
approved byMercedes-Benz, the sunroof will
lower slightly but remain raised at the rear.
Attaching the roof carrier
XFold covers :upwards in the direction of the
arrow.
XOnly secure the roof carrier to the anchorage
points under covers :.
XObserve the manufacturer's installation
instructions.
Features
Cup holder
Important safety notes
GWARNING
If objects in the passenger compartment are
stowed incorrectly, they can slide or be
thrown around and hit vehicle occupants. In
addition, cupholders, open stowage spaces
and mobile phone brackets cannot always
330Features
Stowage and features
Page 353 of 438
XTo remove:pull the floormat from retain-
ers ;.
XRemove the floormat.
Infrared reflective windshield
The infrared reflecting glass prevents the vehi-
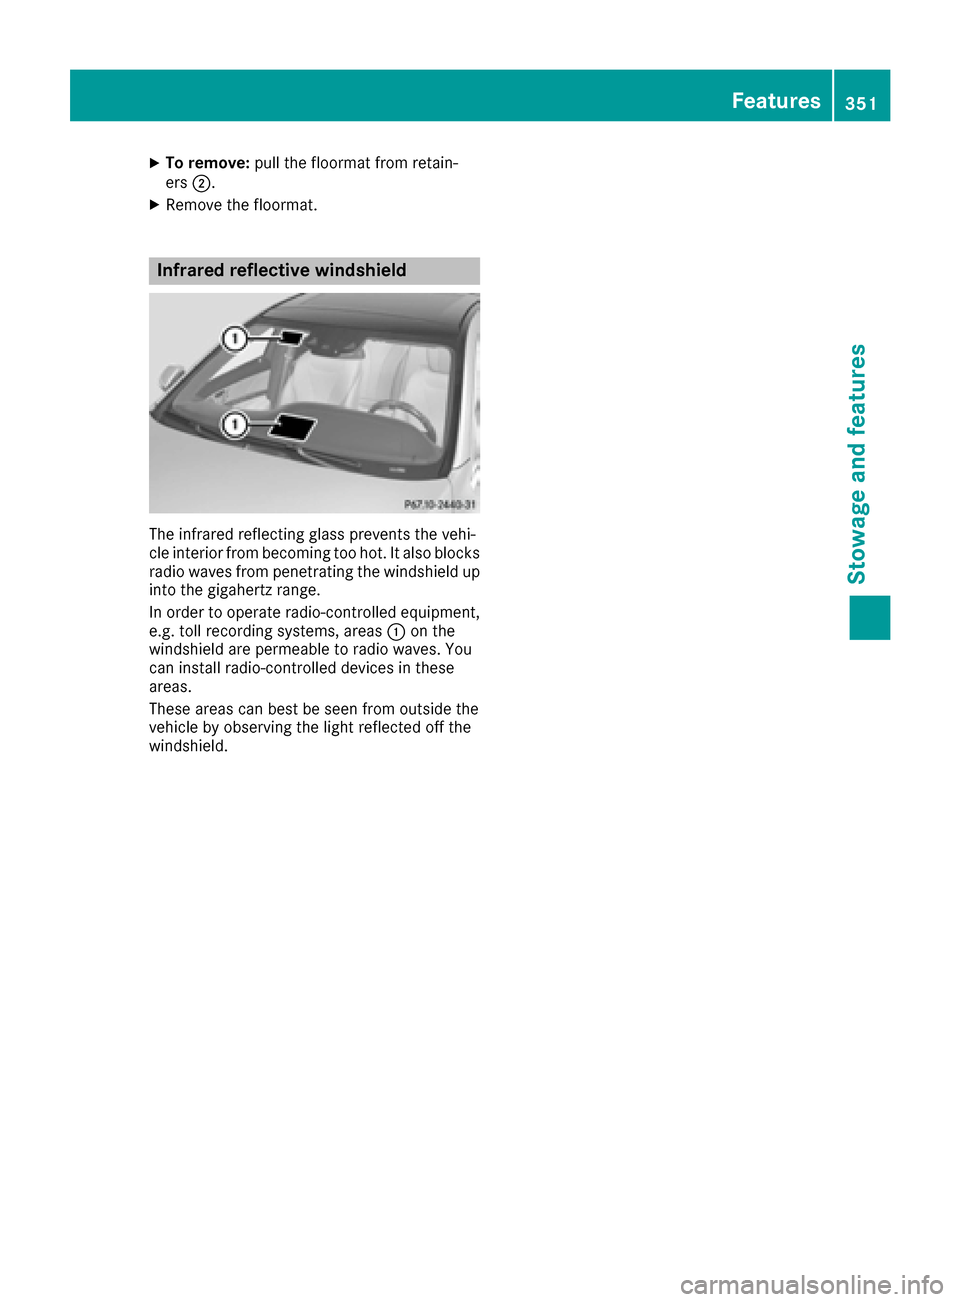
cle interior from becoming too hot. It also blocks
radio waves from penetrating the windshield up
into the gigahertz range.
In order to operate radio-controlled equipment,
e.g. toll recording systems, areas :on the
windshield are permeable to radio waves. You
can install radio-controlled devices in these
areas.
These areas can best be seen from outside the
vehicle by observing the light reflected off the
windshield.
Features351
Stowag ean d features
Z