2016 MERCEDES-BENZ S-Class SEDAN interior
[x] Cancel search: interiorPage 58 of 438
For safety reasons, Mercedes-Benz recom-
mends that you only use seat accessories that
have been approved by Mercedes-Benz.
If the driver's air bag deploys, this does not
mean that the front-passenger front air bag will
also deploy. The Occupant Classification Sys-
tem (OCS) categorizes the occupant on the
front-passenger seat. Depending on the result,
the front-passenger air bag is activated or deac-
tivated.
System self-test
GDANGER
If both the PASSENGER AIR BAG OFF and
PASSENGER AIR BAG ON indicator lamps do
not light up during the system self-test, the
system is malfunctioning. The front-
passenger front air bag might be triggered
unintentionally or might not be triggered at all
in the event of an accident with high deceler-
ation. This poses an increased risk of injury or
even fatal injury.
In this case the front-passenger seat may not
be used. Do not install a child restraint system
on the front-passenger seat. Have the Occu-
pant Classification System (OCS) checked
and repaired immediately at a qualified spe-
cialist workshop.
GDANGER
If the PASSENGER AIR BAG OFF indicator
lamp remains lit after the system self-test, the
front-passenger front air bag is disabled. It will
not be deployed in the event of an accident. In
this case, the front-passenger front air bag
cannot perform its intended protective func-
tion, e.g. when a person is seated in the front-
passenger seat.
That person could, for example, come into
contact with the vehicle's interior, especially
if the person is sitting too close to the dash-
board. This poses an increased risk of injury or
even fatal injury.
When the front-passenger seat is occupied,
always ensure that:
Rthe classification of the person in the front- passenger seat is correct and the front-
passenger front air bag is enabled or disa-
bled in accordance with the person in the
front-passenger seat
Rthe person is seated properly with a cor-
rectly fastened seatbelt
Rthe front-passenger seat has been moved
back as far back as possible
If the PASSENGER AIR BAG OFF indicator
lamp remains lit when it should not, the front-
passenger seat may not be used. Do not
install a child restraint system on the front-
passenger seat. Have the Occupant Classifi-
cation System (OCS) checked and repaired
immediately at a qualified specialist work-
shop.
GWARNING
Objects between the seat surface and the
child restraint system could affect OCS oper- ation. This could result in the front-passenger
air bag not functioning as intended during an
accident. This poses an increased risk of
injury or even fatal injury.
Do not place any objects between the seat
surface and the child restraint system. The
entire base of the child restraint system must
always rest on the seat cushion of the front-
passenger seat. The backrest of the forward-
facing child restraint system must, as far as
possible, be resting on the backrest of the
front-passenger seat. Always comply with the
child restraint system manufacturer's instal-
lation instructions.
After the system self-test, the PASSENGER AIR
BAG OFF or PASSENGER AIR BAG ON indicator
lamp displays the status of the front-passenger
front air bag (
Ypage 54).
For more information about the OCS, see "Prob-
lems with the Occupant Classification System"
(
Ypage 57).
56Occupant safety
Safety
Page 87 of 438
ProblemPossible causes/consequences andMSolutions
The engine cannot be
started using the Smart-
Key.The on-board voltage is too low.
XSwitch off non-essential consumers, e.g. seat heating or interior
lighting, and try to start the engine again.
If this does not work:
XCheck the starter battery and charge it if necessary (Ypage 374).
or
XJump-start the vehicle (Ypage 376).
or
XConsult a qualified specialist workshop.
The engine cannot be
started using the Start/
Stop button. The Smart-
Key is in the vehicle.The vehicle is locked.
XUnlock the vehicle and try to start the vehicle again.
The SmartKey battery is discharged or nearly discharged.
XCheck the SmartKey battery (Ypage 82) and replace it if necessary
(Ypage 82).
If this does not work:
XStart your vehicle with the SmartKey in the ignition lock.
There is interference from a powerful source of radio waves.
XStart your vehicle with the SmartKey in the ignition lock.
You have lost a Smart-
Key.XHave the SmartKey deactivated at a qualified specialist workshop.
XReport the loss immediately to the vehicle insurers.
XIf necessary, have the locks changed as well.
You have lost the
mechanical key.XReport the loss immediately to the vehicle insurers.
XIf necessary, have the locks changed as well.
Doors
Important safety notes
GWARNING
If children are left unsupervised in the vehicle,
they could:
Ropen the doors, thus endangering other
people or road users.
Rget out and disrupt traffic.
Roperate the vehicle's equipment.
Additionally, children could set the vehicle in
motion if, for example, they:
Rrelease the parking brake.
Rshifting the automatic transmission out of
park position P
RStart the engine.
There is a risk of an accident and injury.
When leaving the vehicle, always take the
SmartKey with you and lock the vehicle. Never
leave children or animals unattended in the
vehicle. Always keep the SmartKey out of
reach of children.
Doors85
Opening and closing
Z
Page 90 of 438
firmly. Do not pull the door handle when doing
so.
If you use the mechanical key to unlock and
open the driver's door, the anti-theft alarm sys-
tem will be triggered. Switch off the alarm
(
Ypage 78).
Locking the vehicle (mechanical key)
If the vehicle can no longer be locked with the
SmartKey or KEYLESS-GO, use the mechanical
key.
XOpen the driver's door.
XClose the front-passenger door, the rear
doors and the trunk lid.
XPress the locking button (Ypage 86).
XCheck whether the locking knobs on the
front-passenger door and the rear doors are
still visible. Press down the locking knobs by
hand, if necessary.
XClose the driver's door.
XTake the mechanical key out of the SmartKey
(Ypage 81).
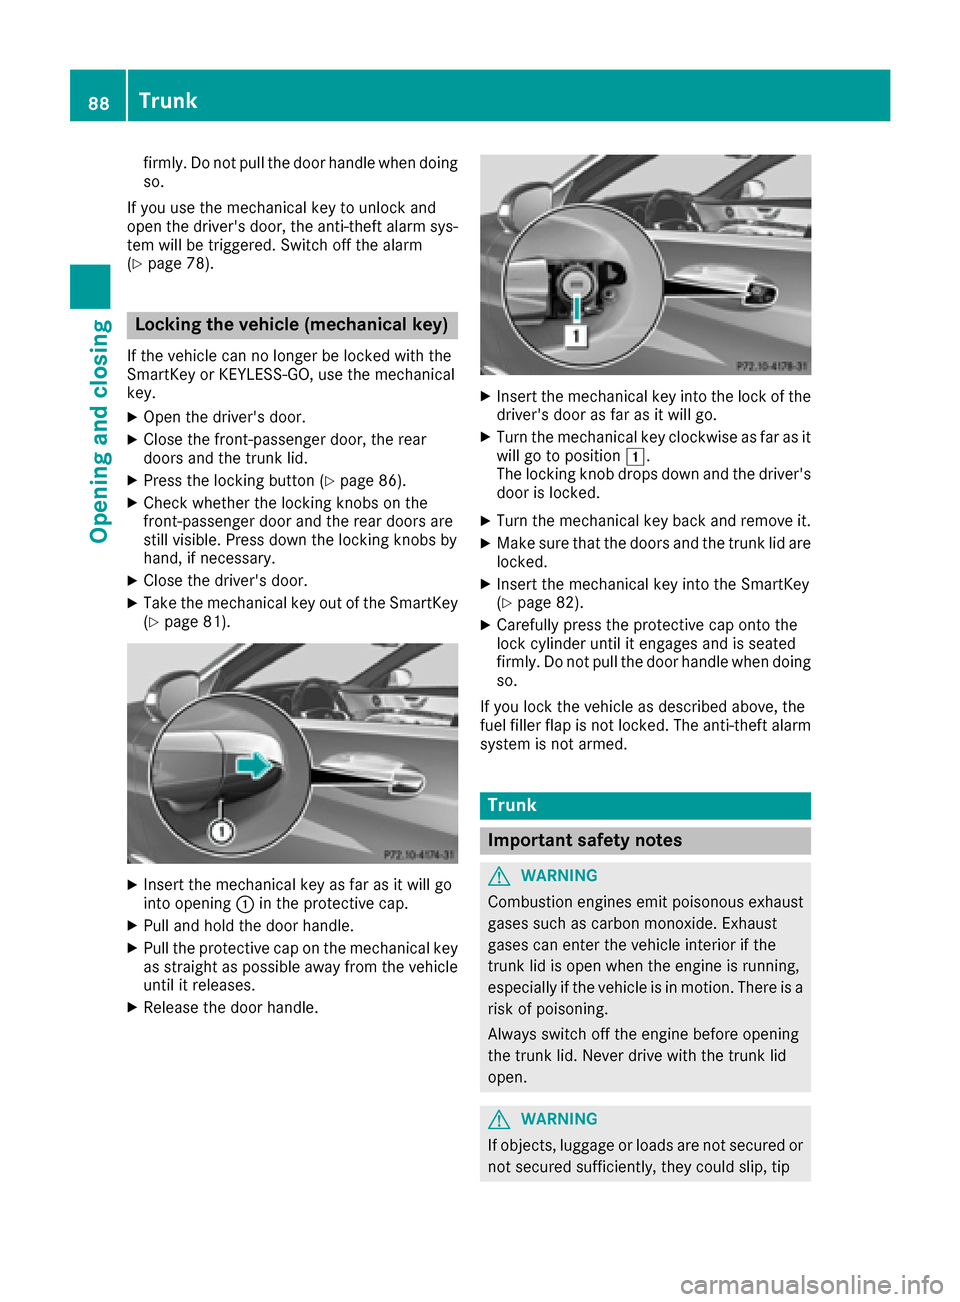
XInsert the mechanical key as far as it will go
into opening :in the protective cap.
XPull and hold the door handle.
XPull the protective cap on the mechanical key
as straight as possible away from the vehicle
until it releases.
XRelease the door handle.
XInsert the mechanical key into the lock of the
driver's door as far as it will go.
XTurn the mechanical key clockwise as far as it
will go to position 1.
The locking knob drops down and the driver's
door is locked.
XTurn the mechanical key back and remove it.
XMake sure that the doors and the trunk lid are locked.
XInsert the mechanical key into the SmartKey
(Ypage 82).
XCarefully press the protective cap onto the
lock cylinder until it engages and is seated
firmly. Do not pull the door handle when doing
so.
If you lock the vehicle as described above, the
fuel filler flap is not locked. The anti-theft alarm system is not armed.
Trunk
Important safety notes
GWARNING
Combustion engines emit poisonous exhaust
gases such as carbon monoxide. Exhaust
gases can enter the vehicle interior if the
trunk lid is open when the engine is running,
especially if the vehicle is in motion. There is a
risk of poisoning.
Always switch off the engine before opening
the trunk lid. Never drive with the trunk lid
open.
GWARNING
If objects, luggage or loads are not secured or
not secured sufficiently, they could slip, tip
88Trunk
Opening and closing
Page 92 of 438

Vehicles with trunk lid remote closing fea-
ture or power closing:
XLightly push the trunk lid closed.
The power closing function pulls the trunk lid
closed.
XLock the vehicle if necessary with the&
button on the SmartKey or with KEYLESS-GO
(
Ypage 80).
iIf KEYLESS-GO detects a SmartKey in the
trunk, the trunk lid cannot be locked. It then
opens again.
Opening/closing automatically from
outside
Important safety notes
GWARNING
Parts of the body could become trapped dur-
ing automatic closing of the trunk lid. More-
over, people, e.g. children, may be standing in the closing area or may enter the closing area
during the closing process. There is a risk of
injury.
Make sure that nobody is in the vicinity of the
closing area during the closing process.
Use one of the following options to stop the
closing process:
Rpress the Fbutton on the SmartKey.
Rpull or press the remote operating switch
on the driver's door.
Rpress the closing or locking button on the
trunk lid.
Rpull the trunk lid handle
Vehicles with HANDS-FREE ACCESS: it is also
possible to stop the closing process by perform-
ing a kicking movement under the rear bumper.
GWARNING
Combustion engines emit poisonous exhaust
gases such as carbon monoxide. Exhaust
gases can enter the vehicle interior if the
trunk lid is open when the engine is running,
especially if the vehicle is in motion. There is a
risk of poisoning.
Always switch off the engine before opening
the trunk lid. Never drive with the trunk lid
open.
!The trunk lid swings upwards when opened.
Therefore, make sure that there is sufficient
clearance above the trunk lid.
The opening dimensions of the trunk lid can be
found in the "Vehicle data" section
(
Ypage 433).
Opening
You can open the trunk lid automatically using
the SmartKey or the handle in the trunk lid.
XPress and hold the Fbutton on the Smart-
Key until the trunk lid opens.
or
XIf the trunk lid is unlocked, pull the trunk lid
handle and let it go again immediately.
Closing
You can close the trunk lid automatically using
the SmartKey or the closing button in the trunk
lid.
XPress closing button :on the trunk lid.
or
XIf the SmartKey is located in the immediate
vicinity of the vehicle: press the Fbutton
on the SmartKey.
You can release the button as soon as the
trunk lid starts to close.
XTo stop the closing process:
RPress the Fbutton on the SmartKey or
RPull the trunk lid handle, or
RPress closing button :or locking but-
ton ;on the trunk lid, or
90Trunk
Opening and closing
Page 94 of 438

ilar to these. This will prevent the uninten-
tional opening/closing of the trunk.
Operation
XTo open/close:kick into sensor detection
range :under the bumper with your foot.
A warning tone will sound while the trunk lid is
opening or closing.
XIf the trunk lid does not open/close after
several attempts: wait at least ten seconds
and then using your foot kick under the
bumper again.
If you hold your foot under the bumper for too
long, the trunk lid does not open or close.
Repeat the leg movement more quickly if this
occurs.
To stop the opening or closing procedure:
Rkick with your leg in the sensor detection
range :under the bumper or
Rpull the handle on the outside of the trunk lid
or
Rpress the closing button on the trunk lid, or
Rpress the Fbutton on the SmartKey
If the trunk lid closing procedure has been stop-
ped:
Rmove your foot under the bumper again and
the trunk lid will open
If the trunk lid opening procedure has been
stopped:
Rmove your foot under the bumper again and
the trunk lid will close
Opening/closing automatically from
inside
Important safety notes
GWARNING
The reversing feature does not react:
Rto soft, light and thin objects, e.g. small fin-
gers
Rover the last 1/3 in (8 mm) of the closing
movement
This means that the reversing feature cannot
prevent someone being trapped in these sit-
uations. There is a risk of injury.
Make sure that no body parts are in close
proximity during the closing procedure.
If somebody becomes trapped:
Rpress the Fbutton on the SmartKey, or
Rpull or press the remote operating switch
on the driver's door or
Rpress the closing or locking button on the
trunk lid, or
Rpull on the trunk lid handle
Vehicles with HANDS-FREE ACCESS: it is also
possible to stop the closing process by perform-
ing a kicking movement under the rear bumper.
GWARNING
Combustion engines emit poisonous exhaust
gases such as carbon monoxide. Exhaust
gases can enter the vehicle interior if the
trunk lid is open when the engine is running,
especially if the vehicle is in motion. There is a
risk of poisoning.
Always switch off the engine before opening
the trunk lid. Never drive with the trunk lid
open.
!The trunk lid swings upwards when opened.
Therefore, make sure that there is sufficient
clearance above the trunk lid.
The opening dimensions of the trunk lid can be
found in the "Vehicle data" section
(
Ypage 433).
92Trunk
Opening and closing
Page 100 of 438
GWARNING
At high speeds the raised sliding sunroof auto-
matically lowers slightly at the rear. This could
trap you or other persons. There is a risk of
injury. Make sure that nobody reaches into
the sweep of the sliding sunroof whilst the
vehicle is in motion.
If somebody becomes trapped, immediately
push the sliding sunroof switch up or pull it
back. The sliding sunroof raises at the rear.
!Only open the sliding sunroof if it is free of
snow and ice. Otherwise, malfunctions may
occur.
Do not allow anything to protrude from the
sliding sunroof. Otherwise, the seals could be
damaged.
!The weather can change abruptly. It could
start to rain or snow. Make sure that the slid-
ing sunroof is closed when you leave the vehi-
cle. The vehicle electronics can be damaged if
water enters the vehicle interior.
!When the sliding sunroof is open, water can
get into the vehicle and cause damage. The
vehicle electronics can be damaged if water
enters the vehicle interior. Only clean the slid-
ing sunroof when it is closed.
Resonance noises can occur in addition to the
usual airflow noises when the sliding sunroof is
open. They are caused by minor pressure fluc-
tuations in the vehicle interior. Change the posi- tion of the sliding sunroof or open a side window
slightly to reduce or eliminate these noises.
Sliding sunroof reversing feature
The sliding sunroof is equipped with an auto-
matic reversing feature. If a solid object blocks
or restricts the sliding sunroof during the closing
process, the sliding sunroof opens again auto-
matically. The automatic reversing feature is
only an aid and is no substitute for your attention
when closing the sliding roof.
GWARNING
The reversing feature does not react:
Rto soft, light and thin objects, e.g. small fin-
gers
Rover the last 1/6 in (4 mm) of the closing
movement
Rduring resetting
Rwhen closing the sliding sunroof again man- ually immediately after automatic reversing
This means that the reversing feature cannot
prevent someone being trapped in these sit-
uations. There is a risk of injury.
Make sure that no body parts are in close
proximity during the closing procedure.
If somebody becomes trapped:
Rrelease the switch immediately, or
Rpress the switch in any direction during the
automatic closing process
The closing process is stopped.
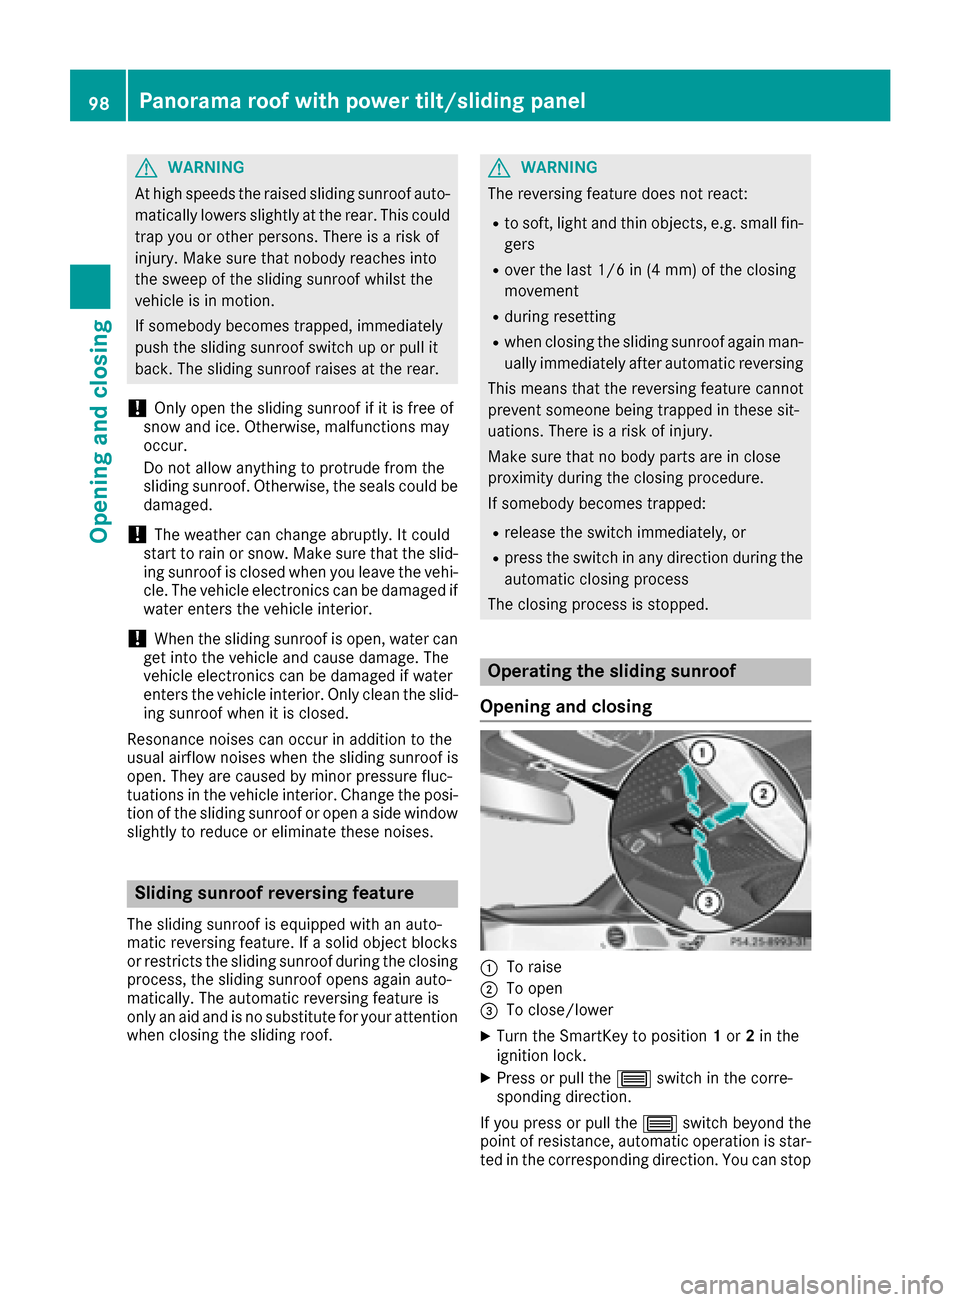
Operating the sliding sunroof
Opening and closing
:To raise
;To open
=To close/lower
XTurn the SmartKey to position 1or 2in the
ignition lock.
XPress or pull the 3switch in the corre-
sponding direction.
If you press or pull the 3switch beyond the
point of resistance, automatic operation is star-
ted in the corresponding direction. You can stop
98Panorama roof with power tilt/sliding panel
Opening and closing
Page 101 of 438
automatic operation by pressing or pulling
again.
If the sliding sunroof is raised at the rear, it low-
ers slightly automatically at higher speeds. The
noise level in the vehicle interior is reduced as a
result.
At low speeds it raises again automatically.
You can also temporarily deactivate automatic
lowering. To do so, press the3switch. The
sliding sunroof raises again automatically.
You can continue to operate the sliding sunroof
after switching off the engine or removing the
SmartKey from the ignition lock. This function
remains active for five minutes or until you open
a front door.
The sliding sunroof cannot be opened if a roof
carrier is installed. In order to allow ventilation
of the vehicle interior, you can raise the sliding
sunroof.
If contact is made with a roof carrier approved
by Mercedes-Benz, the sliding sunroof lowers
slightly but remains raised at the rear.
Before opening, raising or closing the sliding
sunroof, a check is carried out to see whether a valid SmartKey is in the vehicle, if:
Rthe 3 switch is pressed or pulled
and
Rthe Start/Stop button is used instead of the
SmartKey in the ignition lock
and
Rthe engine is not running
This is carried out by means of a brief radio con-
nection between the vehicle and the SmartKey.
Rain-closing feature
The raised sliding sunroof automatically lowers
at the rear when driving if it starts to rain. The
sliding sunroof is lowered depending on:
Rthe road speed and
Rthe intensity of the rain
You can manually cancel the automatic closing
procedure. Press or pull the 3switch in any
direction.
To raise the sliding sunroof again, press the
3 switch in direction :. The rain-closing
feature remains activated.
Operating the roller sunblinds for the
sliding sunroof
Important safety notes
GWARNING
Parts of the body could become trapped
between the roller sunblind and frame or slid-
ing sunroof during automatic opening or clos-
ing. There is a risk of injury.
When opening or closing, make sure that no
body parts are in the sweep of the roller sun-
blind.
If somebody becomes trapped:
Rrelease the switch immediately, or
Rduring automatic operation, push the
switch briefly in any direction
The opening or closing procedure will be stop- ped.
The roller sunblinds shield the vehicle interior
from sunlight. The front roller sunblind can only be opened and closed when the sliding sunroof
is closed.
Roller sunblind reversing feature
The roller sunblinds are equipped with an auto-
matic reversing feature. If a solid object blocks
or restricts a roller sunblind during the closing
process, the roller sunblind opens again auto-
matically. The automatic reversing feature is
only an aid and is not a substitute for your atten-
tion when closing the roller sunblinds.
GWARNING
The reversing feature does not react in par-
ticular to soft, light and thin objects, e.g. small
fingers. This means that the reversing feature
cannot prevent someone being trapped in
these situations. There is a risk of injury.
When closing the roller sunblind, make sure
that no body parts are in the sweep area.
If somebody becomes trapped:
Rrelease the switch immediately, or
Rpress the switch in any direction during the
automatic closing process
The closing process is stopped.
Panorama roof with power tilt/sliding panel99
Opening and closing
Z
Page 107 of 438
Seats
Important safety notes
GWARNING
Children could become trapped if they adjust
the seats, particularly when unattended.
There is a risk of injury.
When leaving the vehicle, always take the
SmartKey with you and lock the vehicle. Never
leave children unsupervised in the vehicle.
The seats can still be adjusted when there is no
SmartKey in the ignition lock.
GWARNING
When you adjust a seat, you or other vehicle
occupants could become trapped, e.g. on the seat guide rail. There is a risk of injury.
Make sure when adjusting a seat that no one
has any body parts in the sweep of the seat.
Observe the safety notes on "Air bags"
(
Ypage 50) and "Children in the Vehicle"
(Ypage 61).
GWARNING
You could lose control of your vehicle if you do the following while driving:
Radjust the driver's seat, head restraint,
steering wheel or mirrors
Rfasten the seat belt
There is a risk of an accident.
Adjust the driver's seat, head restraint, steer-
ing wheel and mirror and fasten your seat belt before starting the engine.
GWARNING
If you adjust the seat height carelessly, you or
other vehicle occupants could be trapped and
thereby injured. Children in particular could
accidentally press the electrical seat adjust-
ment buttons and become trapped. There is a
risk of injury.
While moving the seats, make sure that your
hands or other body parts do not get under the
lever assembly of the seat adjustment sys-
tem.
GWARNING
If the head restraints are not installed or not
adjusted correctly, they cannot provide pro-
tection as intended. There is an increased risk
of injury in the head and neck area, e.g. in the event of an accident or when braking.
Always drive with the head restraints instal-
led. Before driving off, make sure for every
vehicle occupant that the center of the head
restraint supports the back of the head at
about eye level.
GWARNING
The seat belt does not offer the intended level of protection if you have not moved the back-
rest to an almost vertical position. When brak-
ing or in the event of an accident, you could
slide underneath the seat belt and sustain
abdomen or neck injuries, for example. This
poses an increased risk of injury or even fatal injury.
Adjust the seat properly before beginning
your journey. Always ensure that the backrest
is in an almost vertical position and that the
shoulder section of your seat belt is routed
across the center of your shoulder.
!To avoid damage to the seats and the seat
heating, observe the following information:
Rkeep liquids from spilling on the seats. If
liquid is spilled on the seats, dry them as
soon as possible.
Rif the seat covers are damp or wet, do not
switch on the seat heating. The seat heat-
ing should also not be used to dry the seats.
Rclean the seat covers as recommended;
see "Interior care".
Rdo not transport heavy loads on the seats.
Do not place sharp objects on the seat
cushions, e.g. knives, nails or tools. The
seats should only be occupied by passen-
gers, if possible.
Rwhen the seat heating is in operation, do
not cover the seats with insulating materi-
als, e.g. blankets, coats, bags, seat covers,
child seats or booster seats.
!Make sure that there are no objects in the
footwell under or behind the seats when mov-
Seats105
Seats, steering wheel and mirrors
Z