2016 MERCEDES-BENZ S-Class SEDAN Passenger
[x] Cancel search: PassengerPage 65 of 438

Always install child restraint systems prop-
erly, even if they are not being used. Make
sure that you observe the child restraint sys-
tem manufacturer's installation instructions.
You will find further information on stowing
objects, luggage or loads under "Loading guide-
lines" (
Ypage 325).
GWARNING
Child restraint systems or their securing sys-
tems which have been damaged or subjected
to a load in an accident can no longer protect
as intended. The child cannot then be
restrained in the event of an accident, heavy
braking or sudden changes of direction. There is an increased risk of injury, possibly even
fatal.
Replace child restraint systems which have
been damaged or subjected to a load in an
accident as soon as possible. Have the secur-
ing systems on the child restraint system
checked at a qualified specialist workshop,
before you install a child restraint system
again.
The securing systems of child restraint systems
are:
Rthe seat belt system
Rthe LATCH-type (ISOFIX) securing rings
Rthe Top Tether anchorages
If it is absolutely necessary to carry a child on
the front-passenger seat, be sure to observe the
information on the "Occupant Classification
System (OCS)" (
Ypage 53). There you will also
find information on deactivating the front-
passenger front air bag.
All child restraint systems must meet the fol-
lowing standards:
RU.S. Federal Motor Vehicle Safety Standards
213 and 225
RCanadian Motor Vehicle Safety Standards
213 and 210.2
Confirmation tha t the ch
ild restraint system cor-
responds to the standards can be found on an
instruction label on the child restraint system.
This confirmation can also be found in the instal-
lation instructions that are included with the
child restraint system. Observe the warning labels in the vehicle inte-
rior and on the child restraint system.
Vehicles with seat belt extenders:
when
securing a child in a child restraint system on a rear seat, observe the following instructions:
Rmake sure that the seat belt on the child
restraint system is fastened according to the
manufacturer's installation instructions for
the child restraint system.
Rfor child restraint systems with a belt clamp:
engage the belt tongue in the buckle before
you tighten the seat belt using the belt clamp.
Vehicles with a rear reclining seat: when
installing a child restraint system, move the rear
reclining seat backrest to an almost vertical
position. The rear reclining seat backrest must
rest against the child restraint system. Observe
the notes on the cushion air bag (
Ypage 53).
Vehicles with belt bags: only use a child
restraint system which has been approved by
Mercedes-Benz. Always obser ve the i
nstruc-
tions and safety notes on belt bags for the outer
seat belts in the rear (
Ypage 48).
LATCH-type (ISOFIX) child seat secur-
ing system
GWARNING
LATCH-type (ISOFIX) child restraint systems
do not offer sufficient protective effect for
children whose weight is greater than 48 lbs
(22 kg) who are secured using the safety belt integrated in the child restraint system. In the
event of an accident, a child might not be
restrained correctly. This poses an increased
risk of injury or even fatal injury.
If the child weighs more than 48 lbs (22 kg),
only use LATCH-type (ISOFIX) child restraint
systems with which the child is also secured
with the vehicle seat belt. Also secure the
child restraint system with the Top Tether
belt, if available.
Always comply with the manufacturer's instal-
lation and operating instructions for the child
restraint system used.
Before every trip, make sure that the LATCH-
type (ISOFIX) child restraint system is engaged
correctly in both LATCH-type (ISOFIX) securing
rings
Children in the vehicle63
Safety
Z
Page 67 of 438

Always lock rear seat backrests after instal-
ling a Top Tether belt. Observe the lock veri-
fication indicator. Adjust the rear seat backr-
ests so that they are in an upright position.
GWARNING
Vehicles with electrically adjustable rear
bench seats:
If you adjust the seat after installing a child
restraint system:
Rthe seat belt could slacken or become too
tight
Rthe child restraint system could become
loose, incorrectly positioned or damaged
As a result, the child restraint system may not
be able to provide the intended level of pro-
tection. This poses an increased risk of injury
or even fatal injury.
Never adjust the seat after installing the child
restraint system.
If the rear seat backrest is not engaged and
locked, this will be shown in the multifunction
display in the instrument cluster. A warning tone
also sounds.
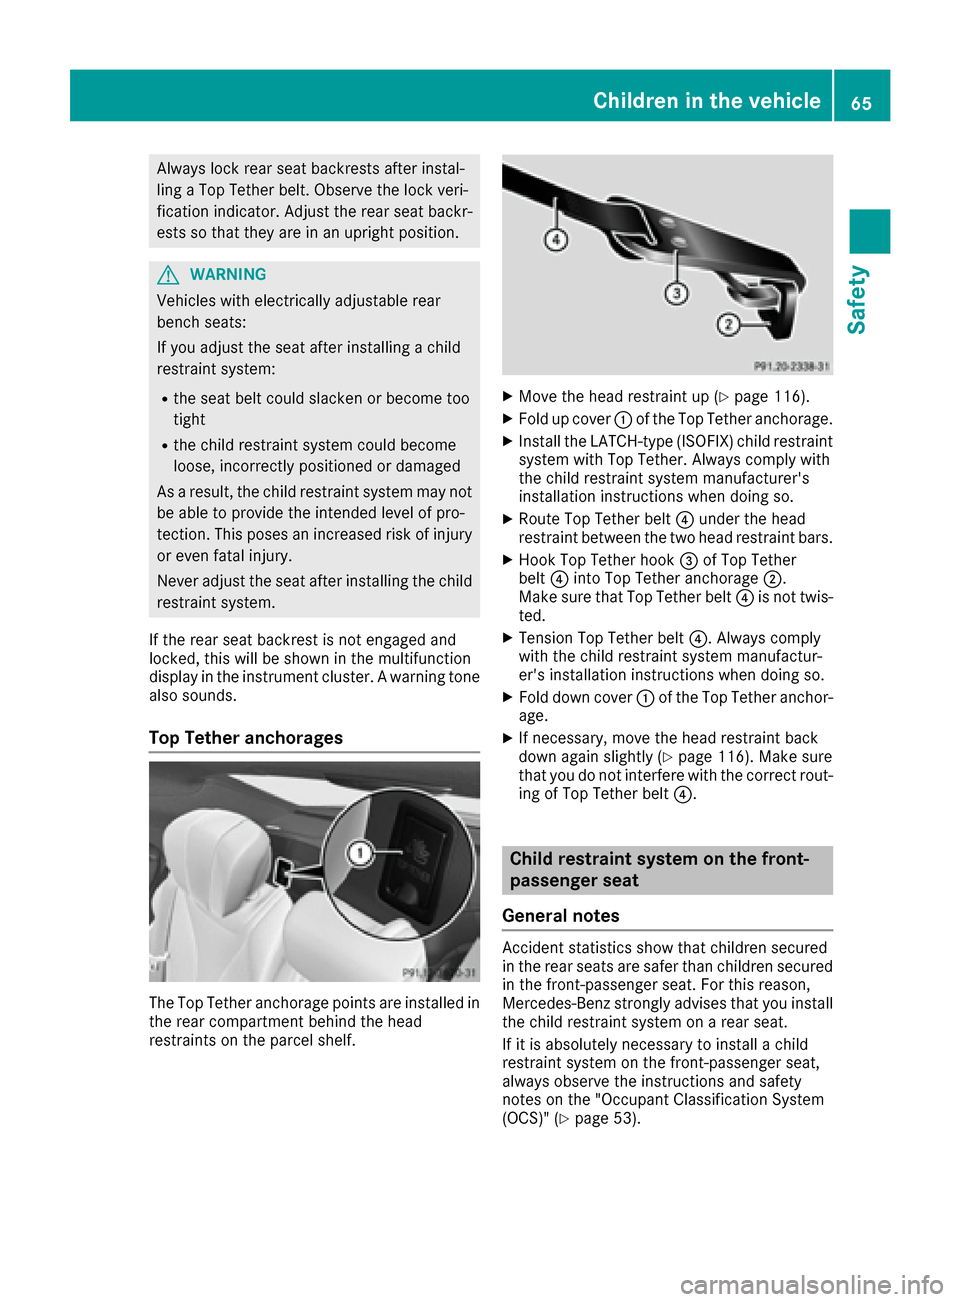
Top Tether anchorages
The Top Tether anchorage points are installed in
the rear compartment behind the head
restraints on the parcel shelf.
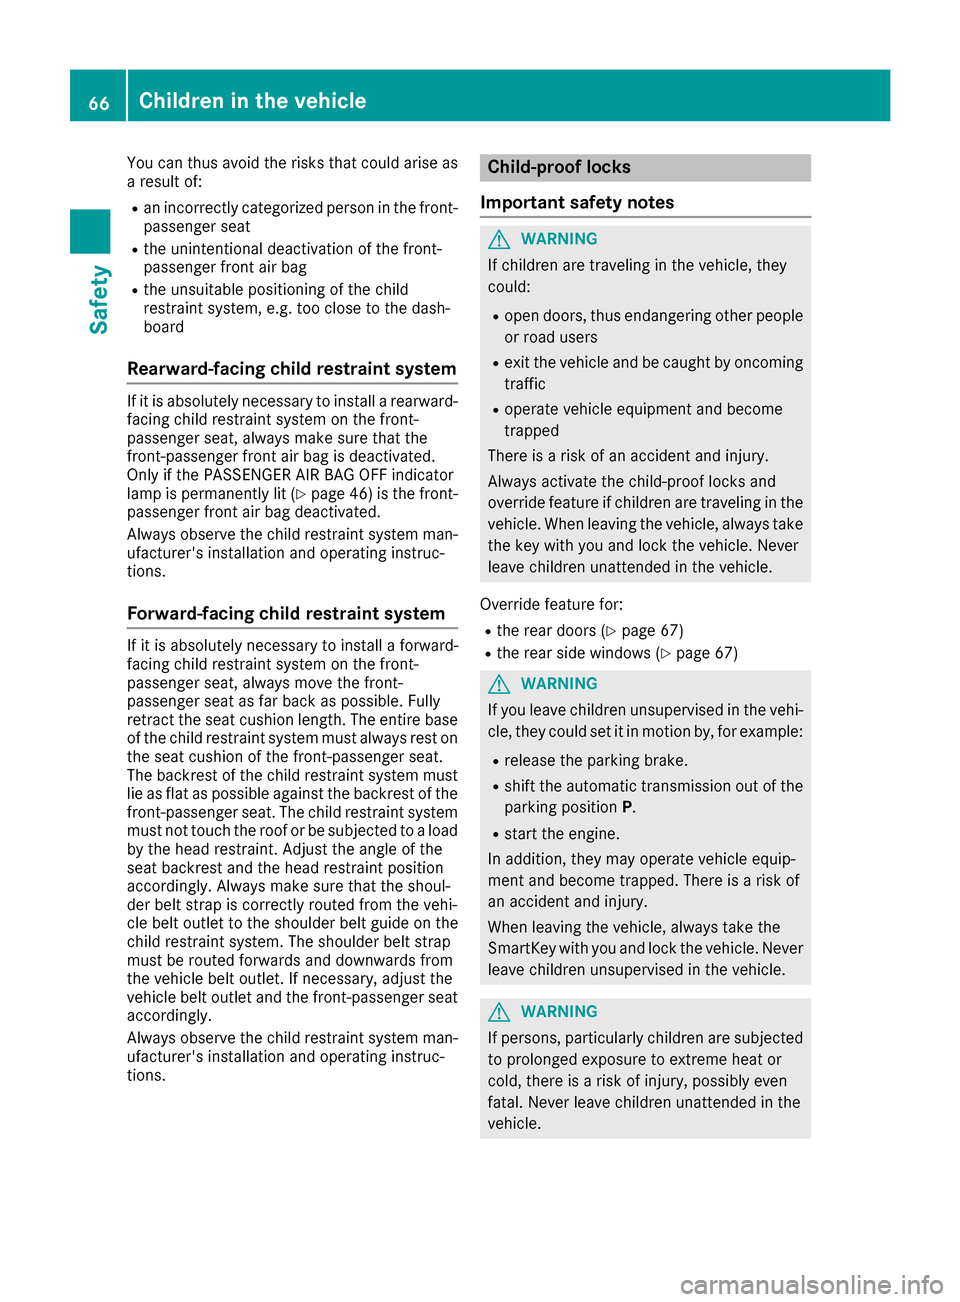
XMove the head restraint up (Ypage 116).
XFold up cover :of the Top Tether anchorage.
XInstall the LATCH-type (ISOFIX) child restraint
system with Top Tether. Always comply with
the child restraint system manufacturer's
installation instructions when doing so.
XRoute Top Tether belt ?under the head
restraint between the two head restraint bars.
XHook Top Tether hook =of Top Tether
belt ?into Top Tether anchorage ;.
Make sure that Top Tether belt ?is not twis-
ted.
XTension Top Tether belt ?. Always comply
with the child restraint system manufactur-
er's installation instructions when doing so.
XFold down cover :of the Top Tether anchor-
age.
XIf necessary, move the head restraint back
down again slightly (Ypage 116). Make sure
that you do not interfere with the correct rout-
ing of Top Tether belt ?.
Child restraint system on the front-
passenger seat
General notes
Accident statistics show that children secured
in the rear seats are safer than children secured
in the front-passenger seat. For this reason,
Mercedes-Benz strongly advises that you install
the child restraint system on a rear seat.
If it is absolutely necessary to install a child
restraint system on the front-passenger seat,
always observe the instructions and safety
notes on the "Occupant Classification System
(OCS)" (
Ypage 53).
Children in the vehicle65
Safety
Z
Page 68 of 438

You can thus avoid the risks that could arise as
a result of:
Ran incorrectly categorized person in the front-
passenger seat
Rthe unintentional deactivation of the front-
passenger front air bag
Rthe unsuitable positioning of the child
restraint system, e.g. too close to the dash-
board
Rearward-facing child restraint system
If it is absolutely necessary to install a rearward-
facing child restraint system on the front-
passenger seat, always make sure that the
front-passenger front air bag is deactivated.
Only if the PASSENGER AIR BAG OFF indicator
lamp is permanently lit (
Ypage 46) is the front-
passenger front air bag deactivated.
Always observe the child restraint system man-
ufacturer's installation and operating instruc-
tions.
Forward-facing child restraint system
If it is absolutely necessary to install a forward-
facing child restraint system on the front-
passenger seat, always move the front-
passenger seat as far back as possible. Fully
retract the seat cushion length. The entire base
of the child restraint system must always rest on
the seat cushion of the front-passenger seat.
The backrest of the child restraint system must
lie as flat as possible against the backrest of the front-passenger seat. The child restraint system
must not touch the roof or be subjected to a load
by the head restraint. Adjust the angle of the
seat backrest and the head restraint position
accordingly. Always make sure that the shoul-
der belt strap is correctly routed from the vehi-
cle belt outlet to the shoulder belt guide on the
child restraint system. The shoulder belt strap
must be routed forwards and downwards from
the vehicle belt outlet. If necessary, adjust the
vehicle belt outlet and the front-passenger seat
accordingly.
Always observe the child restraint system man-
ufacturer's installation and operating instruc-
tions.
Child-proof locks
Important safety notes
GWARNING
If children are traveling in the vehicle, they
could:
Ropen doors, thus endangering other people
or road users
Rexit the vehicle and be caught by oncoming
traffic
Roperate vehicle equipment and become
trapped
There is a risk of an accident and injury.
Always activate the child-proof locks and
override feature if children are traveling in the vehicle. When leaving the vehicle, always take
the key with you and lock the vehicle. Never
leave children unattended in the vehicle.
Override feature for:
Rthe rear doors (Ypage 67)
Rthe rear side windows (Ypage 67)
GWARNING
If you leave children unsupervised in the vehi-
cle, they could set it in motion by, for example:
Rrelease the parking brake.
Rshift the automatic transmission out of the
parking position P.
Rstart the engine.
In addition, they may operate vehicle equip-
ment and become trapped. There is a risk of
an accident and injury.
When leaving the vehicle, always take the
SmartKey with you and lock the vehicle. Never
leave children unsupervised in the vehicle.
GWARNING
If persons, particularly children are subjected to prolonged exposure to extreme heat or
cold, there is a risk of injury, possibly even
fatal. Never leave children unattended in the
vehicle.
66Children in the vehicle
Safety
Page 69 of 438

GWARNING
If the child restraint system is subjected to
direct sunlight, parts may get very hot. Chil-
dren may burn themselves on these parts,
particularly on the metal parts of the child
restraint system. There is a risk of injury.
If you leave the vehicle, taking the child with
you, always ensure that the child restraint
system is not exposed to direct sunlight. Pro- tect it with a blanket, for example. If the child
restraint system has been exposed to direct
sunlight, let it cool down before securing the
child in it. Never leave children unattended in
the vehicle.
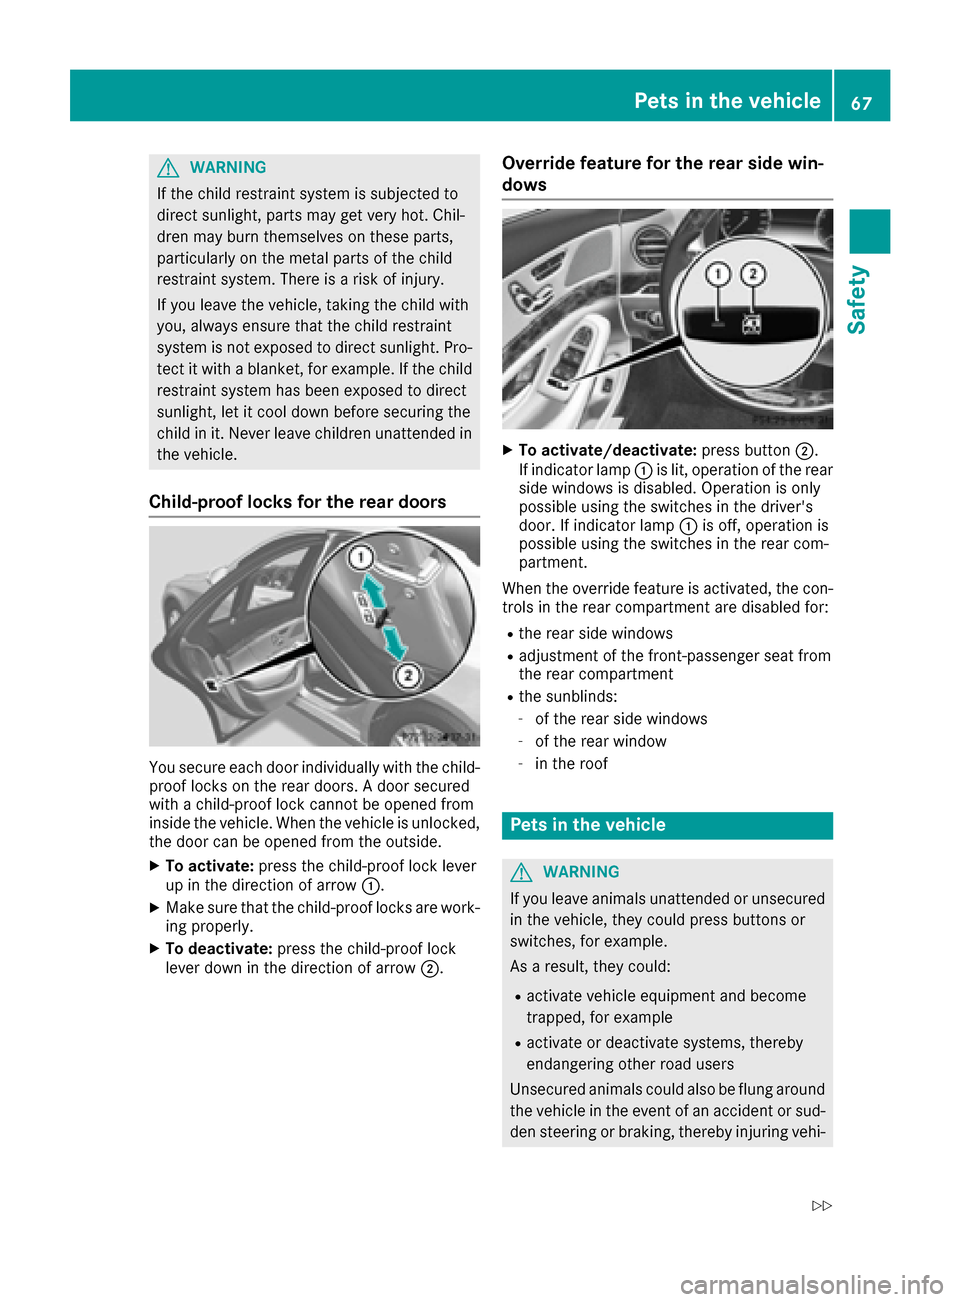
Child-proof locks for the rear doors
You secure each door individually with the child-
proof locks on the rear doors. A door secured
with a child-proof lock cannot be opened from
inside the vehicle. When the vehicle is unlocked,the door can be opened from the outside.
XTo activate: press the child-proof lock lever
up in the direction of arrow :.
XMake sure that the child-proof locks are work-
ing properly.
XTo deactivate: press the child-proof lock
lever down in the direction of arrow ;.
Override feature for the rear side win-
dows
XTo activate/deactivate:press button;.
If indicator lamp :is lit, operation of the rear
side windows is disabled. Operation is only
possible using the switches in the driver's
door. If indicator lamp :is off, operation is
possible using the switches in the rear com-
partment.
When the override feature is activated, the con-
trols in the rear compartment are disabled for:
Rthe rear side windows
Radjustment of the front-passenger seat from
the rear compartment
Rthe sunblinds:
-of the rear side windows
-of the rear window
-in the roof
Pets in the vehicle
GWARNING
If you leave animals unattended or unsecured
in the vehicle, they could press buttons or
switches, for example.
As a result, they could:
Ractivate vehicle equipment and become
trapped, for example
Ractivate or deactivate systems, thereby
endangering other road users
Unsecured animals could also be flung around
the vehicle in the event of an accident or sud-
den steering or braking, thereby injuring vehi-
Pets in the vehicle67
Safety
Z
Page 72 of 438

GWARNING
BAS PLUS does not react:
Rto small people, e.g. children
Rto animals
Rto oncoming vehicles
Rwhen cornering
As a result, BAS PLUS may not intervene in all
critical situations. There is a risk of an acci-
dent.
Always pay careful attention to the traffic sit- uation and be ready to brake.
In the event of snowfall or heavy rain, the rec-
ognition can be impaired.
Recognition by the radar sensor system is also
impaired in the event of:
Rthere is dirt on the sensors or anything else
covering the sensors
Rthere is interference by other radar sources
Rthere are strong radar reflections, for exam-
ple in parking garages
Ra narrow vehicle traveling in front, e.g. a
motorbike
Ra vehicle traveling in front on a different line
Rvehicles quickly moving into the radar sensor
system detection range
Recognition by the camera system is also
impaired in the event of:
Rdirt on the camera or if the camera is covered
Rthere is glare on the camera system, e.g. from
the sun being low in the sky
Rdarkness
Rif:
-pedestrians move quickly, e.g. into the path
of the vehicle
-the camera system no longer recognizes a
pedestrian as a person due to special cloth- ing or other objects
-a pedestrian is concealed by other objects
-the typical outline of a person is not distin-
guishable from the background
Following damage to the front end of the vehicle,
have the configuration and operation of the
radar sensors checked at a qualified specialist
workshop. This also applies to collisions at slow
speeds where there is no visible damage to the
front of the vehicle. Following damage to the windshield, have the
configuration and operation of the camera sys-
tem checked at a qualified specialist workshop.
Function
To avoid a collision, BAS PLUS calculates the
brake force necessary if:
Ryou approach an obstacle, and
RBAS PLUS has detected a risk of collision
When driving at a speed under 20 mph
(30 km/h): if you depress the brake pedal, BAS
PLUS is activated. The increase in brake pres-
sure will be carried out at the last possible
moment.
When driving at a speed above 20 mph
(30 km/h): if you depress the brake pedal
sharply, BAS PLUS automatically raises the
brake pressure to a value adapted to the traffic
situation.
BAS PLUS provides braking assistance in haz-
ardous situations with vehicles in front within a
speed range between 4 mph (7 km/h) and
155 mph (250 km/h).
At speeds of up to approximately 44 mph
(70 km/h), BAS PLUS can react to:
Rstationary objects in the path of your vehicle,
e.g. stopped or parked vehicles
Rpedestrians in the path of your vehicle
Robstacles crossing your path, which move in
the detection range of the sensors and are
recognized by them
iIf BAS PLUS demands particularly high brak-
ing force, preventative passenger protection
measures (PRE-SAFE
®) are activated simulta-
neously (Ypage 59).
XKeep the brake pedal depressed until the
emergency braking situation is over.
ABS prevents the wheels from locking.
BAS PLUS is deactivated and the brakes func-
tion as usual again, if:
Ryou release the brake pedal.
Rthere is no longer a risk of collision.
Rno obstacle is detected in front of your vehi-
cle.
Ryou depress the accelerator pedal.
Ryou activate kickdown.
70Driving safety systems
Safety
Page 74 of 438

GWARNING
The distance warning function cannot always
clearly identify objects and complex traffic
situations.
In such cases, the distance warning function
may:
Rgive an unnecessary warning
Rnot give a warning
There is a risk of an accident.
Always pay careful attention to the traffic sit-
uation and do not rely solely on the distance
warning function.
XBrake immediately in order to increase the
distance from the vehicle in front.
or
XTake evasive action, provided it is safe to do
so.
Due to the nature of the system, particularly
complicated but non-critical driving conditions
may also cause the system to display a warning.
Autonomous braking function
If the driver does not react to the distance warn-
ing signal in a critical situation, COLLISION PRE-
VENTION ASSIST PLUS can assist with the
autonomous braking function.
The autonomous braking function:
Rgives the driver more time to react to critical
driving situations
Rcan help the driver to avoid an accident or
Rreduces the effects of an accident
The autonomous braking function is available in
the following speed ranges:
Rfrom 4 mph (7 km/h) to approx. 65 mph
(105 km/h) for moving objects
Rfrom 4 mph (7 km/h) to approx. 31 mph
(50 km/h) for stationary objects
Due to the nature of the system, particularly
complicated but non-critical driving conditions
may also cause the Autonomous Braking Func-
tion to intervene.
If the autonomous braking function requires a
particularly high braking force, preventative
passenger protection measures (PRE-SAFE
®)
are activated simultaneously (Ypage 59).
Adaptive Brake Assist
General information
iObserve the "Important safety notes" sec-
tion (Ypage 68).
With the help of adaptive Brake Assist, the dis-
tance warning signal can detect obstacles that
are in the path of your vehicle for an extended
period of time.
If adaptive Brake Assist detects a risk of colli-
sion with the vehicle in front, it calculates the
braking force necessary to avoid a collision. If
you apply the brakes forcefully, adaptive Brake
Assist will automatically increase the braking
force to a level suitable for the traffic conditions.
Adaptive Brake Assist provides braking assis-
tance in hazardous situations at speeds above
4 mph (7 km/h). It uses radar sensor technology
to assess the traffic situation.
Up to a speed of approximately 155 mph
(250 km/h), Adaptive Brake Assist is capable of reacting to moving objects that have already
been detected as such at least once over the
period of observation.
Up to a speed of approximately 44 mph
(70 km/h), Adaptive Brake Assist reacts to sta-
tionary obstacles.
If adaptive Brake Assist demands particularly
high braking force, preventative passenger pro-
tection measures (PRE-SAFE
®) are activated
simultaneously (Ypage 59).
XKeep the brake pedal depressed until the
emergency braking situation is over.
ABS prevents the wheels from locking.
The brakes will work normally again if:
Ryou release the brake pedal.
Rthere is no longer any danger of a collision.
Rno obstacle is detected in front of your vehi-
cle.
Adaptive Brake Assist is then deactivated.
Important safety notes
GWARNING
Adaptive Brake Assist cannot always clearly
identify objects and complex traffic situa-
tions.
In such cases, Adaptive Brake Assist can:
Rintervene unnecessarily
Rnot intervene
72Driving safety systems
Safety
Page 79 of 438

Rdarkness
Rif:
-pedestrians move quickly, e.g. into the path
of the vehicle
-the camera system no longer recognizes a
pedestrian as a person due to special cloth- ing or other objects
-a pedestrian is concealed by other objects
-the typical outline of a person is not distin-
guishable from the background
Following damage to the front end of the vehicle,
have the configuration and operation of the
radar sensors checked at a qualified specialist
workshop. This also applies to collisions at slow
speeds where there is no visible damage to the
front of the vehicle.
Following damage to the windshield, have the
configuration and operation of the camera sys-
tem checked at a qualified specialist workshop.
Function
XTo activate/deactivate: activate or deacti-
vate PRE-SAFE®Brake in the on-board com-
puter (Ypage 271).
If the PRE-SAFE®Brake is not activated, the
æ symbol appears in the multifunction dis-
play.
Starting at a speed of around 4 mph (7 km/h),
this function warns you if you rapidly approach a
vehicle in front. An intermittent warning tone
will then sound and the ·distance warning
lamp will light up in the instrument cluster.
XBrake immediately to defuse the situation.
or
XTake evasive action provided it is safe to do
so.
PRE-SAFE
®Brake can also brake the vehicle
automatically under the following conditions:
Rthe driver and front-passenger have their seat
belts fastened
and
Rthe vehicle speed is between approximately
4 mph (7 km/h) and 124 mph (200 km/h)
At speeds of up to approximately 44 mph
(70 km/h) PRE-SAFE
®Brake can also detect:
Rstationary objects in the path of your vehicle,
e.g. stopped or parked vehicles
Rpedestrians in the path of your vehicle
iIf there is an increased risk of a collision,
preventive passenger protection measures
(PRE-SAFE
®) are triggered (Ypage 59).
If the risk of collision with the vehicle in front
remains and you do not brake, take evasive
action or accelerate significantly, the vehicle
may perform automatic emergency braking, up
to the point of full brake application. Automatic emergency braking is not performed until imme-
diately prior to an imminent accident.
You can prevent the intervention of the PRE-
SAFE
®Brake at any time by:
Rdepressing the accelerator pedal further.
Ractivating kickdown.
Rreleasing the brake pedal.
The braking action of PRE-SAFE®Brake is ended
automatically if:
Ryou maneuver to avoid the obstacle.
Rthere is no longer a risk of collision.
Rthere is no longer an obstacle detected in
front of your vehicle.
STEER CONTROL
General information
STEER CONTROL helps you by transmitting a
noticeable steering force to the steering wheel
in the direction required for vehicle stabilization.
This steering assistance is provided in particular if:
Rboth right wheels or both left wheels are on a
wet or slippery road surface when you brake.
Rthe vehicle starts to skid.
Important safety notes
iObserve the "Important safety notes" sec-
tion (Ypage 68).
No steering support is provided from STEER
CONTROL, if:
RESP®is deactivated
RESP®is malfunctioning.
Rthe lighting is faulty.
Power steering will, however, continue to func-
tion.
Driving safety systems77
Safety
Z
Page 83 of 438

conserving battery power. For the purposes of
activation/deactivation, the vehicle must not be
nearby.
XTo deactivate:press the&button on the
SmartKey twice in rapid succession.
The battery check lamp (
Ypage 82) of the
SmartKey flashes twice briefly and lights up
once, then KEYLESS-GO is deactivated .
XTo activate: press any button on the Smart-
Key.
or
XInsert the SmartKey into the ignition lock.
KEYLESS-GO and all of its associated features
are available again.
KEYLESS-GO start function
General notes
Bear in mind that the engine can be started by
any of the vehicle occupants if there is a Smart-
Key in the vehicle (
Ypage 164).
Changing the settings of the locking
system
You can change the settings of the locking sys-
tem. This means that only the driver's door and
the fuel filler flap are unlocked when the vehicle
is unlocked. This is useful if you frequently travel
on your own.
XTo change the setting: press and hold down
the % and& buttons simultaneously
for approximately six seconds until the bat-
tery check lamp flashes twice (
Ypage 82).
If the setting of the locking system is changed
within the signal range of the vehicle, pressing
the & or% button:
Rlocks or
Runlocks the vehicle
The SmartKey now functions as follows:
XTo unlock: press the%button once.
XTo unlock centrally: press the%button
twice.
XTo lock: press the &button. The KEYLESS-GO function is changed as fol-
lows:
XTo unlock the driver's door:
touch the inner
surface of the door handle on the driver's
door.
XTo unlock centrally: touch the inner surface
of the door handle on the front-passenger
door or the rear door.
XTo lock centrally: touch the outer sensor
surface on one of the door handles.
XTo restore the factory settings: press and
hold the %and& buttons simultane-
ously for approximately six seconds until the
battery check lamp flashes twice
(
Ypage 82).
Mechanical key
General notes
If the vehicle can no longer be locked or
unlocked with the SmartKey or KEYLESS-GO,
use the mechanical key.
If you use the mechanical key to unlock and
open the driver's door, the anti-theft alarm sys-
tem will be triggered. Switch off the alarm
(
Ypage 78).
If you unlock the vehicle using the mechanical
key, the fuel filler flap will not be unlocked auto-
matically.
XTo unlock the fuel filler flap: insert the
SmartKey into the ignition lock.
Removing the mechanical key
XPush release catch :in the direction of the
arrow and at the same time remove mechan- ical key ;from the SmartKey.
SmartKey81
Opening and closing
Z